抽象类:
本身不能被实例化,也不应该被实例化,他的作用就是定义标准,不用具体的实现
继承的实现原理:
注:新式类可以使用print(<class_name>.mro())来查询,经典类无法使用
如下继承关系
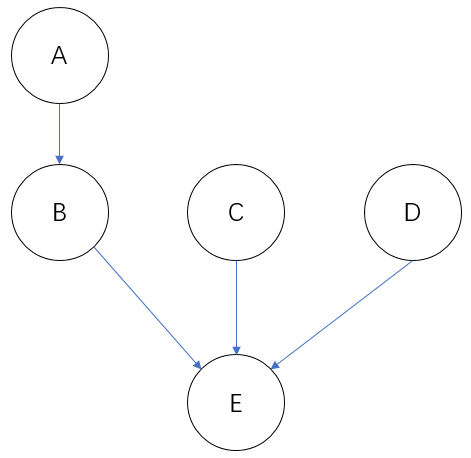
根据上图代码示例:
class A:
    def test(self):
        print('from A')
    pass
class B(A):
    def test(self):
        print('from B')
    pass
class C:
    def test(self):
        print('from C')
    pass
class D:
    def test(self):
        print('from D')
    pass
class E(B,C,D):
    def test(self):
        print('from E')
    pass

e = E()
e.test()

执行结果:
默认这样执行,会显示"from E" ,因为调用一个方法会,先从自己的类中查询,下面我们依次注释掉下列类的test:
把E类的test注释掉:结果显示"from B" ,
把B类的test注释掉:结果显示"from A" ,
把A类的test注释掉:结果显示"from C" ,
把C类的test注释掉:结果显示"from D" ,
把D类的test注释掉:结果显示"'E' object has no attribute 'test'"
根据上面的结果过程:在Python3中,当继承多个父类时且父类没有共同的父类时,这时属性的查询顺序是(深度优先)
上面的属性查询顺序总结:E-->B-->A-->C-->D
这个可能不是很有说服力,那么我们在新建一个F类,让C类继承F类,这时属性的查询顺序如下(仅列出结果):
属性查询顺序:E-->B-->A-->C-->F-->D
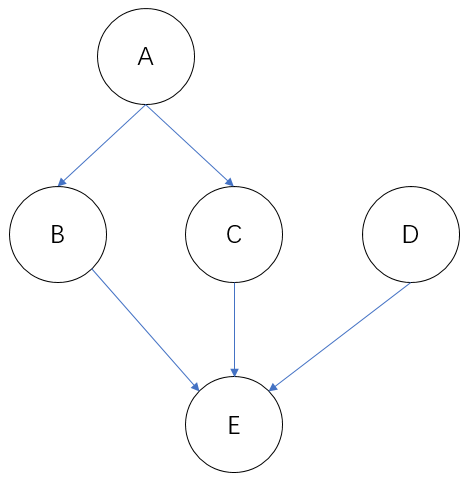
如果继承多个附类且父类有共同的父类时:

根据上图代码示例:
class A:
    def test(self):
        print('from A')
    pass
class B(A):
    def test(self):
        print('from B')
    pass
class C(A):
    def test(self):
        print('from C')
    pass
class D:
    def test(self):
        print('from D')
    pass
class E(B,C,D):
    def test(self):
        print('from E')
    pass

e = E()
e.test()

执行结果:
默认执行:显示"from E"
把E类的test注释掉:结果显示"from B"
把B类的test注释掉:结果显示"from C"
把C类的test注释掉:结果显示"from A"
把A类的test注释掉:结果显示"from D"
把D类的test注释掉:结果显示"'E' object has no attribute 'test'"
根据上面测试的结果:得出结论在Python3中,当继承多个父类且父类还有共同的父类时,这时属性查找是(广度优先)
上面的属性查找顺序总结:E-->B-->C-->A-->D
注:在Python2中因为分新式类和经典类的区别,所以跟Python3有些许不同。
如下图在Python2中:
新式类:同Python3中一样,是广度优先。所以属性查找顺序是:E-->B-->C-->A-->D
经典类:和新式类恰恰相反,是深度优先。所以属性查找顺序是:E-->B-->A-->C-->D
子类调用父类的方法:
super():内置函数,使用绑定方法调用父类的方法。(仅支持新式类)
注:在Python2中需要写成:super(S1,self).__init__(name,age) #S1 为子类的名字。
class Parent:
    def __init__(self,name,age):
        self.name = name
        self.age = age

class D:
    def walk(self):
        return ('from D')

class S1(Parent,D):
    def __init__(self,name,age,job,school):
        super().__init__(name,age)   #因为使用绑定方法调用父类的方法,所以不需要传递self
        self.job = job
        self.school = school
        super().walk()
t = S1('egon',73,'teach','oldboy')

print(t.name,t.age,t.walk())

执行结果:
D:PythonPython36-32python.exe E:/Python/DAY-20/day20.py
egon 73 from D

Process finished with exit code 0
封装:
注:Python中没有真正的隐藏,仅仅是语法上做了些操作。
方法:
在想要封装的变量或者函数名前加上"__"两个下划线,就可以。
加上两个下划线之后,只有在类的定义阶段或者对象的定义阶段(实例化)发生。且在类的外部无法直接调用,但是在类的内部可以直接调用(在定义时全部变形了)
封装其实就是变形。
正常的状态:(注意观察下列红色标识)
class A:
    def foo(self):
        print('from A foo')
        self.bar()
    def bar(self):
        print('from A bar')
class B(A):
    def bar(self):
        print('from B bar')
b = B()
print(A.__dict__)
b.foo()    #正常状态调用 .foo(),因为A是B的父类,B类中没有foo所以向上查找,在A中找到并执行,foo有个self.bar,self指的对象所以可以认为是在执行b.bar() 又搜寻一次父类,在B中找到,所以结果显示from B bar

执行结果:
D:PythonPython36-32python.exe E:/Python/DAY-20/day20.py
{'__module__': '__main__', 'foo': <function A.foo at 0x03873930>, 'bar': <function A.bar at 0x038738E8>, '__dict__': <attribute '__dict__' of 'A' objects>, '__weakref__': <attribute '__weakref__' of 'A' objects>, '__doc__': None}
from A foo
from B bar

Process finished with exit code 0

隐藏变形:
class A:
    def foo(self):
        print('from A foo')
        self.__bar()     #做了隐藏,这时在执行找到就不是bar了,而是 _A__bar,下面的结果能看出来名字被变形了
    def __bar(self):    #这里等于   _A__bar(self)   所以最后显示  from A bar
        print('from A bar')
class B(A):
    def bar(self):
        print('from B bar')
b = B()
print(A.__dict__)
b.foo()

执行结果:
D:PythonPython36-32python.exe E:/Python/DAY-20/day20.py
{'__module__': '__main__', 'foo': <function A.foo at 0x03693930>, '_A__bar': <function A.__bar at 0x036938E8>, '__dict__': <attribute '__dict__' of 'A' objects>, '__weakref__': <attribute '__weakref__' of 'A' objects>, '__doc__': None}
from A foo
from A bar

Process finished with exit code 0
一个封装的例子
class User:
    def __init__(self,name,age,sex):   #这里能看到隐藏了所有的用户信息
        self.__name = name
        self.__age = age
        self.__sex =sex

    def modify_name(self,val):   #定义更改用户名的接口
        if not isinstance(val,str):   #判断是否是字符串
            raise TypeError('must be str')   #如果不是字符串则主动抛出异常
        self.__name = val   #如果是字符串则执行这条,重新赋值

    def dis_info(self):   #显示用户信息
        print('''
        Name:%s
        Age:%s
        Sex:%s
        '''%(self.__name,self.__age,self.__sex))
t = User('laochai',73,'male')   #传入参数 用户名为 laochai
t.modify_name('abc')   #更改用户名 abc
t.dis_info()   #打印信息

执行结果:
D:PythonPython36-32python.exe E:/Python/DAY-20/day20.py

        Name:abc
        Age:73
        Sex:male


Process finished with exit code 0
Property:内置函数,一个装饰器,功能是自动执行函数,可以在封装中起到去括号的目的,让用户不知道自己被套路了。
class User:
    def __init__(self,name,age,sex):
        self.__name = name
        self.__age = age
        self.__sex =sex

    @property    #加上property装饰name
    def name(self):
        print(self.__name)

    @name.setter  #调用 .setter方法
    def name(self,val):
        self.__name = val   #修改用户名

    @property  #调用property装饰
    def dis_info(self):
        print('''
        Name:%s
        Age:%s
        Sex:%s
        '''%(self.__name,self.__age,self.__sex))
t = User('egon',18,'male')
t.name = 'abc'   #直接修改用户名
t.dis_info   #查看信息时没有加()执行

执行结果:
D:PythonPython36-32python.exe E:/Python/DAY-20/day20.py

        Name:abc
        Age:18
        Sex:male


Process finished with exit code 0