最近和前端联调是出现参数结构问题,下面就遇到的问题进行记录——由于本人非后台开发人员,所以一些前端代码只做记录不做详细解释
前端技术参考地址已经附加在下文,请尊重原创
后台参数接收格式
@RequestBody List<Long> idList
或者
@RequestBody Long[] idList
前台传递格式
let idLists = [];
that.checkBoxData.forEach(function(e) {
  idLists.push(e.consumeId);
});
API.stop(idLists)
  .then(
    function(result) {
      that.loading = false;
      if (result && parseInt(result.code) === 0) {
        that.$message.success({
          showClose: true,
          message: "停用成功",
          duration: 1500
        });
        that.search();
      }
    },
    function(err) {
      that.loading = false;
      that.$message.error({
        showClose: true,
        message: err.toString(),
        duration: 2000
      });
    }
  )
如果后台传参为
@RequestParam("supplierMaterialids[]") Long[] supplierMaterialids
则前端传参格式——红色部分
 stopStatus:function (){
        this.hospitalsupplieridarr=[];
        let that = this;
          if(this.checkBoxData.length<1)
        {
            this.$message.error({
                  showClose: true,
                  message: "请选择一条数据进行停用",
                  duration: 2000
                });
        }else{
          for(var i=0;i<this.checkBoxData.length;i++)
          {
            this.hospitalsupplieridarr.push(this.checkBoxData[i].supplierrelationshipid)
          }
          let params = qs.stringify(
            {hospitalSupplierids:this.hospitalsupplieridarr},{ arrayFormat: 'brackets' });
          this.$confirm("确认停用供应商吗?", "提示", {type: "warning"})
          .then(() => {
        API.setHospitalSupplierStopStatus(params).then(res => {
              if (res.code === 0) {
                that.$message.success({
                  showClose: true,
                  message: "停用成功",
                  duration: 2000
                });
                that.search(1);
              } else {
                that.$message.error({
                  showClose: true,
                  message: "停用失败",
                  duration: 2000
                });
              }
            });
        }).catch(() => {
          });
        }
     },
下面是网上查的资料关于——vue qs.stringify 和JSON.stringify 区别
参考链接——https://www.cnblogs.com/web1/p/8659398.html
qs可通过npm install qs命令进行安装,是一个npm仓库所管理的包。
而qs.stringify()将对象 序列化成URL的形式,以&进行拼接。
JSON是正常类型的JSON,请对比一下输出
var a = {name:'hehe',age:10};
 qs.stringify(a)
// 'name=hehe&age=10'
JSON.stringify(a)
// '{"name":"hehe","age":10}'
其中qs 分为三种类型——参考链接https://blog.csdn.net/pifutan/article/details/86320705
qs.stringify({ids: [1, 2, 3]}, {arrayFormat: ‘indices‘})
//形式: ids[0]=1&aids1]=2&ids[2]=3

qs.stringify({ids: [1, 2, 3]}, {arrayFormat: ‘brackets‘})
//形式:ids[]=1&ids[]=2&ids[]=3

qs.stringify({ids: [1, 2, 3]}, {arrayFormat: ‘repeat‘})
//形式: ids=1&ids=2&id=3
对比:
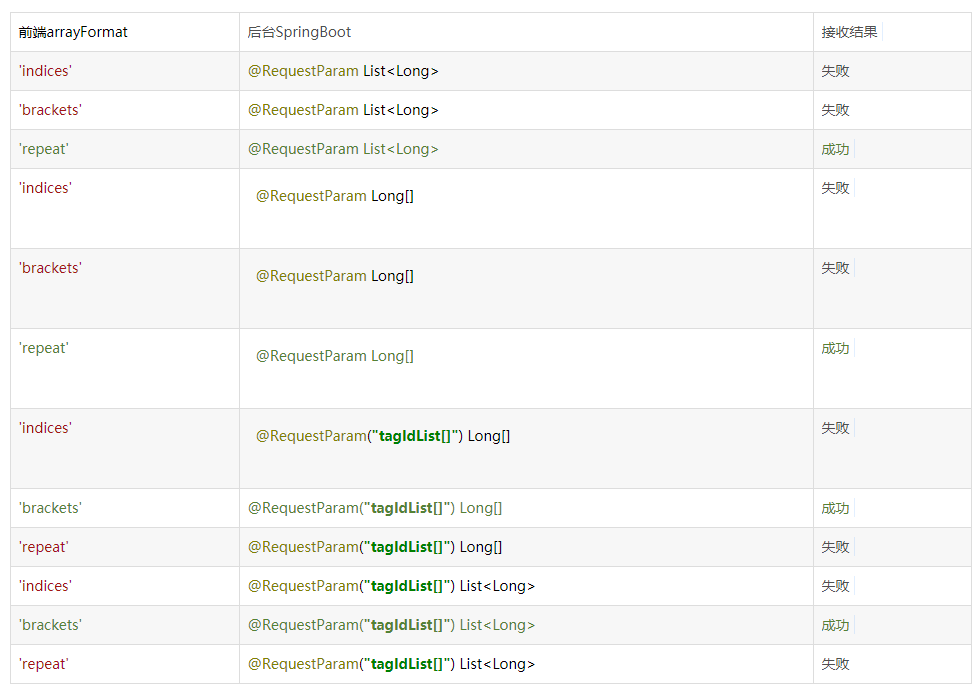
总结:使用List<Long>和Long[]是没有区别的,区别在于@RequestParam中是否加[]
qs.stringify({ids: [1, 2, 3]}, {arrayFormat: ‘indices‘})

//形式: ids[0]=1&aids[1]=2&ids[2]=3 @RequestParam无法接收


qs.stringify({ids: [1, 2, 3]}, {arrayFormat: ‘brackets‘})

//形式:ids[]=1&ids[]=2&ids[]=3 要加[]


qs.stringify({ids: [1, 2, 3]}, {arrayFormat: ‘repeat‘})

//形式: ids=1&ids=2&ids=3 不能加[]