nginx访问控制与用户认证
访问控制
用于location段
allow:设定允许哪台或哪些主机访问,多个参数间用空格隔开
deny:设定禁止哪台或哪些主机访问,多个参数间用空格隔开
示例
只允许192.168.100.1访问
[root@nginx ~]# vim /usr/local/nginx/conf/nginx.conf
······
server {
        listen       80;
        server_name  localhost;

        location /baozi {
            echo "test location";
            allow 192.168.100.1;
            deny all;
        }
······
[root@nginx ~]# nginx -s reload
验证
# 使用192.168.100.2来访问
[root@mysql ~]# curl 192.168.100.1/baozi
<html>
<head><title>403 Forbidden</title></head>
<body>
<center><h1>403 Forbidden</h1></center>
<hr><center>nginx/1.20.0</center>
</body>
</html>

# 使用192.168.100.1来访问
[root@nginx ~]# curl 192.168.100.1/baozi
test location
基于用户认证
auth_basic "欢迎信息";
auth_basic_user_file "/path/to/user_auth_file";
user_auth_file内容格式为:
username:password
这里的密码为加密后的密码串,建议用htpasswd来创建此文件:
htpasswd -c -m /path/to/.user_auth_file USERNAME
示例
# 安装httpd-tools
[root@nginx ~]# yum -y install httpd-tools
# 确保用户不存在
[root@nginx ~]# id baozi
id: ‘baozi’: no such user
# 生成用户认证文件
[root@nginx ~]# htpasswd -c -m /usr/local/nginx/conf/.user-auth-file baozi
New password:
Re-type new password:
Adding password for user baozi
[root@nginx ~]# cat /usr/local/nginx/conf/.user-auth-file
baozi:$apr1$GVrn6VgQ$zsa8woepbuSaIhojeADaG/
# 创建测试文件
[root@nginx ~]# mkdir /usr/local/nginx/html/baozi
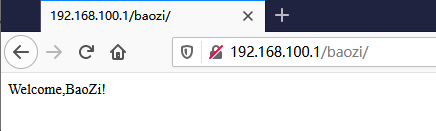
[root@nginx ~]# echo 'Welcome,BaoZi!' > /usr/local/nginx/html/baozi/index.html
[root@nginx ~]# vim /usr/local/nginx/conf/nginx.conf
······
server {
listen 80;
server_name localhost;
location / {
root html;
index index.html;
}
location /baozi {
root html;
index index.html;
auth_basic "Hello BaoZi!";
auth_basic_user_file "/usr/local/nginx/conf/.user-auth-file";
}
······
[root@nginx ~]# nginx -s reload
访问测试
输入用户名密码授权
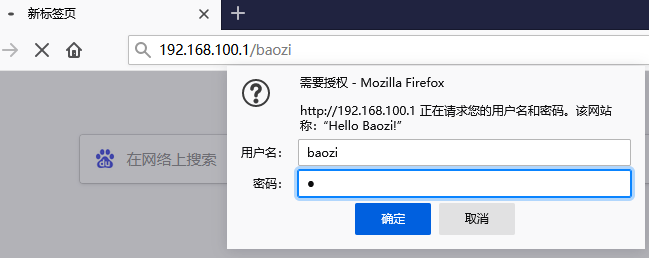
访问成功,用户认证成功