陆陆续续又忙了几天,继续写。
本篇仿照着优秀的文章的书写,加上自己的理解和踩过的坑,原文地址:https://www.jianshu.com/p/5cd772c07041?utm_campaign=haruki&utm_content=note&utm_medium=reader_share&utm_source=weixin
环境/版本一览:
- 开发工具:eclipse
- springboot: 2.0.1.RELEASE
- jdk:1.8.0_40
- maven:3.3.9
额外功能:
- mybatis generator 自动生成代码插件
开始搭建:
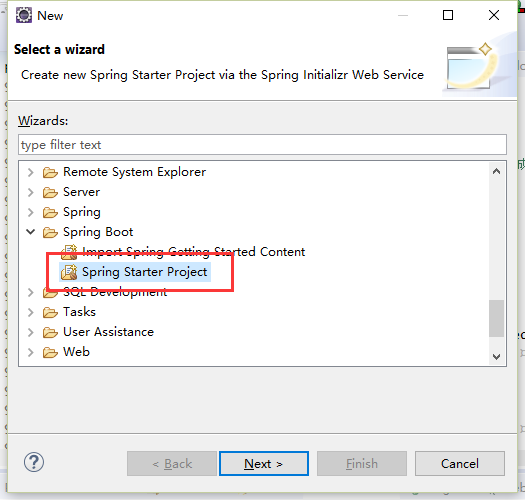
一.创建项目:
1、同样如上文,创建SpringBoot项目(默认为最新版),
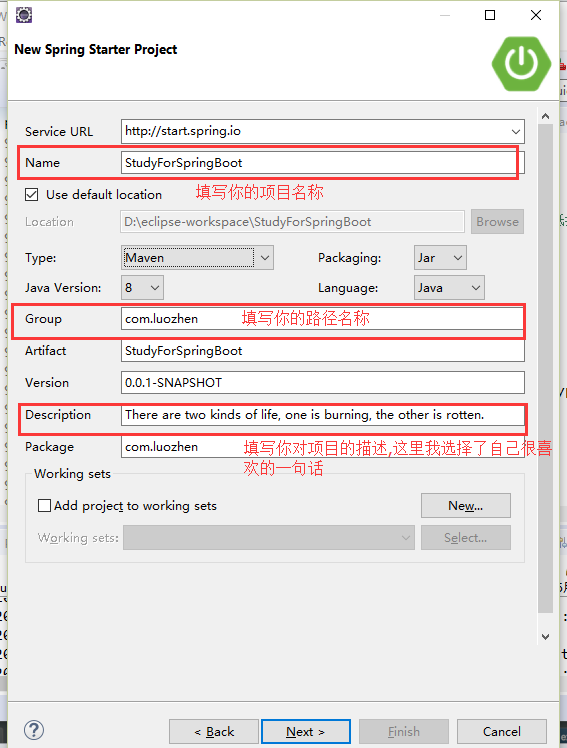
2、填写项目的基础信息,
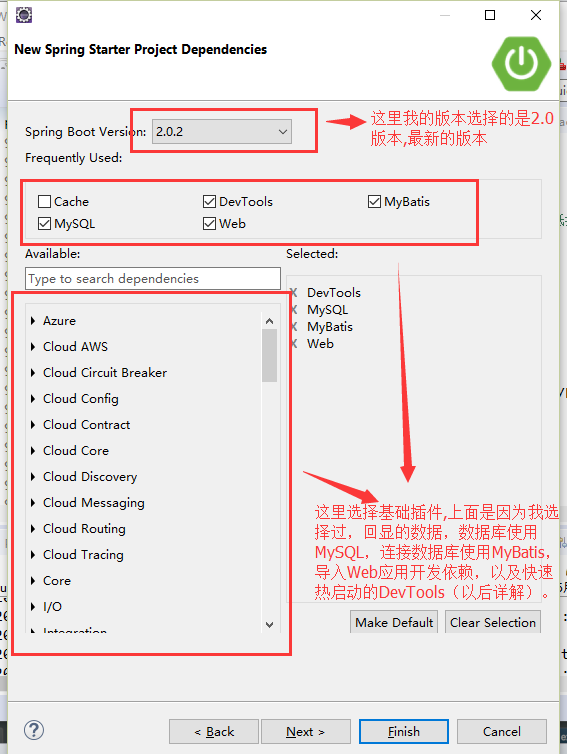
3、选择基础的项目依赖包,可以以后手动添加,
4、选择finish,等待依赖包加载完成。
这是生成pom.xml文件
 1 <?xml version="1.0" encoding="UTF-8"?>
 2 <project xmlns="http://maven.apache.org/POM/4.0.0" xmlns:xsi="http://www.w3.org/2001/XMLSchema-instance"
 3     xsi:schemaLocation="http://maven.apache.org/POM/4.0.0 http://maven.apache.org/xsd/maven-4.0.0.xsd">
 4     <modelVersion>4.0.0</modelVersion>
 5
 6     <groupId>com.luozhen</groupId>
 7     <artifactId>StudyForSpringBoot</artifactId>
 8     <version>0.0.1-SNAPSHOT</version>
 9     <packaging>jar</packaging>
10
11     <name>StudyForSpringBoot</name>
12     <description>There are two kinds of life, one is burning, the other is rotten.</description>
13
14     <parent>
15         <groupId>org.springframework.boot</groupId>
16         <artifactId>spring-boot-starter-parent</artifactId>
17         <version>2.0.1.RELEASE</version>
18         <relativePath/> <!-- lookup parent from repository -->
19     </parent>
20
21     <properties>
22         <project.build.sourceEncoding>UTF-8</project.build.sourceEncoding>
23         <project.reporting.outputEncoding>UTF-8</project.reporting.outputEncoding>
24         <java.version>1.8</java.version>
25     </properties>
26
27     <dependencies>
28         <dependency>
29             <groupId>org.springframework.boot</groupId>
30             <artifactId>spring-boot-starter-web</artifactId>
31         </dependency>
32         <dependency>
33             <groupId>org.mybatis.spring.boot</groupId>
34             <artifactId>mybatis-spring-boot-starter</artifactId>
35             <version>1.3.2</version>
36         </dependency>
37
38         <dependency>
39             <groupId>org.springframework.boot</groupId>
40             <artifactId>spring-boot-devtools</artifactId>
41             <scope>runtime</scope>
42         </dependency>
43         <dependency>
44             <groupId>mysql</groupId>
45             <artifactId>mysql-connector-java</artifactId>
46             <scope>runtime</scope>
47         </dependency>
48         <dependency>
49             <groupId>org.springframework.boot</groupId>
50             <artifactId>spring-boot-starter-test</artifactId>
51             <scope>test</scope>
52         </dependency>
53     </dependencies>
54
55     <build>
56         <plugins>
57             <plugin>
58                 <groupId>org.springframework.boot</groupId>
59                 <artifactId>spring-boot-maven-plugin</artifactId>
60             </plugin>
61         </plugins>
62     </build>
63
64
65 </project>
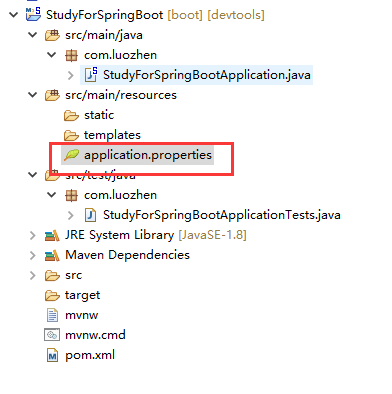
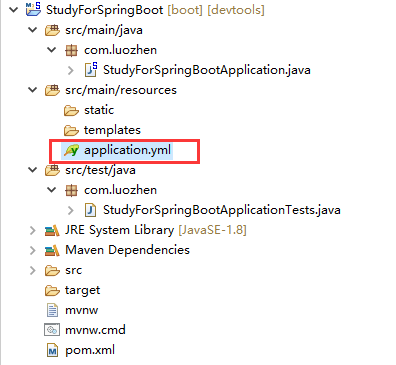
这是生成的文件目录,其中的配置文件application.properties可以根据自己的习惯选择,使用properties或者yml文件,本项目使用的是yml配置文件,所以把原本application.properties删除,创建一个application.yml文件
更改后:(可以直接 rename后缀名为yml)
二.配置mybatis及自动生成代码generate
mybatis配置有两种,一种是注解版,在代码中配置;另一种是xml版,搭配generate,可以灵活的动态生成SQL,很方便的调整SQL.
此处我们讲解的是xml版,搭配generate使用.
1.尽管我们在前面创建项目的时候依赖了mybatis依赖包,但是我们还是要确认下.如果前面没有勾选,我们也可以手动导入mybatis依赖包,在<dependencies>标签中写入一下代码导入依赖,
1         <dependency>
2             <groupId>org.mybatis.spring.boot</groupId>
3             <artifactId>mybatis-spring-boot-starter</artifactId>
4             <version>1.3.2</version>
5         </dependency>
2.接下来就是application.yml配置文件中添加相关的配置.
 1 #端口号
 2 server:
 3   port: 55555
 4
 5 #datasource,数据连接
 6 spring:
 7   datasource:
 8     driver-class-name: com.mysql.jdbc.Driver
 9     # 基本属性
10     url: jdbc:mysql://localhost:3306/test?useUnicode=true&characterEncoding=utf-8&useSSL=false
11     username: root
12     password: 123456
13
14 #mybatis
15 mybatis:
16   type-aliases-package: com.luozhen.entity #实体类映射文件包
17   mapper-locations: classpath:mybatis/mappers/*.xml #生成的sql语句
以上的就是配置文件的基础配置,后续可加入详细的内容,同时需要注意#mybatis后面的配置需要对应的文件包,以下为我的文件包,

很多文章上都写了需要mybatis-config.xml文件,但是你会发现其中的内容会和application.yml的重复,配置为数据库的连接配置.SpringBoot会自动加载,spring.datasource.*相关配置,数据源就会自动注入到sqlSessionFactory中,sqlSessionFactory会自动注入到Mapper中,对了你一切都不用管了,直接拿起来使用就行了。
4.到这里mybatis的配置就完成了,接下就是generate的配置.同样,也是需要在pom.xml中导入依赖包,在<build><plugins></plugins></build>中添加依赖,
 1 <!-- generator自动生成代码依赖包 -->
 2       <plugin>
 3         <groupId>org.mybatis.generator</groupId>
 4         <artifactId>mybatis-generator-maven-plugin</artifactId>
 5         <version>1.3.5</version>
 6         <configuration>
 7           <!-- 配置generatorConfig的位置,注意:若不配置generatorConfig的位置,会默认位置为src/main/resources下。 -->
 8           <configurationFile>src/main/resources/mybatis/generatorConfig.xml</configurationFile>
 9           <verbose>true</verbose>
10           <overwrite>true</overwrite>
11         </configuration>
12         <executions>
13           <execution>
14             <id>Generate MyBatis Files</id>
15             <goals>
16               <goal>generate</goal>
17             </goals>
18             <phase>generate</phase>
19             <configuration>
20               <verbose>true</verbose>
21               <overwrite>true</overwrite>
22             </configuration>
23           </execution>
24         </executions>
25         <dependencies>
26           <dependency>
27             <groupId>MySQL</groupId>
28             <artifactId>mysql-connector-Java</artifactId>
29             <version>5.1.46</version>
30           </dependency>
31           <dependency>
32             <groupId>org.mybatis.generator</groupId>
33             <artifactId>mybatis-generator-core</artifactId>
34             <version>1.3.6</version>
35           </dependency>
36           <dependency>
37             <groupId>org.mybatis</groupId>
38             <artifactId>mybatis</artifactId>
39             <version>3.4.6</version>
40           </dependency>
41         </dependencies>
42       </plugin>
5.配置generatorConfig.xml,内容,
1 <?xml version="1.0" encoding="UTF-8" ?> 2 3 <!DOCTYPE generatorConfiguration 4 PUBLIC "-//mybatis.org//DTD MyBatis Generator Configuration 1.0//EN" 5 "http://mybatis.org/dtd/mybatis-generator-config_1_0.dtd"> 6 7 <generatorConfiguration> 8 <context id="mysqlTables" targetRuntime="MyBatis3"> 9 <!-- 是否去除自动生成的注释 true:是 : false:否 --> 10 <commentGenerator> 11 <property name="suppressDate" value="false" /> 12 <property name="suppressAllComments" value="true" /> 13 </commentGenerator> 14 <!-- 数据库链接URL,用户名、密码 --> 15 <jdbcConnection driverClass="com.mysql.jdbc.Driver" connectionURL="jdbc:mysql://localhost:3306/test?useUnicode=true&characterEncoding=utf-8&useSSL=false" userId="root" password="123456"> 16 </jdbcConnection> 17 18 <javaTypeResolver> 19 <property name="forceBigDecimals" value="false" /> 20 </javaTypeResolver> 21 22 <!-- 生成model模型,对应的包,存放位置可以指定具体的路径,如/ProjectName/src,也可以使用MAVEN来自动生成 --> 23 <javaModelGenerator targetPackage="com.luozhen.entity" targetProject="src/main/java"> 24 <property name="enableSubPackages" value="true" /> 25 <property name="trimStrings" value="true" /> 26 </javaModelGenerator> 27 28 <!--对应的xml mapper文件 --> 29 <sqlMapGenerator targetPackage="mybatis/mappers" targetProject="src/main/resources"> 30 <property name="enableSubPackages" value="true" /> 31 </sqlMapGenerator> 32 33 <!-- 对应的dao接口 --> 34 <javaClientGenerator type="XMLMAPPER" targetPackage="com.luozhen.daos" targetProject="src/main/java"> 35 <property name="enableSubPackages" value="true" /> 36 </javaClientGenerator> 37 38 39 <!-- 要生成的表 tableName是数据库中的表名或视图名 domainObjectName是实体类名(不生成Example(帮助类)类) --> 40 <table tableName="sys_department" domainObjectName="SysDepartment" enableCountByExample="false" enableSelectByExample="false" enableUpdateByExample="false" enableDeleteByExample="false"> 41 </table> 42 43 </context> 44 45 </generatorConfiguration>
具体的参考配置可以查看:
https://www.jianshu.com/p/e09d2370b796 Mybatis Generator最完整配置详解
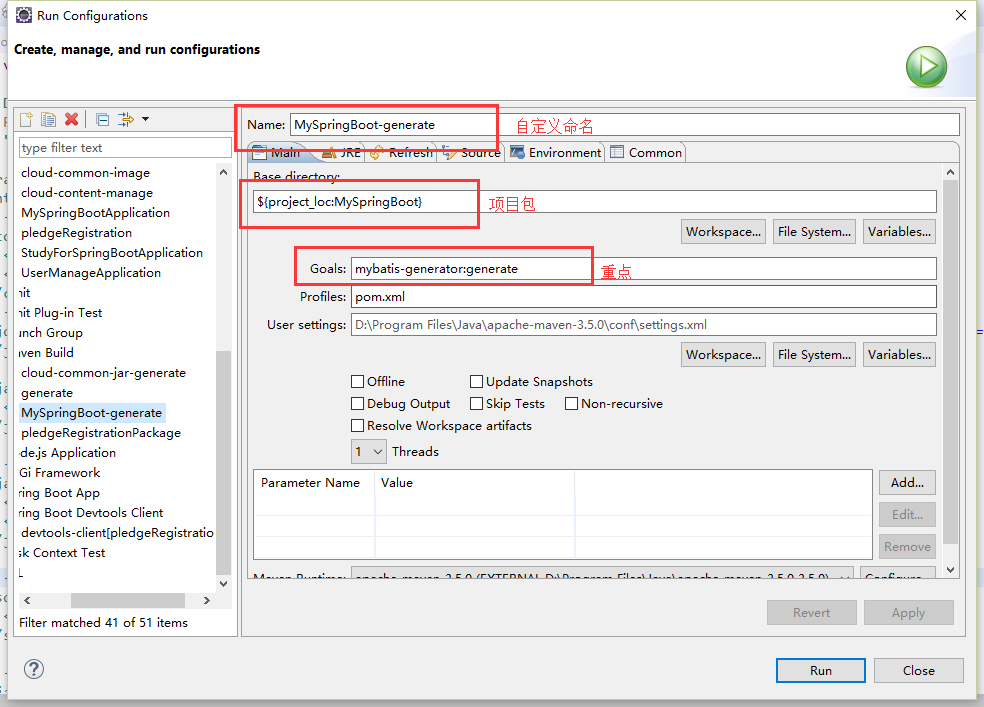
6.最后配置generator生成,F5刷新
项目 右键==>run as ==> maven bulid ==>弹出对话框 ==>在goals中输入mybatis-enerator:generate 或者 点击select --》选择你的mybatis插件 --》apply --》run,结果如下
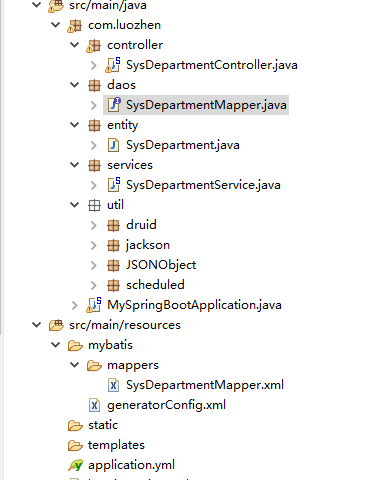
搭建完成后的目录及文件:
目录:
我的数据库表结构:

生成的实体,SysDepartment.java:
 1 package com.luozhen.entity;
 2
 3 import java.util.Date;
 4
 5 import org.springframework.format.annotation.DateTimeFormat;
 6
 7 import com.fasterxml.jackson.annotation.JsonFormat;
 8
 9 public class SysDepartment {
10     private String id;
11
12     private String name;
13
14     private Date createdate;
15
16     private String parentId;
17
18     public String getId() {
19         return id;
20     }
21
22     public void setId(String id) {
23         this.id = id == null ? null : id.trim();
24     }
25
26     public String getName() {
27         return name;
28     }
29
30     public void setName(String name) {
31         this.name = name == null ? null : name.trim();
32     }
33
34     public Date getCreatedate() {
35         return createdate;
36     }
37
38     public void setCreatedate(Date createdate) {
39         this.createdate = createdate;
40     }
41
42     public String getParentId() {
43         return parentId;
44     }
45
46     public void setParentId(String parentId) {
47         this.parentId = parentId == null ? null : parentId.trim();
48     }
49 }
生成的mapper.xml,在resources/mybatis/mappers下:
 1 <?xml version="1.0" encoding="UTF-8"?>
 2 <!DOCTYPE mapper PUBLIC "-//mybatis.org//DTD Mapper 3.0//EN" "http://mybatis.org/dtd/mybatis-3-mapper.dtd">
 3 <mapper namespace="com.luozhen.daos.SysDepartmentMapper">
 4   <resultMap id="BaseResultMap" type="com.luozhen.entity.SysDepartment">
 5     <id column="ID" jdbcType="VARCHAR" property="id" />
 6     <result column="NAME" jdbcType="VARCHAR" property="name" />
 7     <result column="CREATEDATE" jdbcType="TIMESTAMP" property="createdate" />
 8     <result column="PARENT_ID" jdbcType="VARCHAR" property="parentId" />
 9   </resultMap>
10   <sql id="Base_Column_List">
11     ID, NAME, CREATEDATE, PARENT_ID
12   </sql>
13   <select id="selectByPrimaryKey" parameterType="java.lang.String" resultMap="BaseResultMap">
14     select
15     <include refid="Base_Column_List" />
16     from sys_department
17     where ID = #{id,jdbcType=VARCHAR}
18   </select>
19   <delete id="deleteByPrimaryKey" parameterType="java.lang.String">
20     delete from sys_department
21     where ID = #{id,jdbcType=VARCHAR}
22   </delete>
23   <insert id="insert" parameterType="com.luozhen.entity.SysDepartment">
24     insert into sys_department (ID, NAME, CREATEDATE, PARENT_ID)
25     values (#{id,jdbcType=VARCHAR}, #{name,jdbcType=VARCHAR}, #{createdate,jdbcType=TIMESTAMP},
26       #{parentId,jdbcType=VARCHAR})
27   </insert>
28   <insert id="insertSelective" parameterType="com.luozhen.entity.SysDepartment">
29     insert into sys_department
30     <trim prefix="(" suffix=")" suffixOverrides=",">
31       <if test="id != null">
32         ID,
33       </if>
34       <if test="name != null">
35         NAME,
36       </if>
37       <if test="createdate != null">
38         CREATEDATE,
39       </if>
40       <if test="parentId != null">
41         PARENT_ID,
42       </if>
43     </trim>
44     <trim prefix="values (" suffix=")" suffixOverrides=",">
45       <if test="id != null">
46         #{id,jdbcType=VARCHAR},
47       </if>
48       <if test="name != null">
49         #{name,jdbcType=VARCHAR},
50       </if>
51       <if test="createdate != null">
52         #{createdate,jdbcType=TIMESTAMP},
53       </if>
54       <if test="parentId != null">
55         #{parentId,jdbcType=VARCHAR},
56       </if>
57     </trim>
58   </insert>
59   <update id="updateByPrimaryKeySelective" parameterType="com.luozhen.entity.SysDepartment">
60     update sys_department
61     <set>
62       <if test="name != null">
63         NAME = #{name,jdbcType=VARCHAR},
64       </if>
65       <if test="createdate != null">
66         CREATEDATE = #{createdate,jdbcType=TIMESTAMP},
67       </if>
68       <if test="parentId != null">
69         PARENT_ID = #{parentId,jdbcType=VARCHAR},
70       </if>
71     </set>
72     where ID = #{id,jdbcType=VARCHAR}
73   </update>
74   <update id="updateByPrimaryKey" parameterType="com.luozhen.entity.SysDepartment">
75     update sys_department
76     set NAME = #{name,jdbcType=VARCHAR},
77       CREATEDATE = #{createdate,jdbcType=TIMESTAMP},
78       PARENT_ID = #{parentId,jdbcType=VARCHAR}
79     where ID = #{id,jdbcType=VARCHAR}
80   </update>
81 </mapper>
对应的daos文件,SysDepartmentMapper.java:
 1 package com.luozhen.daos;
 2
 3 import java.util.List;
 4
 5 import com.luozhen.entity.SysDepartment;
 6
 7 public interface SysDepartmentMapper {
 8     int deleteByPrimaryKey(String id);
 9
10     int insert(SysDepartment record);
11
12     int insertSelective(SysDepartment record);
13
14     SysDepartment selectByPrimaryKey(String id);
15
16     int updateByPrimaryKeySelective(SysDepartment record);
17
18     int updateByPrimaryKey(SysDepartment record);
19
20 }
使用:
已经完成生成文件,现在我们要使用生成的文件,使用生成mapper.xml中SQL语句,有两种方法,一种统一,一种分散,看你的个人习惯.
(1)统一
1.首先在你的启动类中添加一个注解,注解的目录为生成的dao类文件目录,如下
 1 package com.luozhen;
 2
 3 import org.mybatis.spring.annotation.MapperScan;
 4 import org.springframework.boot.SpringApplication;
 5 import org.springframework.boot.autoconfigure.SpringBootApplication;
 6
 7 @SpringBootApplication //这是重点
 8 @MapperScan("com.luozhen.daos")
 9 public class MySpringBootApplication {
10     public static void main(String[] args) {
11         SpringApplication.run(MySpringBootApplication.class, args);
12     }
13 }
2.xml文件中  id属性必须与你dao类文件中方法名相对应
 ,其中有些坑,下篇文章详解,
(2)分散.在dao类文件上,每个添加@Mapper注解,其余相同.
剩下的使用步骤就不再详解,请参考文章:
https://www.jianshu.com/p/5cd772c07041?utm_campaign=haruki&utm_content=note&utm_medium=reader_share&utm_source=weixin
无非就是SpringMVC的基础架构,以上若有问题可以在评论区提出,大家相互学习.