1 布隆过滤器介绍
Hash、Set、String的BitMap等可以实现判断元素是否存在的功能,但这些实现方式要么随着元素增多会占用大量内存(Hash、Set),要么无法动态伸缩和保持误判率不变(BitMap)。因此,我们非常需要一种可以高效判断大量数据是否存在且允许一定误判率的数据结构。
1.1 什么是布隆过滤器(Bloom Filter)
布隆过滤器由Burton Howard Bloom于1970年提出,用于判断一个元素是否在集合中。
布隆过滤器(Bloom filter)是一种非常节省空间的概率数据结构(space-efficient probabilistic data structure),运行速度快(时间效率),占用内存小(空间效率),但是有一定的误判率且无法删除元素。本质上由一个很长的二进制向量和一系列随机映射函数组成。
1.2 布隆过滤器特点
- 一个很长的二进制向量 (位数组)
- 一系列随机函数 (哈希)
- 空间效率和查询效率高
- 有一定的误判率(哈希表是精确匹配)
- 布隆过滤器支持添加元素、检查元素,但是不支持删除元素;
- 检查结果分为2种:一定不在集合中、可能在集合中(误判率问题);
检查到的结果:
1.元素不存在该集合,就一定不存在该集合
2.元素存在该集合,就不一定是存在(此处是误判率的问题)
官方redisboom地址:
https://docs.redislabs.com/latest/modules/redisbloom/
https://oss.redislabs.com/redisbloom/Quick_Start/
https://oss.redislabs.com/redisbloom/#command-references
https://docs.redislabs.com/latest/modules/redisbloom/redisbloom-quickstart/?_ga=2.234894149.555262092.1603270995-1549265601.1603270995
2.安装REDIS
#下载
[root@localhost redis]# /root/redis
[root@localhost redis]# wget https://download.redis.io/releases/redis-5.0.5.tar.gz

#解压安装
[root@localhost redis]# tar -zxvf redis-5.0.5.tar.gz
[root@localhost redis]# ls
redis-5.0.5  redis-5.0.5.tar.gz
[root@localhost redis]# cd redis-5.0.5
[root@localhost redis-5.0.5]# make
3.下载REDISBLOOM插件
redis官网下载即可
https://github.com/RedisLabsModules/redisbloom/
tag:https://github.com/RedisBloom/RedisBloom/tags
3.1 下载压缩包
[root@localhost redis]# wget https://github.com/RedisBloom/RedisBloom/archive/v2.2.1.tar.gz
3.2 解压并安装,生成.so文件
[root@localhost redis]# tar -zxf v2.2.1.tar.gz
[root@localhost redis]# ls
redis-5.0.5  redis-5.0.5.tar.gz  RedisBloom-2.2.1  v2.2.1.tar.gz
[root@localhost redis]# cd RedisBloom-2.2.1/
[root@localhost RedisBloom-2.2.1]# make
[root@localhost RedisBloom-2.2.1]# ls
changelog  contrib  Dockerfile  docs  LICENSE  Makefile  mkdocs.yml  ramp.yml  README.md  redisbloom.so  rmutil  src  tests

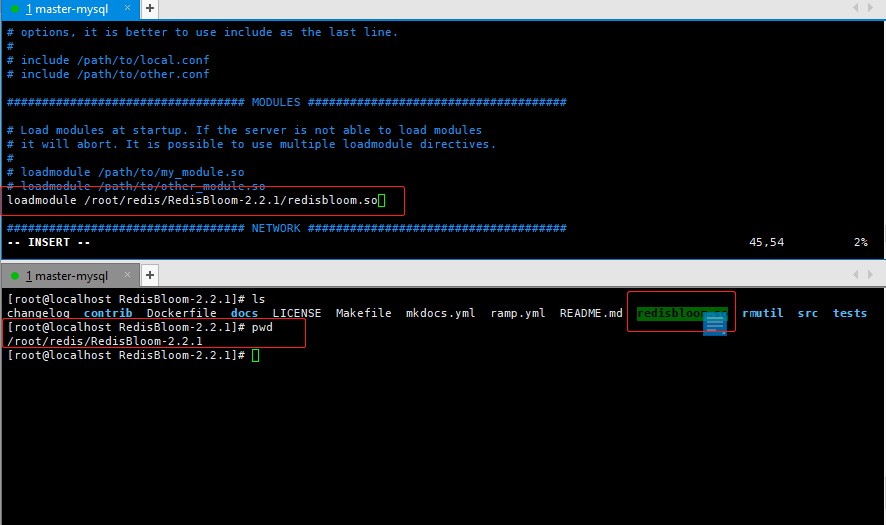
3.3 在redis配置文件(redis.conf)中加入该模块即可
[root@localhost redis-5.0.5]# pwd
/root/redis/redis-5.0.5
[root@localhost redis-5.0.5]# ls
00-RELEASENOTES  CONTRIBUTING  deps     Makefile   README.md   runtest          runtest-moduleapi  sentinel.conf  tests
BUGS             COPYING       INSTALL  MANIFESTO  redis.conf  runtest-cluster  runtest-sentinel   src            utils
[root@localhost redis-5.0.5]# ls |grep redis.conf
redis.conf
#配置文件添加.so文件
[root@localhost redis-5.0.5]# vim redis.conf

4 启动REDIS
[root@localhost redis-5.0.5]# ./src/redis-server ./redis.conf &

#查看是否启动成功
[root@localhost redis-5.0.5]# ps -ef|grep 6379
root       4234   4176  0 22:12 pts/0    00:00:07 ./redis-server *:6379
root       8744   4176  0 23:06 pts/0    00:00:00 grep --color=auto 6379

#连接客户端
[root@localhost redis-5.0.5]# ./src/redis-cli
127.0.0.1:6379> keys *
(empty list or set)
127.0.0.1:6379>
5 操作REDISBLOOM
基本操作命令:
| 命令 | 格式 | 说明 |
|---|---|---|
| bf.reserve | bf.reserve {key} {error_rate} {initial_size} | 创建一个大小为initial_size位向量长度,错误率为error_rate的空的Bloom过滤器 |
| bf.add | bf.add{key} {item} | 向key指定的Bloom中添加一个元素item |
| bf.madd | bf.madd {key} {item} {item2} {item3} … | 一次添加多个元素 |
| bf.exists | bf.exists {key} {item} | 查询元素是否存在 |
| bf.mexists | bf.mexists {key} {item} {item2} {item3} … | 检查多个元素是否存在 |
| bf.info | bf.info {key} | 查询key指定的Bloom的信息 |
| bf.debug | bf.debug {key} | 查看BloomFilter的内部详细信息(如每层的元素个数、错误率等) |
| cf.reserve | cf.reserve {key} {initial_size} | 创建一个initial_size位向量长度的空的Bloom过滤器 |
| cf.add | cf.add {key} {item} | 向key指定的Bloom中添加一个元素item |
| cf.exists | cf.exists {key} {item} | 检查该元素是否存在 |
| bf.scandump | bf.scandump {key} {iter} | (key:布隆过滤器的名字,iter:首次调用传值0,或者上次调用此命令返回的结果值)对Bloom进行增量持久化操作(增量保存) |
| bf.localchunk | bf.localchunk {key} {iter} {data} | 加载SCANDUMP持久化的Bloom数据(key:目标布隆过滤器的名字,iter:SCANDUMP返回的迭代器的值,和data一一对应,data:SCANDUMP返回的数据块(data chunk)) |
【说明redis布隆过滤器不支持修改元素,只能重新创建】
redis中有两个值决定布隆过滤器的准确率:
| 值 | 说明 |
|---|---|
| error_rate | 允许布隆过滤器的错误率,这个值越低过滤器的位数组的大小越大,占用空间就越大 (默认值0.01) |
| initial_size | 布隆过滤器可以存储的元素个数(位存储),当实际存在的元素个数超过这个值之后,过滤器的准确率会下降(默认值100) |
redis 设置redisbloom的这两个值:
demo:bf.reserve test 0.1 100000000
说明: bf.reserve 过滤器的名字 错误率(error_rate 的值) 位向量长度(initial_size 的值)
| 参数 | 说明 |
|---|---|
| test | 是过滤器的名字 |
| 0.1 | 错误率( error_rate 的值) |
| 1000000 | 位向量长度(initial_size 的值) |
(注意必须在add之前使用bf.reserve指令显式创建,如果对应的key已经存在,bf.server会报错。同事设置的错误率越低,需要的空间越大。如果不使用bf.serve,默认的error_rate是0.01,默认的initial_size是100)
6 REDISBLOOM示例
6.1 redis-cli操作
#新建一个过滤器
127.0.0.1:6379> bf.reserve test 0.1 1000000     # test是布隆过滤器名称,0.1是误判率,1000000是位向量长度
OK

#向过滤器中添加元素
127.0.0.1:6379> bf.add test one
(integer) 1
127.0.0.1:6379> bf.add test two
(integer) 1
#test是布隆过滤器名称,one,two是需要判断的元素

#批量添加
127.0.0.1:6379> bf.madd test 1 2 3 4
1) (integer) 1
2) (integer) 1
3) (integer) 1
4) (integer) 1


#判断元素是否在过滤器中
127.0.0.1:6379> bf.exists test one
(integer) 1
127.0.0.1:6379> bf.exists test two
(integer) 1
127.0.0.1:6379> bf.exists test three
(integer) 0
#test是布隆过滤器名称,one,two是需要判断的元素存在返回1,不存在返回0

#批量判断该元素是否存在
127.0.0.1:6379> bf.mexists test 1 2 3 5
1) (integer) 1
2) (integer) 1
3) (integer) 1
4) (integer) 0


#查看指定的key的Bloom信息
127.0.0.1:6379> bf.info test
 1) Capacity
 2) (integer) 1000000
 3) Size
 4) (integer) 779555
 5) Number of filters
 6) (integer) 1
 7) Number of items inserted
 8) (integer) 7
 9) Expansion rate
10) (integer) 2

#查看BloomFilter的内部详细信息(如每层的元素个数、错误率等)
127.0.0.1:6379> bf.debug test
1) "size:7"
2) "bytes:779403 bits:6235224 hashes:5 hash64 capacity:1000000 size:7 ratio:0.05"

#添加一个位向量长度为100000000的空的布隆过滤器
127.0.0.1:6379> cf.reserve test3 100000000
OK

#添加元素
127.0.0.1:6379> cf.add test3 1
(integer) 1
127.0.0.1:6379> cf.add test3 2
(integer) 1

#检查该元素是否存在
127.0.0.1:6379> cf.exists test3 2
(integer) 1

#对Bloom进行增量持久化操作(增量保存
127.0.0.1:6379> bf.scandump test 0
1) (integer) 1
2) "ax00x00x00x00x00x00x00x01x00x00x00x05x00x00x00x02x00x00x00x8bxe4x0bx00x00x00x00x00X$_x00x00x00x00x00ax00x00x00x00x00x00x00x9ax99x99x99x99x99xa9?Jxf7xd4x9exdexf0x18@x05x00x00x00@Bx0fx00x00x00x00x00x00"
6.2 php使用
#添加php-redisbloom.php文件
<?php
$redis=new Redis();
$redis->connect('127.0.0.1',6379);
$result=$redis->rawCommand('bf.exists','test','one');
var_dump($result);

#执行
[root@localhost redis]# php php-redisbloom.php
int(1)
【添加:在向redis set值的之后,调用bf.add添加到过滤器。 检查:在穿过了redis去到Mysql之前,调用bf.exists检查一下,如果不存在则不连接mysql查询】