http://blog.csdn.net/Android_Tutor/article/details/5531849
大家好,我们这一节讲的是Android Preferences 的学习,Preferences 在Android当中被用来记录应用,以及用户喜好等等,它可以用来保存
简单的数据类型,如Int,Double,Boolean等。Preferences中保存的数据可以理解为Map型。我们通过PreferenceManager 以及getDefaultSharedPreferences(Context) 来获取它,比如当我们想获得整数我们可以用 getInt(String key, int defVal) .获取里面的某个键值,当我们想修改时候我们用putInt(String key, int newVal), 最后用 edit(), 方法提交!千万不要忘记了哦~
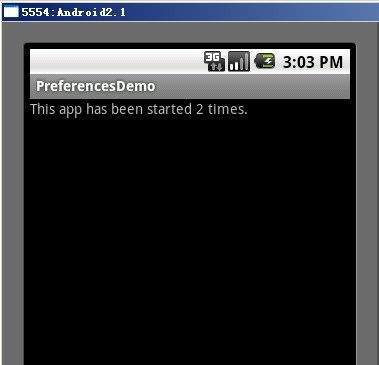
为了让大家跟好的理解我做了一个简单的Demo,程序主要有个TextView控件,上面写着用户使用改应用的次数。效果如下图所示:
下面是实现Demo的大体步骤:
一、新建一个Android工程命名为:PreferencesDemo。
二、在修改main.xml布局文件,这里只是在TextView控件里加了一个id.代码如下:
[java] view plaincopy
- <?xml version="1.0" encoding="utf-8"?>
- <LinearLayout xmlns:android="http://schemas.android.com/apk/res/android"
- android:orientation="vertical"
- android:layout_width="fill_parent"
- android:layout_height="fill_parent"
- >
- <TextView
- android:id="@+id/text"
- android:layout_width="fill_parent"
- android:layout_height="wrap_content"
- android:text="@string/hello"
- />
- </LinearLayout>
三、修改PreferenceDemo.java的代码,全部代码如下:
[java] view plaincopy
- package com.android.tutor;
- import android.app.Activity;
- import android.content.SharedPreferences;
- import android.os.Bundle;
- import android.preference.PreferenceManager;
- import android.widget.TextView;
- public class PreferencesDemo extends Activity {
- /** Called when the activity is first created. */
- @Override
- public void onCreate(Bundle savedInstanceState) {
- super.onCreate(savedInstanceState);
- setContentView(R.layout.main);
- SharedPreferences mPerferences = PreferenceManager
- .getDefaultSharedPreferences(this);
- int counter = mPerferences.getInt("counter", 0);
- TextView mTextView = (TextView)findViewById(R.id.text);
- mTextView.setText("This app has been started " + counter + " times.");
- SharedPreferences.Editor mEditor = mPerferences.edit();
- mEditor.putInt("counter", ++counter);
- mEditor.commit();
- }
- }
四、运行代码,实现上述效果.
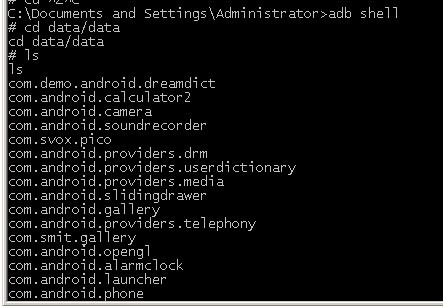
五、查看Preferences文件,首先打开命令终端:adb shell一下,然后cd data/data进入该目录,ls一下我们会发现一大堆包文件,入下图所示:
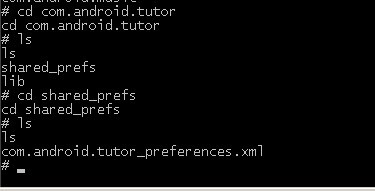
cd com.android.tutor (这里是我程序的包名) /shared_prefs,ls一下会发现.xml文件如下图:
打开.xml文件,格式如下(为什么这样大家自己去理解):
[java] view plaincopy
- <?xml version='1.0' encoding='utf-8' standalone='yes' ?>
- <map>
- <int name="counter" value="3" />
- </map>
OK,今天就到此为止,以上全是个人愚见,如果有什么地方不对的,请指正,谢谢大家!