部署基于python语言的WEB发布环境
部署说明
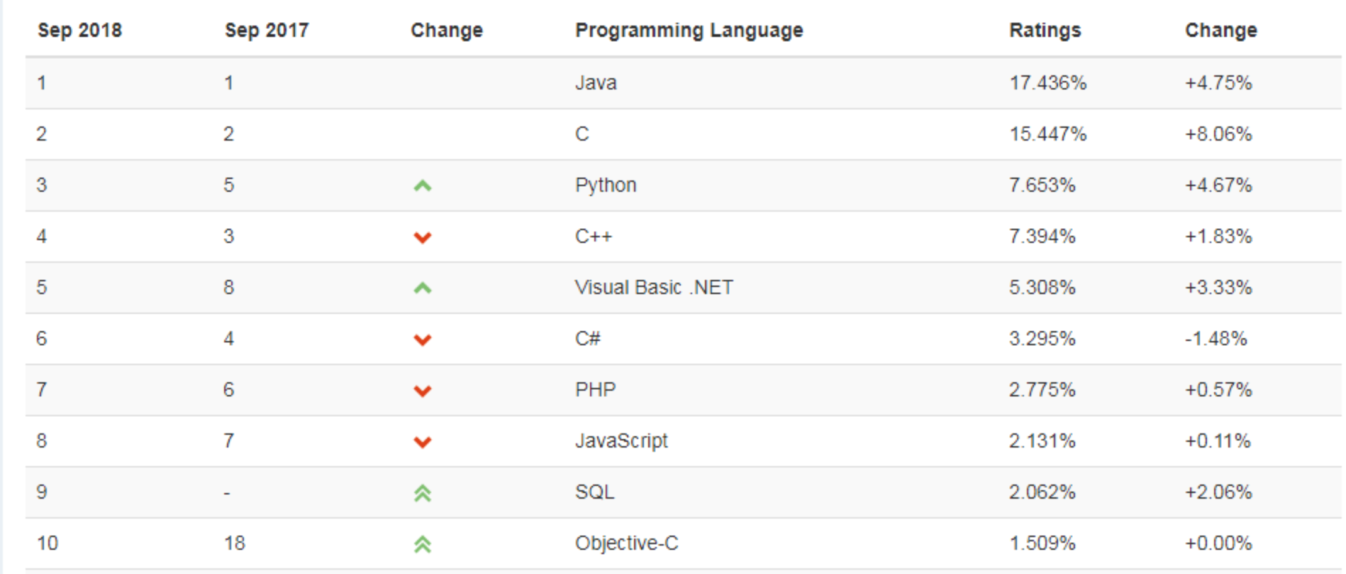
python
1) 一门面向对象的语言
2)拥有丰富的库
3)可移植性
4)免费、开源
5)简单易学
可做软件开发、人工智能、web开发等等
部署流程
Cnetos7.5+Nginx+python+Django+uwsgi+mysql
实验部署流程
1)安装Nginx
2)安装python
3)安装mysql
4)部署发布平台
5)测试
部署Nginx


# 安装
yum -y install gcc pcre-devel zlib zlib-devel wget vim lsof elinks psmisc
wget http://nginx.org/download/nginx-1.15.5.tar.gz -P /usr/src
cd /usr/src
tar xf nginx-1.15.5.tar.gz
cd nginx-1.15.5
mkdir /usr/local/nginx
./configure --prefix=/usr/local/nginx
make
make install
/usr/local/nginx/sbin/nginx
elinks http://192.168.214.20 --dump

# 启动
/usr/local/nginx/sbin/nginx

# 测试
netstat –ntpl
lsof -i :80
MySQL部署
Mysql介绍
一个关系型数据库,由瑞典的AB公司开发,后来卖给了oracle公司,目前分为商业版和社区版
目前有大版本 mysql5 和 mysql8
目前建议⼤家先使⽤用5.7最新版本即可。官方提供了RPM和源码两种格式
Mysql安装步骤
1)安装依赖包
2) 升级cmake⼯工具
3) 升级boost库文件
4) 安装mysql
5) 启动测试
cmake 安装
1)获得软件
https://cmake.org/download/
2)安装软件
tar xf cmake-3.6.0-rc1.tar
cd cmake-3.6.0-rc1
./configure
make
make install
boost
解压到指定目录即可
cmake 参数分解
-DCMAKE_INSTALL_PREFIX 指定安装路径
-DMYSQL_DATADIR 指定存放数据文件的目录位置
-DMYSQL_UNIX_ADDR 指定mysql.sock的路径
-DDOWNLOAD_BOOST=0 不下载boost库文件
-DWITH_INNODBBASE_STORAGE_ENGINE=1 指定默认存储引擎
-DENABLE_LOCAL_INFILE=1 允许客户端使用local data local 导入本地数据文件
-DEXTRA_CHARSETS=all 支持所有字符集
-DDEFAULT_CHARSET=utf8 默认字符集是UTF-8
-DDEFAULT_COLLATION=utf8_general_ci 数据库校对规则
-DMYSQL_USER=mysql 管理用户是mysql
-DWITH_DEBUG=0 关闭debug
-DWITH_EMBEDED_SERVER=0 生成一个libmysqld.a(.so)的库,这个库同时集成了mysql服务与客户端API
-DWITH_BOOST=/usr/local/boost 指定boost的路径
安装后操作
cp support-files/mysql.server /etc/init.d/mysql
chmod 755 /etc/init.d/mysql
chown mysql.mysql /usr/local/mysql/ -R
ln -sf /usr/local/mysql/bin/* /usr/bin/
ln -sf /usr/local/mysql/lib/* /usr/lib/
ln -sf /usr/local/mysql/libexec/* /usr/local/libexec
ln -sf /usr/local/mysql/share/man/man1/* /usr/share/man/man1
ln -sf /usr/local/mysql/share/man/man8/* /usr/share/man/man8
初始化数据库
/usr/local/mysql/bin/mysqld --initialize --user=mysql --basedir=/usr/local/mysql/ --datadir=/usr/local/mysql/data/
修改配置文件
vim /etc/my.cnf
确保所有参数的路径正确
[root@web01 ~]# egrep -v "^#|^$" /etc/my.cnf
[mysqld]
datadir=/usr/local/mysql/data
socket=/usr/local/mysql/mysql.sock
symbolic-links=0
[mysqld_safe]
log-error=/var/log/mysql.log
pid-file=/var/run/mysql.pid
!includedir /etc/my.cnf.d
Python部署
Python安装
wget https://www.python.org/ftp/python/3.7.1/Python-3.7.1.tar.xz /usr/src
cd /usr/src
tar xf Python-3.7.1.tar.xz
cd Python-3.7.1
yum -y install gcc-* openssl-* libffi-devel sqlite-devel
./configure --enable-optimizations --with-openssl=/usr/bin/openssl
make -j4
make install
# 默认安装路路径:/usr/local/lib/python3.7
安装测试
[root@web01 Python-3.7.1]# python3
Python 3.7.1 (default, Oct 27 2018, 22:51:15)
[GCC 4.8.5 20150623 (Red Hat 4.8.5-28)] on linux
Type "help", "copyright", "credits" or "license" for more information.
>>>
>>> exit();
当我们从Python官方网站下载并安装好Python 3.5后,我们就直接获得了一个官方版本的解释器:CPython。
升级pip
Pip: pip 是 Python 包管理工具,该工具提供了对Python 包的查找、下载、安装、卸载的功能。
[root@web01 ~]# pip3 install --upgrade pip
Collecting pip
Downloading https://files.pythonhosted.org/packages/c2/d7/90f34cb0d83a6c5631cf71dfe64cc1054598c843a92b400e55675cc2ac37/pip-18.1-py2.py3-none-any.whl
(1.3MB)
100% |████████████████████████████████| 1.3MB 106kB/s
Installing collected packages: pip
Found existing installation: pip 10.0.1
Uninstalling pip-10.0.1:
Successfully uninstalled pip-10.0.1
Successfully installed pip-18.1
错误处理
# 错误描述
pip is configured with locations that require TLS/SSL, however the ssl module in Python is not available.
Could not fetch URL https://pypi.org/simple/pip/: There was a problem confirming the ssl certificate: HTTPSConnectionPool(host='pypi.org', port=443): Max retries exceeded with url: /simple/pip/ (Caused by SSLError("Can't connect to HTTPS URL because the SSL module is not available.")) - skipping

# 解决
cd /root/install/Python-3.7.1
vim Modules/Setup

# 解开 211-214 行的几行代码
SSL=/usr/local/ssl
_ssl _ssl.c
    -DUSE_SSL -I$(SSL)/include -I$(SSL)/include/openssl
    -L$(SSL)/lib -lssl -lcrypto

# 重新执行 make&make install
安装python虚拟环境
virtualenv 是一个创建隔绝的Python环境的工具。virtualenv创建一个包含所有必要的可执行文件的文件夹,用来使用Python工程所需的包。
[root@web01 ~]# pip3 install virtualenv
Collecting virtualenv
Downloading https://files.pythonhosted.org/packages/b6/30/96a02b2287098b23b875bc8c2f58071c35d2efe84f747b64d523721dc2b5/virtualenv-16.0.0-py2.py3-none-
any.whl (1.9MB)
100% |████████████████████████████████| 1.9MB 55kB/s
Installing collected packages: virtualenv
Successfully installed virtualenv-16.0.0
安裝ipython
pip install ipython
使用虚拟环境
[root@web01 ~]# virtualenv web01
[root@web01 ~]# source web01/bin/activate
(web01) [root@web01 ~]# pip3 install django
(web01) [root@web01 ~]#django-admin.py startproject www
(web01) [root@web01 ~]#python3 manage.py runserver 192.168.10.42:8000
(web01) [root@web01 ~]# vim www/settings.py
修改配置文件:ALLOWED_HOSTS = ['*']
安装Django
[root@web01 ~]# pip3 install django
Collecting django
Downloading https://files.pythonhosted.org/packages/32/ab/22530cc1b2114e6067eece94a333d6c749fa1c56a009f0721e51c181ea53/Django-2.1.2-py3-none-any.whl
(7.3MB)
100% |████████████████████████████████| 7.3MB 96kB/s
Collecting pytz (from django)
Downloading https://files.pythonhosted.org/packages/52/8b/876c5745f617630be90cfb8fafe363c6d7204b176dc707d1805d1e9a0a35/pytz-2018.6-py2.py3-none-any.whl
(507kB)
100% |████████████████████████████████| 512kB 118kB/s
Installing collected packages: pytz, django
Successfully installed django-2.1.2 pytz-2018.6
发布一个WEB
部署web发布环境
安装uwsgi
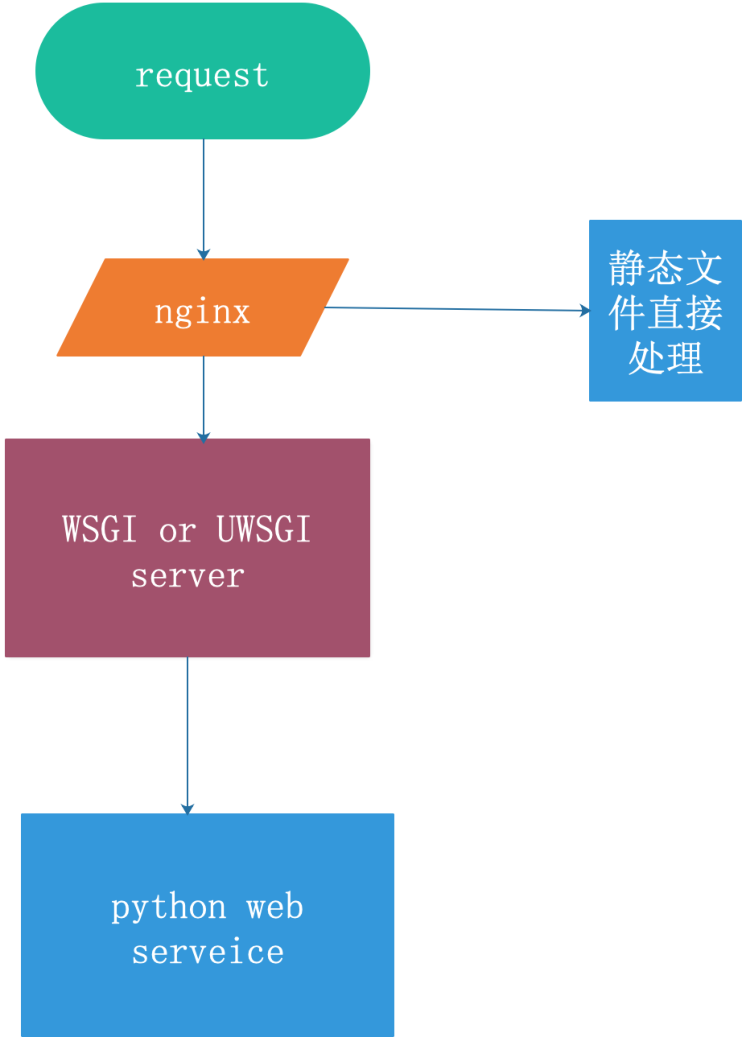
uwsgi是服务器和服务端应用程序的通信协议,规定了怎么把请求转发给应用程序和返回
uWSGI是一个Web服务器,它实现了WSGI协议、uwsgi、http等协议。Nginx中HttpUwsgiModule的作用是与uWSGI服务器进行行交换。
nginx 和 uWSGI交互就必须使用同一个协议,而上面说了uwsgi支持fastcgi,uwsgi,http协议,这些都是nginx支持的协议,只要大家沟通好使用哪个协议,就可以正常运行了。
[root@web01 ~]# pip3 install uwsgi
Collecting uwsgi
Downloading https://files.pythonhosted.org/packages/a2/c9/a2d5737f63cd9df4317a4acc15d1ddf4952e28398601d8d7d706c16381e0/uwsgi-2.0.17.1.tar.gz (800kB)
100% |████████████████████████████████| 808kB 64kB/s
Installing collected packages: uwsgi
Running setup.py install for uwsgi ... done
Successfully installed uwsgi-2.0.17.1
编辑uwsgi配置文件
[root@web01 ~]# vim /etc/uwsgi/uwsgi.ini
[uwsgi]
uid = root
gid = root
socket = 127.0.0.1:9090
master = true //启动主进程
vhost = true //多站模式
no-site = true //多站模式时不设置入口模块和文件
workers = 2 //子进程数
reload-mercy = 10 //平滑的重启
vacuum = true //退出、重启时清理文件
max-requests = 1000 //开启10000个进程后, 自动respawn下
limit-as = 512 // 将进程的总内存量控制在512M
buffer-size = 30000
pidfile = /var/run/uwsgi9090.pid //pid文件,用于下面的脚本启动、停止该进程
daemonize = /website/uwsgi9090.log
测试web
