抽丝剥茧,细说架构那些事——【优锐课】
接着上篇文章:使用Spring Cloud Gateway保护反应式微服务(一)
我们继续~
将Spring Cloud Gateway与反应式微服务一起使用
要在同一个IDE窗口中编辑所有三个项目,我发现创建聚合器pom.xml很有用。在项目的父目录中创建pom.xml文件,然后将下面的XML复制到其中。
创建此文件后,你应该能够在IDE中将其作为项目打开,并可以轻松地在项目之间导航。
在api-gateway项目中,将@EnableEurekaClient添加到主类以使其能够感知Eureka。
|
import org.springframework.cloud.netflix.eureka.EnableEurekaClient;
@EnableEurekaClient
@SpringBootApplication
public class ApiGatewayApplication {...}
|
然后,修改src/main/resources/application.properties文件以配置应用程序名称。
|
spring.application.name=gateway
|
在ApiGatewayApplication中创建一个RouteLocator,以配置路由。 你可以使用YAML配置Spring Cloud Gateway,但我更喜欢Java。
|
package com.example.apigateway;
import org.springframework.boot.SpringApplication;
import org.springframework.boot.autoconfigure.SpringBootApplication;
import org.springframework.cloud.gateway.route.RouteLocator;
import org.springframework.cloud.gateway.route.builder.RouteLocatorBuilder;
import org.springframework.cloud.netflix.eureka.EnableEurekaClient;
import org.springframework.context.annotation.Bean;
@EnableEurekaClient
@SpringBootApplication
public class ApiGatewayApplication {
public static void main(String[] args) {
SpringApplication.run(ApiGatewayApplication.class, args);
}
@Bean
public RouteLocator customRouteLocator(RouteLocatorBuilder builder) {
return builder.routes()
.route("car-service", r -> r.path("/cars")
.uri("lb://car-service"))
.build();
}
}
|
更改完这些代码后,你应该能够启动所有三个Spring Boot应用程序,并点击http://localhost:8080/cars.
|
$ http :8080/cars
HTTP/1.1 200 OK
Content-Type: application/json;charset=UTF-8
transfer-encoding: chunked
[
{
"id": "ff48f617-6cba-477c-8e8f-2fc95be96416",
"name": "ID. CROZZ",
"releaseDate": "2021-05-01"
},
{
"id": "dd6c3c32-724c-4511-a02c-3348b226160a",
"name": "ID. BUZZ",
"releaseDate": "2021-12-01"
},
{
"id": "97cfc577-d66e-4a3c-bc40-e78c3aab7261",
"name": "ID.",
"releaseDate": "2019-12-01"
},
{
"id": "477632c8-2206-4f72-b1a8-e982e6128ab4",
"name": "ID. VIZZION",
"releaseDate": "2021-12-01"
}
]
|
添加REST API来检索你喜欢的汽车
创建一个/fave-cars端点,以剔除你不喜欢的汽车。
首先,添加一个负载平衡的WebClient.Builder bean。
|
@Bean
@LoadBalanced
public WebClient.Builder loadBalancedWebClientBuilder() {
return WebClient.builder();
}
|
然后在同一文件中的ApiGatewayApplication类下添加Car POJO和FaveCarsController。
|
public class ApiGatewayApplication {...}
class Car {...}
class FaveCarsController {...}
|
使用WebClient检索汽车并过滤掉你不喜欢的汽车。
|
@Data
class Car {
private String name;
private LocalDate releaseDate;
}
@RestController
class FaveCarsController {
private final WebClient.Builder carClient;
public FaveCarsController(WebClient.Builder carClient) {
this.carClient = carClient;
}
@GetMapping("/fave-cars")
public Flux<Car> faveCars() {
return carClient.build().get().uri("lb://car-service/cars")
.retrieve().bodyToFlux(Car.class)
.filter(this::isFavorite);
}
private boolean isFavorite(Car car) {
return car.getName().equals("ID. BUZZ");
}
}
|
如果你没有使用为你自动导入的IDE,则需要将以下内容复制/粘贴到ApiGatewayApplication.java的顶部:
|
import org.springframework.web.bind.annotation.GetMapping;
import org.springframework.web.bind.annotation.RestController;
import org.springframework.web.reactive.function.client.WebClient;
import reactor.core.publisher.Flux;
|
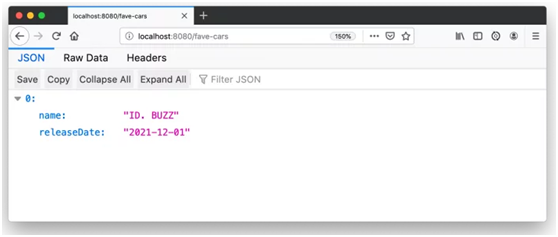
重新启动网关应用程序以查看http://localhost:8080/fave-cars终结点仅返回ID Buzz。
Hystrix的故障转移呢?
在撰写本文时,Spring Cloud Gateway仅支持Hystrix。 Spring Cloud不赞成直接支持Hystrix,而是使用Spring Cloud Breaker。 不幸的是,该库尚未发布GA版本,因此我决定不使用它。
要将Hystrix与Spring Cloud Gateway结合使用,可以向car-service路线添加过滤器,如下所示:
|
.route("car-service", r -> r.path("/cars")
.filters(f -> f.hystrix(c -> c.setName("carsFallback")
.setFallbackUri("forward:/cars-fallback")))
.uri("lb://car-service/cars"))
.build();
|
然后创建一个CarsFallback控制器来处理/cars-fallback路由。
|
@RestController
class CarsFallback {
@GetMapping("/cars-fallback")
public Flux<Car> noCars() {
return Flux.empty();
}
}
|
首先,重新启动网关,并确认http://localhost:8080/cars可以正常工作。然后关闭汽车服务,再试一次,你会看到它现在返回一个空数组。重新启动汽车服务,你会再次看到该列表。
你已经使用Spring Cloud Gateway和Spring WebFlux构建了一个具有弹性和反应性的微服务架构。现在,让我们看看如何保护它!
Feign与Spring Cloud Gateway怎么样?
如果你想在WebFlux应用程序中使用Feign,请参阅feign-reactive项目。在这个特定示例中,我不需要Feign。
具有OAuth 2.0的安全Spring Cloud GatewaySecure
OAuth 2.0是用于委托访问API的授权框架。OIDC(或OpenID Connect)是OAuth 2.0之上的薄层,可提供身份验证。Spring Security对这两个框架都有出色的支持,Okta也是如此。
你可以通过构建自己的服务器或使用开源实现,在不使用云身份提供商的情况下使用OAuth 2.0和OIDC。但是,你不是要使用像Okta这样一直在线的东西吗?
如果你已经拥有Okta帐户,请参见下面的在Okta中创建Web应用程序。否则,我们创建了一个Maven插件,该插件配置了一个免费的Okta开发人员帐户+一个OIDC应用程序(不到一分钟!)。
要使用它,请运行:./mvnw com.okta:okta-maven-plugin:setup创建一个帐户并配置你的Spring Boot应用程序以与Okta一起使用。
在Okta中创建Web应用程序
登录你的Okta Developer帐户(如果你没有帐户,请注册)。
- 在“Applications”页面上,选择“Add Application”。
- 在“Create New Application”页面上,选择“ Web”。
- 给你的应用程序起一个令人难忘的名称,将http://localhost:8080/login/oauth2/code/okta添加为登录重定向URI,选择“Refresh Token”(除了“Authorization Code”),然后单击“Done”。
将issuer(位于API > Authorization Servers下),客户端ID和客户端密钥复制到两个项目的application.properties中。
|
okta.oauth2.issuer=$issuer
okta.oauth2.client-id=$clientId
okta.oauth2.client-secret=$clientSecret
|
接下来,将Okta Spring Boot starter和Spring Cloud Security添加到网关的pom.xml中:
|
<dependency>
<groupId>com.okta.spring</groupId>
<artifactId>okta-spring-boot-starter</artifactId>
<version>1.2.1</version>
</dependency>
<dependency>
<groupId>org.springframework.cloud</groupId>
<artifactId>spring-cloud-security</artifactId>
</dependency>
|
这就是添加Okta OIDC登录所需要做的一切!重新启动你的Gateway应用,并在浏览器中导航到http://localhost:8080/fave-cars,以将其重定向到Okta以进行用户授权。
使你的网关成为OAuth 2.0资源服务器
你可能不会在网关本身上为应用程序构建UI。 你可能会改用SPA或移动应用。 要将网关配置为充当资源服务器(查找带有承载令牌的Authorization header),请在与主类相同的目录中添加新的SecurityConfiguration类。
|
package com.example.apigateway;
import org.springframework.context.annotation.Bean;
import org.springframework.security.config.annotation.method.configuration.EnableReactiveMethodSecurity;
import org.springframework.security.config.annotation.web.reactive.EnableWebFluxSecurity;
import org.springframework.security.config.web.server.ServerHttpSecurity;
import org.springframework.security.web.server.SecurityWebFilterChain;
@EnableWebFluxSecurity
@EnableReactiveMethodSecurity
public class SecurityConfiguration {
@Bean
public SecurityWebFilterChain securityWebFilterChain(ServerHttpSecurity http) {
// @formatter:off
http
.authorizeExchange()
.anyExchange().authenticated()
.and()
.oauth2Login()
.and()
.oauth2ResourceServer()
.jwt();
return http.build();
// @formatter:on
}
}
|
带有Spring Cloud Gateway的CORS
如果你在用户界面上使用SPA,则还需要配置CORS。你可以通过向该类添加CorsWebFilter bean来实现。
|
@Bean
CorsWebFilter corsWebFilter() {
CorsConfiguration corsConfig = new CorsConfiguration();
corsConfig.setAllowedOrigins(List.of("*"));
corsConfig.setMaxAge(3600L);
corsConfig.addAllowedMethod("*");
corsConfig.addAllowedHeader("*");
UrlBasedCorsConfigurationSource source = new UrlBasedCorsConfigurationSource();
source.registerCorsConfiguration("/**", corsConfig);
return new CorsWebFilter(source);
}
|
确保你的进口商品与以下商品相符。
|
import org.springframework.web.cors.CorsConfiguration;
import org.springframework.web.cors.reactive.CorsWebFilter;
import org.springframework.web.cors.reactive.UrlBasedCorsConfigurationSource;
|
Spring Cloud Gateway的文档介绍了如何使用YAML或WebFluxConfigurer配置CORS。不幸的是,我无法任其工作。
使用WebTestClient和JWT测试网关
如果你在网关中配置了CORS,则可以测试它是否可以与WebTestClient一起使用。用以下代码替换ApiGatewayApplicationTests中的代码。
|
import java.util.Map;
import java.util.function.Consumer;
import static org.mockito.ArgumentMatchers.anyString;
import static org.mockito.Mockito.when;
@RunWith(SpringRunner.class)
@SpringBootTest(webEnvironment = SpringBootTest.WebEnvironment.RANDOM_PORT,
properties = {"spring.cloud.discovery.enabled = false"})
public class ApiGatewayApplicationTests {
@Autowired
WebTestClient webTestClient;
@MockBean (1)
ReactiveJwtDecoder jwtDecoder;
@Test
public void testCorsConfiguration() {
Jwt jwt = jwt(); (2)
when(this.jwtDecoder.decode(anyString())).thenReturn(Mono.just(jwt)); (3)
WebTestClient.ResponseSpec response = webTestClient.put().uri("/")
.headers(addJwt(jwt)) (4)
.header("Origin", "http://example.com")
.exchange();
response.expectHeader().valueEquals("Access-Control-Allow-Origin", "*");
}
private Jwt jwt() {
return new Jwt("token", null, null,
Map.of("alg", "none"), Map.of("sub", "betsy"));
}
private Consumer<HttpHeaders> addJwt(Jwt jwt) {
return headers -> headers.setBearerAuth(jwt.getTokenValue());
}
}
|
- 模拟
ReactiveJwtDecoder,以便你设置期望值并在解码时返回模拟
- 创建一个新的JWT
- 解码后返回相同的JWT
- 将JWT添加到带有
Bearer前缀的 Authorization header
我喜欢WebTestClient如何让你如此轻松地设置security headers!你已将Spring Cloud Gateway配置为使用OIDC登录并充当OAuth 2.0资源服务器,但是car服务仍在端口8081上可用。请修复此问题,以便只有网关可以与它对话。
微服务通信的安全网关
将Okta Spring Boot启动器添加到car-service/pom.xml:
|
<dependency>
<groupId>com.okta.spring</groupId>
<artifactId>okta-spring-boot-starter</artifactId>
<version>1.2.1</version>
</dependency>
|
将okta.*属性从网关的application.properties复制到汽车服务的属性。然后创建一个SecurityConfiguration类,使该应用程序成为OAuth 2.0资源服务器。
|
package com.example.carservice;
import com.okta.spring.boot.oauth.Okta;
import org.springframework.context.annotation.Bean;
import org.springframework.security.config.annotation.method.configuration.EnableReactiveMethodSecurity;
import org.springframework.security.config.annotation.web.reactive.EnableWebFluxSecurity;
import org.springframework.security.config.web.server.ServerHttpSecurity;
import org.springframework.security.web.server.SecurityWebFilterChain;
@EnableWebFluxSecurity
@EnableReactiveMethodSecurity
public class SecurityConfiguration {
@Bean
public SecurityWebFilterChain securityWebFilterChain(ServerHttpSecurity http) {
// @formatter:off
http
.authorizeExchange()
.anyExchange().authenticated()
.and()
.oauth2ResourceServer()
.jwt();
Okta.configureResourceServer401ResponseBody(http);
return http.build();
// @formatter:on
}
}
|
重新启动你的汽车服务应用程序,现在它已受到匿名入侵者的保护。
|
$ http :8081/cars
HTTP/1.1 401 Unauthorized
Cache-Control: no-cache, no-store, max-age=0, must-revalidate
Content-Type: text/plain
...
401 Unauthorized
|
使用WebTestClient和JWT测试你的微服务
启用安全性后,你在car-service项目中添加的测试将不再起作用。 修改CarServiceApplicationTests.java中的代码,以将JWT访问令牌添加到每个请求。
|
package com.example.carservice;
import org.junit.Test;
import org.junit.runner.RunWith;
import org.springframework.beans.factory.annotation.Autowired;
import org.springframework.boot.test.context.SpringBootTest;
import org.springframework.boot.test.mock.mockito.MockBean;
import org.springframework.http.HttpHeaders;
import org.springframework.http.MediaType;
import org.springframework.security.oauth2.jwt.Jwt;
import org.springframework.security.oauth2.jwt.ReactiveJwtDecoder;
import org.springframework.test.context.junit4.SpringRunner;
import org.springframework.test.web.reactive.server.WebTestClient;
import reactor.core.publisher.Mono;
import java.time.LocalDate;
import java.time.Month;
import java.util.Map;
import java.util.UUID;
import java.util.function.Consumer;
import static org.mockito.ArgumentMatchers.anyString;
import static org.mockito.Mockito.when;
@RunWith(SpringRunner.class)
@SpringBootTest(webEnvironment = SpringBootTest.WebEnvironment.RANDOM_PORT,
properties = {"spring.cloud.discovery.enabled = false"})
public class CarServiceApplicationTests {
@Autowired
CarRepository carRepository;
@Autowired
WebTestClient webTestClient;
@MockBean
ReactiveJwtDecoder jwtDecoder;
@Test
public void testAddCar() {
Car buggy = new Car(UUID.randomUUID(), "ID. BUGGY", LocalDate.of(2022, Month.DECEMBER, 1));
Jwt jwt = jwt();
when(this.jwtDecoder.decode(anyString())).thenReturn(Mono.just(jwt));
webTestClient.post().uri("/cars")
.contentType(MediaType.APPLICATION_JSON_UTF8)
.accept(MediaType.APPLICATION_JSON_UTF8)
.headers(addJwt(jwt))
.body(Mono.just(buggy), Car.class)
.exchange()
.expectStatus().isCreated()
.expectHeader().contentType(MediaType.APPLICATION_JSON_UTF8)
.expectBody()
.jsonPath("$.id").isNotEmpty()
.jsonPath("$.name").isEqualTo("ID. BUGGY");
}
@Test
public void testGetAllCars() {
Jwt jwt = jwt();
when(this.jwtDecoder.decode(anyString())).thenReturn(Mono.just(jwt));
webTestClient.get().uri("/cars")
.accept(MediaType.APPLICATION_JSON_UTF8)
.headers(addJwt(jwt))
.exchange()
.expectStatus().isOk()
.expectHeader().contentType(MediaType.APPLICATION_JSON_UTF8)
.expectBodyList(Car.class);
}
@Test
public void testDeleteCar() {
Car buzzCargo = carRepository.save(new Car(UUID.randomUUID(), "ID. BUZZ CARGO",
LocalDate.of(2022, Month.DECEMBER, 2))).block();
Jwt jwt = jwt();
when(this.jwtDecoder.decode(anyString())).thenReturn(Mono.just(jwt));
webTestClient.delete()
.uri("/cars/{id}", Map.of("id", buzzCargo.getId()))
.headers(addJwt(jwt))
.exchange()
.expectStatus().isOk();
}
private Jwt jwt() {
return new Jwt("token", null, null,
Map.of("alg", "none"), Map.of("sub", "dave"));
}
private Consumer<HttpHeaders> addJwt(Jwt jwt) {
return headers -> headers.setBearerAuth(jwt.getTokenValue());
}
}
|
再次运行测试,一切都会通过!
中继访问令牌:网关到微服务
你只需为网关与该受保护的服务进行一个小小的更改即可。这非常简单!
在ApiGatewayApplication.java中,添加一个应用Spring Cloud Security的TokenRelayGatewayFilterFactory的过滤器。
|
import org.springframework.cloud.security.oauth2.gateway.TokenRelayGatewayFilterFactory;
@Bean
public RouteLocator customRouteLocator(RouteLocatorBuilder builder,
TokenRelayGatewayFilterFactory filterFactory) {
return builder.routes()
.route("car-service", r -> r.path("/cars")
.filters(f -> f.filter(filterFactory.apply()))
.uri("lb://car-service/cars"))
.build();
}
|
重新启动你的API网关,你应该能够查看http://localhost:8080/cars并使一切正常运行。
很好,你不觉得吗?
感谢阅读!
另外近期整理了一套完整的java架构思维导图,分享给同样正在认真学习的每位朋友~