最近又学到了很多新知识,感谢优锐课老师细致地讲解,这篇博客记录下自己所学所想。
想更多地了解Spring Boot项目中的功能测试吗?这篇文章带你了解有关在测试中使用Docker容器的更多信息。
本文重点介绍在Spring Boot应用程序的功能测试期间应用一些最佳实践。我们将演示一种高级方法,该方法如何在不设置登台环境的情况下将服务作为黑盒进行测试。
理论
让我们从定义功能测试的含义开始:
功能测试是在软件开发中使用的软件测试过程,其中对软件进行测试以确保其符合所有要求。功能测试是一种检查软件的方法,以确保软件具有其功能要求中指定的所有必需功能。
尽管这有点令人困惑,但请不要担心——以下定义提供了进一步的解释:
功能测试主要用于验证某个软件所提供的输出与最终用户或企业所需的输出相同。通常,功能测试涉及评估每个软件功能并将其与业务需求进行比较。通过为软件提供一些相关的输入来对其进行测试,以便可以评估输出以查看其与基本要求相比是否相符,相关或变化。此外,功能测试还检查软件的可用性,例如通过确保导航功能按要求工作。
在我们的案例中,我们将微服务作为软件,应根据最终用户的要求提供一些输出。
目的
功能测试应涵盖我们应用程序的以下方面:
- 上下文启动-确保服务在上下文中没有冲突,并且可以顺利引导。
- 业务需求/用户案例-这包括请求的功能。
基本上,每个(或大多数)用户故事都应该有自己专用的功能测试。如果至少有一个功能测试,我们不需要编写上下文启动测试,因为它仍然会测试它。
实践
为了演示如何应用最佳实践,我们需要编写一些示例服务。让我们从头开始。
任务
我们的新服务要求满足以下要求:
- 用于存储和检索用户详细信息的REST API。
- REST API,用于通过REST从联系人服务获取丰富的联系方式的用户详细信息。
架构设计
对于此任务,我们将使用Spring平台作为框架,并使用Spring Boot作为应用程序引导程序。为了存储用户详细信息,我们将使用MariaDB。
由于该服务应存储和检索用户详细信息,因此将其命名为“用户详细信息”服务是合乎逻辑的。
在实施之前,应制作组件图以更好地了解系统的主要组件:

实操
以下示例代码包含许多Lombok批注。你可以在网站上的docs文件中找到有关每个注释的说明。
Models
用户详细信息模型:
 1 @Value(staticConstructor = "of")
 2 public class UserDetails {
 3     String firstName;
 4     String lastName;
 5     public static UserDetails fromEntity(UserDetailsEntity entity) {
 6         return UserDetails.of(entity.getFirstName(), entity.getLastName());
 7     }
 8     public UserDetailsEntity toEntity(long userId) {
 9         return new UserDetailsEntity(userId, firstName, lastName);
10     }
11 }
用户联系人模型:
1 @Value
2 public class UserContacts {
3     String email;
4     String phone;
5 }
6
具有汇总信息的用户:
1 @Value(staticConstructor = "of")
2 public class User {
3     UserDetails userDetails;
4     UserContacts userContacts;
5 }
REST API
 1 @RestController
 2 @RequestMapping("user")
 3 @AllArgsConstructor
 4 public class UserController {
 5     private final UserService userService;
 6     @GetMapping("/{userId}") //1
 7     public User getUser(@PathVariable("userId") long userId) {
 8         return userService.getUser(userId);
 9     }
10     @PostMapping("/{userId}/details") //2
11     public void saveUserDetails(@PathVariable("userId") long userId, @RequestBody UserDetails userDetails) {
12         userService.saveDetails(userId, userDetails);
13     }
14     @GetMapping("/{userId}/details") //3
15     public UserDetails getUserDetails(@PathVariable("userId") long userId) {
16         return userService.getDetails(userId);
17     }
18 }
- 按ID获取用户汇总数据
- 按ID为用户发布用户详细信息
- 通过ID获取用户详细信息
联系人服务客户端
 1 @Component
 2 public class ContactsServiceClient {
 3     private final RestTemplate restTemplate;
 4     private final String contactsServiceUrl;
 5     public ContactsServiceClient(final RestTemplateBuilder restTemplateBuilder,
 6                                  @Value("${contacts.service.url}") final String contactsServiceUrl) {
 7         this.restTemplate = restTemplateBuilder.build();
 8         this.contactsServiceUrl = contactsServiceUrl;
 9     }
10     public UserContacts getUserContacts(long userId) {
11         URI uri = UriComponentsBuilder.fromHttpUrl(contactsServiceUrl + "/contacts")
12                 .queryParam("userId", userId).build().toUri();
13         return restTemplate.getForObject(uri, UserContacts.class);
14     }
15 }
详细信息实体及其存储库
 1 @Entity
 2 @Data
 3 @NoArgsConstructor
 4 @AllArgsConstructor
 5 public class UserDetailsEntity {
 6     @Id
 7     private Long id;
 8     @Column
 9     private String firstName;
10     @Column
11     private String lastName;
12 }
13 @Repository
14 public interface UserDetailsRepository extends JpaRepository<UserDetailsEntity, Long> {
15 }
用户服务
 1 @Service
 2 @AllArgsConstructor
 3 public class UserService {
 4     private final UserDetailsRepository userDetailsRepository;
 5     private final ContactsServiceClient contactsServiceClient;
 6     public User getUser(long userId) {
 7         UserDetailsEntity userDetailsEntity = userDetailsRepository.getOne(userId); //1
 8         UserDetails userDetails = UserDetails.fromEntity(userDetailsEntity);
 9         UserContacts userContacts = contactsServiceClient.getUserContacts(userId); //2
10         return User.of(userDetails, userContacts); //3
11     }
12     public void saveDetails(long userId, UserDetails userDetails) {
13         UserDetailsEntity entity = userDetails.toEntity(userId);
14         userDetailsRepository.save(entity);
15     }
16     public UserDetails getDetails(long userId) {
17         UserDetailsEntity userDetailsEntity = userDetailsRepository.getOne(userId);
18         return UserDetails.fromEntity(userDetailsEntity);
19     }
20 }
- 从数据库检索用户详细信息
- 从通讯录服务中检索用户通讯录
- 向用户返回汇总数据
应用及其属性
UserDetailsServiceApplication.java
1 @SpringBootApplication
2 public class UserDetailsServiceApplication {
3     public static void main(String[] args) {
4         SpringApplication.run(UserDetailsServiceApplication.class, args);
5     }
6 }
application.properties:
 1 #contact service
 2 contacts.service.url=http://www.prod.contact.service.com
 3 #database
 4 user.details.db.host=prod.maria.url.com
 5 user.details.db.port=3306
 6 user.details.db.schema=user_details
 7 spring.datasource.url=jdbc:mariadb://${user.details.db.host}:${user.details.db.port}/${user.details.db.schema}
 8 spring.datasource.username=prod-username
 9 spring.datasource.password=prod-password
10 spring.datasource.driver-class-name=org.mariadb.jdbc.Driver
POM文件
 1 <?xml version="1.0" encoding="UTF-8"?>
 2 <project xmlns="http://maven.apache.org/POM/4.0.0" xmlns:xsi="http://www.w3.org/2001/XMLSchema-instance"
 3          xsi:schemaLocation="http://maven.apache.org/POM/4.0.0 http://maven.apache.org/xsd/maven-4.0.0.xsd">
 4     <modelVersion>4.0.0</modelVersion>
 5     <artifactId>user-details-service</artifactId>
 6     <version>0.0.1-SNAPSHOT</version>
 7     <packaging>jar</packaging>
 8     <name>User details service</name>
 9     <parent>
10         <groupId>com.tdanylchuk</groupId>
11         <artifactId>functional-tests-best-practices</artifactId>
12         <version>0.0.1-SNAPSHOT</version>
13     </parent>
14     <dependencies>
15         <dependency>
16             <groupId>org.springframework.boot</groupId>
17             <artifactId>spring-boot-starter-data-jpa</artifactId>
18         </dependency>
19         <dependency>
20             <groupId>org.springframework.boot</groupId>
21             <artifactId>spring-boot-starter-web</artifactId>
22         </dependency>
23         <dependency>
24             <groupId>org.projectlombok</groupId>
25             <artifactId>lombok</artifactId>
26             <scope>provided</scope>
27         </dependency>
28         <dependency>
29             <groupId>org.mariadb.jdbc</groupId>
30             <artifactId>mariadb-java-client</artifactId>
31             <version>2.3.0</version>
32         </dependency>
33     </dependencies>
34     <build>
35         <plugins>
36             <plugin>
37                 <groupId>org.springframework.boot</groupId>
38                 <artifactId>spring-boot-maven-plugin</artifactId>
39             </plugin>
40         </plugins>
41     </build>
42 </project>
注意:父级是自定义的功能测试最佳实践项目,该项目继承了spring-boot-starter-parent。稍后将介绍其目的。
Structure

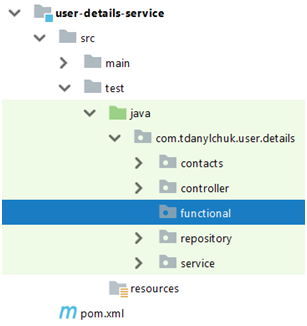
这几乎是我们满足初始需求所需的一切:保存和检索用户详细信息以及检索包含联系人的用户详细信息。
功能测试
是时候添加功能测试了!对于TDD,在实现之前需要阅读本节。
地点
开始之前,我们需要选择功能测试的位置;还有两个更合适的地方:
- 与单元测试一起在单独的文件夹中:
这是开始添加功能测试的最简单,最快的方法,尽管它有一个很大的缺点:如果要单独运行单元测试,则需要排除功能测试文件夹。为什么每次应用较小的代码修改后都不运行所有测试?因为在大多数情况下,功能测试与单元测试相比具有巨大的执行时间,因此应单独进行修改以节省开发时间。
- 在一个单独的项目以及一个公共父项下的服务项目中:
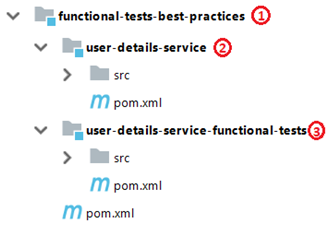
- Parent POM (aggregative project)
- Service project
- Functional tests project
这种方法比以前的方法有一个优势——我们有一个与服务单元测试隔离的功能测试模块,因此我们可以通过分别运行单元测试或功能测试轻松地验证逻辑。另一方面,这种方法需要一个多模块的项目结构,与单模块的项目相比,难度更大。
你可能已经从服务pom.xml中猜到了,对于我们的情况,我们将选择第二种方法。
父POM文件
 1 <?xml version="1.0" encoding="UTF-8"?>
 2 <project xmlns="http://maven.apache.org/POM/4.0.0" xmlns:xsi="http://www.w3.org/2001/XMLSchema-instance"
 3          xsi:schemaLocation="http://maven.apache.org/POM/4.0.0 http://maven.apache.org/xsd/maven-4.0.0.xsd">
 4     <modelVersion>4.0.0</modelVersion>
 5     <groupId>com.tdanylchuk</groupId>
 6     <artifactId>functional-tests-best-practices</artifactId>
 7     <version>0.0.1-SNAPSHOT</version>
 8     <packaging>pom</packaging>
 9     <name>Functional tests best practices parent project</name>
10     <parent>                                                   <!--1-->
11         <groupId>org.springframework.boot</groupId>
12         <artifactId>spring-boot-starter-parent</artifactId>
13         <version>2.0.4.RELEASE</version>
14         <relativePath/>
15     </parent>
16     <modules>                                                  <!--2-->
17         <module>user-details-service</module>
18         <module>user-details-service-functional-tests</module>
19     </modules>
20     <properties>
21         <project.build.sourceEncoding>UTF-8</project.build.sourceEncoding>
22         <project.reporting.outputEncoding>UTF-8</project.reporting.outputEncoding>
23         <java.version>1.8</java.version>
24     </properties>
25 </project>
- spring-boot-starter-parent是我们的父POM的父项目。这样,我们就为Spring提供了依赖管理。
- 模块声明。注意:顺序很重要,功能测试应始终排在最后。
案例
为了挑选功能测试涵盖的案例,我们需要考虑两个主要方面:
- 功能需求——基本上,每个请求的需求都应具有自己的功能测试。
- 较长的执行时间——专注于应用程序的关键部分,与单元测试相反,在单元测试中,应涵盖每个较小的案例。否则,构建时间将是巨大的。
Architecture
是的,测试还需要架构,尤其是功能测试,在这些测试中执行时间很重要,逻辑可能会随着时间变得过于复杂。而且,它们应该是可维护的。这意味着,如果发生功能转移,功能测试对于开发人员而言将不会是头痛的事情。
Steps
步骤(也称为固定装置)是一种封装每个通信通道逻辑的方法。 每个通道应具有自己的步骤对象,该对象与其他步骤隔离。
就我们而言,我们有两个沟通渠道:
- 用户详细信息服务REST API(在渠道中)
- 联系人服务REST API(渠道外)
对于通道中的REST,我们将使用名为REST Assured的库。与我们使用MockMvc进行REST API验证的集成测试相比,这里我们使用更多的黑盒风格测试,以免将Spring上下文与测试模拟对象弄混。
至于REST out通道,将使用WireMock。我们不会指出Spring用模拟的模板替代REST模板。取而代之的是,WireMock在后台使用的码头服务器将与我们的服务一起被引导,以模拟真正的外部REST服务。
用户详细信息步骤
 1 @Component
 2 public class UserDetailsServiceSteps implements ApplicationListener<WebServerInitializedEvent> {
 3     private int servicePort;
 4     public String getUser(long userId) {
 5         return given().port(servicePort)
 6                 .when().get("user/" + userId)
 7                 .then().statusCode(200).contentType(ContentType.JSON).extract().asString();
 8     }
 9     public void saveUserDetails(long userId, String body) {
10         given().port(servicePort).body(body).contentType(ContentType.JSON)
11                 .when().post("user/" + userId + "/details")
12                 .then().statusCode(200);
13     }
14     public String getUserDetails(long userId) {
15         return given().port(servicePort)
16                 .when().get("user/" + userId + "/details")
17                 .then().statusCode(200).contentType(ContentType.JSON).extract().asString();
18     }
19     @Override
20     public void onApplicationEvent(@NotNull WebServerInitializedEvent webServerInitializedEvent) {
21         this.servicePort = webServerInitializedEvent.getWebServer().getPort();
22     }
23 }
从步骤对象中可以看到,每个API端点都有自己的方法。
默认情况下,REST安全的将调用localhost,但是需要指定端口,因为我们的服务将使用随机端口引导。为了区分它,应该侦听WebServerInitializedEvent。
注意:这里不能使用@LocalServerPor注释,因为在Spring Boot嵌入式容器启动之前已创建步骤bean。
联络人服务步骤
1 @Component
2 public class ContactsServiceSteps {
3     public void expectGetUserContacts(long userId, String body) {
4         stubFor(get(urlPathMatching("/contacts")).withQueryParam("userId", equalTo(String.valueOf(userId)))
5                 .willReturn(okJson(body)));
6     }
7 }
在这里,我们需要以与从应用程序调用远程服务时完全相同的方式对服务器进行模拟:端点,参数等。
数据库
我们的服务是将数据存储在Maria DB中,但是就功能测试而言,存储数据的位置无关紧要,因此,如黑盒测试所要求的,在测试中不应提及任何内容。
在将来,如果我们考虑将Maria DB更改为某些NoSQL解决方案,则测试应保持不变。
但是,解决方案是什么?
当然,我们可以像在集成测试中对H2数据库那样使用嵌入式解决方案,但是在生产中,我们的服务将使用Maria DB,这可能会导致出现问题。
例如,我们有一个名为MAXVALUE的列,并针对H2运行测试,一切正常。但是,在生产中,该服务失败,因为这是MariaDB中的保留字,这意味着我们的测试不如预期的好,并且可能会浪费大量时间来解决问题,而该服务将保持不发布状态。
避免这种情况的唯一方法是在测试中使用真正的Maria DB。同时,我们需要确保我们的测试可以在本地执行,而无需在其中设置Maria DB的任何其他登台环境中。
为了解决这个问题,我们将选择testcontainers项目,该项目提供了常见数据库,Selenium Web浏览器或可在Docker容器中运行的任何其他东西的轻量级,一次性的实例。
但是testcontainers库不支持开箱即用的Spring Boot。因此,我们将使用另一个名为testcontainers-spring-boot的库,而不是为MariaDB编写自定义的通用容器并将其手动注入Spring Boot。它支持可能在你的服务中使用的最常见技术,例如:MariaDB,Couchbase,Kafka,Aerospike,MemSQL,Redis,neo4j,Zookeeper,PostgreSQL,ElasticSearch。
要将真正的Maria DB注入我们的测试中,我们只需要向我们的user-details-service-functional-tests项目pom.xml文件中添加适当的依赖项,如下所示:
1 <dependency>
2     <groupId>com.playtika.testcontainers</groupId>
3     <artifactId>embedded-mariadb</artifactId>
4     <version>1.9</version>
5     <scope>test</scope>
6 </dependency>
如果你的服务不使用Spring Cloud,则应在上述依赖项的基础上添加下一个依赖项:
1 <dependency>
2     <groupId>org.springframework.cloud</groupId>
3     <artifactId>spring-cloud-context</artifactId>
4     <version>2.0.1.RELEASE</version>
5     <scope>test</scope>
6 </dependency>
在Spring Boot上下文启动之前,它需要对dockerized资源进行引导。
这种方法显然有很多优点。由于我们拥有“真实”资源,因此如果无法测试所需资源的真实连接,则无需在代码中编写变通办法。 不幸的是,该解决方案带来了一个巨大的缺点——测试只能在安装了Docker的环境中运行。 这意味着你的工作站和CI工具应在板载Docker上。另外,你应该准备好测试将需要更多的时间来执行。
Parent Tests Class
由于执行时间很重要,因此我们需要避免为每个测试加载多个上下文,因此Docker容器将仅对所有测试启动一次。Spring默认情况下启用了上下文缓存功能,但是我们需要谨慎,因为通过仅添加简单的注释@MockBean,我们迫使Spring使用模拟的bean创建新的上下文,而不是重用现有的上下文。这个问题的解决方案是创建一个单一的父抽象类,该类将包含所有必需的Spring批注,以确保将单个上下文重用于所有测试套件:
 1 @RunWith(SpringRunner.class)
 2 @SpringBootTest(
 3         classes = UserDetailsServiceApplication.class,               //1
 4         webEnvironment = SpringBootTest.WebEnvironment.RANDOM_PORT)  //2
 5 @ActiveProfiles("test")                                              //3
 6 public abstract class BaseFunctionalTest {
 7     @Rule
 8     public WireMockRule contactsServiceMock = new WireMockRule(options().port(8777)); //4
 9     @Autowired                                                       //5
10     protected UserDetailsServiceSteps userDetailsServiceSteps;
11     @Autowired
12     protected ContactsServiceSteps contactsServiceSteps;
13     @TestConfiguration                                               //6
14     @ComponentScan("com.tdanylchuk.user.details.steps")
15     public static class StepsConfiguration {
16     }
17 }
- 指向Spring Boot测试注释以加载我们服务的主要配置类。
- 在生产环境中使用Bootstraps Web环境(默认情况下使用模拟的环境)
- 需要测试配置文件来加载application-test.properties,其中将覆盖生产属性,例如URL,用户,密码等。
WireMockRule启动码头服务器以在提供的端口上存根。- 步骤的受保护的自动接线,因此在每次测试中都可以访问它们。
-
@TestConfiguration通过扫描程序包将步骤加载到上下文中。
在这里,我们试图不修改上下文,将在生产环境中通过向其中添加一些util项来进一步使用该上下文,例如步骤和属性覆盖。
使用@MockBean注释是不好的做法,该注释将应用程序的一部分替换为模拟,并且该部分将保持未经测试的状态。
不可避免的情况-即在逻辑中检索当前时间,例如System.currentTimeMillis(),应重构此类代码,因此将改用Clock对象:clock.millis()。并且,在功能测试中,应该模拟Clock对象,以便可以验证结果。
测试性质
application-test.properties:
 1 #contact service                                          #1
 2 contacts.service.url=http://localhost:8777
 3 #database                                                 #2
 4 user.details.db.host=${embedded.mariadb.host}
 5 user.details.db.port=${embedded.mariadb.port}
 6 user.details.db.schema=${embedded.mariadb.schema}
 7 spring.datasource.username=${embedded.mariadb.user}
 8 spring.datasource.password=${embedded.mariadb.password}
 9                                                           #3
10 spring.jpa.hibernate.ddl-auto=create-drop
- 使用WireMock码头服务器端点而不是生产联系服务URL。
- 数据库属性的覆盖。注意:这些属性由spring-boo-test-containers库提供。
- 在测试中,数据库架构将由Hibernate创建。
自我测试
为了进行此测试,已经做了很多准备工作,所以让我们看一下它的外观:
 1 public class RestUserDetailsTest extends BaseFunctionalTest {
 2     private static final long USER_ID = 32343L;
 3     private final String userContactsResponse = readFile("json/user-contacts.json");
 4     private final String userDetails = readFile("json/user-details.json");
 5     private final String expectedUserResponse = readFile("json/user.json");
 6     @Test
 7     public void shouldSaveUserDetailsAndRetrieveUser() throws Exception {
 8         //when
 9         userDetailsServiceSteps.saveUserDetails(USER_ID, userDetails);
10         //and
11         contactsServiceSteps.expectGetUserContacts(USER_ID, userContactsResponse);
12         //then
13         String actualUserResponse = userDetailsServiceSteps.getUser(USER_ID);
14         //expect
15         JSONAssert.assertEquals(expectedUserResponse, actualUserResponse, false);
16     }
17 }
对于stubbing和asserting,使用先前通过JSON文件创建的。这样,请求和响应格式都得到了验证。最好不要在此处使用测试数据,而应使用生产请求/响应的副本。
由于整个逻辑都封装在步骤,配置和JSON文件中,因此如果更改与功能无关,则此测试将保持不变。例如:
- 响应更改的格式-仅应修改测试JSON文件。
- 联系人服务端点更改-应该修改
ContactsServiceSteps对象。 - Maria DB被No SQL DB取代-pom.xml和测试属性文件应被修改。
功能测试项目
 1 <?xml version="1.0" encoding="UTF-8"?>
 2 <project xmlns="http://maven.apache.org/POM/4.0.0" xmlns:xsi="http://www.w3.org/2001/XMLSchema-instance"
 3          xsi:schemaLocation="http://maven.apache.org/POM/4.0.0 http://maven.apache.org/xsd/maven-4.0.0.xsd">
 4     <modelVersion>4.0.0</modelVersion>
 5     <artifactId>user-details-service-functional-tests</artifactId>
 6     <version>0.0.1-SNAPSHOT</version>
 7     <name>User details service functional tests</name>
 8     <parent>
 9         <groupId>com.tdanylchuk</groupId>
10         <artifactId>functional-tests-best-practices</artifactId>
11         <version>0.0.1-SNAPSHOT</version>
12     </parent>
13     <dependencies>
14         <dependency>                                      <!--1-->
15             <groupId>com.tdanylchuk</groupId>
16             <artifactId>user-details-service</artifactId>
17             <version>${project.version}</version>
18             <scope>test</scope>
19         </dependency>
20         <dependency>
21             <groupId>org.springframework.boot</groupId>
22             <artifactId>spring-boot-starter-test</artifactId>
23             <scope>test</scope>
24         </dependency>
25         <dependency>
26             <groupId>org.springframework.cloud</groupId>
27             <artifactId>spring-cloud-context</artifactId>
28             <version>2.0.1.RELEASE</version>
29             <scope>test</scope>
30         </dependency>
31         <dependency>
32             <groupId>com.playtika.testcontainers</groupId>
33             <artifactId>embedded-mariadb</artifactId>
34             <version>1.9</version>
35             <scope>test</scope>
36         </dependency>
37         <dependency>
38             <groupId>com.github.tomakehurst</groupId>
39             <artifactId>wiremock</artifactId>
40             <version>2.18.0</version>
41             <scope>test</scope>
42         </dependency>
43         <dependency>
44             <groupId>io.rest-assured</groupId>
45             <artifactId>rest-assured</artifactId>
46             <scope>test</scope>
47         </dependency>
48     </dependencies>
49 </project>
- 添加了用户详细信息服务作为依赖项,因此可以由
SpringBootTest加载。
结构体
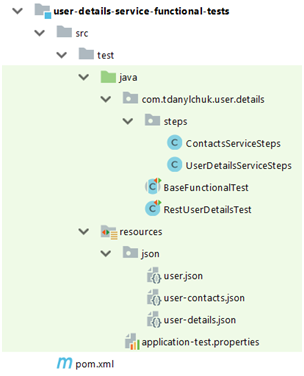
放在一起,我们就有了下一个结构。
向服务添加功能不会更改当前结构,只会扩展它。如果增加了更多的通信渠道,则可以通过其他步骤执行以下操作:使用常用方法添加utils文件夹;带有测试数据的新文件;当然,还要针对每个功能要求进行额外的测试。
结论
在本文中,我们根据给定的需求构建了一个新的微服务,并通过功能测试涵盖了这些需求。在测试中,我们使用了黑盒类型的测试,在这种测试中,我们尝试不更改应用程序的内部部分,而是作为普通客户端从外部与它进行通信,以尽可能地模拟生产行为。同时,我们奠定了功能测试体系结构的基础,因此将来的服务更改将不需要重构现有测试,并且添加新测试将尽可能地容易。
