在完成Xshell成功连接上虚拟机后,接下来在里面完成剩余的虚拟机配置,包括配置时间同步,安装JDK和Hadoop,设置Hadoop用户,设置免密登录等。
安装时间同步软件
使用yum install -y ntpdate命令安装ntpdate,搭建大数据集群时需要每个节点之间的时间保持一样,所以需要进行节点和时间中心的时间同步。
安装完成后,使用crontab -e命令添加如下内容,并wq!保存退出。
crontab -e

#在里面设置如下内容,保存退出

*/1 * * * * /usr/sbin/ntpdate us.pool.ntp.org;
使用date命令查看是否和系统时间同步。

三台机器需关闭selinux
三台机器在root用户下关闭selinux,将SELINUX设置为disabled,selinux是一种更加安全的安全子系统,是属于MAC(强制访问控制),区别于DAC(自主访问控制)。

关于SELINUX的三种状态如下:
# enforcing - SELinux security policy is enforced.
# permissive - SELinux prints warnings instead of enforcing.
# disabled - No SELinux policy is loaded.
添加hadoop普通用户
在root用户基础上添加hadoop用户并设置sudo权限,后续软件的安装有些是在hadoop用户下完成。
useradd hadoop
passwd hadoop

##为hadoop用户添加sudo权限
visudo
hadoop  ALL=(ALL)       ALL

三台机器统一目录
三台linux机器上都建立统一的软件安装包目录和安装目录,其中soft目录为压缩包存放目录,install为实际软件安装目录。
 mkdir -p /kkb/soft     # 软件压缩包存放目录
 mkdir -p /kkb/install  # 软件解压后存放目录
 chown -R hadoop:hadoop /kkb    # 将文件夹权限更改为hadoop用户
将两个文件权限更改为hadoop用户和组。

安装JDK和Hadoop
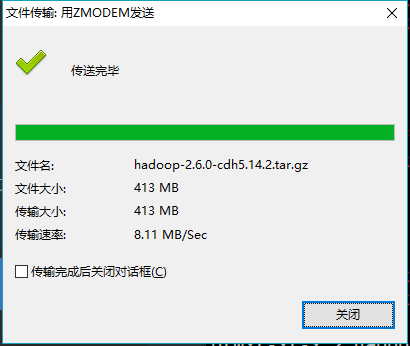
使用lrzsz的rz命令将jdk和hadoop文件上传到soft文件夹下面,然后分别都解压到install文件夹下。

解压使用tar -zxvf 命令。
tar -zxvf jdk-8u181-linux-x64.tar.gz  -C /kkb/install/
tar -zxvf hadoop-2.6.0-cdh5.14.2 -C /kkb/install/
解压完成后还将安装的文件设置hadoop用户权限。

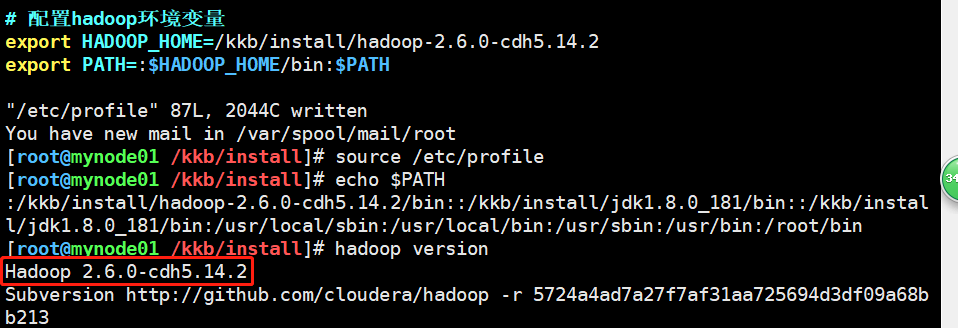
在etc/profile里配置java环境变量,配置完成后使用source命令让其生效,最后使用echo命令打印查看一下是否配置成功。
#添加以下配置内容,配置jdk环境变量
export JAVA_HOME=/kkb/install/jdk1.8.0_181
export PATH=:$JAVA_HOME/bin:$PATH
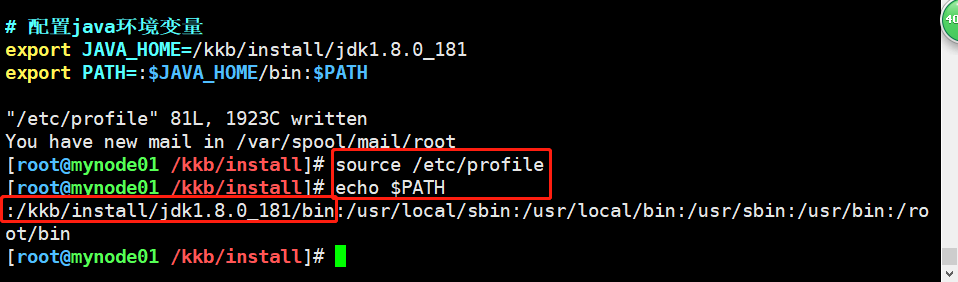
查看是否配置成功,如图所示配置OK。

以上就完成了一台机器的安装准备工作,配置集群的话需要再克隆2台,这里不再展示,克隆完成后需要再修改网卡和主机名。
Hadoop设置免密登录
在给Hadoop配置环境变量前,先进行免密登录设置,这样可以实现主从节点的免密登录,是集群的基础。在给设置免密登录前,需要先配置本地host的ip的地址,后面免密登录直接使用主机名就可以访问。
1 vim /etc/hosts
2
3 192.168.200.200  mynode01
4 192.168.200.210  mynode02
5 192.168.200.220  mynode03
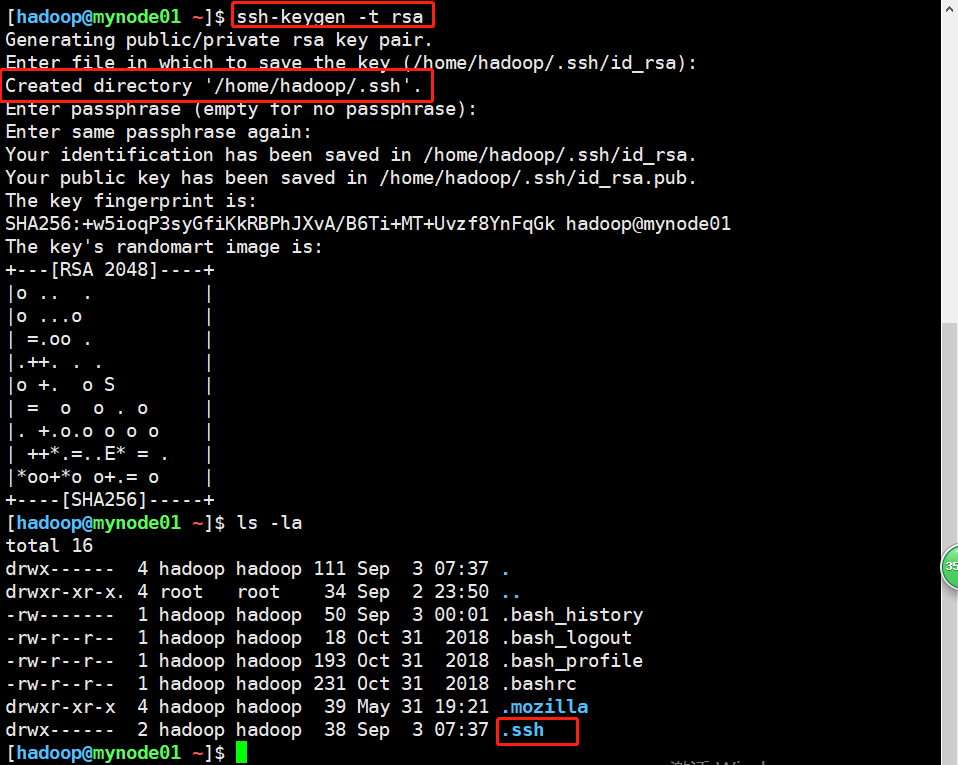
接下来的这一步非常的重要,非常的重要!,在hadoop用户下,先在三台虚拟机上都生成公钥和私钥, 使用如下命令会在用户home目录下生成.ssh文件夹,里面包含公钥和私钥。
ssh-keygen -t rsa #使用了rsa加密算法
命令开始前,home目录下是没有.ssh隐藏目录的。

执行命令后,生成公钥和私钥对,并保存在.ssh目录下,三台虚拟机都需要先执行完再进行后续操作。
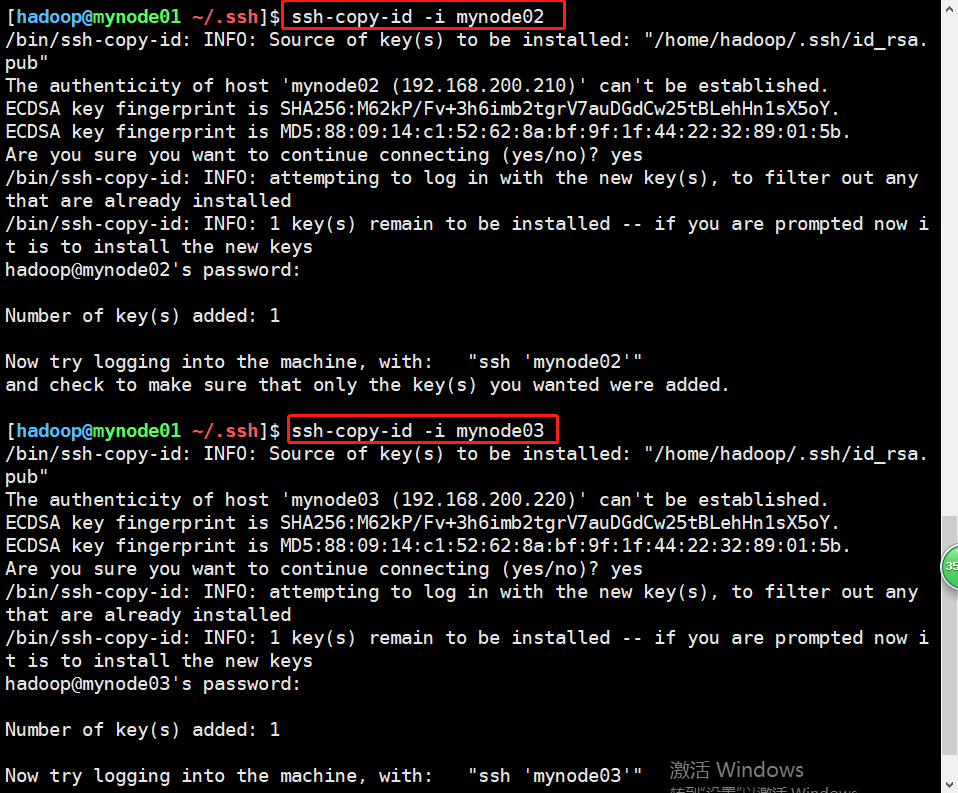
接下来将虚拟机的公钥拷贝到其他两台上面去,也非常的重要。即将节点1的拷贝到节点2和3,将节点2的拷贝的节点1和3,将节点3的拷贝的节点1和2,使用如下命令。
#以mynode01为例
ssh-copy-id -i mynode2 #拷贝到mynode2
ssh-copy-id -i mynode3 #拷贝到mynode3
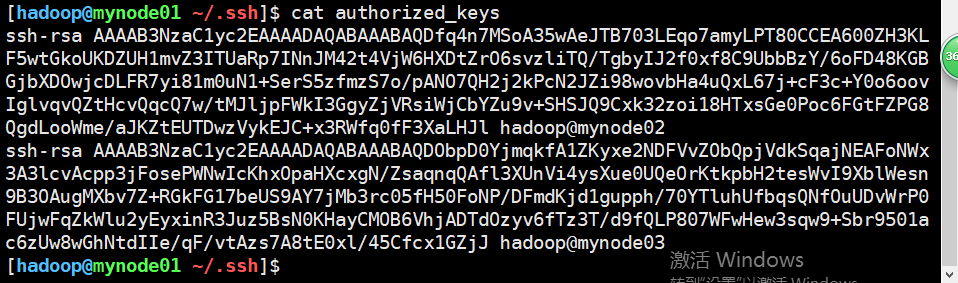
拷贝后,会在.ssh目录下生成authorized_keys文件,里面包含另外两台的公钥,id_isa.pub中保存的就是本机公钥。
三台都拷贝完成后,.ssh目录下是这个结果,其中authorized_keys是自动生成的,包含另外两台的公钥,id_rsa是私钥,id_rsa.pub是公钥。
执行完这一步之后,可以使用ssh mynode02连接其他虚拟机,发现是OK的。

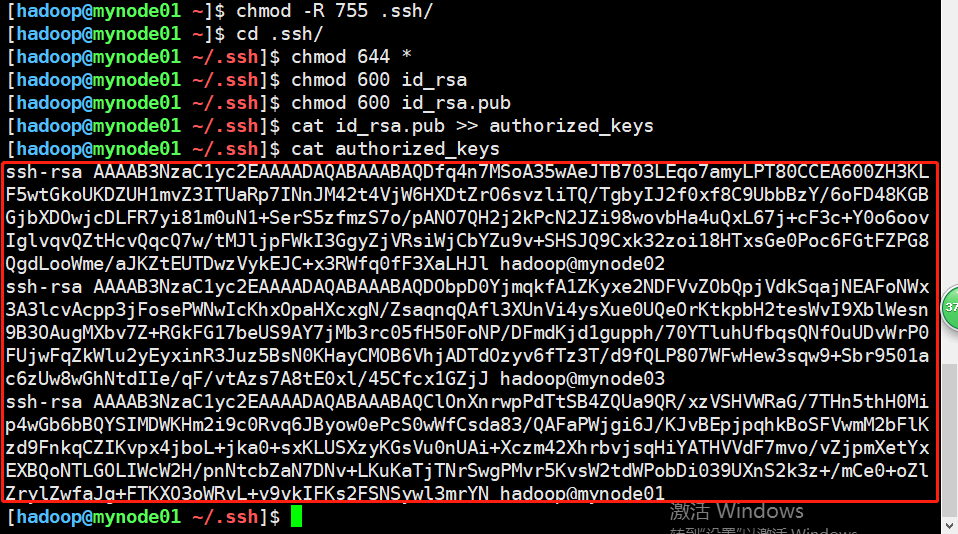
如下接下来执行一些目录权限的操作,并将当前虚拟机hadoop公钥添加到认证文件authorized_keys中,这样配置是为了启动集群的时候不需要输入密码。
[hadoop@mynode01 ~]$ chmod -R 755 .ssh/
[hadoop@mynode01 ~]$ cd .ssh/
[hadoop@mynode01 ~/.ssh]$ chmod 644 *
[hadoop@mynode01 ~/.ssh]$ chmod 600 id_rsa
[hadoop@mynode01 ~/.ssh]$ chmod 600 id_rsa.pub
[hadoop@mynode01 ~/.ssh]$ cat id_rsa.pub >> authorized_keys
[hadoop@mynode01 ~/.ssh]$ cat authorized_keys
以上使用了chmod命令,里面用到了数字,第一个数字代表当前用户的权限,第二个数字代表所属组的权限,最后一个代表其他人的权限,其中权限对应如下。
r读→数字4,w写→2,x可操作→1,因此上面的命令可以逐一解释如下。
(1)chmod -R 755 .ssh/ :赋予ssh目录当前用户-rwx权限,组-rx权限,其他-rx权限。
(2)chmod 644 * :赋予ssh目录下文件夹当前用户-rw权限,组-r权限,其他-r权限。
(3)chmod 600 id_rsa:赋予私钥只有当前用户有-rw权限,其他没有权限。
(4)chmod 600 id_rsa.pub:赋予公钥只有当前用户有-rw权限,其他没有权限。
(5)cat id_rsa.put >> authorized_keys:将公钥内容添加到authorized_keys文件里。
完成后查看发现三台机器的公钥都保存在认证文件当中。每台机器都需要执行同样的操作。
配置Hadoop环境变量
完成免密登录后就可以进行Hadoop环境变量的设置,并使用命令查看是否正常配置,这里依然在/etc/profile下进行配置,三台机器都进行同样的配置即可。
以下xml配置文件三个节点都需要配置,注意不要只配置节点1!注意不要只配置节点1!注意不要只配置节点1!
配置 hadoop-env.sh
此文件在hadoop安装目录下,需要添加java环境变量,三台机器都需要配置。
1 #cd /kkb/install/hadoop-2.6.0-cdh5.14.2/etc/hadoop

配置core-site.xml
配置core-site.xml每个配置name的作用,可以登良官网进行查看,里面有对应的描述,地址https://hadoop.apache.org/docs/stable/hadoop-project-dist/hadoop-common/SingleCluster.html,另外配置文件里有需要配置文件夹,最后统一在第一个节点上创建。


 1 <configuration>
 2     <property>
 3         <name>fs.defaultFS</name>
 4         <value>hdfs://node01:8020</value>
 5     </property>
 6     <property>
 7         <name>hadoop.tmp.dir</name>
 8         <value>/kkb/install/hadoop-2.6.0-cdh5.14.2/hadoopDatas/tempDatas</value><!--需要手动创建目录-->
 9     </property>
10     <!--  缓冲区大小,实际工作中根据服务器性能动态调整 -->
11     <property>
12         <name>io.file.buffer.size</name>
13         <value>4096</value>
14     </property>
15 <property>
16      <name>fs.trash.interval</name>
17      <value>10080</value>
18      <description>检查点被删除后的分钟数。 如果为零,垃圾桶功能将被禁用。
19      该选项可以在服务器和客户端上配置。 如果垃圾箱被禁用服务器端,则检查客户端配置。
20      如果在服务器端启用垃圾箱,则会使用服务器上配置的值,并忽略客户端配置值。</description>
21 </property>
22
23 <property>
24      <name>fs.trash.checkpoint.interval</name>
25      <value>0</value>
26      <description>垃圾检查点之间的分钟数。 应该小于或等于fs.trash.interval。
27      如果为零,则将该值设置为fs.trash.interval的值。 每次检查指针运行时,
28      它都会从当前创建一个新的检查点,并删除比fs.trash.interval更早创建的检查点。</description>
29 </property>
30 </configuration>
配置的具体描述参考了官方文档粘贴如下。
fs.defaultFS:The name of the default file system. A URI whose scheme and authority determine the FileSystem implementation. The uri's scheme determines the config property (fs.SCHEME.impl) naming the FileSystem implementation class. The uri's authority is used to determine the host, port, etc. for a filesystem.
hadoop.tmp.dir: A base for other temporary directories.
io.file.buffer.size:The size of buffer for use in sequence files. The size of this buffer should probably be a multiple of hardware page size (4096 on Intel x86), and it determines how much data is buffered during read and write operations.
fs.trash.interval:Number of minutes after which the checkpoint gets deleted. If zero, the trash feature is disabled. This option may be configured both on the server and the client. If trash is disabled server side then the client side configuration is checked. If trash is enabled on the server side then the value configured on the server is used and the client configuration value is ignored.
fs.trash.checkpoint.interval: Number of minutes between trash checkpoints. Should be smaller or equal to fs.trash.interval. If zero, the value is set to the value of fs.trash.interval. Every time the checkpointer runs it creates a new checkpoint out of current and removes checkpoints created more than fs.trash.interval minutes ago.
配置hdfs-site.xml
继续配置hdfs-site.xml,也可以通过官网查看具体作用,同样需要配置文件夹,最后在节点1上进行。注意将node01修改成mynode01,因为的主节点名字是mynode01,后面启动集群提示这里配置错误,需修改。
 1     <!-- NameNode存储元数据信息的路径,实际工作中,一般先确定磁盘的挂载目录,然后多个目录用,进行分割   -->
 2     <!--   集群动态上下线
 3     <property>
 4         <name>dfs.hosts</name>
 5         <value>/kkb/install/hadoop-2.6.0-cdh5.14.2/etc/hadoop/accept_host</value>
 6     </property>
 7
 8     <property>
 9         <name>dfs.hosts.exclude</name>
10         <value>/kkb/install/hadoop-2.6.0-cdh5.14.2/etc/hadoop/deny_host</value>
11     </property>
12      -->
13
14      <property>
15             <name>dfs.namenode.secondary.http-address</name>
16             <value>node01:50090</value>
17     </property>
18
19     <property>
20         <name>dfs.namenode.http-address</name>
21         <value>node01:50070</value>
22     </property>
23     <property>
24         <name>dfs.namenode.name.dir</name>
25         <value>file:///kkb/install/hadoop-2.6.0-cdh5.14.2/hadoopDatas/namenodeDatas</value>
26     </property>
27     <!--  定义dataNode数据存储的节点位置,实际工作中,一般先确定磁盘的挂载目录,然后多个目录用,进行分割  -->
28     <property>
29         <name>dfs.datanode.data.dir</name>
30         <value>file:///kkb/install/hadoop-2.6.0-cdh5.14.2/hadoopDatas/datanodeDatas</value>
31     </property>
32
33     <property>
34         <name>dfs.namenode.edits.dir</name>
35         <value>file:///kkb/install/hadoop-2.6.0-cdh5.14.2/hadoopDatas/dfs/nn/edits</value>
36     </property>
37     <property>
38         <name>dfs.namenode.checkpoint.dir</name>
39         <value>file:///kkb/install/hadoop-2.6.0-cdh5.14.2/hadoopDatas/dfs/snn/name</value>
40     </property>
41     <property>
42         <name>dfs.namenode.checkpoint.edits.dir</name>
43         <value>file:///kkb/install/hadoop-2.6.0-cdh5.14.2/hadoopDatas/dfs/nn/snn/edits</value>
44     </property>
45     <property>
46         <name>dfs.replication</name>
47         <value>3</value>
48     </property>
49     <property>
50         <name>dfs.permissions</name>
51         <value>false</value>
52     </property>
53     <property>
54         <name>dfs.blocksize</name>
55         <value>134217728</value>
56     </property>
具体描述参考官方文档如下。
dfs.hosts:Names a file that contains a list of hosts that are permitted to connect to the namenode. The full pathname of the file must be specified. If the value is empty, all hosts are permitted.
dfs.hosts.exclude:Names a file that contains a list of hosts that are not permitted to connect to the namenode. The full pathname of the file must be specified. If the value is empty, no hosts are excluded.
dfs.namenode.secondary.http-address: The secondary namenode http server address and port.
dfs.namenode.http-address:The address and the base port where the dfs namenode web ui will listen on.
dfs.namenode.name.dir: Determines where on the local filesystem the DFS name node should store the name table(fsimage). If this is a comma-delimited list of directories then the name table is replicated in all of the directories, for redundancy.
dfs.datanode.data.dir: Determines where on the local filesystem an DFS data node should store its blocks. If this is a comma-delimited list of directories, then data will be stored in all named directories, typically on different devices. The directories should be tagged with corresponding storage types ([SSD]/[DISK]/[ARCHIVE]/[RAM_DISK]) for HDFS storage policies. The default storage type will be DISK if the directory does not have a storage type tagged explicitly. Directories that do not exist will be created if local filesystem permission allows.
dfs.namenode.edits.dir:Determines where on the local filesystem the DFS name node should store the transaction (edits) file. If this is a comma-delimited list of directories then the transaction file is replicated in all of the directories, for redundancy. Default value is same as dfs.namenode.name.dir
dfs.namenode.checkpoint.dir: Determines where on the local filesystem the DFS secondary name node should store the temporary images to merge. If this is a comma-delimited list of directories then the image is replicated in all of the directories for redundancy.
dfs.namenode.checkpoint.edits.dir: Determines where on the local filesystem the DFS secondary name node should store the temporary edits to merge. If this is a comma-delimited list of directories then the edits is replicated in all of the directories for redundancy. Default value is same as dfs.namenode.checkpoint.dir
dfs.replication: Default block replication. The actual number of replications can be specified when the file is created. The default is used if replication is not specified in create time.
dfs.permissions:If "true", enable permission checking in HDFS. If "false", permission checking is turned off, but all other behavior is unchanged. Switching from one parameter value to the other does not change the mode, owner or group of files or directories.
dfs.blocksize: The default block size for new files, in bytes. You can use the following suffix (case insensitive): k(kilo), m(mega), g(giga), t(tera), p(peta), e(exa) to specify the size (such as 128k, 512m, 1g, etc.), Or provide complete size in bytes (such as 134217728 for 128 MB).
配置mapred-site.xml
默认情况下hadoop目录下是没有mapred-site.xml的文件,拷贝一份出来进行修改即可。

拷贝后和修改成如下配置,也需要将node01修改成mynode01。
 1 <!--指定运行mapreduce的环境是yarn -->
 2 <configuration>
 3    <property>
 4         <name>mapreduce.framework.name</name>
 5         <value>yarn</value>
 6     </property>
 7
 8     <property>
 9         <name>mapreduce.job.ubertask.enable</name>
10         <value>true</value>
11     </property>
12
13     <property>
14         <name>mapreduce.jobhistory.address</name>
15         <value>node01:10020</value>
16     </property>
17
18     <property>
19         <name>mapreduce.jobhistory.webapp.address</name>
20         <value>node01:19888</value>
21     </property>
22 </configuration>
具体描述参考官方文档如下。
mapreduce.framework.name: The runtime framework for executing MapReduce jobs. Can be one of local, classic or yarn.
mapreduce.job.ubertask.enable: Whether to enable the small-jobs "ubertask" optimization, which runs "sufficiently small" jobs sequentially within a single JVM. "Small" is defined by the following maxmaps, maxreduces, and maxbytes settings. Note that configurations for application masters also affect the "Small" definition - yarn.app.mapreduce.am.resource.mb must be larger than both mapreduce.map.memory.mb and mapreduce.reduce.memory.mb, and yarn.app.mapreduce.am.resource.cpu-vcores must be larger than both mapreduce.map.cpu.vcores and mapreduce.reduce.cpu.vcores to enable ubertask. Users may override this value.
mapreduce.jobhistory.address: MapReduce JobHistory Server IPC host:port
mapreduce.jobhistory.webapp.address: MapReduce JobHistory Server Web UI host:port
配置yarn-site.xml
同样配置里需要新建文件夹,最后统一在节点1上创建,也需要将node01修改成mynode01。
 1 <configuration>
 2     <property>
 3         <name>yarn.resourcemanager.hostname</name>
 4         <value>node01</value>
 5     </property>
 6     <property>
 7         <name>yarn.nodemanager.aux-services</name>
 8         <value>mapreduce_shuffle</value>
 9     </property>
10
11
12     <property>
13         <name>yarn.log-aggregation-enable</name>
14         <value>true</value>
15     </property>
16
17
18     <property>
19          <name>yarn.log.server.url</name>
20          <value>http://node01:19888/jobhistory/logs</value>
21     </property>
22
23     <!--多长时间聚合删除一次日志 此处-->
24     <property>
25         <name>yarn.log-aggregation.retain-seconds</name>
26         <value>2592000</value><!--30 day-->
27     </property>
28     <!--时间在几秒钟内保留用户日志。只适用于如果日志聚合是禁用的-->
29     <property>
30         <name>yarn.nodemanager.log.retain-seconds</name>
31         <value>604800</value><!--7 day-->
32     </property>
33     <!--指定文件压缩类型用于压缩汇总日志-->
34     <property>
35         <name>yarn.nodemanager.log-aggregation.compression-type</name>
36         <value>gz</value>
37     </property>
38     <!-- nodemanager本地文件存储目录-->
39     <property>
40         <name>yarn.nodemanager.local-dirs</name>
41         <value>/kkb/install/hadoop-2.6.0-cdh5.14.2/hadoopDatas/yarn/local</value>
42     </property>
43     <!-- resourceManager  保存最大的任务完成个数 -->
44     <property>
45         <name>yarn.resourcemanager.max-completed-applications</name>
46         <value>1000</value>
47     </property>
48
49 </configuration>
具体描述参考官方文档如下。
yarn.resourcemanager.hostname:The hostname of the RM.
yarn.nodemanager.aux-services:A comma separated list of services where service name should only contain a-zA-Z0-9_ and can not start with numbers
yarn.log-aggregation-enable: Whether to enable log aggregation. Log aggregation collects each container's logs and moves these logs onto a file-system, for e.g. HDFS, after the application completes. Users can configure the "yarn.nodemanager.remote-app-log-dir" and "yarn.nodemanager.remote-app-log-dir-suffix" properties to determine where these logs are moved to. Users can access the logs via the Application Timeline Server.
yarn.log.server.url:URL for log aggregation server
yarn.log-aggregation.retain-seconds: How long to keep aggregation logs before deleting them. -1 disables. Be careful set this too small and you will spam the name node.
yarn.nodemanager.log.retain-seconds:Time in seconds to retain user logs. Only applicable if log aggregation is disabled
yarn.nodemanager.log-aggregation.compression-type:T-file compression types used to compress aggregated logs.
yarn.nodemanager.local-dirs:List of directories to store localized files in. An application's localized file directory will be found in: ${yarn.nodemanager.local-dirs}/usercache/${user}/appcache/application_${appid}. Individual containers' work directories, called container_${contid}, will be subdirectories of this.
yarn.resourcemanager.max-completed-applications:The maximum number of completed applications RM keeps.
编辑slaves
这个文件用来配置集群中有多少个节点,这里将节点1作为集群管理节点,节点2和节点3作为数据节点,三台机器都需要配置。

创建文件存放目录
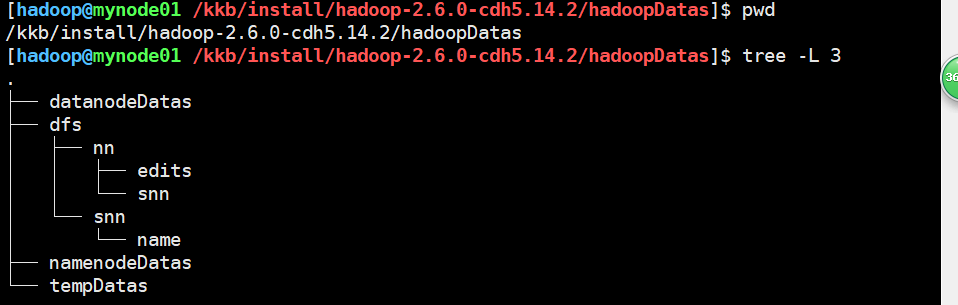
前面配置文件里有很多地方需要目录,这里根据配置文件的设置在节点1上创建目录,其他节点不需要创建此目录。
1 [hadoop@mynode01 /kkb/install/hadoop-2.6.0-cdh5.14.2]$ mkdir -p /kkb/install/hadoop-2.6.0-cdh5.14.2/hadoopDatas/tempDatas
2 [hadoop@mynode01 /kkb/install/hadoop-2.6.0-cdh5.14.2]$ mkdir -p /kkb/install/hadoop-2.6.0-cdh5.14.2/hadoopDatas/namenodeDatas
3 [hadoop@mynode01 /kkb/install/hadoop-2.6.0-cdh5.14.2]$ mkdir -p /kkb/install/hadoop-2.6.0-cdh5.14.2/hadoopDatas/datanodeDatas
4 [hadoop@mynode01 /kkb/install/hadoop-2.6.0-cdh5.14.2]$ mkdir -p /kkb/install/hadoop-2.6.0-cdh5.14.2/hadoopDatas/dfs/nn/edits
5 [hadoop@mynode01 /kkb/install/hadoop-2.6.0-cdh5.14.2]$ mkdir -p /kkb/install/hadoop-2.6.0-cdh5.14.2/hadoopDatas/dfs/snn/name
6 [hadoop@mynode01 /kkb/install/hadoop-2.6.0-cdh5.14.2]$ mkdir -p /kkb/install/hadoop-2.6.0-cdh5.14.2/hadoopDatas/dfs/nn/snn/edits
创建完成后可以简单查看目录结构。
格式化Hadoop
这一步很关键,如果没有什么问题说明前面配置的没有问题,只在节点1行进行格式化,注意!!!
在hadoop用户下,使用命令hdfs namenode -format。
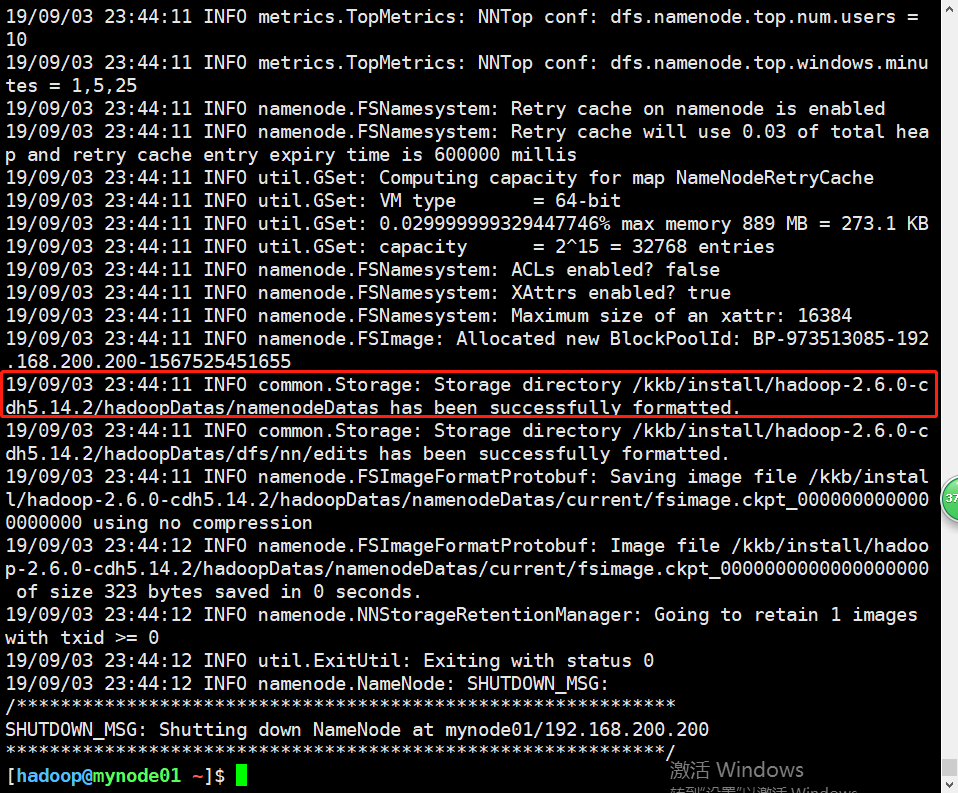
如果看到了如上的提示,并且日志里没有报错说明格式化成功。
启动集群
以上没有问题就可以开始启动集群了,执行脚本为start-all.sh,是hadoop安装目录sbin目录下,进入后执行。
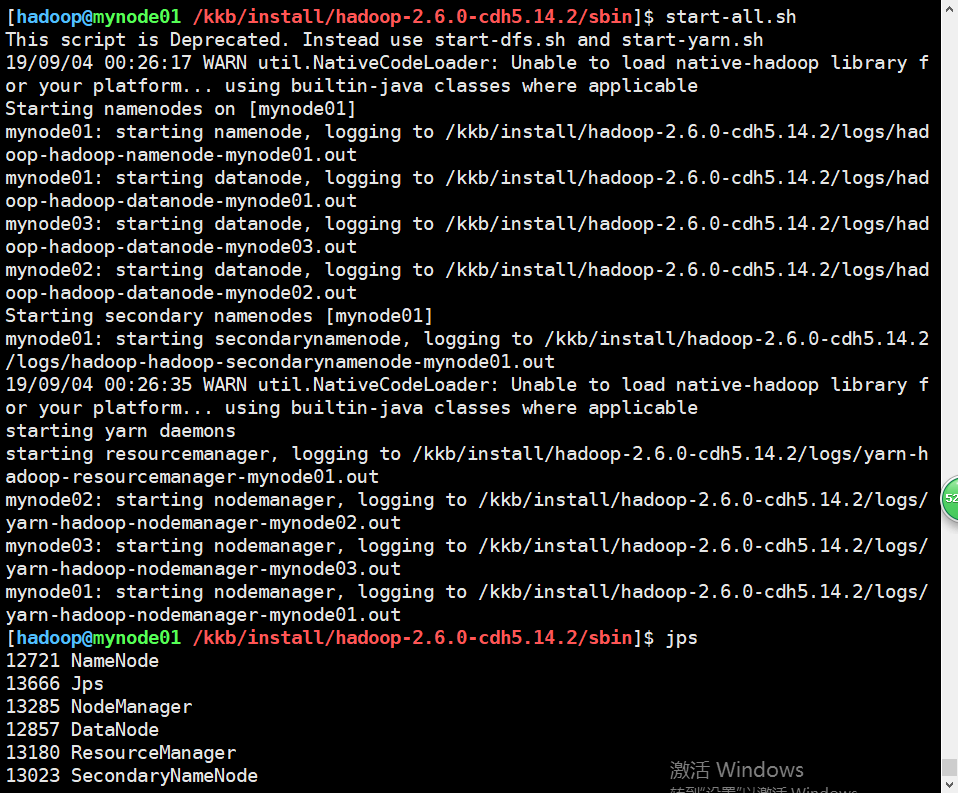
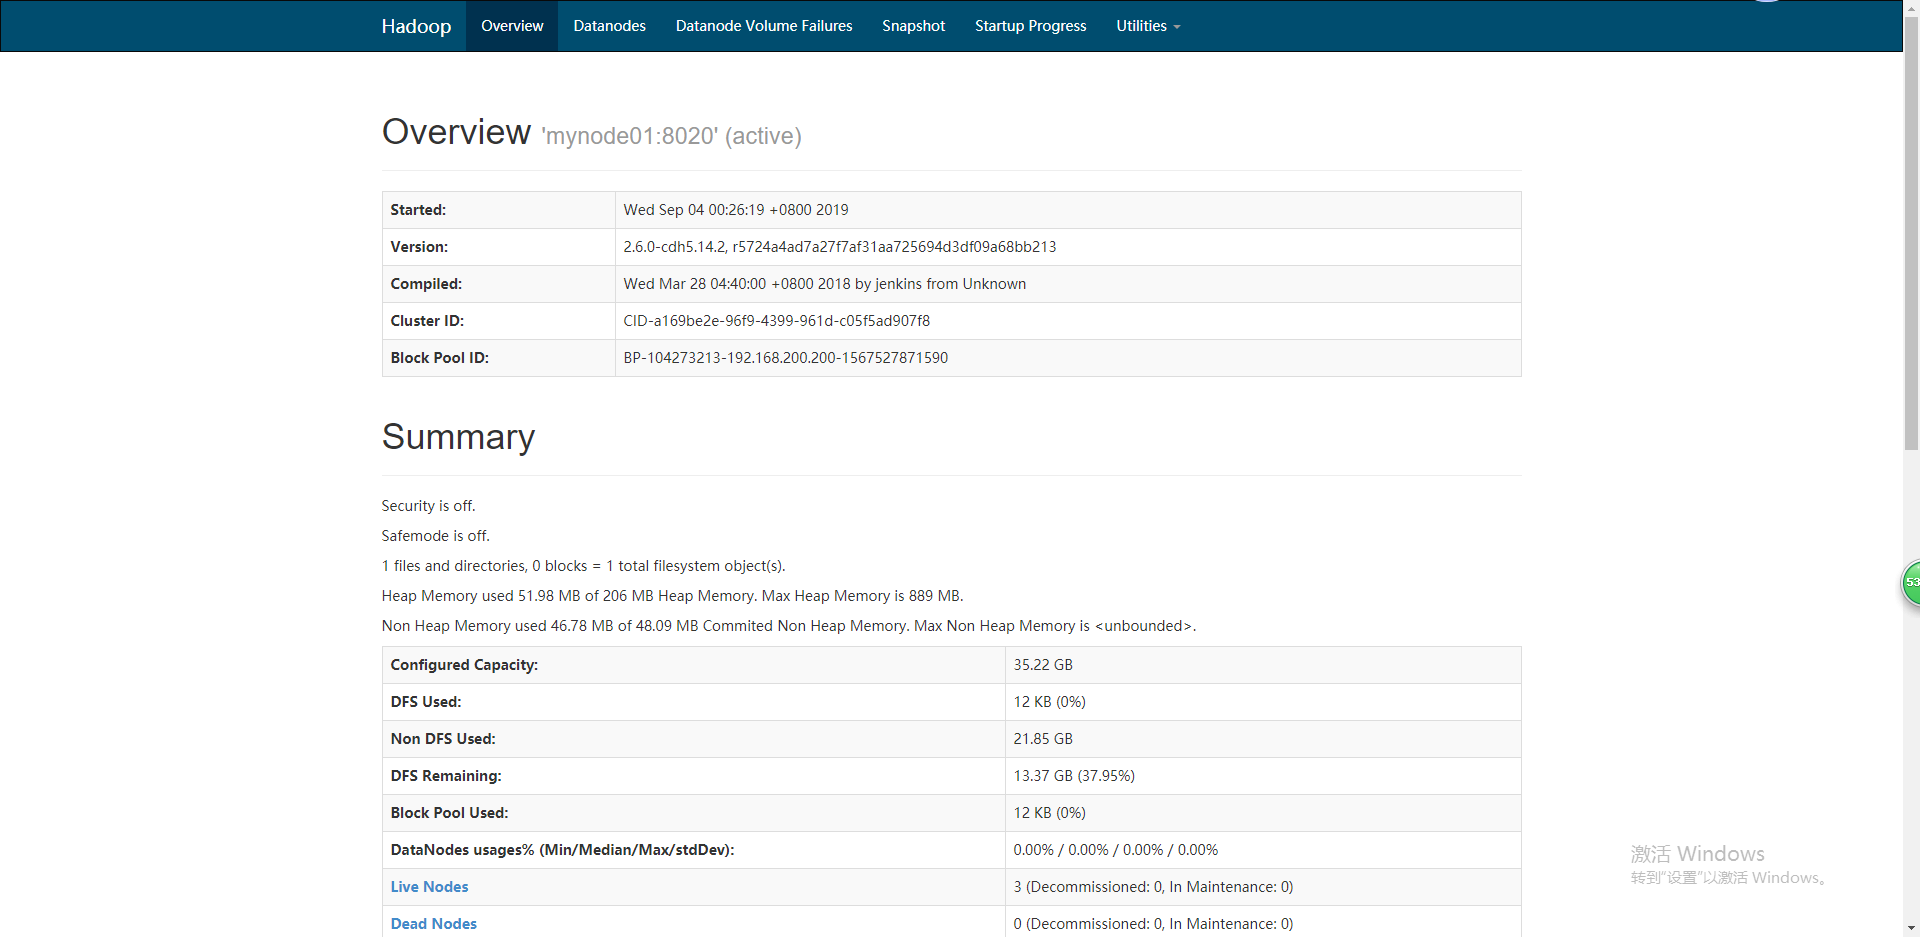
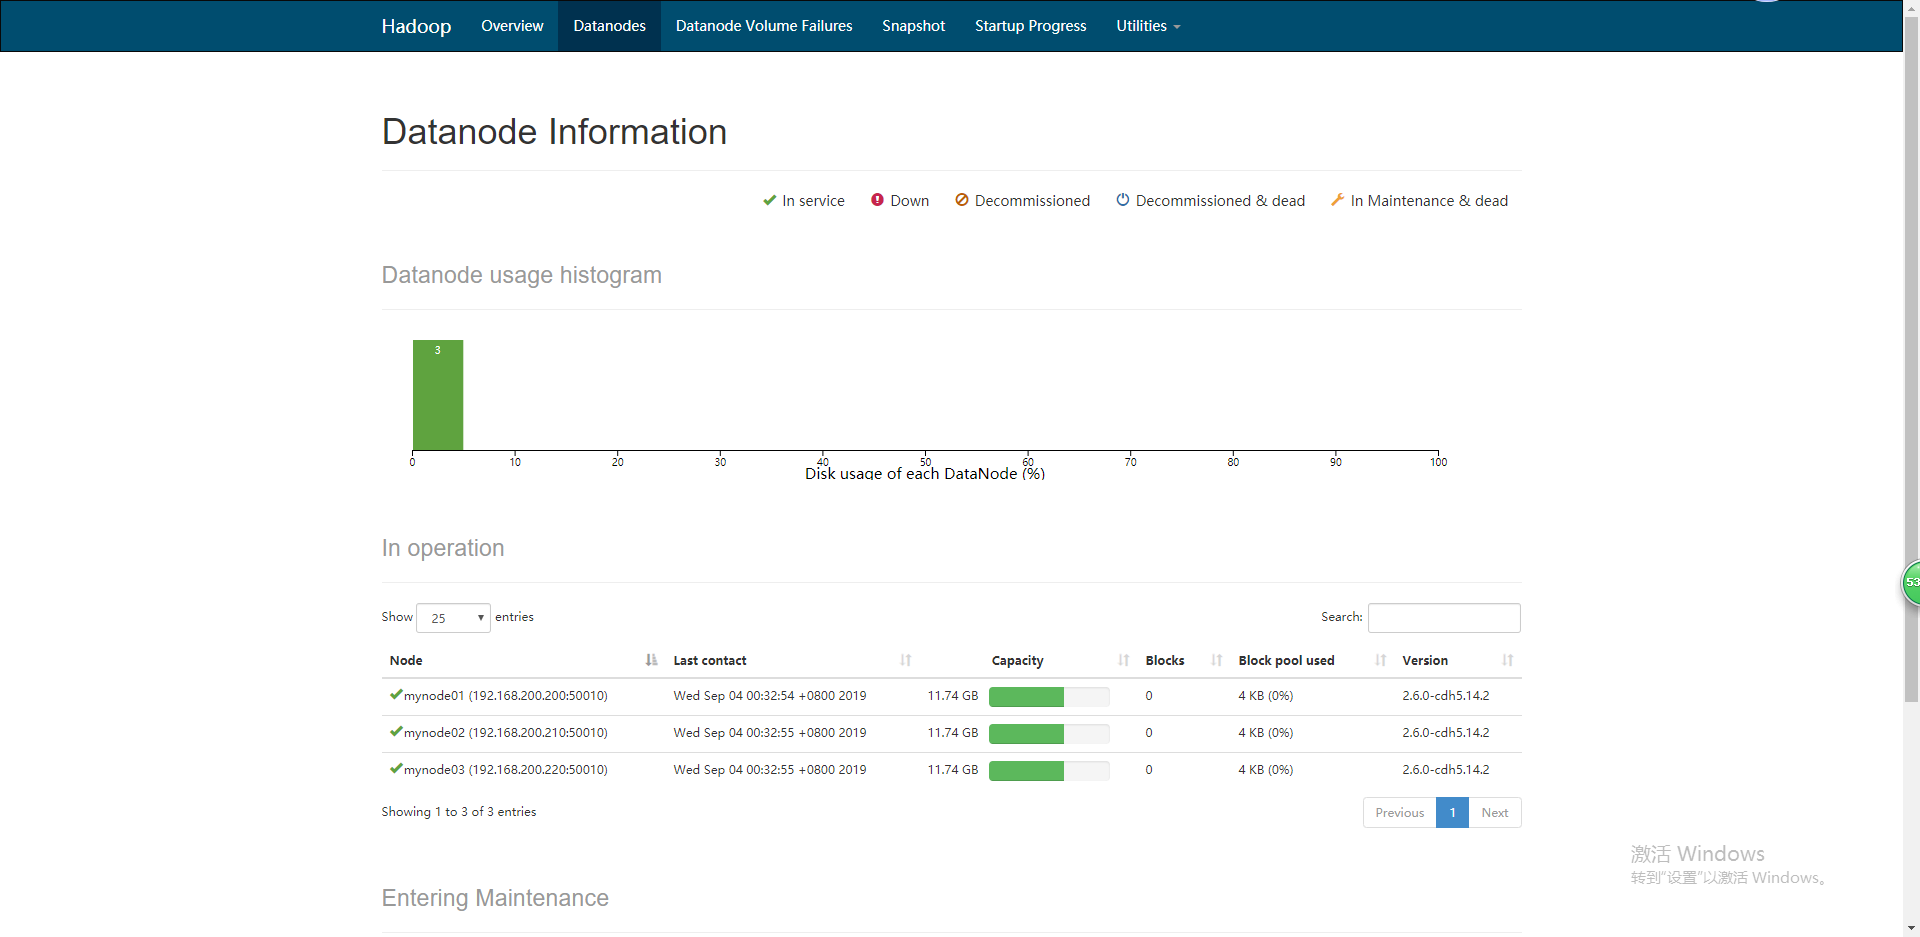
可以看出来正常的启动了集群,下面在web界面也可以可视化查询集群状况。
执行一个mapreduce程序
mapreduce就是词频统计程序,英文名wordcount,这个程序是运行在大型分布式集群里的,用来统计文件中每一个单词出现的次数,是学习大数据最基础最简单的程序,如果其能正常运行成功 1 hadoop@mynode01 ~]$ hdfs dfs -ls /
  2 ▽9/09/04 00:51:52 WARN util.NativeCodeLoader: Unable to load native-hadoop library for your platform... using builtin-java classes where applicable
  3 Found 2 items
  4 drwx------   - hadoop supergroup          0 2019-09-04 00:46 /tmp
  5 drwx------   - hadoop supergroup          0 2019-09-04 00:51 /user
  6 [hadoop@mynode01 ~]$ hdfs dfs -mkdir /test
  7 19/09/04 00:52:02 WARN util.NativeCodeLoader: Unable to load native-hadoop library for your platform... using builtin-java classes where applicable
  8 [hadoop@mynode01 ~]$ hdfs dfs -ls /
  9 19/09/04 00:52:05 WARN util.NativeCodeLoader: Unable to load native-hadoop library for your platform... using builtin-java classes where applicable
 10 Found 3 items
 11 drwxr-xr-x   - hadoop supergroup          0 2019-09-04 00:52 /test
 12 drwx------   - hadoop supergroup          0 2019-09-04 00:46 /tmp
 13 drwx------   - hadoop supergroup          0 2019-09-04 00:51 /user
 14 [hadoop@mynode01 ~]$ ls
 15 words
 16 [hadoop@mynode01 ~]$ rm words
 17 [hadoop@mynode01 ~]$ touch words
 18 [hadoop@mynode01 ~]$ ls
 19 words
 20 [hadoop@mynode01 ~]$ vim words
 21 boe is the best enterprise int the world,yes buddy, i can not agree you anymore
 22 ~
 ...
 54 "words" 1L, 80C written
 55 [hadoop@mynode01 ~]$ ls
 56 words
 57 [hadoop@mynode01 ~]$ cat words
 58 boe is the best enterprise int the world,yes buddy, i can not agree you anymore
 59 [hadoop@mynode01 ~]$ hdfs dfs -put words /test
 60 19/09/04 00:54:04 WARN util.NativeCodeLoader: Unable to load native-hadoop library for your platform... using builtin-java classes where applicable
 61 [hadoop@mynode01 ~]$ hdfs dfs -ls -r /test
 62 19/09/04 00:54:15 WARN util.NativeCodeLoader: Unable to load native-hadoop library for your platform... using builtin-java classes where applicable
 63 Found 1 items
 64 -rw-r--r--   3 hadoop supergroup         80 2019-09-04 00:54 /test/words
 65 [hadoop@mynode01 ~]$ hadoop jar /kkb/install/hadoop-2.6.0-cdh5.14.2/share/hadoop/mapreduce/hadoop-mapreduce-examples-2.6.0-cdh5.14.2.jar wordcount /test/words /test/output
 66 19/09/04 00:55:42 WARN util.NativeCodeLoader: Unable to load native-hadoop library for your platform... using builtin-java classes where applicable
 67 19/09/04 00:55:42 INFO client.RMProxy: Connecting to ResourceManager at mynode01/192.168.200.200:8032
 68 19/09/04 00:55:43 INFO input.FileInputFormat: Total input paths to process : 1
 69 19/09/04 00:55:43 INFO mapreduce.JobSubmitter: number of splits:1
 70 19/09/04 00:55:43 INFO mapreduce.JobSubmitter: Submitting tokens for job: job_1567527998307_0002
 71 19/09/04 00:55:44 INFO impl.YarnClientImpl: Submitted application application_1567527998307_0002
 72 19/09/04 00:55:44 INFO mapreduce.Job: The url to track the job: http://mynode01:8088/proxy/application_1567527998307_0002/
 73 19/09/04 00:55:44 INFO mapreduce.Job: Running job: job_1567527998307_0002
 74 19/09/04 00:55:56 INFO mapreduce.Job: Job job_1567527998307_0002 running in uber mode : true
 75 19/09/04 00:55:56 INFO mapreduce.Job:  map 100% reduce 0%
 76 19/09/04 00:55:58 INFO mapreduce.Job:  map 100% reduce 100%
 77 19/09/04 00:55:58 INFO mapreduce.Job: Job job_1567527998307_0002 completed successfully
 78 19/09/04 00:55:59 INFO mapreduce.Job: Counters: 52
 79     File System Counters
 80         FILE: Number of bytes read=364
 81         FILE: Number of bytes written=562
 82         FILE: Number of read operations=0
 83         FILE: Number of large read operations=0
 84         FILE: Number of write operations=0
 85         HDFS: Number of bytes read=432
 86         HDFS: Number of bytes written=307881
 87         HDFS: Number of read operations=35
 88         HDFS: Number of large read operations=0
 89         HDFS: Number of write operations=10
 90     Job Counters
 91         Launched map tasks=1
 92         Launched reduce tasks=1
 93         Other local map tasks=1
 94         Total time spent by all maps in occupied slots (ms)=0
 95         Total time spent by all reduces in occupied slots (ms)=0
 96         TOTAL_LAUNCHED_UBERTASKS=2
 97         NUM_UBER_SUBMAPS=1
 98         NUM_UBER_SUBREDUCES=1
 99         Total time spent by all map tasks (ms)=924
100         Total time spent by all reduce tasks (ms)=1022
101         Total vcore-milliseconds taken by all map tasks=0
102         Total vcore-milliseconds taken by all reduce tasks=0
103         Total megabyte-milliseconds taken by all map tasks=0
104         Total megabyte-milliseconds taken by all reduce tasks=0
105     Map-Reduce Framework
106         Map input records=1
107         Map output records=15
108         Map output bytes=140
109         Map output materialized bytes=166
110         Input split bytes=96
111         Combine input records=15
112         Combine output records=14
113         Reduce input groups=14
114         Reduce shuffle bytes=166
115         Reduce input records=14
116         Reduce output records=14
117         Spilled Records=28
118         Shuffled Maps =1
119         Failed Shuffles=0
120         Merged Map outputs=1
121         GC time elapsed (ms)=0
122         CPU time spent (ms)=3120
123         Physical memory (bytes) snapshot=842375168
124         Virtual memory (bytes) snapshot=6189252608
125         Total committed heap usage (bytes)=581959680
126     Shuffle Errors
127         BAD_ID=0
128         CONNECTION=0
129         IO_ERROR=0
130         WRONG_LENGTH=0
131         WRONG_MAP=0
132         WRONG_REDUCE=0
133     File Input Format Counters
134         Bytes Read=80
135     File Output Format Counters
136         Bytes Written=104
137 [hadoop@mynode01 ~]$
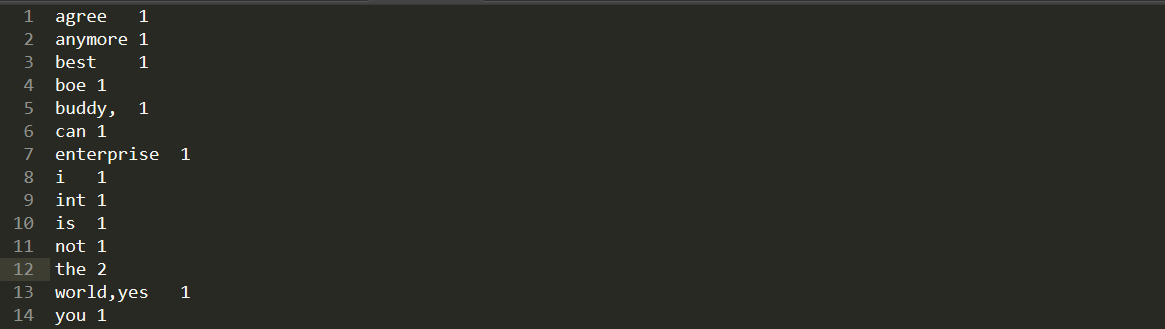
可以在可视化web界面下载计算后的文件。

打开文件后就可以看到对文字的统计情况。
最后关闭集群,完成本次配置。
 1 -rwxr-xr-x 1 hadoop hadoop 1353 Mar 28  2018 yarn-daemons.sh
 2 [hadoop@mynode01 /kkb/install/hadoop-2.6.0-cdh5.14.2/sbin]$ stop-all.sh
 3 This script is Deprecated. Instead use stop-dfs.sh and stop-yarn.sh
 4 19/09/04 01:00:13 WARN util.NativeCodeLoader: Unable to load native-hadoop library for your platform... using builtin-java classes where applicable
 5 Stopping namenodes on [mynode01]
 6 mynode01: stopping namenode
 7 mynode01: stopping datanode
 8 mynode02: stopping datanode
 9 mynode03: stopping datanode
10 Stopping secondary namenodes [mynode01]
11 mynode01: stopping secondarynamenode
12 19/09/04 01:00:31 WARN util.NativeCodeLoader: Unable to load native-hadoop library for your platform... using builtin-java classes where applicable
13 stopping yarn daemons
14 stopping resourcemanager
15 mynode01: stopping nodemanager
16 mynode02: stopping nodemanager
17 mynode03: stopping nodemanager
18 no proxyserver to stop
19 [hadoop@mynode01 /kkb/install/hadoop-2.6.0-cdh5.14.2/sbin]$
以上是hadoop集群的配置过程,记录一下。
参考博客:
(1)https://www.cnblogs.com/optimus-prime/p/7194751.html 权限说明
(2)https://man.linuxde.net/chmod 命令查看
(3)https://blog.csdn.net/myarrow/article/details/9856095/ selinux介绍
(4)https://www.cnblogs.com/kelelipeng/p/10371593.html selinux介绍
(5)https://blog.csdn.net/tttt418/article/details/6113860 pagesize设置
(6)https://www.cnblogs.com/007sx/p/10987906.html 公钥加密私钥解密
(7)https://www.cnblogs.com/zqj-blog/p/10445598.html ssh免密连接原理