一、安装
1、下载地址:
https://github.com/akopytov/sysbench/tree/0.5
2、上传到服务器
刚部署的服务器,可能没有编译环境(可安装编译环境:安装编译环境:yum groupinstall -y "development tools")
Rz命令(如果服务器没有rz命令,可以安装:yum install lrzsz -y)
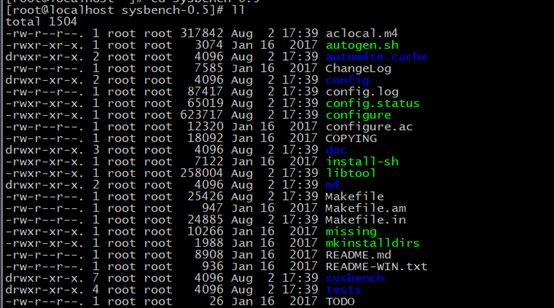
上传成功后,可以查看:
3、安装./autogen.sh
安装依赖包:
安装automake autoconf libtool库
yum install automake autoconf libtool
安装mysql库:yum install mysql-lib mysql-devel
可能涉及的命令:
查看mysql的版本:yum list | grep mysql
4、安装执行文件: ./configure
5、make
6、make install
二、数据准备
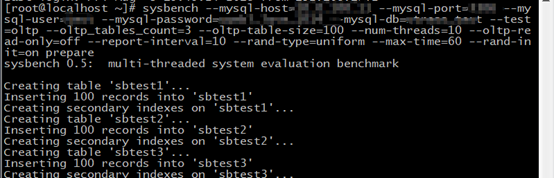
sysbench --mysql-host=test --mysql-port=test --mysql-user=test --mysql-password=test --mysql-db=test --test=oltp --oltp_tables_count=10 --oltp-table-size=0 --num-threads=100 --oltp-read-only=off --report-interval=10 --rand-type=uniform --max-time=60 --rand-init=on prepare
解释:
sysbench
--mysql-host=test (测试数据库的host)
--mysql-port=test (测试数据库的端口)
--mysql-user=test (测试数据库的用户名)
--mysql-password=test (测试数据库的密码)
--mysql-db=test (测试数据库的相应的库名)
--test=oltp
--oltp_tables_count=10 (tables数量)
--oltp-table-size=10 (插入表的大小)
--num-threads=100 (线程数)
--oltp-read-only=off
--report-interval=10
--rand-type=uniform
--max-time=60
--rand-init=on prepare (准备)
三、执行
sysbench --mysql-host=test --mysql-port=test --mysql-user=test --mysql-password=test --mysql-db=test --test=oltp --oltp_tables_count=6 --oltp-table-size=20000000 --num-threads=500 --oltp-read-only=off --report-interval=10 --rand-type=uniform --max-time=600 --mysql-ignore-errors=1062 --max-requests=0 run
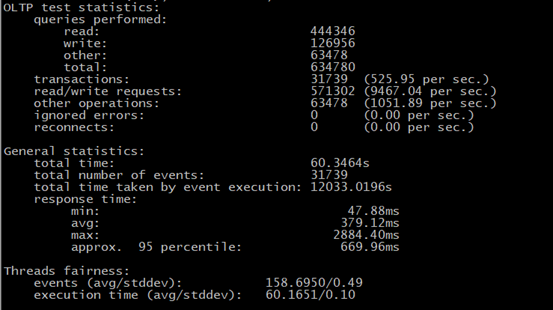
四、结果查看