1.前言
我们知道在ASP.NET Web Forms中,一个URL请求往往对应一个aspx页面,一个aspx页面就是一个物理文件,它包含对请求的处理。
而在ASP.NET MVC中,一个URL请求是由对应的一个Controller中的Action来处理的,由URL Routing来告诉MVC如何定位到正确的Controller和Action。
总的来说,URL Routing包含两个主要功能:解析URL 和 生成URL,本文将围绕这两个大点进行讲解。
2.URL ROUTING的定义方式
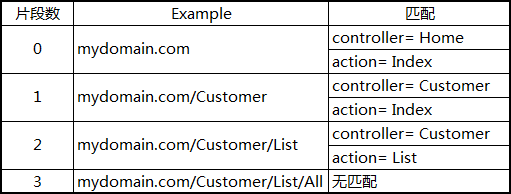
在域名的后面,默认使用“/”来对URL进行分段。路由系统通过类似于 {controller}/{action} 格式的字符串可以知道这个URL的 Admin 和 Index 两个片段分别对应Controller和Action的名称。
默认情况下,路由格式中用“/”分隔的段数是和URL域名的后面的段数是一致的,比如,对于{controller}/{action} 格式只会匹配两个片段。如下表所示:

URL路由是在MVC工程中的App_Start文件夹下的RouteConfig.cs文件中的RegisterRoutes方法中定义的,下面是创建一个空MVC项目时系统生成的一个简单URL路由定义:
public static void RegisterRoutes(RouteCollection routes) {
    routes.IgnoreRoute("{resource}.axd/{*pathInfo}");
    routes.MapRoute(
        name: "Default",
        url: "{controller}/{action}/{id}",
        defaults: new { controller = "Home", action = "Index",  id = UrlParameter.Optional }
    );
}
静态方法RegisterRoutes是在Global.asax.cs文件中的Application_Start方法中被调用的,除了URL路由的定义外,还包含其他的一些MVC核心特性的定义:
protected void Application_Start() {
    AreaRegistration.RegisterAllAreas();
    WebApiConfig.Register(GlobalConfiguration.Configuration);
    FilterConfig.RegisterGlobalFilters(GlobalFilters.Filters);
    RouteConfig.RegisterRoutes(RouteTable.Routes);
    BundleConfig.RegisterBundles(BundleTable.Bundles);
}
RouteConfig.RegisterRoutes方法中传递的是 RouteTable 类的静态 Routes 属性,返回一个RouteCollection的实例。其实,“原始”的定义路由的方法可以这样写:
public static void RegisterRoutes(RouteCollection routes) {

    Route myRoute = new Route("{controller}/{action}", new MvcRouteHandler());
    routes.Add("MyRoute", myRoute);
}
创建Route对象时用了一个URL格式字符串和一个MvcRouteHandler对象作为构造函数的参数。不同的ASP.NET技术有不同的RouteHandler,MVC用的是MvcRouteHandler。
这种写法有点繁琐,一种更简单的定义方法是:
public static void RegisterRoutes(RouteCollection routes) {
    routes.MapRoute("MyRoute", "{controller}/{action}");
}
这种方法简洁易读,一般我们都会用这种方法定义路由。
3.示例准备
public class HomeController : Controller {

    public ActionResult Index() {
        ViewBag.Controller = "Home";
        ViewBag.Action = "Index";
        return View("ActionName");
    }
}
public class CustomerController : Controller {

    public ActionResult Index() {
        ViewBag.Controller = "Customer";
        ViewBag.Action = "Index";
        return View("ActionName");
    }

    public ActionResult List() {
        ViewBag.Controller = "Customer";
        ViewBag.Action = "List";
        return View("ActionName");
    }
}
public class AdminController : Controller {

    public ActionResult Index() {
        ViewBag.Controller = "Admin";
        ViewBag.Action = "Index";
        return View("ActionName");
    }
}
@{
    Layout = null;
}
<!DOCTYPE html>
<html>
<head>
    <meta name="viewport" content="width=device-width" />
    <title>ActionName</title>
</head>
<body>
    <div>The controller is: @ViewBag.Controller</div>
    <div>The action is: @ViewBag.Action</div>
</body>
</html>
public static void RegisterRoutes(RouteCollection routes) {
    routes.MapRoute("MyRoute", "{controller}/{action}");
}
4.给片段变量定义默认值
routes.MapRoute("MyRoute", "{controller}/{action}", new { controller = "Home", action = "Index" });
各种匹配情况:
5.定义静态片段
并不是所有的片段都是用来作为匹配变量的,比如,我们想要URL加上一个名为Public的固定前缀,那么我们可以这样定义:
routes.MapRoute("", "Public/{controller}/{action}", new { controller = "Home", action = "Index" });
这样,请求的URL也需要一个Public前缀与之匹配。我们也可以把静态的字符串放在大括号以外的任何位置,如:
routes.MapRoute("", "X{controller}/{action}", new { controller = "Home", action = "Index" });
在一些情况下这种定义非常有用。比如当你的网站某个链接已经被用户普遍记住了,但这一块功能已经有了一个新的版本,但调用的是不同名称的controller,那么你把原来的controller名称作为现在controller的别名。这样,用户依然使用他们记住的URL,而导向的却是新的controller。如下使用Shop作为Home的一个别名:
routes.MapRoute("ShopSchema", "Shop/{action}", new { controller = "Home" });
6.自定义片段变量
自定义片段变量的定义和取值
contrlloer和action片段变量对MVC来说有着特殊的意义,在定义一个路由时,我们必须有这样一个概念:contrlloer和action的变量值要么能从URL中匹配得到,要么由默认值提供,总之一个URL请求经过路由系统交给MVC处理时必须保证contrlloer和action两个变量的值都有。当然,除了这两个重要的片段变量,我们也可从通过自定义片段变量来从URL中得到我们想要的其它信息。如下自定义了一个名为Id的片段变量,而且给它定义了默认值:
routes.MapRoute("MyRoute", "{controller}/{action}/{id}",
    new{
        controller = "Home",
        action = "Index",
        id = "DefaultId"});
});
我们在HomeController中增加一个名为CustomVariable的ACtion来演示一下如何取自定义的片段变量:
publicActionResult CustomVariable() {
    ViewBag.Controller = "Home";
    ViewBag.Action = "CustomVariable";
    ViewBag.CustomVariable = RouteData.Values["id"];
    return View("ActionName");
}
可以通过 RouteData.Values[segment] 来取得任意一个片段的变量值。
7.将自定义片段变量作为Action方法的参数
我们可以将自定义的片段变量当作参数传递给Action方法,如下所示:
public ActionResult CustomVariable(string id) {
    ViewBag.Controller = "Home";
    ViewBag.Action = "CustomVariable";
    ViewBag.CustomVariable =id;
    return View("ActionName");
}
效果和上面是一样的,只不过这样省去了用 RouteData.Values[segment] 的方式取自定义片段变量的麻烦。这个操作背后是由模型绑定来做的。
8.指定自定义片段变量为可选
指定自定片段变量为可选,即在URL中可以不用指定片段的值。如下面的定义将Id定义为可选:
routes.MapRoute("MyRoute", "{controller}/{action}/{id}", new {
        controller = "Home",
        action = "Index",
        id=UrlParameter.Optional
});
定义为可选以后,需要对URL中没有Id这个片段值的情况进行处理,如下:
public ActionResult CustomVariable(string id) {
    ViewBag.Controller = "Home";
    ViewBag.Action = "CustomVariable";
    ViewBag.CustomVariable = id == null ? "<no value>" : id;
    return View("ActionName");
}
当Id是整型的时候,参数的类型需要改成可空的整型(即int? id)。
为了省去判断参数是否为空,我们也可以把Action方法的id参数也定义为可选,当没有提供Id参数时,Id使用默认值,如下所示:
public ActionResult CustomVariable(string id = "DefaultId") {
    ViewBag.Controller = "Home";
    ViewBag.Action = "CustomVariable";
    ViewBag.CustomVariable = id;
    return View("ActionName");
}
routes.MapRoute("MyRoute", "{controller}/{action}/{id}", new { controller = "Home", action = "Index", id = "DefaultId" });
9. 定义可变数量的自定义片段变量
我们可以通过 catchall 片段变量加 * 号前缀来定义匹配任意数量片段的路由。如下所示:
routes.MapRoute("MyRoute", "{controller}/{action}/{id}/{*catchall}",
new { controller = "Home", action = "Index",  id = UrlParameter.Optional });
这个路由定义的匹配情况如下所示:
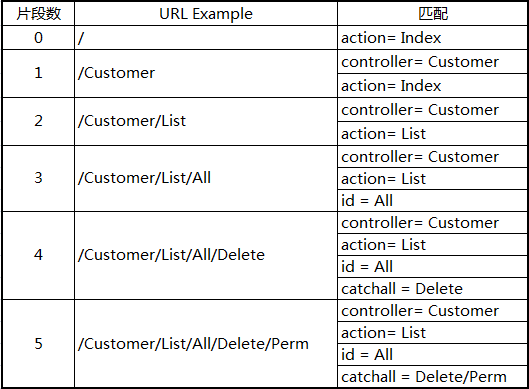
使用*catchall,将匹配的任意数量的片段,但我们需要自己通过“/”分隔catchall变量的值来取得独立的片段值。
10. 路由约束
正则表达式约束
通过正则表达式,我们可以制定限制URL的路由规则,下面的路由定义限制了controller片段的变量值必须以 H 打头:
我们可以用正则表达式约束来定义只有指定的几个特定的片段值才能进行匹配,如下所示:
routes.MapRoute("MyRoute", "{controller}/{action}/{id}",
    new { controller = "Home", action = "Index", id = UrlParameter.Optional },
    new { controller = "^H.*", action = "^Index$|^About$" }
);
这个定义,限制了只能访问controller以H打着的,action片段值只能是Index或About,不区分大小写。
Http请求方式约束
我们还可以限制路由只有当以某个特定的Http请求方式才能匹配。如下限制了只能是Get请求才能进行匹配:
routes.MapRoute("MyRoute", "{controller}/{action}/{id}",
    new { controller = "Home", action = "Index", id = UrlParameter.Optional },
    new { controller = "^H.*", httpMethod = new HttpMethodConstraint("GET") }
);
通过创建一个 HttpMethodConstraint 类的实例来定义一个Http请求方式约束,构造函数传递是允许匹配的Http方法名。这里的httpMethod属性名不是规定的,只是为了区分。
这种约束也可以通过HttpGet或HttpPost过滤器来实现。
自定义路由约束
如果标准的路由约束满足不了你的需求,那么可以通过实现 IRouteConstraint 接口来定义自己的路由约束规则。
我们来做一个限制浏览器版本访问的路由约束。在MVC工程中添加一个文件夹,取名Infrastructure,然后添加一个 UserAgentConstraint 类文件,代码如下:
public class UserAgentConstraint : IRouteConstraint {

    private string requiredUserAgent;

    public UserAgentConstraint(string agentParam) {
        requiredUserAgent = agentParam;
    }

    public bool Match(HttpContextBase httpContext, Route route, string parameterName,
        RouteValueDictionary values, RouteDirection routeDirection) {

        return httpContext.Request.UserAgent != null
            && httpContext.Request.UserAgent.Contains(requiredUserAgent);
    }
}
这里实现IRouteConstraint的Match方法,返回的bool值告诉路由系统请求是否满足自定义的约束规则。我们的UserAgentConstraint类的构造函数接收一个浏览器名称的关键字作为参数,如果用户的浏览器包含注册的关键字才可以访问。接一来,我们需要注册自定的路由约束:
public static void RegisterRoutes(RouteCollection routes) {

    routes.MapRoute("ChromeRoute", "{*catchall}",
        new { controller = "Home", action = "Index"},
        new { customConstraint = new UserAgentConstraint("Chrome") }
    );
}
11. 定义请求磁盘文件路由
并不是所有的URL都是请求controller和action的。有时我们还需要请求一些资源文件,如图片、html文件和JS库等。
我们先来看看能不能直接请求一个静态Html文件。在项目的Content文件夹下,添加一个html文件,内容随意。然后把URL定位到该文件,如下图:
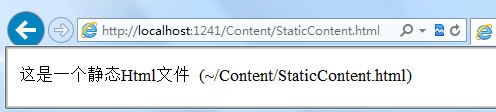
我们看到,是可以直接访问一静态资源文件的。
默认情况下,路由系统先检查URL是不是请求静态文件的,如果是,服务器直接返回文件内容并结束对URL的路由解析。我们可以通过设置 RouteCollection的 RouteExistingFiles 属性值为true 让路由系统对静态文件也进行路由匹配,如下所示:
public static void RegisterRoutes(RouteCollection routes) {

    routes.RouteExistingFiles = true;//

    routes.MapRoute("MyRoute", "{controller}/{action}/{id}/{*catchall}",
        new { controller = "Home", action = "Index", id = UrlParameter.Optional
    });
}
设置了routes.RouteExistingFiles = true后,还需要对IIS进行设置,这里我们以IIS Express为例,右键IIS Express小图标,选择“显示所有应用程序”,弹出如下窗口:
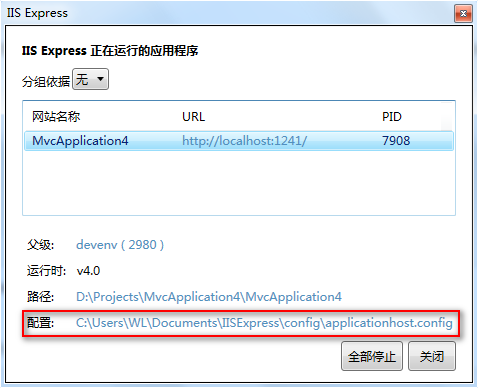
点击并打开配置文件,Control+F找到UrlRoutingModule-4.0,将这个节点的preCondition属性改为空,如下所示:
<add name="UrlRoutingModule-4.0" type="System.Web.Routing.UrlRoutingModule" preCondition=""/>
然后我们运行程序,再把URL定位到之前的静态文件:
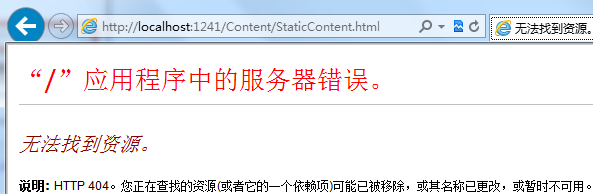
这样,路由系统通过定义的路由去匹配RUL,如果路由中没有定义该静态文件的匹配,则会报上面的错误。
一旦定义了routes.RouteExistingFiles = true,我们就要为静态文件定义路由,如下所示:
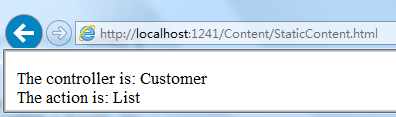
public static void RegisterRoutes(RouteCollection routes) {

    routes.RouteExistingFiles = true;

    routes.MapRoute("DiskFile", "Content/StaticContent.html",
        new { controller = "Customer", action = "List", });

    routes.MapRoute("MyRoute", "{controller}/{action}/{id}/{*catchall}",
        new { controller = "Home", action = "Index", id = UrlParameter.Optional });
}
这个路由匹配Content/StaticContent.html的URL请求为controller = Customer, action = List。我们来看看运行结果:
这样做的目的是为了可以在Controller的Action中控制对静态资源的请求,并且可以阻止对一些特殊资源文件的访问。
设置了RouteExistingFiles属性为true后,我们要为允许用户请求的资源文件进行路由定义,如果每种资源文件都去定义相应的路由,就会显得很繁琐。
我们可以通过RouteCollection类的IgnoreRoute方法绕过路由定义,使得某些特定的静态文件可以由服务器直接返回给给浏览器,如下所示:
public static void RegisterRoutes(RouteCollection routes) {

    routes.RouteExistingFiles = true;

    routes.IgnoreRoute("Content/{filename}.html");

    routes.MapRoute("DiskFile", "Content/StaticContent.html",
        new { controller = "Customer", action = "List", });

    routes.MapRoute("MyRoute", "{controller}/{action}/{id}/{*catchall}",
        new { controller = "Home", action = "Index", id = UrlParameter.Optional });
}
这样,只要是请求Content目录下的任何html文件都能被直接返回。这里的IgnoreRoute方法将创建一个RouteCollection的实例,这个实例的Route Handler 为 StopRoutingHandler,而不是 MvcRouteHandler。运行程序定位到Content/StaticContent.html,我们又看到了之前的静态面面了。
12. 生成URL
生成指向当前controller的action链接
<div>The controller is: @ViewBag.Controller</div>
<div>The action is: @ViewBag.Action</div>
<div>    @Html.ActionLink("This is an outgoing URL", "CustomVariable")
</div>
这里的Html.ActionLink方法将会生成指向View对应的Controller和第二个参数指定的Action,我们可以看看运行后页面是如何显示的:
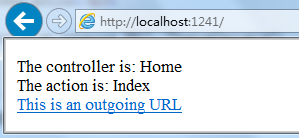
经过查看Html源码,我们发现它生成了下面这样的一个html链接:
<a href="/Home/CustomVariable">This is an outgoing URL</a>
这样看起来,通过Html.ActionLink生成URL似乎并没有直接在View中自己写一个<a>标签更直接明了。 但它的好处是,它会自动根据路由配置来生成URL,比如我们要生成一个指向HomeContrller中的CustomVariable Action的连接,通过Html.ActionLink方法,只需要给出对应的Controller和Action名称就行,我们不需要关心实际的URL是如何组织的。举个例子,我们定义了下面的路由:
public static void RegisterRoutes(RouteCollection routes) {

    routes.MapRoute("NewRoute", "App/Do{action}", new { controller = "Home"});

    routes.MapRoute("MyRoute", "{controller}/{action}/{id}",
        new { controller = "Home", action = "Index", id = UrlParameter.Optional });
}
运行程序,我们发现它会自动生成下面这样的连接:
<a href="/App/DoCustomVariable">This is an outgoing URL</a>
所以我们要生成指向某个Action的链接时,最好使用Html.ActionLink方法,否则你很难保证你手写的连接就能定位到你想要的Action。
生成其他controller的action链接
上面我们给Html.ActionLink方法传递的第二个参数只告诉了路由系统要定位到当前View对应的Controller下的Action。Html.ActionLink方法可以使用第三个参数来指定其他的Controller,如下所示:
<div>
    @Html.ActionLink("This targets another controller", "Index", "Admin")
</div>
<a href="/Admin">This targets another controller</a>
生成带有URL参数的链接
<div>   @Html.ActionLink("This is an outgoing URL", "CustomVariable", new { id = "Hello" })
</div>
<a href="/Home/CustomVariable/Hello">This is an outgoing URL</a>
指定链接的Html属性
<div>
    @Html.ActionLink("This is an outgoing URL",  "Index", "Home", null,
        new {id = "myAnchorID", @class = "myCSSClass"})
</div>
这里的class加了@符号,是因为class是C#关键字,@符号起到转义的作用。它生成 的Html代码如下:
<a class="myCSSClass" href="/"id="myAnchorID">This is an outgoing URL</a>
生成完整的标准链接
<div>
    @Html.ActionLink("This is an outgoing URL", "Index", "Home",
        "https", "myserver.mydomain.com", " myFragmentName",
        new { id = "MyId"},
        new { id = "myAnchorID", @class = "myCSSClass"})
</div>
这是Html.ActionLink方法中最多参数的重载方法,它允许我们提供请求的协议(https)和目标服务器地址(myserver.mydomain.com)等。它生成的链接如下:
<a class="myCSSClass" id="myAnchorID" href="https://myserver.mydomain.com/Home/Index/MyId#myFragmentName" > This is an outgoing URL</a>
生成URL字符串
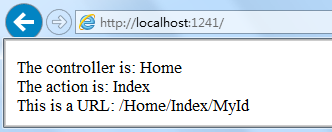
用Html.ActionLink方法生成一个html链接是非常有用而常见的,如果要生成URL字符串(而不是一个Html链接),我们可以用 Url.Action 方法,使用方法如下:
<div>This is a URL:
    @Url.Action("Index", "Home", new { id = "MyId" })
</div>
根据指定的路由名称生成URL
我们可以根据某个特定的路由来生成我们想要的URL,为了更好说明这一点,下面给出两个URL的定义:
public static void RegisterRoutes(RouteCollection routes) {
    routes.MapRoute("MyRoute", "{controller}/{action}");
    routes.MapRoute("MyOtherRoute", "App/{controller}/{action}", new { controller = "Home" });
}
对于这样的两个路由,对于类似下面这样的写法:
@Html.ActionLink("Click me", "Index", "Customer")
始终会生成这样的链接:
<a href="/Customer/Index">Click me</a>
也就是说,永远无法使用第二个路由来生成App前缀的链接。这时候我们需要通过另一个方法Html.RouteLink来生成URL了,方法如下:
@Html.RouteLink("Click me", "MyOtherRoute", new {controller="Customer",action="Index" });
<a href="/App/Customer/Index">Click me</a>
这个链接指向的是HomeController下的Index Action。但需要注意,通过这种方式来生成URL是不推荐的,因为它不能让我们从直观上看到它生成的URL指向的controller和action。所以,非到万不得已的情况才会这样用。
在Action方法中生成URL
Public ViewResult MyActionMethod() {

    string myActionUrl = Url.Action("Index", new { id = "MyID" });
    string myRouteUrl = Url.RouteUrl(new { controller = "Home", action = "Index" });

    //... do something with URLs...
    return View();
}
更多时候我们会在Action方法中将客户端浏览器重定向到别的URL,这时候我们使用RedirectToAction方法,如下:
public RedirectToRouteResultMyActionMethod() {
    return RedirectToAction("Index");
}
RedirectToAction的返回结果是一个RedirectToRouteResult类型,它使MVC触发一个重定向行为,并调用指定的Action方法。RedirectToAction也有一些重载方法,可以传入controller等信息。也可以使用RedirectToRoute方法,该方法传入的是object匿名类型,易读性强,如:
publicRedirectToRouteResult MyActionMethod() {
    return RedirectToRoute(new { controller = "Home", action = "Index", id = "MyID"});
}
13. URL方案最佳实践
下面是一些使用URL的建议:
- 最好能直观的看出URL的意义,不要用应用程序的具体信息来定义URL。比如使用 /Articles/Report 比使用 /Website_v2/CachedContentServer/FromCache/Report 好。
- 使用内容标题比使用ID好。比如使用 /Articles/AnnualReport 比使用 /Articles/2392 好。如果一定要使用使用ID(比如有时候可能需要区分相同的标题),那么就两者都用,如 /Articles/2392/AnnualReport ,它看起来很长,但对用户更友好,而且更利于SEO。
- 对于Web页面不要使用文件扩展名(如 .aspx 或 .mvc)。但对于特殊的文件使用扩展名(如 .jpg、.pdf 和 .zip等)。
- 尽可能使用层级关系的URL,如 /Products/Menswear/Shirts/Red,这样用户就能猜到父级URL。
- 不区分大小写,这样方便用户输入。
- 正确使用Get和Post。Get一般用来从服务器获取只读的信息,当需要操作更改状态时使用Post。
- 尽可能避免使用标记符号、代码、字符序列等。如果你想要用标记进行分隔,就使用中划线(如 /my-great-article),下划线是不友好的,另外空格和+号都会被URL编码。
- 不要轻易改变URL,尤其对于互联网网站。如果一定要改,那也要尽可能长的时间保留原来的URL。
- 尽量让URL使用统一的风格或习惯。
注以上内容来自于:《Pro ASP.NET MVC 4 4th Edition》
附:RouterDebugger安装使用说明 :
1.安装
在程序包控制台中执行命令
PM> Install-Package routedebugger
安装成功后Web.config文件中会自动加入行
<add key="RouteDebugger:Enabled"value="true" />
2.使用
MVC3中需要在文件Global.asax中 Application_Start() 中添加代码 PreApplicationStart.Start(); MVC4 以后不需要
如下样式:
protected voidApplication_Start() {
 RegisterRoutes(RouteTable.Routes);
 PreApplicationStart.Start(); //....... }
3.禁用
web.config中
<add key="RouteDebugger:Enabled" value="true" />
改为
<add key="RouteDebugger:Enabled" value="false" />