parted命令可以划分单个分区大于2T的GPT格式的分区,也可以划分普通的MBR分区
fdisk命令对于大于2T的分区无法划分,所以用fdisk无法看到parted划分的GPT格式的分区
1. 用 fdisk 分区
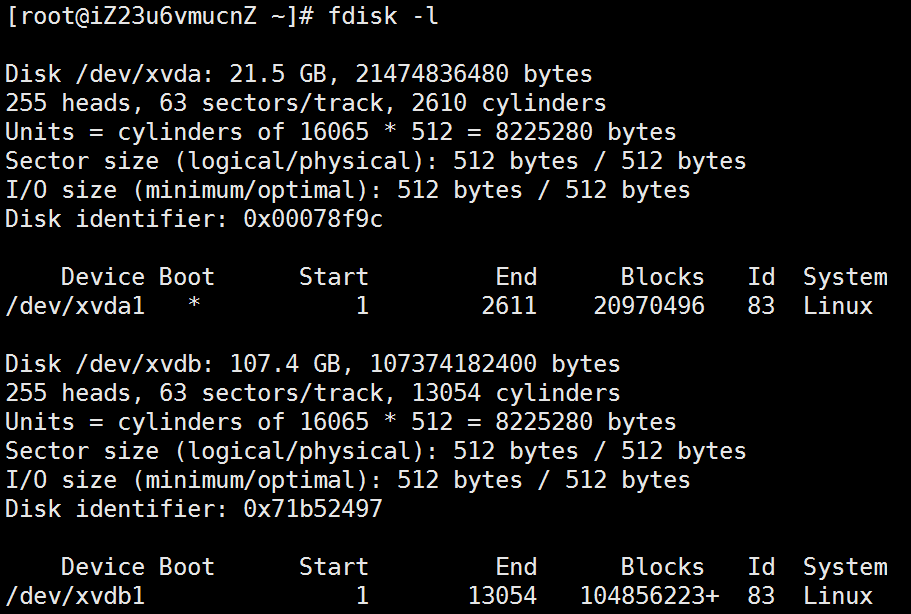
1.1 查看硬盘状态
[root@Lenovo~]# fdisk -l
出现类似下面的信息(以下提示信息仅供参考,有的并非本人实际操作时的屏幕显示,但意思是一样 的):
Disk/dev/sda: 10.7 GB, 10737418240 bytes
255heads, 63 sectors/track, 1305 cylinders
Units= cylinders of 16065 * 512 = 8225280 bytes
Diskidentifier: 0x0007d856
DeviceBoot Start End Blocks Id System
/dev/sda1 * 1 25 200781 83 Linux
/dev/sda2 26 1305 10281600 8e LinuxLVM
Disk /dev/sdb: 2147 MB, 2147483648 bytes <=新硬盘
255heads, 63 sectors/track, 261 cylinders
Units= cylinders of 16065 * 512 = 8225280 bytes
Diskidentifier: 0x00000000
Disk /dev/sdb doesn't contain a validpartition table
1.2 用 fdisk 对硬盘进行分区
[root@Lenovo~]#fdisk /dev/sdb
Devicecontains neither a valid DOS partition table, nor Sun, SGI or OSF disklabel
Buildinga new DOS disklabel with disk identifier 0x623223a1.
Changeswill remain in memory only, until you decide to write them.
Afterthat, of course, the previous content won't be recoverable.
Warning: invalid flag 0x0000 ofpartition table 4 will be corrected by w(rite)
Command (m for help): p <=显示信息
Disk /dev/sdb: 1002.2 GB, 10*** bytes
255heads, 63 sectors/track, 121601 cylinders
Units= cylinders of 16065 * 512 = 8225280 bytes
Diskidentifier: 0x623223a1
DeviceBoot Start End Blocks Id System
Command (m for help): n <=新建分区
Commandaction
e extended
p primarypartition (1-4)
p <=新建主分区
Partitionnumber (1-4): 1 <=分区号为1,即/dev/sdb1
Firstcylinder (1-261, default 1): 回车取默认值
Usingdefault value 1
Lastcylinder or +size or +sizeM or +sizeK (1-261, default 261): 回车取默认值
Usingdefault value 261
Command (m for help): p <=显示分区信息
Disk /dev/sdb: 2147 MB, 2147483648 bytes
255heads, 63 sectors/track, 261 cylinders
Units= cylinders of 16065 * 512 = 8225280 bytes
Diskidentifier: 0x623223a1
DeviceBoot Start End Blocks Id System
/dev/sdb1 1 261 2096451 83 Linux
Command (m for help): w <=保存退出
Thepartition table has been altered!
Callingioctl() to re-read partition table.
Syncingdisks.
1.3 格式化分区
# mkfs.ext4 -L disk2 /dev/sdb1 --格式化的同时给新硬盘加标签为 disk2
或者 mkfs.ext4 /dev/sdb1 --只格式化但不加标签
单独加标签的命令是: # e2label /dev/sdb1 /disk2
1.4 创建挂载点
[root@Lenovo~]# mkdir /disk2
1.5 开机时自动挂载分区
[root@Lenovo~]# vi /etc/fstab
添加一行:
/dev/sdb1 /disk2 ext4 auto 1 2
若一次性手动挂载分区 ,使用命令: #mount /dev/sdb1 /disk2/
1.6 设置新硬盘或分区的读写权限:
# chmod -R 777 /disk2
这样所有计算机的用户都可以读写该分区,即/disk2盘了
2. 用 parted 分区
2.1 安装
yum install -y parted
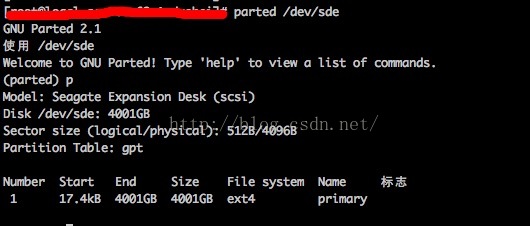
2.2 使用命令进入交互模式并且查看当前硬盘分区信息
parted /dev/sde
p
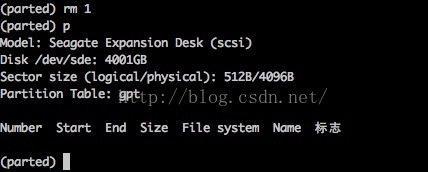
2.3 删除当前存在分区,并在此查看结果(为了写这个教程,我把刚分区好的硬盘又删除了^~^!!)
rm 1
p
2.4 将硬盘格式化为gpt
mklabel gpt

2.5 对磁盘分区,将整个硬盘分为一个区域
mkpart primary 0 -1
Ignore
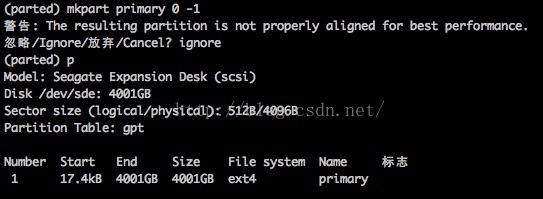
parted执行mkpart primary会直接分区(而fdisk需要保存)
2.6 退出parted
quit
2.7 完成分区之后,就开始格式化分区的工作了
mkfs.ext4 /dev/sde1
格式化与挂载及之后的操作都与 fdisk 类似
转自:https://zhidao.baidu.com/question/303523188254562564.html
http://blog.itpub.net/29392174/viewspace-1064061/
http://tomhat.iteye.com/blog/2303968
https://www.cnblogs.com/zishengY/p/7137671.html
查看硬盘个数及分区情况:fdisk -l;
查看硬盘使用情况:df -hl