本章的重点是对产品信息增加排序和分页的功能,以及使用ASP.NET Routing特性添加更加友好的URL支持。
注意:如果你想按照本章的代码编写示例,你必须完成第四章或者直接从www.apress.com下载第四章的源代码。
5.1 按照价格对产品进行排序
为了演示如何进行排序,我们将使用一个简单的例子让用户可以对产品按照价格进行排序。
首先,我们向ControllersProductsController.cs文件中的Index方法添加一个switch语句,以便可以按照价格对产品信息进行排序,修改之处如下列高亮显示的代码:
 1 public ActionResult Index(string category, string search, string sortBy)
 2 {
 3     // instantiate a new view model
 4     ProductIndexViewModel viewModel = new ProductIndexViewModel();
 5
 6     // select the products
 7     var products = db.Products.Include(p => p.Category);
 8
 9     // perform the search and save the search string to the vieModel
10     if (!string.IsNullOrEmpty(search))
11     {
12         products = products.Where(p => p.Name.Contains(search) || p.Description.Contains(search) || p.Category.Name.Contains(search));
13         viewModel.Search = search;
14     }
15
16     // group search results into categories and count how many item in each category
17     viewModel.CatsWithCount = from matchinngProducts in products
18                               where matchinngProducts.CategoryID != null
19                               group matchinngProducts by matchinngProducts.Category.Name into catGroup
20                               select new CategoryWithCount()
21                               {
22                                   CategoryName = catGroup.Key,
23                                   ProductCount = catGroup.Count()
24                               };
25
26     if (!string.IsNullOrEmpty(category))
27     {
28         products = products.Where(p => p.Category.Name == category);
29     }
30
31     // sort the results
32     switch (sortBy)
33     {
34         case "price_lowest":
35             products = products.OrderBy(p => p.Price);
36             break;
37         case "price_highest":
38             products = products.OrderByDescending(p => p.Price);
39             break;
40         default:
41             break;
42     }
43
44     viewModel.Products = products;
45
46     return View(viewModel);
47 }
这段代码分别使用Entity Framework的OrderBy和OrderByDescending方法,按照价格对产品信息进行升序或降序操作。不调试启动应用程序,然后手动修改URL以测试排序是否按照预期正确工作,URL的格式分别为Products?sortBy=price_lowest和Products?sortBy=price_highest。产品信息应该分别显示为最低价格显示在列表的头部和最高价格显示在列表的头部。图5-1显示的是按照最高价格来显示产品信息。

图5-1:按照最高价格优先排序的产品列表
5.1.1 向产品的索引(Index)视图添加排序
我们需要向站点中添加一些用户接口控件以允许用户可以按照他们的意图来进行排序。为了演示这个功能,我们需要添加一个下拉列表以及一个填充该下拉列表值和文本的字典。
首先,向ViewModelsProductIndexViewModel.cs文件中的ProductIndexViewModel类添加SortBy和Sorts属性,具体代码如下列高亮显示的代码:
 1 using System.Collections.Generic;
 2 using System.Linq;
 3 using System.Web.Mvc;
 4 using BabyStore.Models;
 5
 6 namespace BabyStore.ViewModels
 7 {
 8     public class CategoryWithCount
 9     {
10         public int ProductCount { get; set; }
11         public string CategoryName { get; set; }
12         public string CatNameWithCount
13         {
14             get
15             {
16                 return CategoryName + " (" + ProductCount.ToString() + ")";
17             }
18         }
19     }
20
21     public class ProductIndexViewModel
22     {
23         public IQueryable<Product> Products { get; set; }
24         public string Search { get; set; }
25         public IEnumerable<CategoryWithCount> CatsWithCount { get; set; }
26         public string Category { get; set; }
27         public string SortBy { get; set; }
28         public Dictionary<string, string> Sorts { get; set; }
29
30         public IEnumerable<SelectListItem> CatFilterItems
31         {
32             get
33             {
34                 var allCats = CatsWithCount.Select(cc => new SelectListItem
35                 {
36                     Value = cc.CategoryName,
37                     Text = cc.CatNameWithCount
38                 });
39
40                 return allCats;
41             }
42         }
43     }
44 }
SortBy属性用于保存在视图中的Select元素的名称,Sorts属性用于保存显示在Select元素中的数据。
现在,我们需要在ProductController类中为Sorts属性赋值。修改ControllersProductsController.cs文件,在Index方法的最后,返回视图的代码之前添加下列高亮显示的代码:
 1 // GET: Products
 2 public ActionResult Index(string category, string search, string sortBy)
 3 {
 4     // instantiate a new view model
 5     ProductIndexViewModel viewModel = new ProductIndexViewModel();
 6
 7     // select the products
 8     var products = db.Products.Include(p => p.Category);
 9
10     // perform the search and save the search string to the vieModel
11     if (!string.IsNullOrEmpty(search))
12     {
13         products = products.Where(p => p.Name.Contains(search) || p.Description.Contains(search) || p.Category.Name.Contains(search));
14         viewModel.Search = search;
15     }
16
17     // group search results into categories and count how many item in each category
18     viewModel.CatsWithCount = from matchinngProducts in products
19                               where matchinngProducts.CategoryID != null
20                               group matchinngProducts by matchinngProducts.Category.Name into catGroup
21                               select new CategoryWithCount()
22                               {
23                                   CategoryName = catGroup.Key,
24                                   ProductCount = catGroup.Count()
25                               };
26
27     if (!string.IsNullOrEmpty(category))
28     {
29         products = products.Where(p => p.Category.Name == category);
30     }
31
32     // sort the results
33     switch (sortBy)
34     {
35         case "price_lowest":
36             products = products.OrderBy(p => p.Price);
37             break;
38         case "price_highest":
39             products = products.OrderByDescending(p => p.Price);
40             break;
41         default:
42             break;
43     }
44
45     viewModel.Products = products;
46
47     viewModel.Sorts = new Dictionary<string, string>
48     {
49         { "Price low to high", "price_lowest" },
50         { "Price low to low", "price_highest" }
51     };
52
53     return View(viewModel);
54 }
最后,我们需要向视图添加一个控件,以便用户可以进行选择。为了完成这个功能,我们在ViewsProductsIndex.cshtml文件的按照分类来过滤产品信息的代码后面,添加下列高亮显示的代码:
 1 @model BabyStore.ViewModels.ProductIndexViewModel
 2
 3 @{
 4     ViewBag.Title = "Index";
 5 }
 6
 7 <h2>Index</h2>
 8
 9 <p>
10     @Html.ActionLink("Create New", "Create")
11     @using(Html.BeginForm("Index", "Products", FormMethod.Get))
12     {
13         <label>Filter by category:</label>@Html.DropDownListFor(vm => vm.Category, Model.CatFilterItems, "All");
14         <label>Sort by:</label>@Html.DropDownListFor(vm => vm.SortBy, new SelectList(Model.Sorts, "Value", "Key"), "Default")
15         <input type="submit" value="Filter"/>
16         <input type="hidden" name="Search" id="Search" value="@Model.Search"/>
17     }
18 </p>
19 <table class="table">
20     <tr>
21         <th>
22             @Html.DisplayNameFor(model => model.Category)
23         </th>
24         <th>
25             @Html.DisplayNameFor(model => model.Products.First().Name)
26         </th>
27         <th>
28             @Html.DisplayNameFor(model => model.Products.First().Description)
29         </th>
30         <th>
31             @Html.DisplayNameFor(model => model.Products.First().Price)
32         </th>
33         <th></th>
34     </tr>
35
36 @foreach (var item in Model.Products) {
37     <tr>
38         <td>
39             @Html.DisplayFor(modelItem => item.Category.Name)
40         </td>
41         <td>
42             @Html.DisplayFor(modelItem => item.Name)
43         </td>
44         <td>
45             @Html.DisplayFor(modelItem => item.Description)
46         </td>
47         <td>
48             @Html.DisplayFor(modelItem => item.Price)
49         </td>
50         <td>
51             @Html.ActionLink("Edit", "Edit", new { id=item.ID }) |
52             @Html.ActionLink("Details", "Details", new { id=item.ID }) |
53             @Html.ActionLink("Delete", "Delete", new { id=item.ID })
54         </td>
55     </tr>
56 }
57
58 </table>
新的Select控件使用视图模型的SortBy属性作为它的名字。使用视图模型的Sorts属性来生成现在在Select控件中的数据,其中Select控件的显示文本使用Sorts属性的Value值来指定,Select控件中数据的值使用Sorts属性的Key值来指定,如图5-2所示。
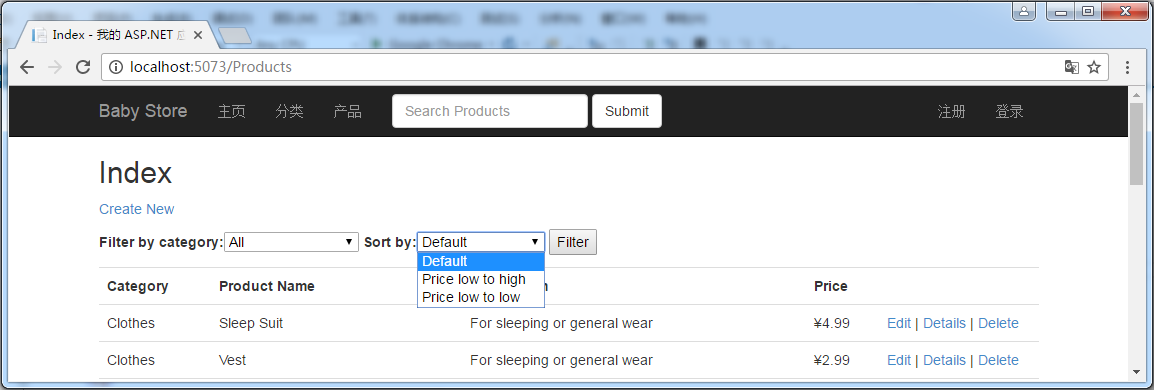
图5-2:在产品索引(Index)页面上的排序下拉列表
不调试启动应用程序,然后点击产品链接,在分类过滤下列列表后面,我们会看到一个用于按照价格排序的下列列表,如图5-2所示。我们可以使用这个新控件按照价格对产品信息进行排序。
5.2 添加分页
在这一小节,我们将学习一种添加分页的方法,以允许用户可以对产品搜索的结果进行分页,而不是将整个结果显示一个一个比较大的列表中。我们将使用流行的PagedList.Mvc包来实现该功能,该包由Troy Goode编写和维护。我们之所以选择它来进行分页功能的实现,是因为该包比较容易设置和使用。在本书的后边章节,我们将学习如何编写我们自己的异步分页代码,并使用一个HTML辅助器来显示分页控件。
5.2.1 安装PagedList.Mvc
首先,我们需要安装包,点击【项目】-【管理NuGet程序包】,打开NuGet包管理器窗体,在该窗体中,选择浏览标签,然后搜索pagedlist,如图5-3所示。点击安装按钮安装PagedList.Mvc的最新版本(目前最新版本为4.5.0)。当安装PagedList.Mvc后,PagedList包也被安装上了。
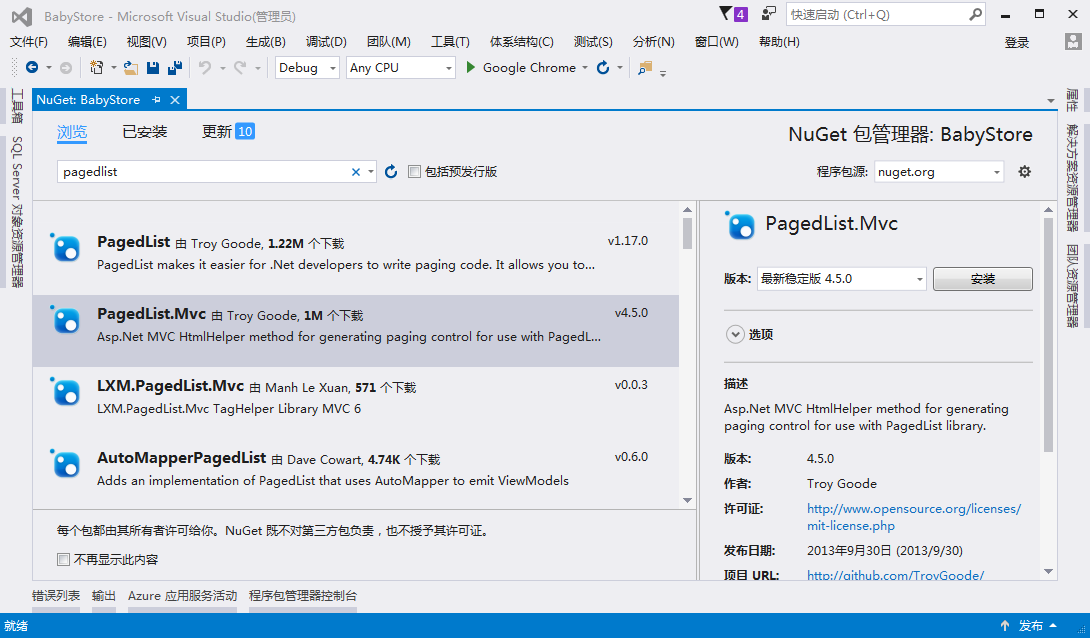
图5-3:NuGet包管理器中显示的PagedList.Mvc
5.2.2 为实现分页更新视图模型和控制器
一旦安装完PagedList.Mvc,第一件事就是要修改ProductIndexViewModel,以便将Products属性的类型修改为IPagedList。修改ViewModelsProductIndexViewModel.cs文件中的代码如下列所示的高亮代码:
 1 using System.Collections.Generic;
 2 using System.Linq;
 3 using System.Web.Mvc;
 4 using BabyStore.Models;
 5 using PagedList;
 6
 7 namespace BabyStore.ViewModels
 8 {
 9     ... ...
10
11     public class ProductIndexViewModel
12     {
13         public IPagedList<Product> Products { get; set; }
14         public string Search { get; set; }
15         public IEnumerable<CategoryWithCount> CatsWithCount { get; set; }
16         public string Category { get; set; }
17         public string SortBy { get; set; }
18         public Dictionary<string, string> Sorts { get; set; }
19
20         ... ...
21     }
22 }
我们现在需要修改ProductsController类的Index方法,以便Products作为PagedList返回(使用ToPagedList()方法完成)。为了使用PagedLIst,我们还需要设置默认排序。为了使用PagedList包,我们首先需要在该文件的顶部添加using PagedList;代码,然后修改ControllersProductsController.cs文件为下列高亮显示的代码。
 1 public ActionResult Index(string category, string search, string sortBy, int? page)
 2 {
 3     // instantiate a new view model
 4     ProductIndexViewModel viewModel = new ProductIndexViewModel();
 5
 6     // select the products
 7     var products = db.Products.Include(p => p.Category);
 8
 9     // perform the search and save the search string to the vieModel
10     if (!string.IsNullOrEmpty(search))
11     {
12         products = products.Where(p => p.Name.Contains(search) || p.Description.Contains(search) || p.Category.Name.Contains(search));
13         viewModel.Search = search;
14     }
15
16     // group search results into categories and count how many item in each category
17     viewModel.CatsWithCount = from matchinngProducts in products
18                               where matchinngProducts.CategoryID != null
19                               group matchinngProducts by matchinngProducts.Category.Name into catGroup
20                               select new CategoryWithCount()
21                               {
22                                   CategoryName = catGroup.Key,
23                                   ProductCount = catGroup.Count()
24                               };
25
26     if (!string.IsNullOrEmpty(category))
27     {
28         products = products.Where(p => p.Category.Name == category);
29         viewModel.Category = category;
30     }
31
32     // sort the results
33     switch (sortBy)
34     {
35         case "price_lowest":
36             products = products.OrderBy(p => p.Price);
37             break;
38         case "price_highest":
39             products = products.OrderByDescending(p => p.Price);
40             break;
41         default:
42             products = products.OrderBy(p => p.Name);
43             break;
44     }
45
46     const int pageItems = 3;
47     int currentPage = (page ?? 1);
48     viewModel.Products = products.ToPagedList(currentPage, pageItems);
49     viewModel.SortBy = sortBy;
50
51     viewModel.Sorts = new Dictionary<string, string>
52     {
53         { "Price low to high", "price_lowest" },
54         { "Price low to low", "price_highest" }
55     };
56
57     return View(viewModel);
58 }
第一处改动是添加了一个int? page参数,它是一个可空整型,表示用户在视图中选择的当前页码。当第一次加载产品的索引(Index)页面时,用户还没有选择任何页码,因此,这个参数可以为null。
我们必须确保当前的分类也要保存在视图模型中,因此,我们添加了viewModel.Category = category;这行代码。
代码products = products.OrderBy(p => p.Name);用于对产品列表进行默认排序,这是因为PagedList要求列表必须是一个有序列表。
接着,我们使用代码const int pageItems = 3;来指定每页显示的条目数。然后,我们声明了一个整型变量int currentPage = (page ?? 1);来保存当前页码,该变量的值是page参数的值,或者是1(当page变量为null时)。
我们使用代码viewModel.Products = products.ToPagedList(currentPage, PageItems);,对产品信息调用了ToPagedList方法,并将当前页和每页显示的条目数传递给了ToPagedList方法,然后将该方法的返回值赋值给了视图模型的Products属性。
我们使用代码viewModel.SortBy = sortBy;将sortBy参数的值保存到视图模型的SortBy属性中,以便我们从一页移动到另一页时,产品的排序保持不变。
5.2.3 为实现分页更新产品的索引(Index)视图
在视图模型和控制器中完成了实现分页的代码之后,现在,我们需要更新ViewsProductsIndex.cshtml文件来显示一个分页控件,以便用户可以在各页之间移动。我们同时也添加了有多少条目被发现的指示信息。为了完成这些功能,我们在该文件中添加了一个using语句,一个产品总数的指示信息以及在该页底部显示一个页面之间的链接,具体代码如下面的高亮显示的代码:
 1 @model BabyStore.ViewModels.ProductIndexViewModel
 2 @using PagedList.Mvc
 3
 4 @{
 5     ViewBag.Title = "Index";
 6 }
 7
 8 <h2>Index</h2>
 9
10 <p>
11     @(string.IsNullOrWhiteSpace(Model.Search)?"Showing all":"You search for " + Model.Search + " found") @Model.Products.TotalItemCount products
12 </p>
13
14 <p>
15     @Html.ActionLink("Create New", "Create")
16     @using(Html.BeginForm("Index", "Products", FormMethod.Get))
17     {
18         <label>Filter by category:</label>@Html.DropDownListFor(vm => vm.Category, Model.CatFilterItems, "All");
19         <label>Sort by:</label>@Html.DropDownListFor(vm => vm.SortBy, new SelectList(Model.Sorts, "Value", "Key"), "Default")
20         <input type="submit" value="Filter"/>
21         <input type="hidden" name="Search" id="Search" value="@Model.Search"/>
22     }
23 </p>
24 <table class="table">
25     <tr>
26         <th>
27             @Html.DisplayNameFor(model => model.Category)
28         </th>
29         <th>
30             @Html.DisplayNameFor(model => model.Products.First().Name)
31         </th>
32         <th>
33             @Html.DisplayNameFor(model => model.Products.First().Description)
34         </th>
35         <th>
36             @Html.DisplayNameFor(model => model.Products.First().Price)
37         </th>
38         <th></th>
39     </tr>
40
41 @foreach (var item in Model.Products) {
42     <tr>
43         <td>
44             @Html.DisplayFor(modelItem => item.Category.Name)
45         </td>
46         <td>
47             @Html.DisplayFor(modelItem => item.Name)
48         </td>
49         <td>
50             @Html.DisplayFor(modelItem => item.Description)
51         </td>
52         <td>
53             @Html.DisplayFor(modelItem => item.Price)
54         </td>
55         <td>
56             @Html.ActionLink("Edit", "Edit", new { id=item.ID }) |
57             @Html.ActionLink("Details", "Details", new { id=item.ID }) |
58             @Html.ActionLink("Delete", "Delete", new { id=item.ID })
59         </td>
60     </tr>
61 }
62
63 </table>
64
65 <div>
66     Page @(Model.Products.PageCount < Model.Products.PageNumber ? 0 : Model.Products.PageNumber) of @Model.Products.PageCount
67     @Html.PagedListPager(Model.Products, page => Url.Action("Index", new { category = Model.Category, search = Model.Search, sortBy = Model.SortBy, page}))
68 </div>
指示有多少产品被发现的代码如下所示:
1 <p>
2     @(string.IsNullOrWhiteSpace(Model.Search)?"Showing all":"You search for " + Model.Search + " found") @Model.Products.TotalItemCount products
3 </p>
这段代码使用?:(也称之为三元)操作符检查搜索条件是否为null或空,如果结果为true,代码的输出结果为“Showing all xx products”,否则,如果用户输入了一个搜索条件,结果显示为“Your search for search term found xx products”。实际上,这个操作符是if语句的快捷方式,关于?:操作符的更多信息可以在https://msdn.microsoft.com/en-gb/library/ty67wk28.aspx找到。
最后,分页链接使用下列代码生成:
1 <div>
2     Page @(Model.Products.PageCount < Model.Products.PageNumber ? 0 : Model.Products.PageNumber) of @Model.Products.PageCount
3     @Html.PagedListPager(Model.Products, page => Url.Action("Index", new { category = Model.Category, search = Model.Search, sortBy = Model.SortBy, page}))
4 </div>
为了便于显示,这段代码包裹在div标签内。使用?:操作符的第一行代码决定是否有任何页码显示,它显示“Page 0 of 0”或者“Page x of y”,x表示当前页码,y表示总页数。
下一行代码使用来自于PagedList.Mvc命名空间的PagedListPager辅助器。该辅助器接收一个产品列表参数,并为每个页面生成一个超链接。Url.Action用于生成一个含有当前页参数超链接目标。我们将一个匿名类型(含有当前分类、搜索条件、排序信息和分页)传递给该辅助器方法,以便每个页面的链接中都包含一个查询字符串,这个查询字符串包含有当前分类、搜索条件、排序信息和分页信息。这意味着,当从一个页面移动到另一个页面时,搜索条件、选择的分类和排序规则都被保存下来。如果没有这样做,产品列表将会被重置为显示所有产品信息。
图5-4显示了使用上述代码后,我们执行了一个对sleeping的搜索,然后对其结果按照sleeping分类进行过滤,并按照价格从高到低进行排序,并且移动到第2页的效果。
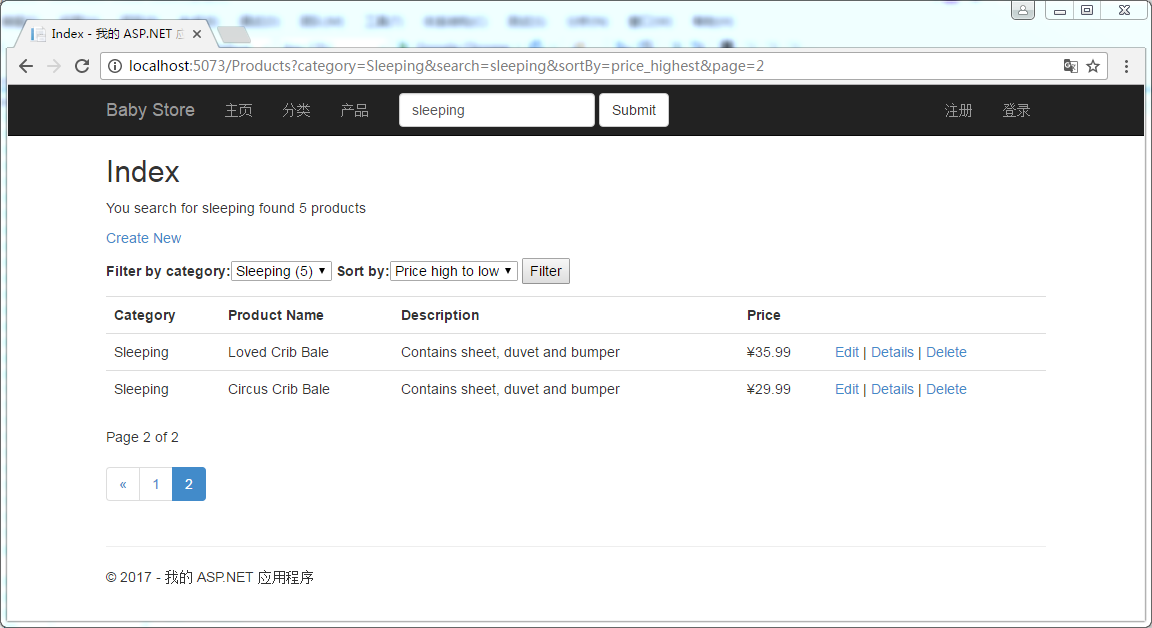
图5-4:伴有搜索条件、排序和按分类过滤的分页效果
5.3 路由
到目前为止,我们一直使用作为URL一部分的查询字符串中的参数,将分类和分页信息由视图传递给ProductController类的Index动作方法。这些URL的格式基本上为/Products?category=Sleeping&page=2,使用ASP.NET路由特性可以改进这些URL,以便让这些URL对于用户和搜索引擎更加友好和有意义。ASP.NET路由不仅能够用于MVC,也可以用于Web Forms和Web API。但是在应用到Web Forms时,使用方法稍有不同。
为了让事情更加可控,我们打算只为分类和分页生成路由。不为搜索或排序生成路由的原因是:路由系统需要为每一种情况都制定唯一的一种模式,该模式可以用来唯一标识它们自己。例如,我们可以使用page前缀加数字的形式来生成一个路由。如果为每种情况都添加一个路由,会使路由系统过度复杂,难以维护。
关于路由的最重要的一个事情是:最具体的路由要添加在路由列表的前面,更加通用的路由要添加在路由列表的后面。路由系统根据最先被定义的路由模式来匹配一个URL,并且只有在不匹配时,才会对下一条路由进行处理,当匹配时,就停止搜索。如果存在一个一般路由和一个更加具体的路由都匹配一个URL,但是更加具体的路由在一般路由的后面定义,那么更加具体的路由永远都不会被使用。
5.3.1 添加路由
我们将会采取和创建项目时,基架为我们在App_StartRouteConfig.cs文件中添加路由的方法一样,来添加新的路由。基架为我们添加的路由格式为:
1 routes.MapRoute(
2     name: "Name",
3     url: "Rule",
4     defaults: DefaultValues
5 );
name参数表示路由的名字,它可以为空,但是,在本书中我们都会使用该参数以区分不同的路由。
url参数包含与URL格式相匹配的某个路由的一条规则,它可以包含多个格式和参数,如下所示:
- url参数被分为多个片段,每个片段匹配URL的某个部分。
- URL必须与片段具有相同数量的参数,以匹配每一个片段,除非使用了默认值或通配符(参见下面列表中的每一个解释)。
- 每个片段可以是:
- 静态URL片段:例如,“Products”,这将会匹配/Products形式的URL,并且调用与之有关的控制器和动作方法。
- 片段变量:用于匹配任何事物。例如,“Products/{category}”将会匹配URL中跟在Products/后面的任何事物,并将其赋值给变量category,然后变量category会被传递给该路由的目标动作方法的参数(该参数的名称必须为category)。
- 静态片段和片段变量的组合:将会匹配与任何指定格式相匹配的URL。例如,“Products/Page{page}”将会匹配诸如Products/Page2或Products/Page99形式的URL,并且会将2或99赋值给变量page。
- 全匹配的片段变量:例如,“Products/{*everything}”将会匹配URL中Products/后面的部分,而不管URL包含多少片段数,也不管这些片段数的值是什么,它们都会赋给everything变量。在这个项目中,我们没有使用全匹配的片段变量。
- 每一个片段也可以指定为可选的,或者具有一个默认值(如果与之对应的URL部分为空)。一个比较好的使用默认值的例子是项目创建时,基架为我们创建的默认路由。这个路由使用下面的代码指定控制器和动作方法的默认值,并且定义了一个可选的id变量。
1 routes.MapRoute(
2     name: "Default",
3     url: "{controller}/{action}/{id}",
4     defaults: new { controller = "Home", action = "Index", id = UrlParameter.Optional }
5 );
我们添加一个与URL的格式/Products/Category(比如Products/Sleeping只显示分类为Sleeping的产品信息)相匹配的路由,来开始我们的路由学习。在App_StartRouteConfig.cs文件的RegisterRoutes方法的默认路由上面,添加下列高亮显示的代码:
 1 using System;
 2 using System.Collections.Generic;
 3 using System.Linq;
 4 using System.Web;
 5 using System.Web.Mvc;
 6 using System.Web.Routing;
 7
 8 namespace BabyStore
 9 {
10     public class RouteConfig
11     {
12         public static void RegisterRoutes(RouteCollection routes)
13         {
14             routes.IgnoreRoute("{resource}.axd/{*pathInfo}");
15
16             routes.MapRoute(
17                 name: "ProductsbyCategory",
18                 url: "Products/{category}",
19                 defaults: new { controller = "Products", action = "Index" }
20             );
21
22             routes.MapRoute(
23                 name: "Default",
24                 url: "{controller}/{action}/{id}",
25                 defaults: new { controller = "Home", action = "Index", id = UrlParameter.Optional }
26             );
27         }
28     }
29 }
不调试启动应用程序,然后点击分类链接,在分类索引页面点击Sleeping链接,这个链接打开的URL为/Product/Sleeping,如图5-5所示,这归功于我们刚刚添加的新路由ProductsbyCategory。
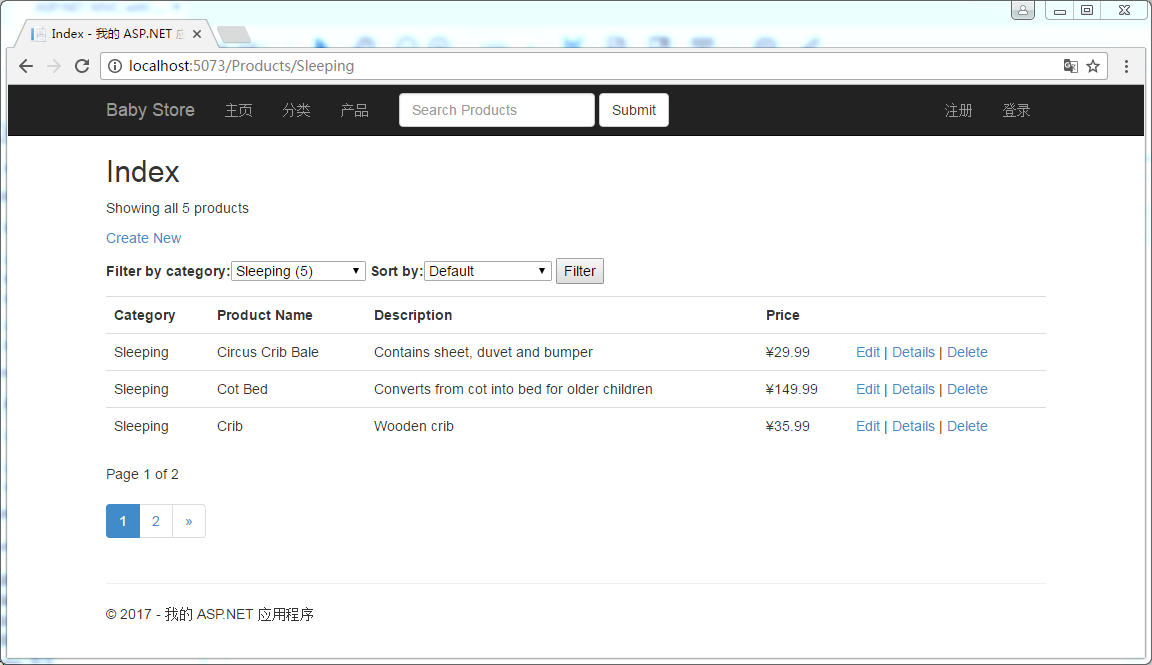
图5-5:格式为Products/Category的URL
到目前为止,一切看起来还不错,我们现在可以使用Products/Category格式的ULR了。但是,这里有一个问题。尝试着点击Create New链接,产品创建页面没有显示,取而代之的是一个显示了空的产品列表的页面。之所以出现这个问题,是因为新路由对出现在Products后面的任何事物看作是一个分类,而我们没有一个叫做Create的分类,因此,没有产品信息返回,如图5-6所示。
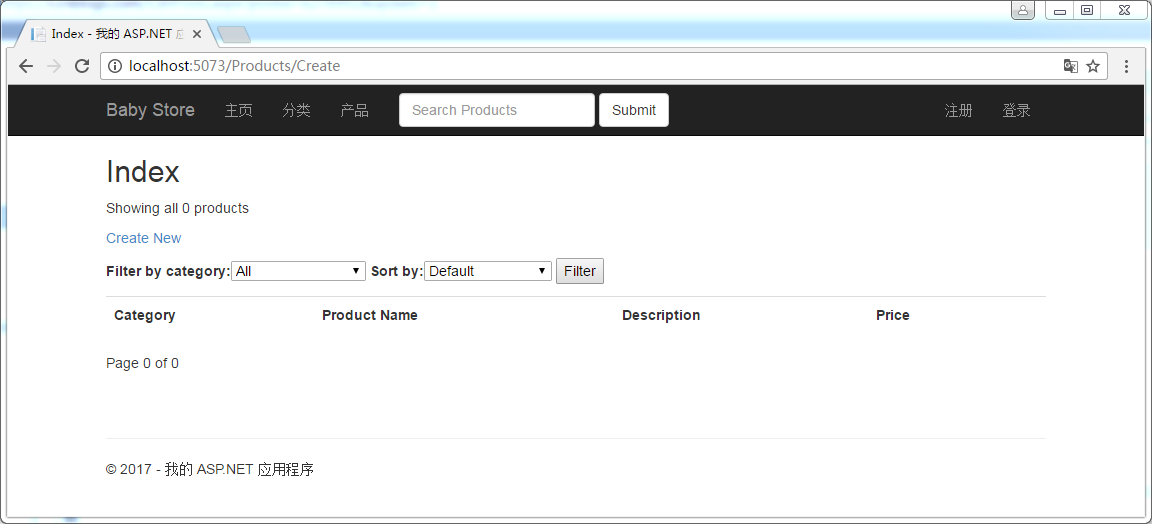
图5-6:出了问题的Create New链接
现在点击回退按钮返回到产品的索引(Index)页面,试着点击Edit、Details和Delete链接,它们依然正常工作!我们可能想知道为什么会这样,答案是这些链接都包含有一个ID参数,例如,编辑链接的格式为/Products/Edit/6,这个格式匹配原来的默认路由("{controller}/{action}/{id})而不是我们刚刚创建的ProductsbyCategory路由("Products/{category})。
为了解决这个问题,我们需要为格式为Products/Create的URL添加一个更加具体的路由。在App_StartRouteConfig.cs文件中的RegisterRoutes方法的ProductsbyCategory路由上面添加下面高亮显示的新路由代码:
 1 public static void RegisterRoutes(RouteCollection routes)
 2 {
 3     routes.IgnoreRoute("{resource}.axd/{*pathInfo}");
 4
 5     routes.MapRoute(
 6         name: "ProductsCreate",
 7         url: "Products/Create",
 8         defaults: new { controller = "Products", action = "Create" }
 9     );
10
11     routes.MapRoute(
12         name: "ProductsbyCategory",
13         url: "Products/{category}",
14         defaults: new { controller = "Products", action = "Index" }
15     );
16
17     routes.MapRoute(
18         name: "Default",
19         url: "{controller}/{action}/{id}",
20         defaults: new { controller = "Home", action = "Index", id = UrlParameter.Optional }
21     );
22 }
不调试启动应用程序,然后点击Create New链接,因为ProductsCreate路由,现在创建新产品的功能又能正常实现了。非常重要的一点是要把ProductsCreate路由放在ProductsByCategory路由上面,否则,它永远不会被使用。如果把它放在ProductsByCategory路由的下面,路由系统将会首先匹配“Products/{category}”,并将停止继续匹配路由。
下一步,我们将会为分页添加一个路由,以便应用程序可以使用格式为/Products/Page2的URL。更新App_StartRouteConfig.cs文件的RegisterRoutes方法,在该方法的ProductbyCategory路由上面添加一个新的路由,其代码如下所示:
新的ProductsByPage路由将会匹配任何形如Products/PageX的URL,在这儿X表示页码。再一次申明,这个路由要放在ProductsbyCategory的前面,否则,它将永远不会被使用。然后,点击页面下方的分页控件中的页码,现在形如Products/PageX格式的URL将会出现在地址栏中。比如,5-7显示的是点击分页控件中的数字4时,所生成的URL为Products/Page4的结果。
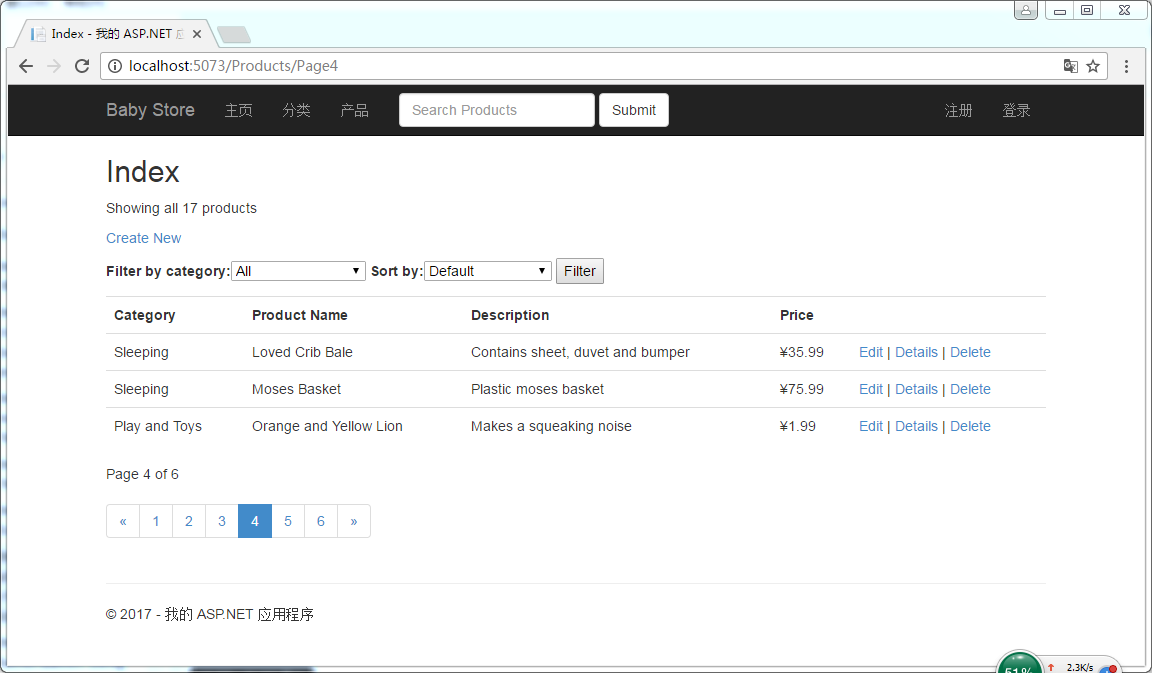
图5-7:格式为Products/PageX的路由
到目前为止,我们已经为Products/Category和Product/PageX添加了路由,但是,我们还没有为Product/Category/PageX添加路由,为了添加一条允许这种格式的新路由,我们在App_StartRouteConfig.cs文件中的RegisterRoutes方法的ProductsByPage路由上面,添加下列代码:
 1 public static void RegisterRoutes(RouteCollection routes)
 2 {
 3     routes.IgnoreRoute("{resource}.axd/{*pathInfo}");
 4
 5     routes.MapRoute(
 6         name: "ProductsCreate",
 7         url: "Products/Create",
 8         defaults: new { controller = "Products", action = "Create" }
 9     );
10
11     routes.MapRoute(
12         name: "ProductsbyCategorybyPage",
13         url: "Products/{category}/Page{page}",
14         defaults: new { controller = "Products", action = "Index" }
15     );
16
17     routes.MapRoute(
18         name: "ProductsbyPage",
19         url: "Products/Page{page}",
20         defaults: new { controller = "Products", action = "Index" }
21     );
22
23     routes.MapRoute(
24         name: "ProductsbyCategory",
25         url: "Products/{category}",
26         defaults: new { controller = "Products", action = "Index" }
27     );
28
29     routes.MapRoute(
30         name: "Default",
31         url: "{controller}/{action}/{id}",
32         defaults: new { controller = "Home", action = "Index", id = UrlParameter.Optional }
33     );
34 }
不调试启动应用程序,点击分类链接,然后点击Sleeping链接,紧接着再点击分页控件中的页码2,现在生成的URL的格式应该为Products/Sleeping/Page2,因为它匹配新的路由ProductsbyCategorybyPage。如图5-8所示。
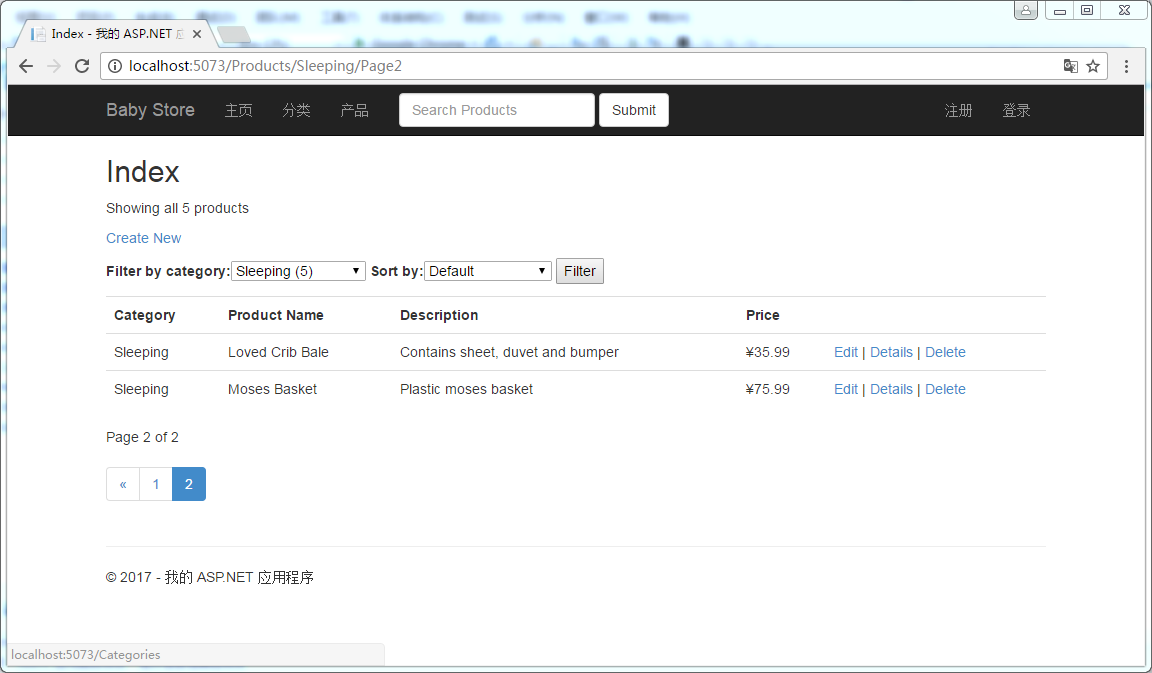
图5-8:ProductsbyCategorybyPage路由的格式
我们现在似乎添加完了所有的路由,但是,由于新添加路由的影响,现在应用程序存在一些小问题。先看第一个遗留问题,启动应用程序,导航到图5-8所示的页面。然后,在分类下拉列表中选择另一个分类,然后点击Filter按钮,我们将会看到结果没有变化,依然是遗留的Sleeping分类的产品信息。这是因为HTML表单的目标现在不再是正确的ProductsController控制器的Index动作方法了。为了解决这个问题,我们向/App_Start/RouteConfig.cs文件添加最后一个路由,然后配置HTML表单来使用它。
首先,在App_StartRoutesConfig.cs文件中的RegisterRoutes方法的默认路由的上面添加一个新路由,代码如下:
 1 public static void RegisterRoutes(RouteCollection routes)
 2 {
 3     routes.IgnoreRoute("{resource}.axd/{*pathInfo}");
 4
 5     routes.MapRoute(
 6         name: "ProductsCreate",
 7         url: "Products/Create",
 8         defaults: new { controller = "Products", action = "Create" }
 9     );
10
11     routes.MapRoute(
12         name: "ProductsbyCategorybyPage",
13         url: "Products/{category}/Page{page}",
14         defaults: new { controller = "Products", action = "Index" }
15     );
16
17     routes.MapRoute(
18         name: "ProductsbyPage",
19         url: "Products/Page{page}",
20         defaults: new { controller = "Products", action = "Index" }
21     );
22
23     routes.MapRoute(
24         name: "ProductsbyCategory",
25         url: "Products/{category}",
26         defaults: new { controller = "Products", action = "Index" }
27     );
28
29     routes.MapRoute(
30         name: "ProductsIndex",
31         url: "Products",
32         defaults: new { controller = "Products", action = "Index" }
33     );
34
35     routes.MapRoute(
36         name: "Default",
37         url: "{controller}/{action}/{id}",
38         defaults: new { controller = "Home", action = "Index", id = UrlParameter.Optional }
39     );
40 }
这条新的路由命名为ProductsIndex,它的目标是ProductsController控制器的Index动作方法。当使用URL链接和表单时,我们创建的这条路由会让应用程序调用ProductsController控制器的Index动作方法。
5.3.2 在窗体中使用路由
当前,在产品索引(Index)页面中的,按分类过滤产品信息的表单,其工作是不正确的,因为它依然被配置为调用ProductsController控制器类的Index方法。(译者注:其实,之所以工作不正确,是因为该表单的目标URL被ProductsbyCategory路由所匹配,因此,当形如http://localhost:58735/Products/Sleeping?Category=Feeding&SortBy=&Search=的URL向服务器发送请求时,会匹配ProductsbyCategory路由,该路由会将Sleeping赋值给category变量,该变量会传递给Index动作方法的category参数,因此,会导致依然是查询的Sleeping分类的产品,而不是Feeding分类的产品)。例如,当点击分类链接,然后再点击Sleeping链接,之后再在分类下拉列表中选择Feeding,最后点击Filter按钮提交表单,这时的URL格式为:
http://localhost:5073/Products/Sleeping?Category=Feeding&SortBy=&Search=
这个URL包含两个category参数:Sleeping和Feeding,因为应用程序只是简单地按照第一个匹配的参数进行过滤,因此,依然按照Sleeping分类进行产品信息的过滤。为了解决这个问题,包含按照分类过滤产品的表单应该使用ProductsIndex路由,该路由会将/Sleeping?Category=Feeding&SortBy=&Search=中的/Sleeping前缀移除,并将?Category=Feeding&SortBy=&Search=作为查询字符串的参数提交给Index动作方法,这个时候只有Category=Feeding才作为category参数传递给Index动作方法的category参数。
为了让表单使用ProductsIndex路由,修改ViewsProductsIndex.cshtml文件,将其中的
1 @using (Html.BeginForm("Index", "Products", FormMethod.Get))
修改为
1 @using (Html.BeginRouteForm("ProductsIndex", FormMethod.Get))
不调试启动应用程序,然后点击分类链接,然后再点击分类索引页中的Sleeping链接,然后再点击分页控件中的页码2,这时应该如5-8所示。然后再分类下拉列表中选择Feeding,然后点击Filter按钮,这个时候的结果应该就是按照Feeding分类过滤的产品信息。
提示:HTML表单只能被配置为提交给路由,它们不会按路由格式提交值,比如,过滤表单提交的URL依然是Products?Category=Feeding&SortBy=&Search=格式,而不是Products/Feeding。这是因为HTML表单的默认行为就是按这种格式提交URL,输入元素被追加到URL的查询字符串中。
和过滤表单一样,搜索表单也存在这样的问题,因此,按下列代码更新/Views/Shared/_Layout.cshtml文件,将
1 @using (Html.BeginForm("Index", "Products", FormMethod.Get, new { @class = "navbar-form navbar-left" }))
更改为
1 @using (Html.BeginRouteForm("ProductsIndex", FormMethod.Get, new { @class = "navbar-form navbar-left" }))
5.3.3 在超链接中使用路由
需要解决的最后一个问题是当用户在分类索引(Index)页面中点击某个分类的链接之后,这会导航到产品索引(Index)页面,在这个时候再点击导航栏中的产品链接,不会显示全部产品信息。这个问题和我们上面解决的问题类似,为了解决这个问题,我们需要将输出URL链接更新为路由,而不是动作方法。修改ViewsShared\_Layout.cshtml中的代码由
1 <li>@Html.ActionLink("产品", "Index", "Products")</li>
修改为
1 <li>@Html.RouteLink("产品", "ProductsIndex")</li>
为了将额外的参数由URL传递给目标路由,我们可以给它们传递一个匿名对象。例如,使一个链接的目标仅仅是Clothes分类,我们可以使用下列代码:
1 <li>@Html.RouteLink("View all Clothes", "ProductsbyCategory", new { category = "Clothes" })</li>
5.4 设置项目的起始URL
我们已经添加了一些路由,现在,我们有必要停止Visual Studio自动加载我们当前正在编辑的视图作为项目的启动视图。在Visual Studio中,点击【项目】->【BabyStore属性】打开项目属性窗体(或者右键点击解决方案资源管理器中的项目,然后选择属性)。然后选择Web标签,设置启动操作为特定页,如图5-9所示。不需要输入值,仅仅设置这个选择即可以使得项目加载Home页(主页)。

图5-9:设置项目的启动URL为特定页
5.5 小节
在这一章中,我们首先使用Entity Framework添加了对搜索结果的排序功能,然后又在视图中添加了一个下列列表,以便用户使用它来对产品信息按照价格进行排序。其次,我们使用PagedList.Mvc包向产品的索引(Index)页面添加了分页功能。最后,我们使用了ASP.NET的路由特性以使我们的站点对于分类和分页信息显示更加友好的URL。