一、socket提升
1、熟悉socket.socket()中的省略部分
socket.socket(AF.INET,socket.SOCK_STREAM)
2、send与recv发送大文件时对于黏包的处理。
2.1 sendall的发送方式与for i in f(局部)
2.2 使用send、recv交替的方式做一个ack来解决黏包
3、socketserver多并发处理
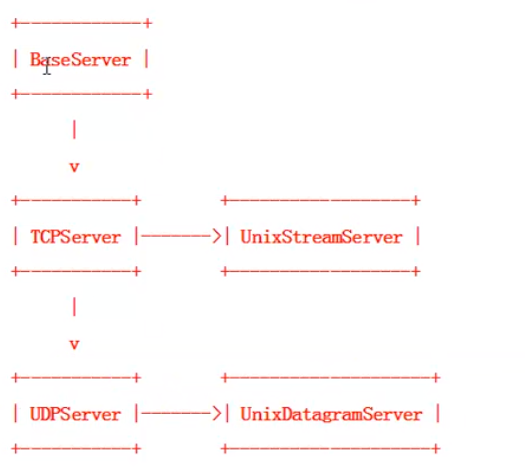
3.1 5种不同的socket类
3.1.1 baseserver用于继承,不对外提供服务
3.1.2 tcpserver继承baseserver类用于处理tcp连接
3.1.3 unixstreamserver继承tcpserver使用UNIX域套接字实现面向数据流协议(sock_stream --->tcp)
3.1.4 udpserver继承tcpsever用于处理udp连接
3.1.5 unixdatagramserver继承tcpserver使用针对UNIX域套接字来处理数据报式协议(sock_dgram--->udp)
3.2 socketserver的实现
3.2.1 step1 定义一个类,存放handler方法
需要继承socketserver.BaseRequestHandler,之后每生成一个新连接,都会实例化一个类,并调用这个handler方法,和客户端所有的交互都是在这个handler里面定义的
class myclass(socketserver.BaseRequestHandler):
    def handle(self):
        print('xxx')
        self.request.send(b'ok')
3.2.2 step2 定义一个实例,此实例关联上一步的handler、并绑定ip和及端口,监听端口处理新发起的连接,将新发起的连接实例化对像,并交给handler处理。
此处我们要处理tcp,所以是tcpserver。考虑到并发,此处使用threading多线程实现,或者可以使用ForkingServer来处理
s1=socketserver.ThreadingTCPServer(('localhost',9999),myclass)
s2=socketserver.FuckingTCPServer(('localhost',8888),myclass)
3.2.3 step3 server.forever()
s1.serve_forever()
s2.serve_forever()
3.2.4 step4 客户端对接测试
import socketserver
class myclass(socketserver.BaseRequestHandler):
    def handle(self):
        print('xxx')
        self.request.send(b'ok')
s1=socketserver.ThreadingTCPServer(('localhost',9999),myclass)
s2=socketserver.FockingTCPServer(('localhost',8888),myclass)
s1.serve_forever()
s2.serve_forever()
-------------------------------
import socket
c=socket.socket()
c.connect(('localhost',8888))
print(c.recv(1024).decode())
4、断点续传的实现->seek
通过byte的方式读取文件结合使用ab的方式续写文件的方式来实现断点续传,其核心的思路就是,获得当前半成品文件的字节数,使用seek将被操作文件的句柄移动到此处再往后读取,以此实现断点续传
import socket
c1=socket.socket()
c1.connect(('localhost',6666))
'''
f=open(r'E:L.exe','rb')
count = 0
for i in f:
    c1.send(i)
    count+=1
    if count > 10:
        break

'''
x=input('seek到哪个位置?')
f=open(r'E:L.exe','rb')
f.seek(int(x))
print('开始传输')
count=0
for i in f:
    print('
%s'%count)
    count+=1
    c1.send(i)
print('ok')
---------------------
import socket
import os
s1=socket.socket()
s1.bind(('localhost',6666))
s1.listen()
print('----begin----')
conn,addr=s1.accept()
print('连接建立')

print(os.path.getsize(r'E:\xxxx.exe'))
f=open(r'E:\xxxx.exe','ab')
while True:
data=conn.recv(1024)
f.write(data)
if not data:
print('end')
break
'''
f=open(r'E:\xxxx.exe','wb')
while True:
data=conn.recv(1024)
f.write(data)
if not data:
print('end')
break
'''
5、optparse模块的使用
5.1 定义对象
import optparse
parse=optparse.OptionParser()
5.2 添加参数
parse.add_option('-u','--user',dest='user',action='store',type=str,metavar='user',help='Enter User Name!!')
parse.add_option('-p','--port',dest='port',type=int,metavar='xxxxx',default=3306,help='Enter Mysql Port!!')
#-u,--user 表示一个是短选项 一个是长选项
#dest='user' 将该用户输入的参数保存到变量user中,可以通过options.user方式来获取该值
#type=str,表示这个参数值的类型必须是str字符型,如果是其他类型那么将强制转换为str(可能会报错)
#metavar='user',当用户查看帮助信息,如果metavar没有设值,那么显示的帮助信息的参数后面默认带上dest所定义的变量名
#help='Enter..',显示的帮助提示信息
#default=3306,表示如果参数后面没有跟值,那么将默认为变量default的值
#parse.set_defaults(v=1.2) #也可以这样设置默认值
5.3 监听
将监听结果赋值给options和args,一个结果为属性一个结果为列表。
options,args=parse.parse_args()
5.4 例子
import optparse
class test():
def __init__(self):
parse=optparse.OptionParser()
parse.add_option('-s',dest='x',help='server binding host',metavar='HOST')
parse.add_option('-p',dest='port',help='server binding port')
(options,args)=parse.parse_args()
print(options.x,options.port)
for i in args:
print(i)
F:ftp服务器_sockserver版servercore>python main.py -s 0.0.0.0 -p xxx aaa bbb ccc
0.0.0.0 xxx
aaa
bbb
ccc

F:ftp服务器_sockserver版servercore>python main.py -h
Usage: main.py [options]

Options:
-h, --help show this help message and exit
-s HOST server binding host
-p PORT server binding port
二、paramiko模块的使用
1、远程ssh并执行指令返回结果
import paramiko
#step1 实例化ssh
ssh = paramiko.SSHClient()
#step2
#加上这句话不用担心选yes的问题,会自动选上(用ssh连接远程主机时,第一次连接时会提示是否继续进行远程连接,选择yes)
ssh.set_missing_host_key_policy(paramiko.AutoAddPolicy)#家目录/.ssh/known_hosts
#step3 连接
ssh.connect(hostname='xxx.cm',port=22,username='xxxxx',password='xxxxx')
#step4 执行
stdin,stdout,stderr=ssh.exec_command('df -h;pwd')#可以用;执行多个指令

x1=stdout.read()
x2=stderr.read()

result=x1 if x1 else x2#三元运算
print(result.decode())

#step5 关闭
ssh.close()
------------------------
Filesystem Size Used Avail Use% Mounted on
/dev/sda1 7.9G 3.8G 3.8G 51% /
none 3.9G 4.0K 3.9G 1% /dev/shm
/dev/sda2 8.7G 298M 7.9G 4% /xxx/conf
/dev/sda3 893G 88G 761G 11% /xxx/data
/xxx/data/home/xxxxxx
2、transport文件远程scp文件
import paramiko
#step1 写连接信息
linkit=paramiko.Transport('xxx.cm',22)
linkit.connect(username='xxxxx',password='xxxx')
#step2 创建连接对象
sftp_object=paramiko.SFTPClient.from_transport(linkit)
#step3 上传下载文件
sftp_object.put('config.conf','tmpfromwin')#上传
# config.conf 为本地文件  tmpfromwin为本地文件上传到服务器上的文件名
sftp_object.get('xxx.zip',r'f:x.zip')#下载
#xxx.zip为服务器的文件名  r'f:x.zip'本地保存的位置及文件名
3、免密登录
3.1 免密登录的思路
PC-A 生成公钥和私钥
PC-A 将公钥发给PC B
PC-A 无密码登录PC-B
Python 调用pca的私钥即可完成对pcb的无密码登录
3.2 免密登录的key生成
pc-A
[root@localhost ~]# ssh-keygen
Generating public/private rsa key pair.
Enter file in which to save the key (/root/.ssh/id_rsa):
Enter passphrase (empty for no passphrase):
Enter same passphrase again:
Your identification has been saved in /root/.ssh/id_rsa.
Your public key has been saved in /root/.ssh/id_rsa.pub.
The key fingerprint is:
SHA256:cNTWlMyJXaOFTQMY3dFKCIywHfVzgmpXvjt0vVfuZao root@localhost.localdomain
The key's randomart image is:
+---[RSA 2048]----+
|      ..o=+%o@Bo |
|       +..*o@o+o.|
|      o o.. *... |
|       o . o +.  |
|        S . .  . |
|       . .  ... o|
|           ... .=|
|            .. ++|
|            Eo..o|
+----[SHA256]-----+
[root@localhost ~]#

[root@localhost ~]# cd .ssh/
[root@localhost .ssh]# ll
总用量 8
-rw-------. 1 root root 1675 4月  29 12:44 id_rsa
-rw-r--r--. 1 root root  408 4月  29 12:44 id_rsa.pub


[root@localhost .ssh]# ssh-copy-id -p 22 root@192.168.99.172
/usr/bin/ssh-copy-id: INFO: Source of key(s) to be installed: "/root/.ssh/id_rsa.pub"
The authenticity of host '192.168.99.172 (192.168.99.172)' can't be established.
ECDSA key fingerprint is SHA256:JRJkZRzFncdiupBqjji0LP6XNMQ9eSdFKm0wVoDp8RY.
ECDSA key fingerprint is MD5:f3:c8:77:ef:15:36:b7:3f:b9:36:bd:1a:4e:1a:5d:33.
Are you sure you want to continue connecting (yes/no)?
/usr/bin/ssh-copy-id: INFO: attempting to log in with the new key(s), to filter out any that are already installed
The authenticity of host '192.168.99.172 (192.168.99.172)' can't be established.
ECDSA key fingerprint is SHA256:JRJkZRzFncdiupBqjji0LP6XNMQ9eSdFKm0wVoDp8RY.
ECDSA key fingerprint is MD5:f3:c8:77:ef:15:36:b7:3f:b9:36:bd:1a:4e:1a:5d:33.
Are you sure you want to continue connecting (yes/no)? yes
/usr/bin/ssh-copy-id: INFO: 1 key(s) remain to be installed -- if you are prompted now it is to install the new keys
root@192.168.99.172's password:

Number of key(s) added: 1

Now try logging into the machine, with:   "ssh -p '22' 'root@192.168.99.172'"
and check to make sure that only the key(s) you wanted were added.

[root@localhost .ssh]# ssh 192.168.99.172
Last login: Sun Apr 29 12:39:28 2018 from 192.168.99.239
[root@localhost ~]# exit
登出
Connection to 192.168.99.172 closed.

----------------------------------------------------------

PC-B

drwx------.  2 root root       29 4月  29 12:48 .ssh
[root@localhost ~]# cd .ssh/
[root@localhost .ssh]# ll
总用量 4
-rw-------. 1 root root 408 4月  29 12:48 authorized_keys
[root@localhost .ssh]# cat authorized_keys
ssh-rsa AAAAB3NzaC1yc2EAAAADAQABAAABAQDMeTAz8cAtlZON+sUMSYpTXjhW32IkAdE+336BwW9LotWGznIOoS7d6cdvY...
3.3 python的实现
import paramiko
#step 1 获取私钥
pk=paramiko.RSAKey.from_private_key_file('F:id_rsa')
#step 2 连接服务器,设置用户名并关联私钥
link1=paramiko.Transport('xxx.cm',22)
link1.connect(username='xxxx',pkey=pk)
#step 3 创建transport对象 收发文件
myobject=paramiko.SFTPClient.from_transport(link1)
myobject.get('xxx.sh',r'f:xxx.sh')
3.4 一则网上的代码,此处先不作分析
import paramiko
import time
def verification_ssh(host,username,password,port,root_pwd,cmd):
   s=paramiko.SSHClient()
   s.load_system_host_keys()
   s.set_missing_host_key_policy(paramiko.AutoAddPolicy())
   s.connect(hostname = host,port=int(port),username=username, password=password)
   if username != 'root':
       ssh = s.invoke_shell()
       time.sleep(0.1)
       ssh.send('su -
')
       buff = ''
       while not buff.endswith('Password: '):
           resp = ssh.recv(9999)
           buff +=resp
       ssh.send(root_pwd)
       ssh.send('
')
       buff = ''
       while not buff.endswith('# '):
           resp = ssh.recv(9999)
           buff +=resp
       ssh.send(cmd)
       ssh.send('
')
       buff = ''
       while not buff.endswith('# '):
           resp = ssh.recv(9999)
           buff +=resp
       s.close()
       result = buff
   else:
       stdin, stdout, stderr = s.exec_command(cmd)
       result = stdout.read()
       s.close()
   return result
三、多线程 多进程的引入
1、进程、线程、协程的基本概念(两个最小,需要分清楚)
1.1 进程是系统进行资源分配和的基本单位
1.2 线程是CPU运算调度的最小单位
1.3 协程比线程还小的单位
2、进程和线程的关系
2.1 进程就是资源的集合,这些资源包括对内存、对硬盘、对光驱等各种资源的调用的集合。
2.2 线程包含在进程中(进程是线程的容器)是进程的实际运算单位。
2.3 一个进程可以包括一个或多个线程
2.4 进程需要操作cpu 必须通过创建线程来操作
2.5 一个线程,实际就是一个cpu的控制流,一个进程中可以并发多个线程
2.6 程序是指令、数据及其组织形式的描述,进程是程序的实体。
3、多线程、多进程、进程上下文
3.1 一个进程是有一系列的相关的资源的集合一个进程的资源包括了memory page (内存页,存储页,存储页面),文件句柄,socket连接,一些安全信息 如谁的id启动了这个进程
3.2 进程上下文,意思是可执行程序代码是进程的重要组成部分。进程上下文实际上是进程执行活动全过程的静态描述。
3.3 每个进程执行过的、执行时的以及待执行的指令和数据;在指令寄存器、堆栈、状态字寄存器等中的内容。此外, 还包括进程打开的文件描述符等.
3.4 多个线程共享进程上下文(即资源)
3.5 一个进程的所有线程 共享同一块内存空间
3.6 线程快还是进程快 没有可比性 一个是资源的集合 一个是cpu的控制流,进程需要执行 也必须通过创建线程来执行
3.7 线程创建快 还是进程创建快 线程创建快 它就是一段cpu的指令集,而进程需要去申请各种资源组成集合
3.8 线程共享内存空间 进程间资源互相独立
3.8.1一个父进程创建子进程,相当于克隆了一份独立的内容 多个子进程直接的资源是不能互相访问的
3.8.2 一个线程,创建多个线程都共享同一个进程的资源
3.9同一个进程的多个线程直接能直接联系交流交互,两个进程想通信交流 要找一个中间代理
3.10
3.10.1对于一个主线程的修改 可能或影响其他线程的运行(因为共享资源)
3.10.2对于父进程的修改,不会影响到子进程(资源独立)
四、线程语法详解
1、创建多线程
两步,一步关联函数和变量,一步start
import threading
import time
def PointIt(x):
    print('---->',x)
    time.sleep(5)
    print(x,'--->ok')
PointIt('n1')
PointIt('n2')
#对比n1/n2/n3/n4的输出用时
#step 1 创建进程,target为函数的函数名,args内输入函数的参数
n3=threading.Thread(target=PointIt,args=('n3',))#逗号不能漏
n4=threading.Thread(target=PointIt,args=('n4',))#逗号不能漏
#step 2 start
n3.start()
n4.start()
print('done')
2、面向对象的方式创建多线程
import threading
import time
#step 1 建立一个类,需要继承线程类
class Mythread_class(threading.Thread):
    #step 2定义构造函数,接收需要输入的变量
    def __init__(self,n):
        super(Mythread_class, self).__init__()
        self.n=n
    #step 3 定义run ->这里必须是run这个名字
    def run(self):
        print(self.n)
        time.sleep(3)
        print(self.n,'done')
#step 4 生成实例,每个实例运行start方法都会启动一个线程运行run方法
t1=Mythread_class('t1')
t2=Mythread_class('t2')
t1.run()#这样不行 这样还是单线程
t2.run()#如果直接是run方法,还是单线程
t1.start()
t2.start()#多线程

for i in range(5):
    x=Mythread_class('x-%s'%i)
    x.start()
print('主线程done')
程序运行的主线程在启动子线程之后不会等子线程执行完毕 而是继续运行主线程
同样,在主线程中也无法计算出子线程运行所花费的时间
3、join()方法的使用
如果run()运行结束则join()结束,如果run()没有完成,则卡住等待完成。通过这个方法来判断各个线程都运行结束所花费的时间
import threading
import time

class Mythread(threading.Thread):
def __init__(self,n):
super(Mythread, self).__init__()
self.n=n
def run(self):
print('t-%s is running,当前线程为%s,当前活跃线程数为%s'%(self.n,threading.current_thread(),threading.active_count()))
time.sleep(3)
print('t-%s done'%self.n)
time1=time.time()
t_object=[]#使用这个列表来记录线程对象
for i in range(10):
x=Mythread(i)
x.start()
t_object.append(x)
print('main',threading.current_thread())
for i in t_object:
i.join()
time2=time.time()
print(time2-time1)
------------------------------------------
t-0 is running,当前线程为<Mythread(Thread-1, started 2712)>,当前活跃线程数为2
t-1 is running,当前线程为<Mythread(Thread-2, started 9332)>,当前活跃线程数为3
t-2 is running,当前线程为<Mythread(Thread-3, started 2696)>,当前活跃线程数为4
t-3 is running,当前线程为<Mythread(Thread-4, started 9884)>,当前活跃线程数为5
t-4 is running,当前线程为<Mythread(Thread-5, started 3272)>,当前活跃线程数为6
t-5 is running,当前线程为<Mythread(Thread-6, started 9208)>,当前活跃线程数为7
t-6 is running,当前线程为<Mythread(Thread-7, started 1828)>,当前活跃线程数为8
t-7 is running,当前线程为<Mythread(Thread-8, started 9256)>,当前活跃线程数为9
t-8 is running,当前线程为<Mythread(Thread-9, started 1060)>,当前活跃线程数为10
t-9 is running,当前线程为<Mythread(Thread-10, started 9780)>,当前活跃线程数为11
我是主线程main <_MainThread(MainThread, started 2056)>
t-0 done
t-4 done
t-5 done
t-2 done
t-3 done
t-1 done
t-8 done
t-9 done
t-7 done
t-6 done

3.003652811050415
4、守护线程
当主线程执行完毕后,主线程结束,则所有守护线程全部结束,无论运行到什么状态 setDeamon
import threading
import time
class Myclass(threading.Thread):
    def __init__(self,n):
        super(Myclass, self).__init__()
        self.n=n
    def run(self):
       print(self.n,'begin')
       time.sleep(3)
       print(self.n,'------------->done','目前还活跃的线程数:',threading.active_count())

tmp_list=[]
for i in range(20):
    j=Myclass(i)
    j.setDaemon(True)#setdaesmon来设置为守护进程
    j.start()
    tmp_list.append(j)
time.sleep(3)
print('我要结束主进程了')
-----------------------------------------------
0 begin
1 begin
2 begin
3 begin
4 begin
5 begin
6 begin
7 begin
8 begin
9 begin
10 begin
11 begin
12 begin
13 begin
14 begin
15 begin
16 begin
17 begin
18 begin
19 begin
1 ------------->done 目前还活跃的线程数: 21
0 ------------->done 目前还活跃的线程数: 20
4 ------------->done 目前还活跃的线程数: 19
3 ------------->done 目前还活跃的线程数: 18
6 ------------->done 目前还活跃的线程数: 17
5 ------------->done 目前还活跃的线程数: 16
2 ------------->done 目前还活跃的线程数: 15
11 ------------->done 目前还活跃的线程数: 14
12 ------------->done 目前还活跃的线程数: 14
10 ------------->done 目前还活跃的线程数: 14
7 ------------->done 目前还活跃的线程数: 12
9 ------------->done 目前还活跃的线程数: 12
14 ------------->done 目前还活跃的线程数: 11
8 ------------->done 目前还活跃的线程数: 9
我要结束主进程了
5、GIL 全局解释器锁
5.1 In CPython,This lock is necessary mainly because CPython’s memory management is not thread-safe.
5.2 多个线程都打到多个cpu的核上 但是同一时刻只能有一个线程在真正的工作
5.3 全局解释器锁(Global Interpreter Lock)是计算机程序设计语言解释器用于同步线程的工具,使得任何时刻仅有一个线程在执行
5.4 一个python解释器进程内有一条主线程,以及多条用户程序的执行线程。即使在多核CPU平台上,由于GIL的存在,所以禁止多线程的并行执行。
5.5 Python 3.2开始使用新的GIL。
5.6 可以创建独立的进程来实现并行化
6、互斥锁
一个全局变量,每个线程都要对其进行操作,为了防止一个线程还未对其操作完毕,即这个变量的值还未被原线程修改时,这个变量的值就被传到下一个线程进行操作,这样有可能照成最终的结果不准确。为了防止这种情况,使用互斥锁解决
step1 实例一个锁对象
step2 acqiure()方法->锁变量
step3 release()方法释放变量
import threading
import time
mylock=threading.Lock()
num=0
class Myclass(threading.Thread):
   def __init__(self,n):
      super(Myclass, self).__init__()
      self.n=n
   def run(self):
       print(self.n,'begin')
       mylock.acquire()
       time.sleep(3)
       global num
       num += 1
       mylock.release()
       time.sleep(1)
      #mylock.release()使用完后迅速释放
tmp_list=[]
for i in range(5000):
    x=Myclass(i)
    x.start()
    tmp_list.append(x)
for i in tmp_list:
    i.join()
print(num)
7、递归锁
mylock=threading.RLock()#RLock 递归锁
import threading
mylock=threading.RLock()#RLock 递归锁

number1=0
number2=1111
count=0
def run1():
  mylock.acquire()
  global number1
  number1+=1
  mylock.release()

def run2():
  #mylock.acquire() 只能套两层锁,如果套三层锁,即把这个注释去掉,就卡死了
  global number2
  number2+=2
  #mylock.acquire()

def terminal_fun():
  mylock.acquire()
  global count
  run1()
  print('between run1 with run2')
  run2()
  print('count:',count)
  count+=1
  mylock.release()

for i in range(5):
  x=threading.Thread(target=terminal_fun)
  x.start()

while threading.active_count() != 1:
    print(threading.active_count())
else:
    print('ok')
---------------------------------
between run1 with run2
count: 0
between run1 with run2
count: 1
between run1 with run2
count: 2
between run1 with run2
count: 3
between run1 with run2
count: 4
ok
此代码说明:注意主程序结束的写法法,本程序使用的是:等待活跃线程数等于1结束的方法
8、信号量,
不能单纯理解为线程并发数
threading.BoundedSemaphore(3) 同时访问资源的线程数量,但不是活跃的线程数量
线程中,信号量主要是用来维持有限的资源,使得在一定时间使用该资源的线程只有指定的数量
是一个变量,控制着对公共资源或者临界区的访问。信号量维护着一个计数器,指定可同时访问资源或者进入临界区的线程数。
每次有一个线程获得信号量时,计数器-1。若计数器为0,其他线程就停止访问信号量,直到另一个线程释放信号量。
以下代码,io为一个信号量,查看活跃的线程,实际所有的线程都跑起来了,但是,能输出的只有三个线程
import threading
import time

limit_num = threading.BoundedSemaphore(3)  # 控制并发,不是三个一组,释放一个,就新增一个


def run(x):
    limit_num.acquire()
    print('i am %s' % x, threading.active_count())
    time.sleep(3)
    print('i am %s' % x, threading.active_count())
    limit_num.release()

for i in range(20):
    x = threading.Thread(target=run, args=(i,))
    x.start()

while threading.active_count() != 1:
    pass
else:
    print('done!')
-------------------------------------------
i am 0 2
i am 1 3
i am 2 4
i am 1 21
i am 2 21
i am 4 20
i am 0 19
i am 3 18
i am 5 18
i am 3 18
i am 4 18
i am 6 16
i am 7 16
i am 5 16
i am 8 15
i am 7 15
i am 6 15
i am 9 13
i am 10 13
i am 8 13
i am 11 12
i am 10 12
i am 9 12
i am 11 11
i am 13 10
i am 14 9
i am 12 9
i am 14 9
i am 13 9
i am 12 9
i am 15 7
i am 17 7
i am 16 7
i am 15 6
i am 17 5
i am 18 5
i am 16 5
i am 19 3
i am 18 3
i am 19 2
done!
9、事件 event
可用于多个线程间同步信息 如同一个线程控制红绿灯,一个线程等待红绿灯
四个知识点
9.1 生成事件 threading.Event()
9.2 set事件 x.set()
9.3 clear事件 x.clear()
9.4 wait事件 x.wait()
import threading import time my_green_red_light=threading.Event() def light():#负责对light event 进行set或clear time_count=0 my_green_red_light.set() while True: if time_count >8 and time_count < 16: my_green_red_light.clear() print('�33[41;1mred�33[0m') elif time_count > 16: my_green_red_light.set() time_count=0 else: print('�33[42;1mgreen�33[0m') time.sleep(0.3) time_count+=1 def car(x): while True: if my_green_red_light.is_set(): print('car [%s] is running'%x) else: print('is red now,wait for green....') my_green_red_light.wait() print('green now ,go go go !!!') time.sleep(0.8) light_thread=threading.Thread(target=light) car_thread=threading.Thread(target=car,args=('tesla',)) light_thread.start() car_thread.start() ------------------------------ green car [tesla] is running green green car [tesla] is running green green green car [tesla] is running green green car [tesla] is running green red red is red now,wait for green.... red red red red red green green now ,go go go !!! green green car [tesla] is running green green green car [tesla] is running green
10、队列与堆栈 queue模块
使用队列的意义
1、解耦 是程序之间实现双耦合 通过生产者消费者模型
2、提高处理效率
10.1 q.qsize()获取队列长度
10.2 q.put()放元素
10.3 q.get()拿元素
10.4 q.nowait()是否等待(立即响应)
10.5 q.get(block=False)是否阻塞
10.6 q.get(timeout=1)响应超时
10.7 q=queue.Queue(maxsize=3)队列长度
10.8 q=queue.LifoQueue()(last in first out 堆栈)
import queue

>>> import queue
>>> x=queue.Queue(maxsize=5)
>>> x.put(1)
>>> x.put(2)
>>> x.put(3)
>>> x.put(4)
>>> x.put(5,timeout=1)
>>> x.put(6,timeout=1)
Traceback (most recent call last):
File "<pyshell#8>", line 1, in <module>
x.put(6,timeout=1)
queue.Full
>>> x.get()
1
>>> x.get()
2
>>> x.get()
3
>>> x.get()
4
>>> x.get(block=False)
5
>>> x.get(block=False)
Traceback (most recent call last):
File "<pyshell#14>", line 1, in <module>
x.get(block=False)
queue.Empty
>>>


>>> y=queue.LifoQueue()
>>> y.put(1)
>>> y.put(2)
>>> y.put(3)
>>> y.get()
3
>>> y.get()
2
>>> y.get()
1


>>> z=queue.PriorityQueue()
>>> z.put((1,'123'))
>>> z.put((-1,'456'))
>>> z.put((5,'789'))
>>> z.get
<bound method Queue.get of <queue.PriorityQueue object at 0x000001A41A496550>>
>>> z.get()
(-1, '456')
>>> z.get()
(1, '123')
>>> z.get()
(5, '789')
>>>
>>> x.qsize()
0
>>>
11、生产者消费者模型(同步队列)
import queue
import time
import threading

q=queue.Queue(maxsize=5)

def product_it(name,t):
    count=0
    while True:
       data='骨头%s'%count
       q.put(data)
       print('[%s]生成[%s]'%(name,data))
       count+=1
       time.sleep(t)
def eat_it(name,t):
     while True:
          print('[%s]吃了骨头[%s]'%(name,q.get()))
          time.sleep(t)

t1=threading.Thread(target=product_it,args=('北京店',4,))
t2=threading.Thread(target=product_it,args=('上海店',0.3,))
t3=threading.Thread(target=eat_it,args=('小明',5,))
t4=threading.Thread(target=eat_it,args=('小王',2,))
t1.start()
t2.start()
t3.start()
t4.start()
------------------------------
[北京店]生成[骨头0]
[上海店]生成[骨头0]
[小明]吃了骨头[骨头0]
[小王]吃了骨头[骨头0]
[上海店]生成[骨头1]
[上海店]生成[骨头2]
[上海店]生成[骨头3]
[上海店]生成[骨头4]
[上海店]生成[骨头5]
[小王]吃了骨头[骨头1]
[上海店]生成[骨头6]
[小王]吃了骨头[骨头2]
[上海店]生成[骨头7]
[小明]吃了骨头[骨头3]
[北京店]生成[骨头1]
12、总结:多线程实现同步的四种方式(锁机制(互斥,迭代,gli)、条件变量(event)、信号量和同步队列)
13、python中多线程的使用场景
cpu密集型,io密集型
线程占用cpu资源 python的多线程实际是通过gil锁进行上下文切换 某个时间点上 只有一个线程在跑
如果cpu只有一个核心 那么 无论有多少个线程 同一时间,只可能有一个线程在被cpu处理
线程之间通过快速切换执行,使使用者感觉同一时刻多线程并行的效果,但单核情况实际是串行的
如果多核心 理论上来说 不同的核心同一时刻可以运行不同的线程
但是在python中 由于考虑到线程间数据共享的情况 python内存在GLI锁,使得同一时间内,只有一个线程运行 无论多少核 这个是python的局限性
python语言诞生时 cpu只有单核 开发者没有考虑多核的情况,
cpu在执行指令时需要知道上下文关系 所以python在启用线程的时候 调用的是c语言的thread接口 并将这个关系传给cpu (和互斥锁类似 有一个全局变量+1)
如果线程同时操作,拿到的上下文可能一样 所以为了避免上下文雷同 使用gli锁来确保同一时刻只有一个线程在执行
五、进程详解
1、进程的引入
1.1 进程间是独立的
1.2 python的进程是操作系统的原生进程,进程间管理是由操作系统来完成的,且进程间的数据相互独立也不需要锁这个概念。所以python的多进程 可以解决python的多核问题
2、创建多进程的方法
multiprocessing.Process(target=run,args=(i,))
3、通过创建多进程,进程中使用多线程来充分利用cpu资源
import multiprocessing
import time
import threading

def run(x):
    print('process %s is running'%x)
    t=threading.Thread(target=mythread,args=(x,))
    t.start()
    print('process %s is done'%x)

def mythread(x):
   print('进程%s启用的线程的线程号是:%s'%(x,threading.get_ident()))#打印线程号


if __name__=='__main__':
   for i in range(10):
       x=multiprocessing.Process(target=run,args=(i,))
       x.start()
-------------------------------------------
process 4 is running
process 4 is done
进程4启用的线程的线程号是:2172
process 0 is running
process 0 is done
进程0启用的线程的线程号是:764
process 2 is running
process 6 is running
process 2 is done
进程2启用的线程的线程号是:8236
process 9 is running
process 3 is running
进程6启用的线程的线程号是:2544
process 6 is done
process 5 is running
process 7 is running
进程9启用的线程的线程号是:3536
process 9 is done
process 3 is done
进程3启用的线程的线程号是:484
process 5 is done
process 7 is done
进程5启用的线程的线程号是:9624
进程7启用的线程的线程号是:1464
process 1 is running
进程1启用的线程的线程号是:1764
process 1 is done
process 8 is running
进程8启用的线程的线程号是:3516
process 8 is done
此处可以观察cpu的使用情况,能发现cpu的使用率快速提升

4、线程号、进程号、父进程号的查看
threading.get_ident()/os.getpid()/os.getppid()
import multiprocessing
import os

def info():
   tmp_info ='''	name:%s
	ppid:%s
	pid :%s'''%(__name__,os.getppid(),os.getpid())
   print(tmp_info)

def run():
    print('子进程信息'.center(50,'-'))
    x = multiprocessing.Process(target=run2)
    x.start()
    info()
def run2():
    print('子进程信息'.center(50,'-'))
    info()

if __name__=="__main__":
    print('父进程信息'.center(50,'-'))
    info()
    x=multiprocessing.Process(target=run)
    x.start()
---------------------------------------------------------------
----------------------父进程信息-----------------------
name:__main__
ppid:2592
pid :10720
----------------------子进程信息-----------------------
name:__mp_main__
ppid:10720
pid :7752
----------------------子进程信息-----------------------
name:__mp_main__
ppid:7752
pid :5696
5、不同进程间通信的方法
5.1 进程队列方式进行进程间通信
此处需要对比进程队列与线程队列的区别
queue.Queue()普通的队列,在一个进程中使用
multithreading.Queue 原理为pickle序列号与反序列化,并不是资源共享
import multiprocessing
import threading
import queue
#进程queue与线程queue

def main(my_queue):
   print(my_queue.get())
   print(my_queue.get())
   print(my_queue.get())

def main2(x):
   x.put(1)
   x.put(2)
   x.put(3)

if __name__=='__main__':
     my_queue = queue.Queue()
     my_queue.put('[a]')
     my_queue.put('[b]')
     my_queue.put('[c]')
     t1 = threading.Thread(target=main,args=(my_queue,))
     t1.start()#子线程访问主线程资源
     #t1 = threading.Thread(target=main)此处不将队列传入,线程依然能调用主线程的队列
     #t1.start()  # 子线程访问主线程资源

     #p1=multiprocessing.Process(target=main,args=(my_queue,))
     #p1.start()#子进程访问主进程资源
     #即使是父进程将进程queue做完参数传给子进程,子进程依然无法访问这个queue

     Q = multiprocessing.Queue()#进程queue multiprocessing.Queue()
     p2=multiprocessing.Process(target=main2,args=(Q,))#将队列传入子进程
     p2.start()
     p2.join()#等待子进程执行完毕,确保都入队成功
     print(Q.get())
     print(Q.get())
     print(Q.get())
----------------------------------------
[a]
[b]
[c]
1
2
3
5.2 进程通道pip方式进行进程间通信
multiprocessing.Pipe()结合send和recv来使用
import multiprocessing
import threading
import time

def f(x1):
   print('f')
   x1.send('hello,i am p1')
   print(x1.recv())
def f2(x2):
    print('f2')
    time.sleep(3)
    print(x2.recv())
    x2.send('ok , p2 ack')

if __name__=='__main__':
    x1, x2 = multiprocessing.Pipe()
    p1=multiprocessing.Process(target=f,args=(x1,))
    p2=multiprocessing.Process(target=f2,args=(x2,))
    p1.start()
    p2.start()
------------------------
f
f2
hello,i am p1
ok , p2 ack
5.3 多进程共同修改字典列表的方法manager().dict()、manager().list()
import multiprocessing
import os

def f(x,y):
    x[os.getpid()]=os.getpid()#x是一个字典,给x这字典添加一个key和value
    y.append(os.getpid())#y是一个列表,给y这个列表添加一个value
    print(x,y)
if __name__=='__main__':
     with multiprocessing.Manager() as xxx:
         x=xxx.dict()#生成一个字典 一个多进程manage的字典
         y=xxx.list(range(5))#列表生成 生成一个列表 一个多进程manage的列表
         p_list=[]#主进程列表
         for i in range(5):
            p=multiprocessing.Process(target=f,args=(x,y,))#给进程manage的列表字典添加元素
            p.start()
            p_list.append(p)#为了确保是否添加完成
         for i in p_list:
             i.join() #配合上面的start 判断是否子进程运行结束
------------------------------------------------
{19080: 19080} [0, 1, 2, 3, 4, 19080]
{19080: 19080, 20880: 20880} [0, 1, 2, 3, 4, 19080, 20880]
{19080: 19080, 20880: 20880, 15908: 15908} [0, 1, 2, 3, 4, 19080, 20880, 15908]
{19080: 19080, 20880: 20880, 15908: 15908, 8140: 8140} [0, 1, 2, 3, 4, 19080, 20880, 15908, 8140]
{19080: 19080, 20880: 20880, 15908: 15908, 8140: 8140, 13536: 13536} [0, 1, 2, 3, 4, 19080, 20880, 15908, 8140, 13536]
以上可以看出,多进程实时修改数据(字典,列表,队列) 无需互斥锁。
6、进程锁
为什么要有进程锁 ,不同进程之间不是不能访问各自的内存空间
但是例如屏幕,打印机,投影仪这种资源在进程非常多的情况下可能会出现例如输出错行的情况,此时就要用到锁
进程锁比较少用到
import multiprocessing
import os

def f(x,i):
    x.acquire()
    print(i,'---',os.getpid())
    x.release()
if __name__=='__main__':
   lock=multiprocessing.Lock()
for i in range(1000):
       p=multiprocessing.Process(target=f,args=(lock,i,))
       p.start()
------------------------
2 --- 3784
4 --- 4544
3 --- 13556
5 --- 4864
0 --- 13100
6 --- 15272
1 --- 20104
8 --- 11800
7 --- 672
9 --- 19056
7、进程池
7.1
进程池 用于限制同时运行的进程数量
#运行进程过多导致进程间频繁切换降低程序效率->根据cpu核心等实际情况,优化同时运行的进程数量
#对同时运行的进程数进行限制 多进程同时存在,但是只有固定数量的进程在执行
7.2
step1 实例化一个pool
step2 用实例化的pool去生成进程。需要注意两种生成进程的方式apply与apply_async一种是单进程执行,一种是多进程执行
import multiprocessing
import os
import time
def f(i):
    print('process',i,'is running...',os.getpid())
    time.sleep(3)
    return i  #传递给回调函数

def backtome(xxxx):
    print(xxxx,'is done',os.getpid())


if __name__=='__main__':
     print('主进程的pid为:',os.getpid())
     mypool=multiprocessing.Pool(processes=5)#设置同一时刻能实际运行的进程数量

     for i in range(20):
         #p=mypool.apply(func=f,args=(i,))#单核串行
         p=mypool.apply_async(func=f,args=(i,),callback=backtome)
     print('end')
     mypool.close()#必须添加close()
     mypool.join()#必须添加join
-------------------------------------------
主进程的pid为: 12720
end
process 0 is running... 10644
process 1 is running... 5056
process 2 is running... 20972
process 3 is running... 6148
process 4 is running... 19120
process 5 is running... 10644
0 is done 12720
process 6 is running... 5056
1 is done 12720
2 is done 12720
process 7 is running... 20972
3 is done 12720
process 8 is running... 6148
4 is done 12720
process 9 is running... 19120
process 10 is running... 10644
5 is done 12720
6 is done 12720
process 11 is running... 5056
7 is done 12720
process 12 is running... 20972
9 is done 12720
process 13 is running... 19120
8 is done 12720
process 14 is running... 6148
process 15 is running... 10644
10 is done 12720
process 16 is running... 5056
11 is done 12720
process 17 is running... 20972
12 is done 12720
14 is done 12720
process 18 is running... 6148
13 is done 12720
process 19 is running... 19120
15 is done 12720
16 is done 12720
17 is done 12720
18 is done 12720
19 is done 12720
apply无回调方法
import multiprocessing
import os
import time
def f(i):
    print('process',i,'is running...',os.getpid())
    time.sleep(3)
    print('end')
    return i  #传递给回调函数

def backtome(xxxx):
    print(xxxx,'is done',os.getpid())


if __name__=='__main__':
     print('主进程的pid为:',os.getpid())
     mypool=multiprocessing.Pool(processes=5)#设置同一时刻能实际运行的进程数量

     for i in range(20):
         p=mypool.apply(func=f,args=(i,),)#单核串行
         #p=mypool.apply(func=f, args=(i,),callback=backtome)apply无callback函数
         #p=mypool.apply_async(func=f,args=(i,),callback=backtome)
     print('end')
     mypool.close()#必须添加close()
     mypool.join()#必须添加join
--------------------------------
主进程的pid为: 17912
process 0 is running... 4080
end
process 1 is running... 18092
end
process 2 is running... 5924
end
process 3 is running... 14276
end
process 4 is running... 1800
end
process 5 is running... 4080
end
process 6 is running... 18092
end
process 7 is running... 5924
end
process 8 is running... 14276
end
process 9 is running... 1800
end
process 10 is running... 4080
end
process 11 is running... 18092
end
process 12 is running... 5924
end
process 13 is running... 14276
end
process 14 is running... 1800
end
process 15 is running... 4080
end
process 16 is running... 18092
end
process 17 is running... 5924
end
process 18 is running... 14276
end
process 19 is running... 1800
end
end
六、协程的概念
1、协程概念的理解 单线程 触发切换来完成并行 不依赖cpu切换上下文。
协程 异步io
协程在单线程情况下操作
协程是一种用户态的轻量级线程 -> cpu根本不知道他的存在
线程在切换的时候有cpu的寄存器来保存每个线程的状态 每个线程有自己的上下文
协程在切换时的状态需要用户自己将上下文保存到相应的地方。
yelid是协程的一种
在单线程下实现并发的效果,用户需要自己保存运行状态
2、协程的好处
2.1 无需线程切换 也就无需cpu在线程切换时上下文切换的开销
2.2 无需原子操作锁定及同步开销 ->相对于多线程的互斥锁 ->协程是单线程的串行操作
2.3 方便切换控制流 简化模型
2.4 高并发 高扩展 低成本
3、协程的缺点
协程实质上是一个单线程,无法利用多核资源
协程需要和进程配合才能在多cpu上运行
4、一些补充
nginx 就是单线程 就能支持上万个并发
协程能处理上万并发的思路,遇到io就进行协程切换 -> io完成就自动切换到原协程
#进程是资源分配的最小单位,线程是CPU调度的最小单位.这是计算机里经常考的
#协程。比线程还小的单位
七、协程的使用
1、yield完成协助的一种形式
import time

def produce_scq(n,x,y):#生产者实际就是个函数 ,实体化生成器并next他
    x.__next__()#这里很关键
    y.__next__()
    print(n,'is producing')
    count=0
    while count < 20:
        x.send('包子%s'%count)
        y.send('包子%s'%count)
        count +=1
    return 'done'

def custom_scq(n): #消费者是生成器 ,等待外部信息输入
     print('start eat')
     while True:
         baozi=yield
         print(n,'is eating',baozi)
         time.sleep(0.01)


c1=custom_scq('小明')
c2=custom_scq('小东')
print(produce_scq('大明',c1,c2))
---------------------------------------------
start eat
start eat
大明 is producing
小明 is eating 包子0
小东 is eating 包子0
小明 is eating 包子1
小东 is eating 包子1
小明 is eating 包子2
小东 is eating 包子2
小明 is eating 包子3
小东 is eating 包子3
小明 is eating 包子4
小东 is eating 包子4
小明 is eating 包子5
小东 is eating 包子5
小明 is eating 包子6
小东 is eating 包子6
小明 is eating 包子7
小东 is eating 包子7
小明 is eating 包子8
小东 is eating 包子8
小明 is eating 包子9
小东 is eating 包子9
小明 is eating 包子10
小东 is eating 包子10
小明 is eating 包子11
小东 is eating 包子11
小明 is eating 包子12
小东 is eating 包子12
小明 is eating 包子13
小东 is eating 包子13
小明 is eating 包子14
小东 is eating 包子14
小明 is eating 包子15
小东 is eating 包子15
小明 is eating 包子16
小东 is eating 包子16
小明 is eating 包子17
小东 is eating 包子17
小明 is eating 包子18
小东 is eating 包子18
小明 is eating 包子19
小东 is eating 包子19
done
2、协程手动切换 greenlet的使用
step1 greenlet.greenlet(xxx)
step2 xxx.switch
import multiprocessing
import greenlet

def test1():
   print(12)
   g2.switch()
   print(56)
   g2.switch()
def test2():
   print(34)
   g1.switch()
   print(78)

g1=greenlet.greenlet(test1)
g2=greenlet.greenlet(test2)
#实例化两个协程来运行函数,实际此时函数还未运行
g1.switch()#开始执行g1
---------------------------------------------
12
34
56
78
3、gevet的使用 gevent是greenlet的第三方库,可以自动切换协程
切换思路,遇到io或非cpu操作时,自动切换,让cpu继续处理下一个指令
gevent.sleep与gevent.joinall()、gevent.spawn的搭配使用
import gevent

def f1():
      print('f1 run')
      gevent.sleep(2)
      print('f1 done')
def f2():
      print('f2 run')
      gevent.sleep(1)
      print('f2 done')
def f3():
      print('f3 run')
      gevent.sleep(0)
      print('f3 done')
gevent.joinall([gevent.spawn(f1),gevent.spawn(f2),gevent.spawn(f3)])
#生成协程
----------------------------------------
f1 run
f2 run
f3 run
f3 done
f2 done
f1 done
#gevent.sleep 模拟io操作 -》 joinall 全部执行 gevent.spawn 生成协程
f1 -> sleep -> f2 -> sleep -> f3 -> f1还未执行完成 -> f2 还未完成 -> f3 ok -> f3 done -> f1 还未完成-> f2 还未完成->f1 还未完成->f2 ok -> f1 还未完成 -> f1 ok
4、使用协程gevent,搭配monkey.patch_all()来对比urllib.request模块url.openget多个网页的时间
import urllib
import gevent,time
#step 1  导入模块
from urllib import request
from gevent import monkey
#step 2 监控IO
monkey.patch_all()


#step 3
def f(url):
    print('GET:',url)
    res=request.urlopen(url)#获取数据

# step 4 用来展示get到的这个url有多少data
    data=res.read()#读数据
    print('bytes:',len(data),'url:',url)

t1=time.time()#获取程序开始时间
f('http://www.dangdang.com')
f('http://d.cn')
f('http://www.163.com')
f('http://www.126.com')#单线程执行
t2=time.time()
print('--------------------->cost:',t2-t1)
#step 5 协程执行

gevent.joinall([gevent.spawn(f,'http://d.cn'),gevent.spawn(f,'http://www.dangdang.com'),gevent.spawn(f,'http://www.163.com'),gevent.spawn(f,'http://www.126.com')])
t3=time.time()

print('--------------------->cost:',t3-t2)
-------------------------------------------------------------------
GET: http://www.dangdang.com
bytes: 720 url: http://www.dangdang.com
GET: http://d.cn
bytes: 80968 url: http://d.cn
GET: http://www.163.com
bytes: 688755 url: http://www.163.com
GET: http://www.126.com
bytes: 12921 url: http://www.126.com
--------------------->cost: 1.0575993061065674
GET: http://d.cn
GET: http://www.dangdang.com
GET: http://www.163.com
GET: http://www.126.com
bytes: 720 url: http://www.dangdang.com
bytes: 688755 url: http://www.163.com
bytes: 80968 url: http://d.cn
bytes: 12921 url: http://www.126.com
--------------------->cost: 0.14879226684570312
此处的joinall是等协程都运行结束的意思
如果没有joinall()
import urllib
import gevent,time
#step 1  导入模块
from urllib import request
from gevent import monkey
#step 2 监控IO
monkey.patch_all()


#step 3
def f(url):
    print('GET:',url)
    res=request.urlopen(url)#获取数据

# step 4 用来展示get到的这个url有多少data
    data=res.read()#读数据
    print('bytes:',len(data),'url:',url)

t1=time.time()#获取程序开始时间
f('http://www.dangdang.com')
f('http://d.cn')
f('http://www.163.com')
f('http://www.126.com')#单线程执行
t2=time.time()
print('--------------------->cost:',t2-t1)
#step 5 协程执行

gevent.spawn(f,'http://d.cn')
gevent.spawn(f,'http://www.dangdang.com')
gevent.spawn(f,'http://www.163.com')
gevent.spawn(f,'http://www.126.com')
t3=time.time()

print('--------------------->cost:',t3-t2)
---------------------------------
GET: http://www.dangdang.com
bytes: 168224 url: http://www.dangdang.com
GET: http://d.cn
bytes: 80968 url: http://d.cn
GET: http://www.163.com
bytes: 688790 url: http://www.163.com
GET: http://www.126.com
bytes: 12921 url: http://www.126.com
--------------------->cost: 1.2731683254241943
--------------------->cost: 0.0
5、gevent完成socket并发
单线程遇到io轮训的过程,需要注意注册轮询的过程。gevent.spawn
import socket
import gevent
from gevent import monkey
monkey.patch_all()

def server_port_and_listen():
      sever1=socket.socket()
      sever1.bind(('localhost',9999))
      sever1.listen()
      count=1
      print('开始监听9999端口')
      while True:
            conn,addr=sever1.accept()
#精髓在这里 每个连接起一个协程
            gevent.spawn(server_deal_conn,conn,count) #协程轮训监听 遇到io自动切换
#server_deal_conn(conn)
            count+=1


def server_deal_conn(x,i):
    print('连接%s建立'%i)
    try:
        while True:
           data=x.recv(1024)
           if not data:
                print('连接已经断开')
                break
           tmp_data='i am %s
'%i+data.decode()
           x.send(tmp_data.encode('utf-8'))
           #此处不考虑长度了,只做短消息传递
    except Exception as ex:
        print(ex)
    finally:
        print('断开连接',i,'详细信息',x)
        x.close()

server_port_and_listen()

------------------------------------------
开始监听9999端口
连接1建立
连接2建立
连接3建立
连接4建立
[WinError 10054] 远程主机强迫关闭了一个现有的连接。
断开连接 1 详细信息 <gevent._socket3.socket object, fd=616, family=2, type=1, proto=0>
[WinError 10054] 远程主机强迫关闭了一个现有的连接。
断开连接 2 详细信息 <gevent._socket3.socket object, fd=624, family=2, type=1, proto=0>
[WinError 10054] 远程主机强迫关闭了一个现有的连接。
断开连接 3 详细信息 <gevent._socket3.socket object, fd=628, family=2, type=1, proto=0>
[WinError 10054] 远程主机强迫关闭了一个现有的连接。
断开连接 4 详细信息 <gevent._socket3.socket object, fd=620, family=2, type=1, proto=0>
连接5建立
连接6建立
八、事件驱动模型的简述
1、如何简单的理解事件
即 :事件 -> 触发 ->回应
事件如我点击鼠标、键盘、我的网卡收到数据包
回应如点鼠标关机,ctrl+s保存文件。回复对方的ping包。和对方三次握手。
2、三种编程思路(范式)的对比
2.1 单线程
2.2 多线程
2.3 异步

单线程和多线程随着需要扫描设备的增加,更容易出现响应时间和遗漏响应的情况。多线程需要多次切换上下文。
3、事件驱动模型图解,在上文的协程事件驱动模型。
4、事件驱动模型一般是由事件收集器、事件发送器和事件处理器三部分组成基本单元组成。
针对不同的操作系统有不同的库可以选择
4.1、select库
select库是各个版本的linux和windows平台都支持的基本事件驱动模型库,并且在接口的定义上也基本相同,只是部分参数的含义略有差异。
Select库有三种事件:读事件、写事件、异常事件
4.2、poll库
poll库,作为linux平台上的基本事件驱动模型,Windows平台不支持poll库。
4.3、epoll库
epoll库是Nginx服务器支持的高性能事件之一,它是公认的非常优秀的事件驱动模型,和poll和select有很大的不同,属于poll库的一个变种,他们的处理方式都是创建一个待处理事件列表,然后把这个事件列表发送给内核,返回的时候,再去轮询检查这个列表,以判断事件是否发生。
九、select实现IO多路复用
readable, writeable, exeptional = select.select(inputs,outputs,inputs) #如果没有任何fd就绪,那程序就会一直阻塞在这里 # select中第1个参数表示inputs中发生变化的句柄放入readable。 # select中第2个参数表示outputs中的值原封不动的传递给writeable。
# select中第3个参数表示inputs中发生错误的句柄放入exeptional.
import socket
import queue
import select
input_list=[]
output_list=[]
conn_list=[]
my_dict={}
server1=socket.socket()
server1.setblocking(False)#默认为阻塞IO
server1.bind(('localhost',6666))
server1.listen()
input_list.append(server1)

while True:
    readable, writeable, exeptional = select.select(input_list, output_list, input_list)
    # io轮询监控 多路复用
    # print(readable)
    for i in readable:
        if i is server1:
            print('新建连接')
            conn, addr = i.accept()  # 注意accept的位置
            conn.setblocking(False)
            input_list.append(conn)
            my_dict[conn] = queue.Queue()  # 生成一个字典key key对应value为字典
        else:
            print('in else')
            try:
                data = i.recv(1024)
                print('-----------------------------', len(data))
                if data:
                    print('接收到消息')
                    print(data.decode())
                    my_dict[i].put(data)
                    print(my_dict)
                    output_list.append(i)
                    print('outputlist', output_list)
                else:
                    print('断开')
                    input_list.remove(i)
            except Exception as areyouok:
                print(areyouok, i)
                input_list.remove(i)
                if i in output_list:
                    output_list.remove(i)
                    del my_dict[i]
    for i in writeable:
        print('writeable----------')
        data = my_dict[i].get()
        print(data.decode())
        i.send(data)
        output_list.remove(i)
    for i in exeptional:
        input_list.remove(i)
        if i in output_list:
            output_list.remove(i)
            del my_dict[i]
十、selector与百万连接
seletor在select、poll、epoll基础上封装,如果系统支持eqoll优先epoll
1、selector的思路
#step 1 生成一个selector对象,相当于监听列表
still_listen=selectors.DefaultSelector()
#step 2 定义方法
#等待连接的方法
def wait_for_connect(server,mask):
    conn,addr=server1.accept()
    ...
#等待消息的方法
def conn_wait_for_message(conn,mask):
       data=conn.recv(1024)
       ...
#Step 3 创建socket
socket.socket()、bind(('127.0.0.1',9999))、listen(10000)、.setblocking(False)
#step 4 注册及卸载 selectors.EVENT_READ/ x.register /x.unregister(conn)(类似于gevent.spawn)
still_listen.register(server1,selectors.EVENT_READ,wait_for_connect)
still_listen.register(conn,selectors.EVENT_READ,conn_wait_for_message)
#step 5 开始监听
   infor_come=still_listen.select()#无返回时阻塞
   for key,mask in infor_come:
       choice_func=key.data #根据注册的方式获取需要调用的函数
       choice_func(key.fileobj,mask)#传入对象(已建立的连接conn或新建连接server)
2、selector 实例
import selectors
import socket

#ulimit - n
#ulimit -SHn

#step 1 selectors.DefaultSelector()生成一个额select对象
still_listen=selectors.DefaultSelector()

#step 2 定义方法
#等待连接的方法
def wait_for_connect(server,mask):
    conn,addr=server1.accept()
    print('accepted', conn, 'from', addr)
    conn.setblocking(False)
    still_listen.register(conn,selectors.EVENT_READ,conn_wait_for_message)

#等待消息的方法
def conn_wait_for_message(conn,mask):
    try:
       data=conn.recv(1024)
       print(conn,'message coming')
       if data:
         conn.send(data)
       else:
           print('close...')
           still_listen.unregister(conn)
           conn.close()
    except Exception as ex:
        print(ex)
        still_listen.unregister(conn)
        conn.close()

server1=socket.socket()
server1.bind(('127.0.0.1',9999))
server1.listen(10000)
server1.setblocking(False)
#step 3 注册方法 x.register 与卸载方法 x.unregister(conn)
still_listen.register(server1,selectors.EVENT_READ,wait_for_connect)
print('运行成功,开始监听端口。。。')

#step 4 开始监听
while True:
   infor_come=still_listen.select()#无返回时阻塞
   for key,mask in infor_come:
       choice_func=key.data #根据注册的方式获取需要调用的函数
       choice_func(key.fileobj,mask)#传入对象(已建立的连接conn或新建连接server)
3、触发大量连接的方法
实际就是循环建立连接
import socket

socket_List=[]#用于存放连接对象
t1=time.time()#开始时间
for i in range(1000):#生成一千个连接对象
    x=socket.socket()
    socket_List.append(x)
print('准备开始连接服务器')
t2=time.time()
for x in socket_List:
    x.connect(('192.168.99.106', 8999))#对象开始正式连接服务器
print('连接建立完毕')
messgae_list=['it is the first message','it is the second message','it is the third message']
t3=time.time()

for mes in messgae_list:
    print(mes)
    for s in socket_List:#每个连接开始发送内容
        print('%s: sending "%s"' % (s.getsockname(), mes) )
        s.send(mes.encode('utf-8'))
    for s in socket_List:#每个连接开始接收内容
        data=s.recv(1024)
        print('%s: received "%s"' % (s.getsockname(), data))
        if not data:
            print(sys.stderr, 'closing socket', s.getsockname())
t4=time.time()
print(t2-t1)
print(t3-t2)
print(t4-t3)
#输出时间
os.walk()的使用!!!