想了解SSH的工作原理吗?还不快快来看我的新文章----ssh框架的工作原理
也许你还不知道SSH存在的意义,但只是因为在没点开这篇文章之前的事了。
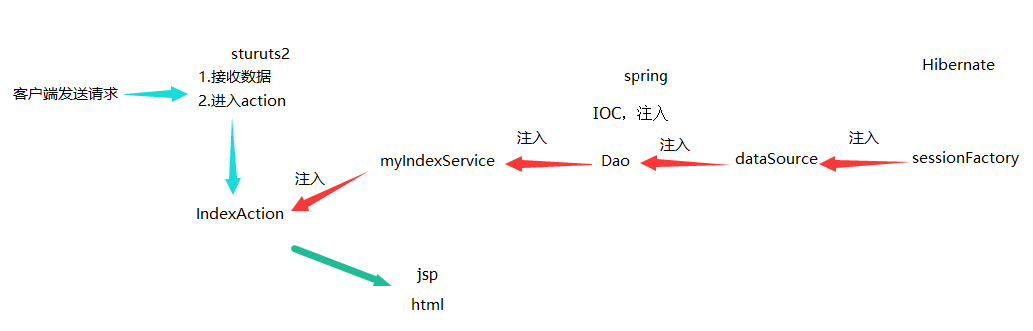
SSH由Strut2,Spring,Hibernate三大模块组成,汇集了Strut2的MVC模式,Sping的IOC容器和AOP,Hibernate的ORM。
MVC为模型(Model)、视图(View)和控制器(Controller)。一种软件设计典范,用一种业务逻辑、数据、界面显示分离的方法组织代码,将业务逻辑聚集到一个部件里面,在改进和个性化定制界面及用户交互的同时,不需要重新编写业务逻辑。MVC被独特的发展起来用于映射传统的输入、处理和输出功能在一个逻辑的图形化用户界面的结构中。
IOC:控制反转。 即把接口的实现类交给Sping去托管,由我们手动控制的接口实现类,变成了Sping去控制。
IOC的好处:把页面的结耦扼杀了,变成了不想要去关心这个接口具体的实现类是谁,只需要调用接口的方法,就可以轻松运行。即解耦。
AOP:面向切面编程(本文不用,就不概述了)
ORM:对象关系映射。通过ORM,实现了由原来的操作数据库,变成了操作对象。
SSH的最大好处在于当业务产生变化后,修改起来会特别轻松,只需修改相应接口的实现类。
搭建SSH框架的步骤
struts-2.3.30 下载地址:点击跳转到struts下载页
spring-framework-4.3.1 点击跳转到spring下载页
hibernate-release-5.2.2.点击跳转到hibernate下载页
一、部署struts环境。
1.解压下载好的 struts-2.3.30 jar。
2.打开解压目录下的struts-2.3.30-allstruts-2.3.30apps目录,并解压目录下的struts2-blank.war文件,如图:

3.解压后得到struts2-blank文件夹,打开文件夹,进入到WEB-INF/lib 目录,如图:

4.把上图的所有jar包拷贝进去项目的lib目录。
5.配置 web.xml 文件添加 struts过滤器。
</welcome-file-list>
  <filter>
    <filter-name>struts2</filter-name>
    <filter-class>org.apache.struts2.dispatcher.ng.filter.StrutsPrepareAndExecuteFilter</filter-class>
  </filter>
  <filter-mapping>
    <filter-name>struts2</filter-name>
    <url-pattern>/*</url-pattern>
  </filter-mapping>
通过struts过滤器,进入了action,执行了execute1方法。
<?xml version="1.0" encoding="UTF-8" ?>
<!DOCTYPE struts PUBLIC
    "-//Apache Software Foundation//DTD Struts Configuration 2.3//EN"
    "http://struts.apache.org/dtds/struts-2.3.dtd">
<struts>
    <package name="mypck001" extends="struts-default">
        <action name="Index" class="myIndexAction" method="execute1">
            <result name="success">/WEB-INF/jsp/index2.jsp</result>
            <result name="error">/WEB-INF/jsp/s_tag.jsp</result>
        </action>
    </package>
</struts>
根据action的返回值跳转的相应的jsp页面
public String execute1() {
        List<BookCard> myBookCardList = is.getAllBookCard();
        System.out.println("结果集:"+myBookCardList.size());
        ActionContext ac = ActionContext.getContext();
        ac.put("myBookCardList", myBookCardList);
        return "success";
    }
二、部署spring环境。
1.解压下载好的spring-framework-4.2.2.RELEASE-dist.zip。
2.打开解压目录下的spring-framework-4.2.2.RELEASE-distspring-framework-4.2.2.RELEASElibs。
<特别提醒:***.javadoc.jar和***.sources.jar不需要拷贝到项目。
还要导入struts2文件目录下的commons-logging.jar 和 struts2-spring-plugin.jar >
3.导入spring jar包。
配置applicationContext.xml文件,实现IOC功能。
<?xml version="1.0" encoding="UTF-8"?>
<beans xmlns="http://www.springframework.org/schema/beans"
        xmlns:xsi="http://www.w3.org/2001/XMLSchema-instance"
        xmlns:p="http://www.springframework.org/schema/p"
        xmlns:aop="http://www.springframework.org/schema/aop"
        xmlns:context="http://www.springframework.org/schema/context"
        xmlns:jee="http://www.springframework.org/schema/jee"
        xmlns:tx="http://www.springframework.org/schema/tx"
        xsi:schemaLocation="
            http://www.springframework.org/schema/aop http://www.springframework.org/schema/aop/spring-aop-4.2.xsd
            http://www.springframework.org/schema/beans http://www.springframework.org/schema/beans/spring-beans-4.2.xsd
            http://www.springframework.org/schema/context http://www.springframework.org/schema/context/spring-context-4.2.xsd
            http://www.springframework.org/schema/jee http://www.springframework.org/schema/jee/spring-jee-4.2.xsd
            http://www.springframework.org/schema/tx http://www.springframework.org/schema/tx/spring-tx-4.2.xsd">

    <!-- 引入外部属性文件 -->
    <context:property-placeholder location="classpath:jdbc.properties"/>


    <!-- 类似于财务部门一样,类就是钱,所有需要类的实例都由srping去管理 -->
    <bean id="myIndexAction" class="ssh.action.IndexAction" scope="prototype">
        <!-- setIs(myIndexService) -->
        <property name="is" ref="myIndexService"/>
    </bean>

    <!-- myIndexService = new ssh.service.IndexServiceImpl() -->
    <bean id="myIndexService" class="ssh.service.IndexServiceImpl" scope="prototype">
        <property name="id" ref="myIndexDao"/>
    </bean>

    <bean id="myIndexDao" class="ssh.dao.IndexDaoImpl" scope="prototype">
        <!-- 晚点再注入能用的seesionFactory -->
        <property name="sessionFactory" ref="mySessionFactory"></property>
    </bean>
</beans>
二、部署Hibernate环境。
1.解压下载好的hibernate-release-5.2.2.Final.zip。
2.导入hibernate-release-5.2.2.Finallib equired下的jar包。

3.导入连接数据库需要用到的包,本例用mysql。
4.导入hibernate-release-5.2.2.Finalliboptionalc3p0目录下的所有jar包。(用于配置数据连接池)

命名标准:xxx.hbm.xml 【注意:该文件必须和实体类在同一个目录(包)】
<?xml version="1.0" encoding="UTF-8"?>
<hibernate-mapping xmlns="http://www.hibernate.org/xsd/hibernate-mapping">

    <class name="ssh.entity.BookCard" table="BookCard">
        <id name="cid" column="cid">
            <generator class="native"></generator>
        </id>
        <property name="name" type="string" length="50" column="name" not-null="true"></property>
        <property name="sex" type="string" length="2" column="sex"></property>
        <property name="cardDate" type="date" column="cardDate"></property>
        <property name="deposit" type="double" column="deposit"></property>
    </class>
</hibernate-mapping>
将 hibernate.cfg.xml 文件内的信息写入到 applicationContext.xml 文件中,注入SessionFactory。
<bean id="mySessionFactory" class="org.springframework.orm.hibernate5.LocalSessionFactoryBean">
        <!-- 注入连接池,包含了数据库用户名,密码等等信息 -->
        <property name="dataSource" ref="myDataSource"/>

        <!-- 配置Hibernate的其他的属性 -->
        <property name="hibernateProperties">
            <props>
                <prop key="hibernate.dialect">org.hibernate.dialect.MySQL5Dialect</prop>
                <prop key="hibernate.show_sql">true</prop>
                <prop key="hibernate.format_sql">true</prop>
                <prop key="hibernate.connection.autocommit">false</prop>
                <!-- 开机自动生成表 -->
                <prop key="hibernate.hbm2ddl.auto">update</prop>
            </props>
        </property>
        <property name="mappingResources">
            <list>
                <value>ssh/entity/BookCard.hbm.xml</value>
            </list>
        </property>

    </bean>

    <bean id="myDataSource" class="com.mchange.v2.c3p0.ComboPooledDataSource">
        <property name="driverClass" value="${jdbc.driver}"/>
        <property name="jdbcUrl" value="${jdbc.url}"/>
        <property name="user" value="${jdbc.user}"/>
        <property name="password" value="${jdbc.password}"/>
        <!-- 每300秒检查所有连接池中的空闲连接 -->
        <property name="idleConnectionTestPeriod" value="300"></property>
        <!-- 最大空闲时间,900秒内未使用则连接被丢弃。若为0则永不丢弃 -->
        <property name="maxIdleTime" value="900"></property>
        <!-- 最大连接数 -->
        <property name="maxPoolSize" value="2"></property>

    </bean>
编写 jdbc.properties 文件,便于发布人员进行修改。
jdbc.driver=com.mysql.jdbc.Driver
jdbc.url=jdbc:mysql://localhost:3306/CardDB
jdbc.user=root
jdbc.password=123456