工作中我们如果安装一台操作系统,我们可以做一个U启动来安装我们所需要的操作系统,但是如果我们如果要给几十台server 安装操作系统,我们在用U启动安装效率太低,这时候我们可以采用pxe + kickstart 来批量安装系统大大节省我们的时间。
PXE 交换的原理
Client向PXE Server上的DHCP发送IP地址请求消息,DHCP检测Client是否合法(主要是检测Client的网卡MAC地址),如果合法则返回Client的IP地址,同时将启动文件pxelinux.0的位置信息一并传送给Client
Client向PXE Server上的TFTP发送获取pxelinux.0请求消息,TFTP接收到消息之后再向Client发送pxelinux.0大小信息,试探Client是否满意,当TFTP收到Client发回的同意大小信息之后,正式向Client发送pxelinux.0 Client执行接收到的pxelinux.0文件
Client向TFTP Server发送针对本机的配置信息文件(在TFTP 服务的pxelinux.cfg目录下),TFTP将配置文件发回Client,继而Client根据配置文件执行后续操作。
Client向TFTP发送Linux内核请求信息,TFTP接收到消息之后将内核文件发送给Client
Client向TFTP发送根文件请求信息,TFTP接收到消息之后返回Linux根文件系统
Client启动Linux内核
Client下载安装源文件,读取自动化安装脚本
我以ubuntu 14.04系统为例演示一下怎么实现pxe和kickstart 来实现批量部署系统
环境系统: ubuntu14.04
1. 软件安装及配置,首先需要安装 apache tftpserver kickstart dhcp 配置工具
apt-get install -y system-config-kickstart tftpd-hpa tftp-hpa apache2 isc-dhcp-server
2.将ubuntu-14.04 镜像上传,在apache2 网站上创建挂载目录,将镜像挂载在目录上。
我们安装完apache2 后在apache2 的网站目录(/var/www/html/) 上创建挂载的目录 (在哪里挂载没有关系只需要将挂载目录上的数据都放在网站目录下)
mkdir -p /var/www/html/ubuntu-1404/
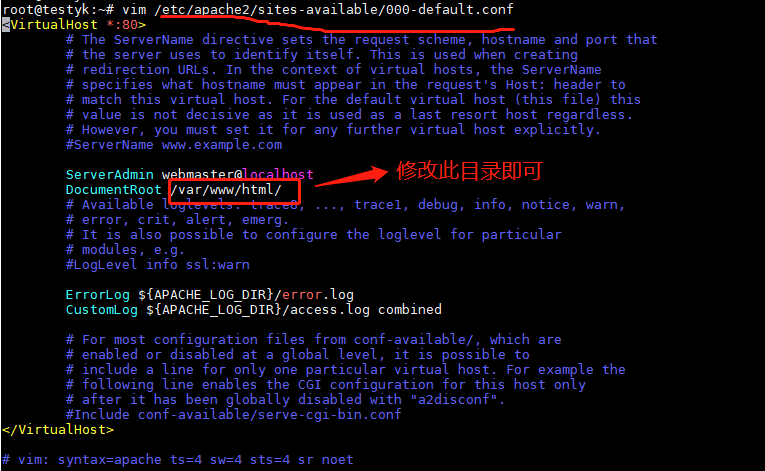
网站默认目录是/var/www/html/ 如果想要挂载指定位置需要修改 /etc/apache2/sites-available/000-default.conf 文件中默认根目录,修改完记得要重启服务
挂载镜像到目录上,挂载后的目录是由数据。
mount -t iso9660 ubuntu-14.04.6-server-amd64.iso /opt/tftp/ubuntu-1404

永久挂载需要写在开机自动挂载的fstab 里
/root/ubuntu-14.04.6-server-amd64.iso /var/www/html/ubuntu-1404 iso9660 ro,loop,defaults 0 0
将挂载目录的启动文件cp 到我们tftp 共享目录中(/var/lib/tftpboot/ 初始的目录是为空)与网站目录中
cp -arf /var/www/html/ubuntu-1404/install/netboot/* /var/lib/tftpboot/
cp /var/www/html/ubuntu-1404/preseed/ubuntu-server.seed /var/www/html/

在网站目录创建ks
mkdir -p /var/www/html/ks/
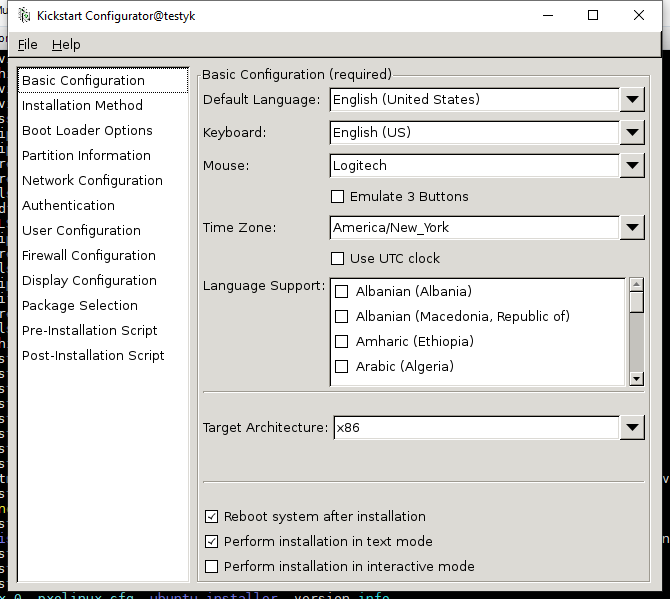
生成ks.cfg 文件 (需要支持图形界面如果不是图形界面apt-get install ubuntu-desktop 安装一下)
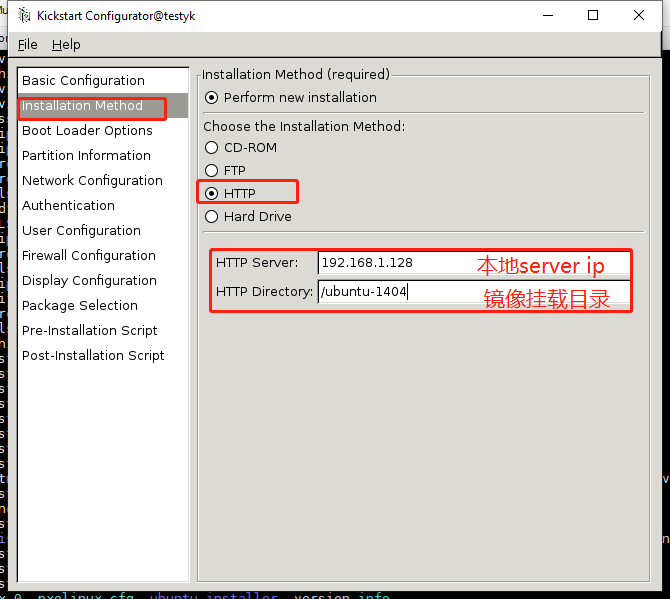
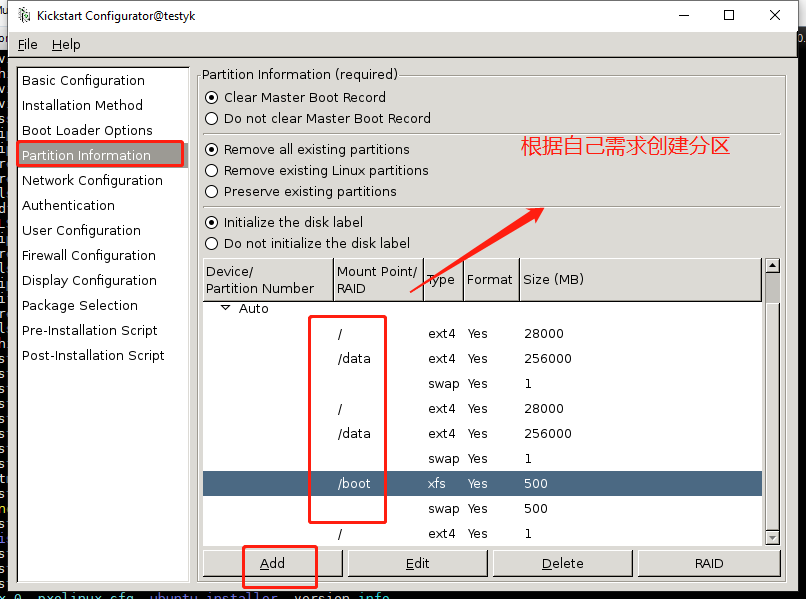
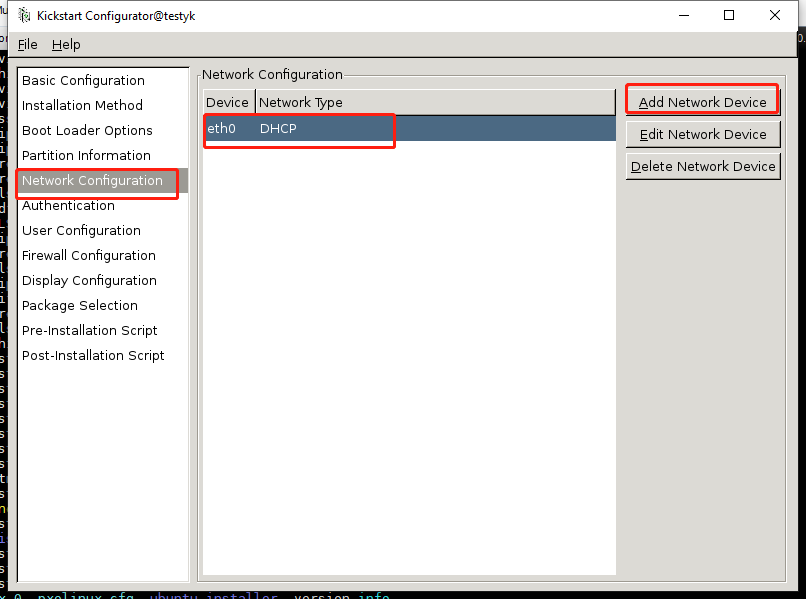
system-config-kickstart (选择一些关键的就可以,其他保持默认根据需求来配置----自己可以百度一下kickstart 详细配置说明) 配置完后在file 中save file


保存文件后会有一个ks.cfg 文件存在

修改/var/www/html/ubuntu-server.seed 文件追加一条 (因为在ubuntu12.10版本以后,安装一些包会依赖于预配置的文件系统,会导致使用kickstart方式无法成功安装)
vim /var/www/html/ubuntu-server.seed
d-i live-installer/net-image string http://192.168.1.128/ubuntu-1404/install/filesystem.squashfs
添加 ks.cfg 文路径,在install标签下的append 添加ks
vim /var/lib/tftpboot/ubuntu-installer/amd64/boot-screens/txt.cfg
default install
label install
menu label ^Install
menu default
kernel ubuntu-installer/amd64/linux
append ks=http://192.168.1.128/ks/ks.cfg preseed/url=http://192.168.1.128/ubuntu-server.seed vga=788 initrd=ubuntu-installer/amd64/initrd.gz --- quiet
label cli
menu label ^Command-line install
kernel ubuntu-installer/amd64/linux
append tasks=standard pkgsel/language-pack-patterns= pkgsel/install-language-support=false vga=788 initrd=ubuntu-installer/amd64/initrd.gz --- quiet
~
配置dhcp
/etc/dhcp/dhcpd.conf
subnet 192.168.1.0 netmask 255.255.255.0 {
range 192.168.1.50 192.168.1.60; #地址分配范围
option routers 192.168.1.1; #网关
option domain-name-servers 192.168.1.1; #dns (/etc/resolv.conf 可以查看到)
default-lease-time 6000; #默认租期
max-lease-time 7200; #最大租期
filename "pxelinux.0"; #pxe启动文件名称,注意文件最后是数字0,不是字母o
next-server 192.168.1.128; #tftp 地址
}
3.重启各个服务
service isc-dhcp-server restart
service tftpd-hpa restart
service apache2 restart
4. 验证
起一个虚机设置网络启动 (这个虚机需要和pxe server 在同一个vlan 里) 装好后的虚机

附ks.cfg
#Generated by Kickstart Configurator
#platform=x86
#System language
lang en_US
#Language modules to install
langsupport en_US
#System keyboard
keyboard us
#System mouse
mouse
#System timezone
timezone Asia/Shanghai
#Root password
rootpw --iscrypted $1$FMLT9HTQ$A9NJbHTiSiCsPq9Qg3h1m0
#Initial user
user test --fullname "" --iscrypted --password $1$MWbigjvn$C5HPkUqvo9PBnu0YnfaoE/
#Reboot after installation
reboot
#Use text mode install
text
#Install OS instead of upgrade
install
#Use Web installation
url --url http://192.168.1.128/ubuntu-1404
#System bootloader configuration
bootloader --location=mbr
#Clear the Master Boot Record
zerombr yes
#Partition clearing information
clearpart --all --initlabel
#Disk partitioning information
part /boot --fstype xfs --size 500
part swap --size 500
part / --fstype ext4 --size 1 --grow
#System authorization infomation
auth --useshadow --enablemd5
#Network information
network --bootproto=dhcp --device=eth0
#Firewall configuration
firewall --disabled
#Do not configure the X Window System
skipx