一、Ganglia基本概述
Ganglia是UC Berkeley发起的一个开源集群监视项目,设计用于测量数以千计的节点。Ganglia的核心包含gmond、gmetad以及一个Web前端。主要是用来监控系统性能,如:cpu 、mem、硬盘利用率, I/O负载、网络流量情况等,通过曲线很容易见到每个节点的工作状态,对合理调整、分配系统资源,提高系统整体性能起到重要作用 【来自百度百科】
二、基本信息
1、组件
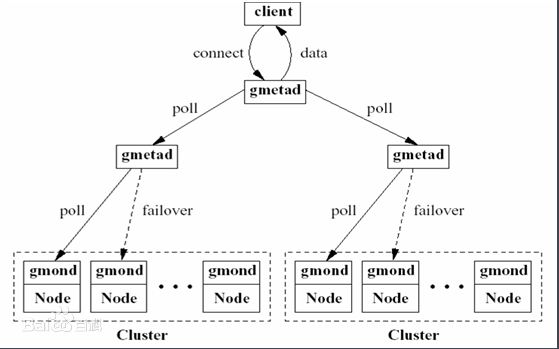
- gmond:作为一个守护进程存在,可以运行在所有的节点,主要获取节点数据以及把数据发送到gmetad。相当于agent
- gmetad:可以部署在集群内任一台节点或者通过网络连接到集群的独立主机,它通过单播路由的方式与gmond通信,收集区域内节点的状态信息,并以XML数据的形式,保存在数据库中。相当于server
- web服务:用于展示
2、工作模式
- 多播模式:适用于同一网段,各
gmond节点相互发送数据,然后gmetad从自身配置文件中的data_source设置值中依次读取,如果第一个数据源读取失败,则会读取下一处数据源数据。 - 单播模式:能跨网段工作,各
gmond节点将数据统一发送于同一节点,然后gmetad再从中读取数据。
多播模式配置比较简单,gmond节点无需配置直接启动即可运行
三、架构图或工作原理
四、部署与配置
1、安装
安装可以从官网下载源码进行编译安装,也可以使用yum或者apt的方式安装
1)源码安装下载地址:https://sourceforge.net/projects/ganglia/
2)yum方式安装
1.1 使用yum安装
- 安装依赖
# 安装依赖之前先安装epel源
# yum install -y epel-release
# yum -y install httpd-devel automake autoconf libtool ncurses-devel libxslt groff pcre-devel pkgconfig
如果安装过程中没有找到软件包,需要下载对应的yum源
- 查看Ganglia安装包
[root@yjt ganglia-web-3.7.2]# yum search ganglia

- 安装软件
服务端安装(服务端需要启动的程序包括gmetad、gmond、gganlia-web)
[root@yjt ganglia-web-3.7.2]# yum install ganglia-devel.x86_64 ganglia-gmetad.x86_64 ganglia-gmond.x86_64 ganglia-gmond-python.x86_64 ganglia-web.x86_64 -y
客户端安装:
[root@yjt ganglia-web-3.7.2]# yum install ganglia-gmond.x86_64 ganglia-gmond-python.x86_64 -y
2、配置
- 配置文件或者目录
ganglia配置文件目录:/etc/ganglia
rrd数据库存放目录:/var/lib/ganglia/rrds
httpd主站点目录:/var/www/html
ganglia-web安装目录:/usr/share/ganglia
ganglia-web配置目录:/etc/httpd/conf.d/ganglia.conf
- 关闭selinux
sed -i 's/enforcing/disabled/g' /etc/selinux/config && getenforce 0
- 服务端配置/etc/ganglia/gmetad.conf
# egrep  -v  "(^#|^$)" /etc/ganglia/gmetad.conf
data_source "hadoop" 192.168.0.230   # 默认注释,主要修改这个参数, 其中的hadoop表示集群名称, 后面的ip地址表示gmetad从这个gmond节点获取数据,可以配置多个ip,gmetad将依次读取,如果是本机,可以配置为localhost
 gridname "Test"   # 主要是用于在web界面展示的时候替换掉unspecified
setuid_username ganglia
case_sensitive_hostnames 0
- 配置gmond配置文件(服务端与客户端一致),以单播方式进行配置
配置文件信息如下:
cluster {
  #name = "unspecified"
  name = "hadoop"   # 集群名称,需要与gmetad中配置的data_source后面的名字一直
  owner = "unspecified" # 类似于管理员
  latlong = "unspecified"
  url = "unspecified"
}

/* The host section describes attributes of the host, like the location */
host {
  location = "unspecified"
}

/* Feel free to specify as many udp_send_channels as you like.  Gmond
   used to only support having a single channel */
udp_send_channel {
  #bind_hostname = yes # Highly recommended, soon to be default.
                       # This option tells gmond to use a source address
                       # that resolves to the machine's hostname.  Without
                       # this, the metrics may appear to come from any
                       # interface and the DNS names associated with
                       # those IPs will be used to create the RRDs.
  #mcast_join = 239.2.11.71 # 多播模式,需要注释掉
  port = 8649 # 发送数据时的端口
  ttl = 1 # 存活时间
  host = 192.168.0.230  #发送到哪个节点
}

/* You can specify as many udp_recv_channels as you like as well. */
udp_recv_channel {
  #mcast_join = 239.2.11.71
  port = 8649 # 本地监听的端口
  bind = 192.168.0.230  #本地监听的ip地址,可以是0.0.0.0
  retry_bind = true
  # Size of the UDP buffer. If you are handling lots of metrics you really
  # should bump it up to e.g. 10MB or even higher.
  # buffer = 10485760
}

/* You can specify as many tcp_accept_channels as you like to share
   an xml description of the state of the cluster */
tcp_accept_channel {
  port = 8649 # gmetad主动获取数据时的端口号
  # If you want to gzip XML output
  gzip_output = no
}
- 配置web
ln -s /usr/share/ganglia /var/www/ganglia
- 配置/etc/httpd/conf.d/ganglia.conf
#
# Ganglia monitoring system php web frontend
#

Alias /ganglia /usr/share/ganglia

<Location /ganglia>
#  Require local
#Order deny,allow
#  Deny from all
#  Allow from all  # 最开始配置的这个值,但是在web界面访问的时候出现了没有权限。
  # Require ip 10.1.2.3
  # Require host example.org
Require all granted  # 这是在访问web界面出现没有权限的时候添加的配置
</Location>
- 服务端启动(先启动)
# systemctl sart httpd
# systemctl start gmetad
# systemctl start gmond
- 客户端启动
# systemctl start gmond
3、配置大数据集群
1)、配置hadoop,修改etc/hadoop/hadoop-metrics2.properties
namenode.sink.ganglia.servers=yjt:8649

datanode.sink.ganglia.servers=yjt:8649

resourcemanager.sink.ganglia.servers=yjt:8649

nodemanager.sink.ganglia.servers=yjt:8649

mrappmaster.sink.ganglia.servers=yjt:8649

jobhistoryserver.sink.ganglia.servers=yjt:8649
2)、配置hbase,修改hbase/conf/hadoop-metrics2-hbase.properties
hbase.sink.ganglia.period=10
hbase.sink.ganglia.servers=192.168.0.230:8649


hbase.class=org.apache.hadoop.metrics2.sink.ganglia.GangliaSink31
hbase.period=10
hbase.servers=192.168.0.230:8649

jvm.class=org.apache.hadoop.metrics2.sink.ganglia.GangliaSink31
jvm.period=10
jvm.servers=192.168.0.230:8649

rpc.class=org.apache.hadoop.metrics2.sink.ganglia.GangliaSink31
rpc.period=10
rpc.servers=192.168.0.230:8649
分发配置到其他节点,然后重启进程
4、访问
1)访问地址:http://ip/ganglia 端口默认是80

hbase监控信息:

借鉴:
https://blog.51cto.com/hsbxxl/2062477
https://www.cnblogs.com/gcczhongduan/p/5230839.html
https://blog.csdn.net/wuwenxiang91322/article/details/46425403
https://www.linuxidc.com/Linux/2018-03/151488.htm
https://sourceforge.net/projects/ganglia/