戒色诗: 二八佳人体似酥,腰间仗剑斩凡夫。虽然不见人头落,暗里教君骨髓枯。
在学习这一章节之前,一定要先学习一下老蝴蝶写的这篇文章: SSM实现权限管理(三)
一. 前期准备
一.一 数据库准备
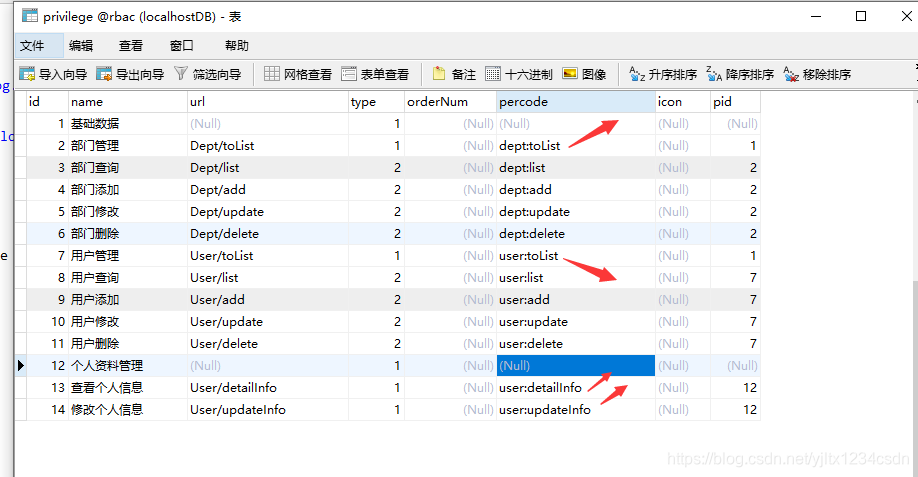
数据库仍然使用的是 rbac数据库, 将 privilage 表数据改变一下, 为 菜单网址也添加 percode 属性。
一.二 前端页面准备

与前面基本一致 。
一.三 SSM框架准备

web.xml 和依赖,都需要添加。
二. SSM 整合Shiro 实现RBAC
通过 SSM 整合Shiro, 就是将 以前 shiro.ini 里面的配置内容,放置到 spring.xml 配置文件里面,
同样,要注入自定义的Realm, 设置securityManager,密码, 过滤器等内容。
但 spring整合 Shiro, 远比利用 shiro.ini 配置文件功能强大得多。
为了比较区别, 将上一章节的 shiro.ini 配置文件拿过来
[main]
#加密类
credentialsMatcher=org.apache.shiro.authc.credential.HashedCredentialsMatcher
#加密方式
credentialsMatcher.hashAlgorithmName=md5
#加密次数
credentialsMatcher.hashIterations=10
#存储散列后的密码是否为16进制
credentialsMatcher.storedCredentialsHexEncoded=false
#配置自定义realm
myRealm=com.yjl.shiro.MyRealm
#配置加密
myRealm.credentialsMatcher=$credentialsMatcher
#注入自定义的realm
securityManager.realm=$myRealm

#配置权限
authc.loginUrl=/User/toLogin
#跳转到权限不足的路径
roles.unauthorizedUrl=/NoPermission/NoPermission
perms.unauthorizedUrl=/NoPermission/NoPermission

[urls]
#静态页面可以访问
/static/**=anon
#跳转到登录页面和登录方法可以访问
/User/toLogin=anon
/User/login=anon
#跳转到主页,需要认证
/Main/toMain=authc
/Privilege/getPrivilegeByUId=authc
#执行方法,不仅需要认证,还需要有相应的方法
/Dept/add=authc,perms["dept:add"]
/Dept/update=authc,perms["dept:update"]
/Dept/list=authc,perms["dept:list"]
/Dept/delete=authc,perms["dept:delete"]
/User/toList=authc,perms["user:toList"]
#退出登录
/User/logout=logout
#其他的一切资源,都需要认证
/**=authc
二.一 添加 pom.xml 依赖
相比较以前,只多了一个 shiro-all 的依赖信息。
<!-- shiro依赖 -->
<dependency>
	<groupId>org.apache.shiro</groupId>
	<artifactId>shiro-all</artifactId>
	<version>1.2.2</version>
</dependency>
二.二 web.xml 配置过滤器
<!-- 配置shiro 的过滤器 ,注意 filter-name的名称-->
<filter>
	<filter-name>shiroFilter</filter-name>
	<filter-class>org.springframework.web.filter.DelegatingFilterProxy</filter-class>
	<!-- 配置生命周期,由web控制 -->
	<init-param>
		<param-name>targetFilterLifecycle</param-name>
		<param-value>true</param-value>
	</init-param>
	<!--一般不配置 targetBeanName参数,默认与filter-name 相同即可 -->
</filter>

<filter-mapping>
	<filter-name>shiroFilter</filter-name>
	<url-pattern>/*</url-pattern>
</filter-mapping>
二.三 编写后端代码
目录结构如下:
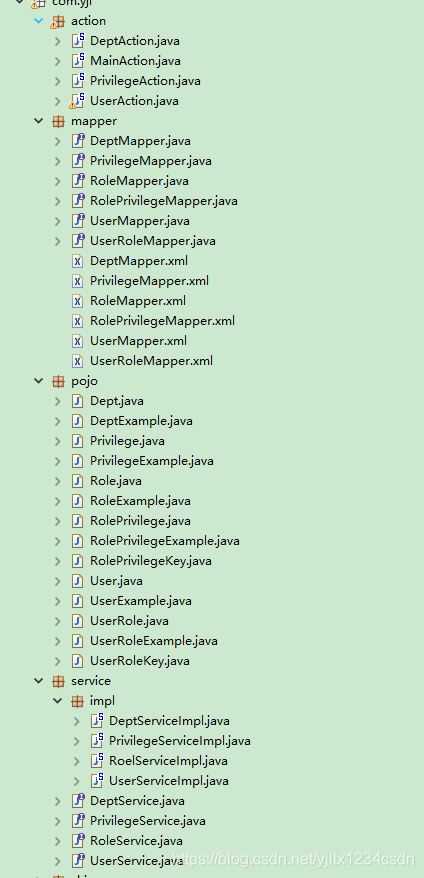
与前面的基本一致,没有太大的改动。
二.三.一 PrivilgeMapper 信息
注意, PrivilegeMapper.java 和 对应的 .xml 文件里面 仍然有一个根据员工编号和类型查询员工的权限方法
/*
     * 根据员工编号,查询员工的权限信息
     * */
	List<Privilege> findByUid(@Param(value="uId") Integer uId,@Param(value="type") Integer type);
对应 xml配置文件:
<select id="findByUid" resultMap="BaseResultMap">
    select
    <include refid="Base_Column_List" />
    from privilege a where a.id in (
		select rp.pid from user_role ur left join role_privilege rp
		on ur.rid=rp.rid
		where ur.uid=#{uId,jdbcType=INTEGER}
	)
	<if test="type != null and type !=''" >
      and a.type=#{type,jdbcType=INTEGER}
    </if>
  </select>
这也是与前面一样的, 比较重要,故单独列一下。
二.三.二 登录和注销功能
@RequestMapping("/login")
	@ResponseBody
	public Map<String,Object> login(User userInfo){
		Map<String,Object> dataMap=new HashMap<String,Object>();

		//1. 获取 Subject
		Subject subject=SecurityUtils.getSubject();
		//2. 配置Token
		//配置用户名和密码
		UsernamePasswordToken token=new UsernamePasswordToken(userInfo.getCode(), userInfo.getPassword());
		try{
			//进行登录
			subject.login(token);

			Session session=subject.getSession();
			User user=(User)subject.getPrincipal();
			session.setAttribute("loginUser", user);
			dataMap.put("response_status",true);
		}catch(Exception e){
			e.printStackTrace();
			dataMap.put("response_status",false);
			dataMap.put("error_msg","001");
		}

		return dataMap;

	}
	@RequestMapping("/logout")
	//退出登录
	public String logout(HttpSession session){
		//注销
		session.invalidate();
		return "login";
	}
二.四 编写自定义 Realm
这个跟前面也一样, 路径为: com.yjl.shiro.MyRealm
package com.yjl.shiro;

import java.util.List;

import org.apache.shiro.authc.AuthenticationException;
import org.apache.shiro.authc.AuthenticationInfo;
import org.apache.shiro.authc.AuthenticationToken;
import org.apache.shiro.authc.SimpleAuthenticationInfo;
import org.apache.shiro.authz.AuthorizationInfo;
import org.apache.shiro.authz.SimpleAuthorizationInfo;
import org.apache.shiro.realm.AuthorizingRealm;
import org.apache.shiro.subject.PrincipalCollection;
import org.apache.shiro.util.ByteSource;
import org.springframework.beans.factory.annotation.Autowired;

import com.yjl.mapper.PrivilegeMapper;
import com.yjl.mapper.UserMapper;
import com.yjl.pojo.Privilege;
import com.yjl.pojo.User;

public class MyRealm extends AuthorizingRealm{
	@Autowired
	private UserMapper userMapper;
	@Autowired
	private PrivilegeMapper privilegeMapper;
	@Override
	public String getName() {
		return "myRealm";
	}
	//授权
	@Override
	protected AuthorizationInfo doGetAuthorizationInfo(PrincipalCollection paramPrincipalCollection) {
		//获取当前的登录用户
		System.out.println("获取权限");
		User user=(User)paramPrincipalCollection.getPrimaryPrincipal();

		if(user==null){
			return null;
		}
		//根据 id,获取相应的权限信息

		List<Privilege> privilegeList=privilegeMapper.findByUid(user.getId(),null);

		SimpleAuthorizationInfo info=new SimpleAuthorizationInfo();

		for(Privilege priInfo:privilegeList){
			//仍然放置的是权限的标识 , 注意,这儿获取的是所有的非一级 权限,包括菜单和按钮。
			if(priInfo!=null&&priInfo.getPercode()!=null){
				info.addStringPermission(priInfo.getPercode());
			}
		}
		return info;

	}
	//认证
	@Override
	protected AuthenticationInfo doGetAuthenticationInfo(AuthenticationToken paramAuthenticationToken)
			throws AuthenticationException {
		System.out.println("进入认证");
		String code=(String)paramAuthenticationToken.getPrincipal();
		//根据用户名,去查询相应的数据
		User user=userMapper.selectInfoByCode(code);
		if(user==null){
			//没有查询出来
			return null;
		}
		SimpleAuthenticationInfo simpleAuthenticationInfo=
				new SimpleAuthenticationInfo(user,user.getPassword(),
						//传入转换后的盐
						ByteSource.Util.bytes(user.getSalt()),getName());
		return simpleAuthenticationInfo;

	}
}
二.五 配置shiro 文件
文件的名称是 applicationContext-shiro.xml ,在读取 spring配置文件时,也读取进来了。 不用单独配置。
web.xml 文件中:
<!-- 启动spring -->
  <context-param>
    <param-name>contextConfigLocation</param-name>
    <param-value>classpath:spring/applicationContext-*.xml</param-value>
  </context-param>
二.五.一 配置密码加密验证
<!-- 凭证匹配器 -->
<bean id="credentialsMatcher" class="org.apache.shiro.authc.credential.HashedCredentialsMatcher">
    <property name="hashAlgorithmName" value="md5"/>
    <property name="hashIterations" value="10"/>
    <property name="storedCredentialsHexEncoded" value="false"/>
</bean>
与 以前的 shiro.ini 文件
#加密类
credentialsMatcher=org.apache.shiro.authc.credential.HashedCredentialsMatcher
#加密方式
credentialsMatcher.hashAlgorithmName=md5
#加密次数
credentialsMatcher.hashIterations=10
#存储散列后的密码是否为16进制
credentialsMatcher.storedCredentialsHexEncoded=false
是匹配的。
二.五.二 配置自定义realm, 注入密码匹配器
<!-- 配置自定义的ream -->
<bean id="myRealm" class="com.yjl.shiro.MyRealm">
	<!-- 配置密码管理 -->
	<property name="credentialsMatcher" ref="credentialsMatcher"></property>
</bean>
与以前的
#配置自定义realm
myRealm=com.yjl.shiro.MyRealm
#配置加密
myRealm.credentialsMatcher=$credentialsMatcher
是匹配的。
二.五.三 配置 securityManager 对象,注入自定义Realm
<!-- 配置securityManager, 将一些信息注入到里面 -->

<bean id="securityManager" class="org.apache.shiro.web.mgt.DefaultWebSecurityManager">
	<property name="realm" ref="myRealm"></property>
</bean>
与以前的:
#配置自定义realm
myRealm=com.yjl.shiro.MyRealm
#配置加密
myRealm.credentialsMatcher=$credentialsMatcher
#注入自定义的realm
securityManager.realm=$myRealm
是匹配的。
securityManager 不仅可以注入自定义Realm,还可以注入缓存,session管理,记住我等功能。
二.五.四 配置 生命周期
<!-- 保证实现了Shiro内部lifecycle函数的bean执行 -->
<bean id="lifecycleBeanPostProcessor" class="org.apache.shiro.spring.LifecycleBeanPostProcessor"/>
与 web.xml 中 shiroFilter 部分的 targetFilterLifecycle 属性为 true 相对应。
二.五.五 配置 shiroFilter 过滤器
<!-- 配置shiroFilter 规则 ,与web.xml的过滤器中的 targetBeanName 名称保持一致-->
	<bean id="shiroFilter" class="org.apache.shiro.spring.web.ShiroFilterFactoryBean">
		<property name="securityManager" ref="securityManager"></property>

		<!-- 配置登录,登录成功和没有权限的三个路径 ,以前的main 部分-->
		<property name="loginUrl" value="/User/toLogin"></property>
		<!-- <property name="successUrl" value="/Main/toMain"></property>  -->
		<property name="unauthorizedUrl" value="/Privilege/noPrivilege"></property>

		<!-- 配置规则 ,即urls部分-->
		<property name="filterChainDefinitions">
			<value>
				<!-- 配置拦截器 -->
				/static/**=anon
		 		/User/toLogin=anon
		 		/User/login=anon
		 		/User/logout=logout
		 		/Main/toMain=authc
		 		<!-- 没有配置的路径走认证 -->
		 		/**=authc
			</value>
		</property>
	</bean>
常用的,主要分为五个部分,下面依次讲解。
注意点: 该工厂 ShiroFilterFactoryBean 实例化bean 的 必须是 shiroFilter ,这个名称必须要与 web.xml中关于shiro配置的 filter-name 的名称相同。
二.五.五.一 注入 securityManager 对象
<property name="securityManager" ref="securityManager"></property>
二.五.五.二 配置 loginUrl 路径
<property name="loginUrl" value="/User/toLogin"></property>
loginUrl 指的是 ,如果用户没有认证,或者没有通过认证,跳转到哪?
一般跳转到去登录页面的那个方法。
与以前 [main] 里面的
#配置权限
authc.loginUrl=/User/toLogin
对应。
二.五.五.三 配置 successUrl 路径
一般不配置这一个路径。
这个路径指的是,如果员工认证通过,跳转到哪? 认证通过,会跳转到主页, 但跳转到主页,一般都是通过程序代码固化下来,并不在这儿进行配置。 这个路径的实际意义是, 如果认证通过,就跳转到上一次要访问的页面。
即,如果用户 admin 想访问 用户的界面, /项目名/User/toList, 当用户手动输入这个网址时,发现没有认证,就会跳转到登录的界面,当用户登录成功后, 这个时候,会跳转到哪呢? 并不会跳转到主页那,而是跳转到上一次想访问的那个页面, 即 /项目名/User/toList 页面, 展示用户的相应信息。 这个功能还是非常好的,所以一般不配置这个属性值。
二.五.五.四 配置 unauthorizedUrl 路径
<property name="unauthorizedUrl" value="/Privilege/noPrivilege"></property>
unauthorizedUrl 指的是权限不足时,跳转到哪?
与以前 [main] 部分的
#跳转到权限不足的路径
roles.unauthorizedUrl=/NoPermission/NoPermission
perms.unauthorizedUrl=/NoPermission/NoPermission
相对应。
二.五.五.五 filterChainDefinitions 配置拦截器
<!-- 配置规则 ,即urls部分-->
<property name="filterChainDefinitions">
	<value>
		<!-- 配置拦截器 -->
		/static/**=anon
 		/User/toLogin=anon
 		/User/login=anon
 		/User/logout=logout
 		/Main/toMain=authc
 		<!-- 没有配置的路径走认证 -->
 		/**=authc
	</value>
</property>
这个与以前的 [urls] 部分
[urls]
#静态页面可以访问
/static/**=anon
#跳转到登录页面和登录方法可以访问
/User/toLogin=anon
/User/login=anon
#跳转到主页,需要认证
/Main/toMain=authc
/Privilege/getPrivilegeByUId=authc
#执行方法,不仅需要认证,还需要有相应的方法
/Dept/add=authc,perms["dept:add"]
/Dept/update=authc,perms["dept:update"]
/Dept/list=authc,perms["dept:list"]
/Dept/delete=authc,perms["dept:delete"]
/User/toList=authc,perms["user:toList"]
#退出登录
/User/logout=logout
#其他的一切资源,都需要认证
/**=authc
相对应。
发现,并没有 /Dept/add,/Dept/list ... 等权限的配置。
一个系统中,会有很多的权限,不能添加一个就在 filterChainDefinitions 部分配置一个,那么就太烦繁了, 一般都是通过 注解的方式进行配置权限。
关于注解方式配置权限,老蝴蝶下面会讲解。
二.五.六 applicationContext-shiro.xml 配置文件合并
将上面的这些部分,进行合并,得到一个总的配置信息。
<!-- 凭证匹配器 -->
	<bean id="credentialsMatcher" class="org.apache.shiro.authc.credential.HashedCredentialsMatcher">
	    <property name="hashAlgorithmName" value="md5"/>
	    <property name="hashIterations" value="10"/>
	    <property name="storedCredentialsHexEncoded" value="false"/>
	</bean>


	<!-- 配置自定义的ream -->
	<bean id="myRealm" class="com.yjl.shiro.MyRealm">
		<!-- 配置密码管理 -->
		<property name="credentialsMatcher" ref="credentialsMatcher"></property>
	</bean>


	<!-- 配置securityManager, 将一些信息注入到里面 -->

	<bean id="securityManager" class="org.apache.shiro.web.mgt.DefaultWebSecurityManager">
		<property name="realm" ref="myRealm"></property>
	</bean>

	<!-- 保证实现了Shiro内部lifecycle函数的bean执行 -->
	<bean id="lifecycleBeanPostProcessor" class="org.apache.shiro.spring.LifecycleBeanPostProcessor"/>

	<!-- 配置shiroFilter 规则 ,与web.xml的过滤器中的 targetBeanName 名称保持一致-->
	<bean id="shiroFilter" class="org.apache.shiro.spring.web.ShiroFilterFactoryBean">
		<property name="securityManager" ref="securityManager"></property>

		<!-- 配置登录,登录成功和没有权限的三个路径 ,以前的main 部分-->
		<property name="loginUrl" value="/User/toLogin"></property>
		<!-- <property name="successUrl" value="/Main/toMain"></property>  -->
		<property name="unauthorizedUrl" value="/Privilege/noPrivilege"></property>

		<!-- 配置规则 ,即urls部分-->
		<property name="filterChainDefinitions">
			<value>
				<!-- 配置拦截器 -->
				/static/**=anon
		 		/User/toLogin=anon
		 		/User/login=anon
		 		/User/logout=logout
		 		/Main/toMain=authc
		 		<!-- 没有配置的路径走认证 -->
		 		/**=authc
			</value>
		</property>
	</bean>
二.六 前端页面
前端页面的配置信息,与以前基本一致,故不重复写了。
重点提一下, dept.jsp 页面的按钮标识控制部分。
dept.jsp 页面设置标识:
<shiro:hasPermission name="dept:add">
		<script>
			 sessionStorage.setItem("dept_update",true);
		</script>
	</shiro:hasPermission>
	<shiro:hasPermission name="dept:update">
		<script>
			 sessionStorage.setItem("dept_update",true);
		</script>
	</shiro:hasPermission>
	<shiro:hasPermission name="dept:delete">
		<script>
			 sessionStorage.setItem("dept_delete","true")
		</script>
	</shiro:hasPermission>
<script type="text/javascript" src="${pageContext.request.contextPath}/static/js/dept.js"></script>
dept.js 脚本里面获取标识:
//看是否有添加的权限
var add=sessionStorage.getItem("dept_add");
if(add){
$("#add").show();
}else{
$("#add").hide();
}
//看修改和删除是否显示和隐藏
function operateFormatter(value, row, index) {
var update=sessionStorage.getItem("dept_update");
var del=sessionStorage.getItem("dept_delete");
//console.log("update:"+update+",del:"+del);
var udpateIcon="";
if(update){
udpateIcon='<a class="update text-primary" href="javascript:void(0)" data-toggle="tooltip" title="修改">'
+'<i class="fa fa-pencil"></i> 修改 </a>';
}
var delIcon="";
if(del){
delIcon='<shiro:hasPermission name="dept:delete"><a class="delete text-danger" href="javascript:void(0)" data-toggle="tooltip" title="撤销">'
+'<i class="fa fa-minus"></i> 删除 </a></shiro:hasPermission">';
}
return udpateIcon+delIcon;
}
二.七 测试验证
输入网址: http://localhost:8080/SSM_Shiro_RBAC/User/toLogin
输入admin,1234 进行测试 (错误的密码情况就不测试了)
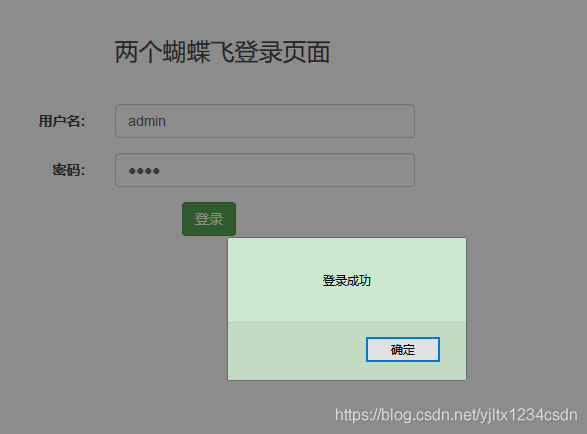

看起来,是正常的,
然后,当手动输入 部门的添加功能呢, http://localhost:8080/SSM_Shiro_RBAC/Dept/add
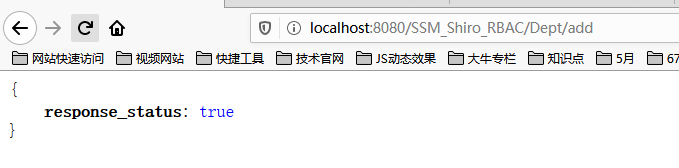
响应是正常的, 这是因为我们没有配置具体的权限验证呢。
三. 注解式配置具体权限
在 applicationContext-shiro.xml 中的 filterChainDefinitions 属性中,虽然可以像 shiro.ini 那样,配置具体的权限,但是当权限过多时,再那样配置,就不太好了。
所以 shiro 提供了注解式配置。

| 注解名称 | 意义 |
|---|---|
| @RequiresPermissions | 必须具有权限 |
| @RequiresAuthentication | 必须通过认证 |
| @RequiresGuest | 匿名访客 |
| @RequiresRoles | 必须具有角色 |
| @RequiresUser | 是否被记忆,两个含义,一个成功认证的,二是记住我登录的 |
只需要在某个具体的方法上面加入相应的注解即可。
如: 在 部门的 add() 方法上面 ,添加 @RequiresPermissions("Dept:add") 注解
@RequiresPermissions("dept:add")
@RequestMapping("/add")
@ResponseBody
public Map<String,Object> add(){
	System.out.println("实现部门添加的方法");
	Map<String,Object> map=new HashMap<String,Object>();
	map.put("response_status",true);
	return map;
}
shiro 会先看一下,当前会话登录的用户,是否具有 权限 Dept:add ,如果有才执行 add 方法,如果没有,不执行,抛出异常。
会从 MyRealm 里面的 doGetAuthorizationInfo() 返回对象里面取数据进行比较。
一般常用的,就是 权限验证。
@Target({java.lang.annotation.ElementType.TYPE, java.lang.annotation.ElementType.METHOD})
@Retention(RetentionPolicy.RUNTIME)
public @interface RequiresPermissions
{
  String[] value();

  Logical logical() default Logical.AND;
}
默认是 AND
配置单个权限:
@RequiresPermissions("dept:add")
表示具有权限 dept:add 才执行
配置多个权限与:
@RequiresPermissions({"dept:add","dept:update"})
表示具有权限 dept:add和 dept:update, 两个权限同时具有才执行
配置多个权限或:
@RequiresPermissions(value={"dept:add","dept:update"},logical=Logical.OR)
表示具有权限 dept:add 或者 dept:update 任意一个均可。
四. 注解式声明 Shiro 权限
直接在方法上 添加 @RequiresPermissions("dept:add") 注解是不生效的,必须要动态代理一下。
由于 权限注解被放置在 Action类的方法上,所以配置动态代理,必须要配置在 springmvc.xml 文件里面。
applicationContext-shiro.xml 文件不用动。
四.一 配置注解
<bean class="org.apache.shiro.spring.security.interceptor.AuthorizationAttributeSourceAdvisor">
		<property name="securityManager" ref="securityManager"></property>
</bean>
<bean class="org.springframework.aop.framework.autoproxy.DefaultAdvisorAutoProxyCreator"
	depends-on="lifecycleBeanPostProcessor">
	<property name="proxyTargetClass" value="true"></property>
</bean>
四.二 验证
admin 没有 部门的 添加权限, 当手动输入添加的地址时,会报错。
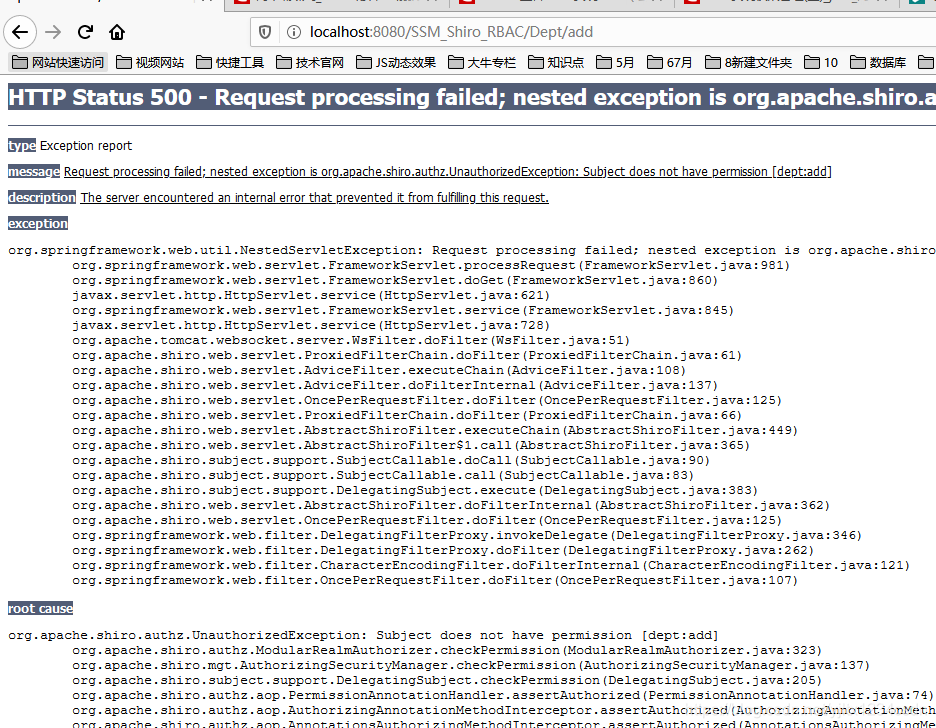
org.springframework.web.util.NestedServletException: Request processing failed; nested exception is org.apache.shiro.authz.UnauthorizedException: Subject does not have permission [dept:add]
当输入 delete 网址时:

说明,注解权限是可以的。
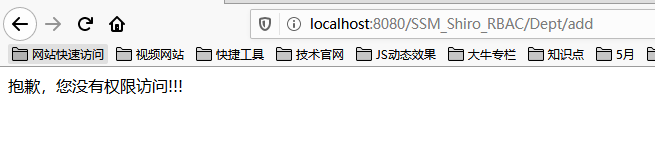
需要处理一下异常,如果没有权限的话,就跳转到 无权限那个提示页面。
四.三 springmvc.xml 捕获异常
关于 SpringMVC 的异常处理,可以看老蝴蝶以前写的 SpringMVC系列文章。
<!-- 配置异常 -->
<bean class="org.springframework.web.servlet.handler.SimpleMappingExceptionResolver">
	<property name="exceptionMappings">
		 <props>
		 	<!-- 每个异常类,对应一个jsp -->
		 	 <!-- 没有权限,到哪个具体的页面 -->
        	<prop key="org.apache.shiro.authz.AuthorizationException">noPrivilege</prop>
        	<!-- 没有认证通过 -->
        	<prop key="org.apache.shiro.authc.AuthenticationException">login</prop>
			<!-- 可继续添加多个 ,如StudentException -->
		</props>
	</property>
</bean>
配置好之后,重新测试
当登录成功后,再输入 部门添加的网址后,
注意观察控制台的打印信息:
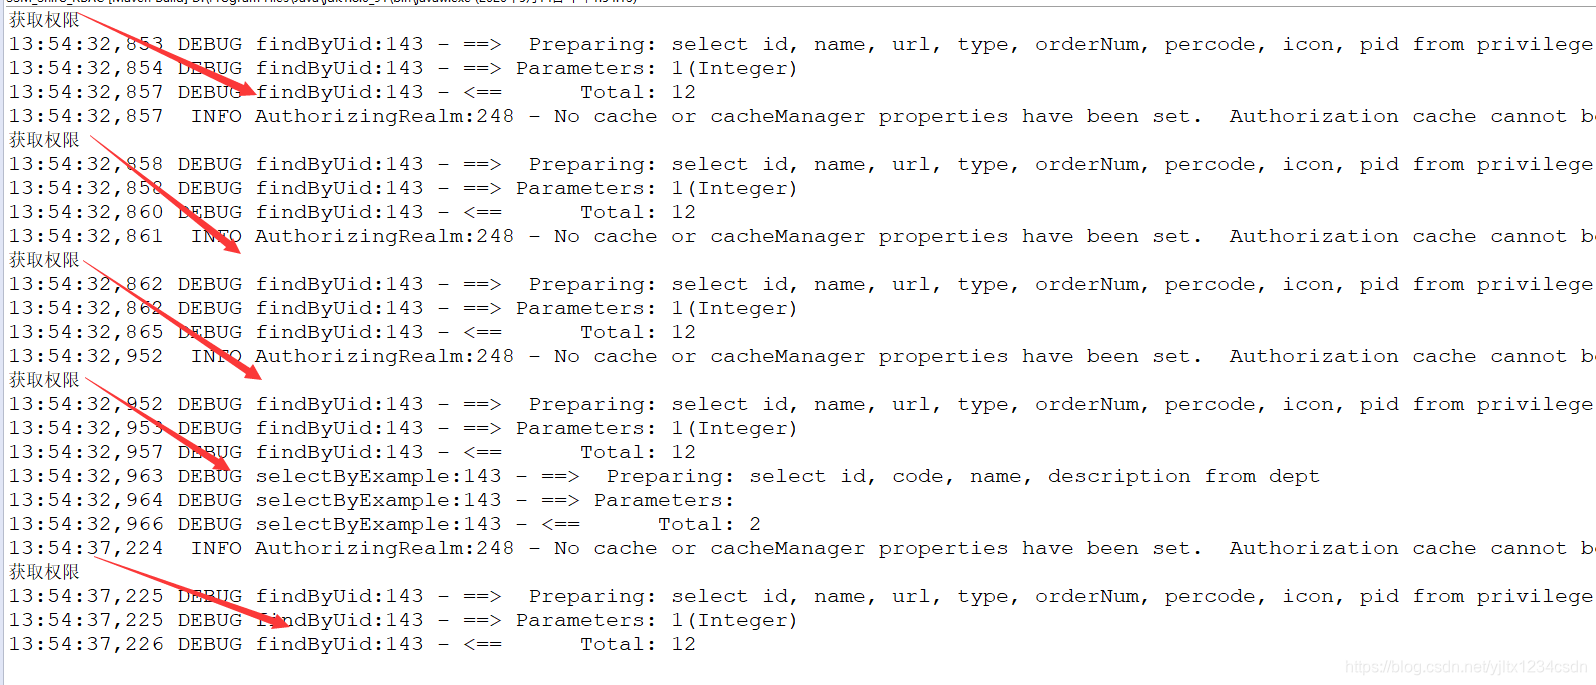
发现,自定义Realm 中的授权方法,被执行了很多次, 每一个注解方法,每一个前端的 shiro:hasPermission 判断,都需要执行一下这个方法,频繁地取数据, 影响数据库的效率, 所以我们需要做缓存的处理。 老蝴蝶下一章节再讲缓存。
本章节代码链接为:
链接:https://pan.baidu.com/s/1qjZcQfKQa4f_SdCjXvTtxQ
提取码:ko9l
“