当你描边或者填充的时候,你用当前的描边或者填充样式。而这可以被设定为一个颜色,一个团或者是渐变。
渐变
渐变指定起始颜色,结束颜色,以及颜色变换的区域。一个单一的渐变包含一个以上的颜色变化。二位画布上绘图上下文支持两种渐变类型:线性 linear和径向 radial。
线性渐变
线性渐变定义两点之间颜色沿着一条线变化。
var grad = ctx.createLinearGradient(x1, y1, x2, y2);
之后调用CanvasGradient之中唯一的方法addColorStop()来向渐变色中增加至少两个 “颜色停止点”(color stop)。该方法接受两个参数:一个是位于0~1.0之间的double值,代表颜色停止点在渐变线上的位置;另一个是DOMString类型的CSS3颜色字串值。
grad.addColorStop(0, 'black');
grad.addColorStop(1, 'white');
grad.addColorStop(0.2, 'white');
grad.addColorStop(1/6, 'white');
你同样可以设定颜色为 #000,rgba(0,0,0,1)如
grad.addColorStop(1, 'rgba(255, 255, 255, 0.5)');
从一个色标到另一个,颜色在渐变定义的间隔中变化。定义一个颜色渐变就想是创建画布上的一个虚拟的矩形,但它不显示任何内容。让渐变通过展示,你需要设置填充样式或者是笔触样式为渐变,在渐变之上画些东西!注意,如果你正在绘制的东西超过了渐变的端点,填充或者描边的颜色是最接近的那个色标。
主要代码:
  var grad = ctx.createLinearGradient(10, 0, 80, 0);
            grad.addColorStop(0, 'black');
            grad.addColorStop(1, 'white');
            ctx.fillStyle = grad;
            ctx.fillRect(10, 10, 100, 100);
如图:
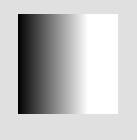
注意到没有设置渐变的两个点位置和填充区域的位置,额外的填充颜色是选择最近的的色标。
注意
你可以添加颜色停止点,但是你不能更改颜色停止点,替换或者删除它。如果你需要改变颜色停止点的话,你必须重新设定颜色停止点。
径向渐变
径向渐变定义沿颜色沿两个圆之间的锥变化。
var grad = ctx.createRadialGradient(x, y, rad, x1, y1, rad1);
传入的两个圆参数,每个定义了圆点和半径,当然用同一个圆点不同的半径也是很常见的。
如:
 var grad = ctx.createRadialGradient(50, 50, 5, 50, 50, 50);
            grad.addColorStop(0, 'white');
            grad.addColorStop(1, 'black');
            ctx.fillStyle = grad;
            ctx.arc(50, 50, 50, 0, 2 * Math.PI);
            ctx.fill();
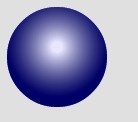
径向渐变通常用来创建一个三维的照明效果。
示例代码:
ctx.fillStyle = "blue";
    ctx.beginPath();
    ctx.arc(50, 50, 50, 0, 2 * Math.PI);
    ctx.fill();
    var grad = ctx.createRadialGradient(50,40, 5, 50, 40, 50);
    grad.addColorStop(0, 'rgba(255, 255, 255, 0.9)');
    grad.addColorStop(1, 'rgba(0, 0, 0, 0.6)');
    ctx.beginPath();
    ctx.fillStyle = grad;
    ctx.arc(50, 50, 50, 0, 2 * Math.PI);
    ctx.fill();
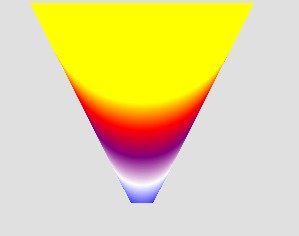
设定半径不同,效果也不一样。
代码:
var gradient = ctx.createRadialGradient(  can.width/2, can.height,10, can.width/2, 0, 100);
gradient.addColorStop(0, 'blue');
gradient.addColorStop(0.25, 'white');
gradient.addColorStop(0.5, 'purple');
gradient.addColorStop(0.75, 'red');
gradient.addColorStop(1, 'yellow');
ctx.fillStyle = gradient;
ctx.rect(0, 0, can.width, can.height);
ctx.fill();
效果:
图案
你可以用图案替代需要非常大的图片。一个图案可以是从小的,自然重复的图像如砂、草或木制作而来。例如,可以用2d纹理生成照片版逼真的风景。
这里的图案可以是以下三种之一:image元素、canvas元素或video元素。可以用createPattern()方法来创建图案,该方法接收两个参数:图案本身,以及一个用来告知浏览器应该如何重复图案的字符串。第二个参数可以取如下的值:repeat、repeat-x、repeat-y或no-repeat。
var dot = document.getElementById("dot");
var pat = ctx.createPattern(dot, "repeat");
举例:
Html:
<img src="butterfly1.png" id="butterfly" />
<canvas id="can" height="200" width="400"></canvas>
javascript
var can = document.getElementById("can");
           var ctx = can.getContext("2d");
           var  bt=document.getElementById("butterfly");
           var pat=ctx.createPattern(bt,"repeat");
           ctx.lineWidth=100;
           ctx.beginPath();
           ctx.moveTo(10,10);
           ctx.lineTo(200,200);
           ctx.strokeStyle=pat;
           ctx.stroke();
           ctx.fillStyle=pat;
           ctx.fillRect(80,80,200,200);
当然你可以用script对象 image,前例更改如下:
Html:
<canvas id="can" height="200" width="400"></canvas>
javascript
var can = document.getElementById("can");
            var ctx = can.getContext("2d");
            var bt=new Image(),pat;
              bt.src = 'butterfly1.png';
              bt.onload = function (e) {
                this.width=
                pat=ctx.createPattern(bt,"repeat");
               ctx.lineWidth=100;
               ctx.beginPath();
               ctx.moveTo(10,10);
               ctx.lineTo(200,200);
               ctx.strokeStyle=pat;
               ctx.stroke();
               ctx.fillStyle=pat;
               ctx.fillRect(80,80,200,200);
                }
            }
提醒
因为CanvasPattern对象是JavaScript语言中的那种所谓“不透明对象”(opaque object),它没有提供用于操作其内容的属性及方法。如果你要更改pattern对象指向的图案只能是调用ctx.createPattern().
如第一个例子中,你设定了图片的样式,更改了显示的大小,但是在图案中还是原来的大小;你在js中更改了大小还是不能更改图案中源图的大小。