keepalived基础介绍
作者:尹正杰
版权声明:原创作品,谢绝转载!否则将追究法律责任。
一.keepalived概述
1>.什么是keepalived
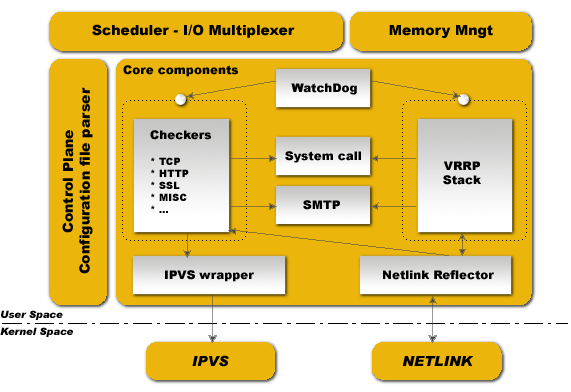
  vrrp协议(Virtual Router Redundancy Protocol)的软件实现,原生设计目的为了高可用ipvs服务。

  keepalived有以下组件:
    用户空间核心组件(Core components):
      VRRP Stack:
        定期发送广播包通知其它节点自己拥有的IP地址,即VIP消息报告。
      Checkers:
        在ipvs模式下使用,用来监测服务器(real server)是否存货。
      System call
        顾名思义,用来标记服务器(real server)的权重。
      SMTP-邮件组件
        发送邮件通知的组件。
      IPVS wrapper:
        根据咱们自定义的配置文件生成相应的IPVS规则。
      Netlink Reflector:
        用来传输数据的网络接口。
      WatchDog:
        监控进程,用来监控以上组件的进程。
    控制组件(Control Plane):
      配置文件分析器,说白了就是解析配置文件的组件。
    IO复用器(Scheduler-I/O Multiplexer):
      IO多路复用的一个组件。
    内存管理组件(Memory Mngt):
      顾名思义,管理内存的组件。

  通告:
    心跳,优先级等;周期性

  工作方式:
    抢占式,非抢占式

  安全工作认证:
    无认证
    简单字符认证:预共享密钥

  工作模式:
    主/备:单虚拟路由器
    主/主:主/备(虚拟路由器1),备/主(虚拟路由器2)


  博主推荐阅读:
    https://keepalived.org/documentation.html
2>.keepalived功能
  基于vrrp协议完成地址流动

  为vip地址所在的节点生成ipvs规则(在配置文件中预先定义)

  为ipvs集群的各RS做健康状态检测

  基于脚本调用接口通过执行脚本完成脚本中定义的功能,进而影响集群事务,以此支持nginx、haproxy等服务
3>.keepalived术语
  虚拟路由器(Virtual Router):

  虚拟路由器标识:VRID(0-255),唯一标识虚拟路由器

  物理路由器:
    master(主设备)
    backup(备用设备)
    priority(优先级)
    VIP(Virtual IP)
    VMAC(Viruta lMAC (00-00-5e-00-01-VRID))
二.安装keepalived
1>.使用yum方式安装keepalived


[root@node102.yinzhengjie.org.cn ~]# yum -y install keepalived
Loaded plugins: fastestmirror
Loading mirror speeds from cached hostfile
epel/x86_64/metalink                                                          | 8.3 kB  00:00:00
 * base: mirrors.aliyun.com
 * epel: mirrors.njupt.edu.cn
 * extras: mirrors.aliyun.com
 * updates: mirrors.aliyun.com
base                                                                          | 3.6 kB  00:00:00
epel                                                                          | 5.3 kB  00:00:00
extras                                                                        | 2.9 kB  00:00:00
updates                                                                       | 2.9 kB  00:00:00
(1/2): epel/x86_64/updateinfo                                                 | 1.0 MB  00:00:03
(2/2): epel/x86_64/primary_db                                                 | 6.9 MB  00:00:46
Resolving Dependencies
--> Running transaction check
---> Package keepalived.x86_64 0:1.3.5-16.el7 will be installed
--> Processing Dependency: libnetsnmpmibs.so.31()(64bit) for package: keepalived-1.3.5-16.el7.x86_64
--> Processing Dependency: libnetsnmpagent.so.31()(64bit) for package: keepalived-1.3.5-16.el7.x86_64
--> Processing Dependency: libnetsnmp.so.31()(64bit) for package: keepalived-1.3.5-16.el7.x86_64
--> Running transaction check
---> Package net-snmp-agent-libs.x86_64 1:5.7.2-43.el7 will be installed
--> Processing Dependency: libsensors.so.4()(64bit) for package: 1:net-snmp-agent-libs-5.7.2-43.el7.x
86_64---> Package net-snmp-libs.x86_64 1:5.7.2-43.el7 will be installed
--> Running transaction check
---> Package lm_sensors-libs.x86_64 0:3.4.0-8.20160601gitf9185e5.el7 will be installed
--> Finished Dependency Resolution

Dependencies Resolved

=====================================================================================================
 Package                    Arch          Version                                  Repository   Size
=====================================================================================================
Installing:
 keepalived                 x86_64        1.3.5-16.el7                             base        331 k
Installing for dependencies:
 lm_sensors-libs            x86_64        3.4.0-8.20160601gitf9185e5.el7           base         42 k
 net-snmp-agent-libs        x86_64        1:5.7.2-43.el7                           base        706 k
 net-snmp-libs              x86_64        1:5.7.2-43.el7                           base        750 k

Transaction Summary
=====================================================================================================
Install  1 Package (+3 Dependent packages)

Total download size: 1.8 M
Installed size: 6.0 M
Downloading packages:
(1/4): lm_sensors-libs-3.4.0-8.20160601gitf9185e5.el7.x86_64.rpm              |  42 kB  00:00:00
(2/4): keepalived-1.3.5-16.el7.x86_64.rpm                                     | 331 kB  00:00:01
(3/4): net-snmp-libs-5.7.2-43.el7.x86_64.rpm                                  | 750 kB  00:00:00
(4/4): net-snmp-agent-libs-5.7.2-43.el7.x86_64.rpm                            | 706 kB  00:00:01
-----------------------------------------------------------------------------------------------------
Total                                                                1.0 MB/s | 1.8 MB  00:00:01
Running transaction check
Running transaction test
Transaction test succeeded
Running transaction
  Installing : 1:net-snmp-libs-5.7.2-43.el7.x86_64                                               1/4
  Installing : lm_sensors-libs-3.4.0-8.20160601gitf9185e5.el7.x86_64                             2/4
  Installing : 1:net-snmp-agent-libs-5.7.2-43.el7.x86_64                                         3/4
  Installing : keepalived-1.3.5-16.el7.x86_64                                                    4/4
  Verifying  : keepalived-1.3.5-16.el7.x86_64                                                    1/4
  Verifying  : 1:net-snmp-agent-libs-5.7.2-43.el7.x86_64                                         2/4
  Verifying  : lm_sensors-libs-3.4.0-8.20160601gitf9185e5.el7.x86_64                             3/4
  Verifying  : 1:net-snmp-libs-5.7.2-43.el7.x86_64                                               4/4

Installed:
  keepalived.x86_64 0:1.3.5-16.el7

Dependency Installed:
  lm_sensors-libs.x86_64 0:3.4.0-8.20160601gitf9185e5.el7  net-snmp-agent-libs.x86_64 1:5.7.2-43.el7
  net-snmp-libs.x86_64 1:5.7.2-43.el7

Complete!
[root@node102.yinzhengjie.org.cn ~]#
[root@node102.yinzhengjie.org.cn ~]# keepalived -v          #查看keepalived的版本信息。
Keepalived v1.3.5 (03/19,2017), git commit v1.3.5-6-g6fa32f2

Copyright(C) 2001-2017 Alexandre Cassen, <acassen@gmail.com>

Build options:  PIPE2 LIBNL3 RTA_ENCAP RTA_EXPIRES RTA_PREF FRA_OIFNAME FRA_SUPPRESS_PREFIXLEN FRA_TUN_ID RTAX_CC_ALGO RTAX_QUICKACK LIBIPTC LIBI
PSET_DYNAMIC LVS LIBIPVS_NETLINK VRRP VRRP_AUTH VRRP_VMAC SOCK_NONBLOCK SOCK_CLOEXEC FIB_ROUTING INET6_ADDR_GEN_MODE SNMP_V3_FOR_V2 SNMP SNMP_KEEPALIVED SNMP_CHECKER SNMP_RFC SNMP_RFCV2 SNMP_RFCV3 SO_MARK[root@node102.yinzhengjie.org.cn ~]#
[root@node102.yinzhengjie.org.cn ~]#
2>.keepalived的程序环境
主配置文件:
  /etc/keepalived/keepalived.conf

主程序文件:
  /usr/sbin/keepalived

Unit File:
  /usr/lib/systemd/system/keepalived.service(CentOS)
  /lib/systemd/system/keepalived.service(Ubuntu)

Unit File的环境配置文件:
  /etc/sysconfig/keepalived
三.keepalived软件初体验
1>.编辑haproxny的配置文件
[root@node102.yinzhengjie.org.cn ~]# cat /etc/keepalived/keepalived.conf
! Configuration File for keepalived

#上一行是注释信息,global_defs则定义全局配置。
global_defs {
   #定义收件人信息,即发生故障切换时邮件发送的对象,可以按行区分写多个。
   notification_email {
     jason@yinzhengjie.org.cn
   }
   #定义发件人信息。
   notification_email_from root@yinzhengjie.org.cn
   #定义邮件服务器地址。
   smtp_server 127.0.0.1
   #定义邮件服务器的连接超时时间。
   smtp_connect_timeout 30
   #声明虚拟路标识符,一般会写当前主机名称,需要保证该id在局域网唯一。
   router_id node102.yinzhengjie.org.cn
   #所有报文都检查比较消耗性能,此配置为如果收到的报文和上一个报文是同一个路由器发出的则跳过检查报文中的源地址。
   vrrp_skip_check_adv_addr
   #禁用防火墙策略,keepalived默认启动时会自动生成iptables策略,因此我们启用此项就可以不生成iptables的策略。
   vrrp_iptables
   #严格遵守VRRP协议,即不允许以下三种状况:
   #    1>.没有VIP地址;
   #    2>.单播邻居;
   #    3>.在VRRP版本2中有IPv6地址;
   vrrp_strict
   #ARP报文发送延迟时间,0表示不延迟。
   vrrp_garp_interval 0
   #消息发送延迟,0表示不延迟。
   vrrp_gna_interval 0
   #默认组播IP地址,224.0.0.0到239.255.255.255,不写的话默认就是224.0.0.18。
   vrrp_mcast_group4 224.0.0.18
}

#使用vrrp_instance指令定义一个VIP实例名称,我这里自定义VIP实例的名称为"VIP01",生产环境建议该名称和业务相结合。
vrrp_instance VIP01 {
    #指定当前实例默认角色,当前节点在此虚拟路由器上的初始状态,状态为MASTER或者BACKUP
    state MASTER
    #定义VIP绑定的本地接口的名称(该接口名称必须在当前节点存在哟~),即绑定为当前虚拟路由器使用的物理接口
    interface eth1
    #定义当前虚拟路由器惟一标识,该id的范围是0-255,该id不要和其它keepalived的id冲突即可。
    virtual_router_id 27
    #当前物理节点在此虚拟路由器中的优先级;范围1-254
    priority 150
    #定义vrrp通告的时间间隔,默认1s
    advert_int 3
    #定义认证机制
    authentication {
        #指定认证类型
        auth_type PASS
        #指定认证密码,仅前8位有效哟~
        auth_pass yinzhengjie
    }
    #指定具体的虚拟IP地址,可以指定多个。
    virtual_ipaddress {
        172.30.1.200 dev eth1 label eth1:0
    }
}
[root@node102.yinzhengjie.org.cn ~]#
[root@node102.yinzhengjie.org.cn ~]#
[root@node103.yinzhengjie.org.cn ~]# cat /etc/keepalived/keepalived.conf
! Configuration File for keepalived

#上一行是注释信息,global_defs则定义全局配置。
global_defs {
   #定义收件人信息,即发生故障切换时邮件发送的对象,可以按行区分写多个。
   notification_email {
     jason@yinzhengjie.org.cn
   }
   #定义发件人信息。
   notification_email_from root@yinzhengjie.org.cn
   #定义邮件服务器地址。
   smtp_server 127.0.0.1
   #定义邮件服务器的连接超时时间。
   smtp_connect_timeout 30
   #声明虚拟路标识符,一般会写当前主机名称,需要保证该id在局域网唯一。
   router_id node103.yinzhengjie.org.cn
   #所有报文都检查比较消耗性能,此配置为如果收到的报文和上一个报文是同一个路由器发出的则跳过检查报文中的源地址。
   vrrp_skip_check_adv_addr
   #禁用防火墙策略,keepalived默认启动时会自动生成iptables策略,因此我们启用此项就可以不生成iptables的策略。
   vrrp_iptables
   #严格遵守VRRP协议,即不允许以下三种状况:
   #    1>.没有VIP地址;
   #    2>.单播邻居;
   #    3>.在VRRP版本2中有IPv6地址;
   vrrp_strict
   #ARP报文发送延迟时间,0表示不延迟。
   vrrp_garp_interval 0
   #消息发送延迟,0表示不延迟。
   vrrp_gna_interval 0
   #默认组播IP地址,224.0.0.0到239.255.255.255,不写的话默认就是224.0.0.18。
   vrrp_mcast_group4 224.0.0.18
}

#使用vrrp_instance指令定义一个VIP实例名称,我这里自定义VIP实例的名称为"VIP01",生产环境建议该名称和业务相结合。
vrrp_instance VIP01 {
    #指定当前实例默认角色,当前节点在此虚拟路由器上的初始状态,状态为MASTER或者BACKUP
    state BACKUP
    #定义VIP绑定的本地接口的名称(该接口名称必须在当前节点存在哟~),即绑定为当前虚拟路由器使用的物理接口
    interface eth1
    #定义当前虚拟路由器惟一标识,该id的范围是0-255,注意,用一组keepalived的id编号必须要一致哟~
    virtual_router_id 27
    #当前物理节点在此虚拟路由器中的优先级;范围1-254
    priority 100
    #定义vrrp通告的时间间隔,默认1s
    advert_int 3
    #定义认证机制
    authentication {
        #指定认证类型
        auth_type PASS
        #指定认证密码,仅前8位有效哟~
        auth_pass yinzhengjie
    }
    #指定具体的虚拟IP地址,可以指定多个。
    virtual_ipaddress {
        172.30.1.200 dev eth1 label eth1:0
    }
}
[root@node103.yinzhengjie.org.cn ~]#
[root@node103.yinzhengjie.org.cn ~]#
2>.启动keepalived
[root@node102.yinzhengjie.org.cn ~]# yum -y install ipvsadm
Loaded plugins: fastestmirror
Loading mirror speeds from cached hostfile
 * base: mirrors.aliyun.com
 * epel: mirrors.njupt.edu.cn
 * extras: mirrors.aliyun.com
 * updates: mirrors.aliyun.com
Resolving Dependencies
--> Running transaction check
---> Package ipvsadm.x86_64 0:1.27-7.el7 will be installed
--> Finished Dependency Resolution

Dependencies Resolved

=================================================================================================================================================
 Package                           Arch                             Version                                 Repository                      Size
=================================================================================================================================================
Installing:
 ipvsadm                           x86_64                           1.27-7.el7                              base                            45 k

Transaction Summary
=================================================================================================================================================
Install  1 Package

Total download size: 45 k
Installed size: 75 k
Downloading packages:
ipvsadm-1.27-7.el7.x86_64.rpm                                                                                             |  45 kB  00:00:00
Running transaction check
Running transaction test
Transaction test succeeded
Running transaction
  Installing : ipvsadm-1.27-7.el7.x86_64                                                                                                     1/1
  Verifying  : ipvsadm-1.27-7.el7.x86_64                                                                                                     1/1

Installed:
  ipvsadm.x86_64 0:1.27-7.el7

Complete!
[root@node102.yinzhengjie.org.cn ~]#
[root@node102.yinzhengjie.org.cn ~]# ifconfig
eth0: flags=4163<UP,BROADCAST,RUNNING,MULTICAST>  mtu 1500
        inet 10.0.2.15  netmask 255.255.255.0  broadcast 10.0.2.255
        ether 08:00:27:50:b8:26  txqueuelen 1000  (Ethernet)
        RX packets 1  bytes 590 (590.0 B)
        RX errors 0  dropped 0  overruns 0  frame 0
        TX packets 3  bytes 522 (522.0 B)
        TX errors 0  dropped 0 overruns 0  carrier 0  collisions 0

eth1: flags=4163<UP,BROADCAST,RUNNING,MULTICAST>  mtu 1500
        inet 172.30.1.102  netmask 255.255.255.0  broadcast 172.30.1.255
        ether 08:00:27:1d:d2:80  txqueuelen 1000  (Ethernet)
        RX packets 270  bytes 25083 (24.4 KiB)
        RX errors 0  dropped 0  overruns 0  frame 0
        TX packets 195  bytes 29595 (28.9 KiB)
        TX errors 0  dropped 0 overruns 0  carrier 0  collisions 0

lo: flags=73<UP,LOOPBACK,RUNNING>  mtu 65536
        inet 127.0.0.1  netmask 255.0.0.0
        loop  txqueuelen 1000  (Local Loopback)
        RX packets 0  bytes 0 (0.0 B)
        RX errors 0  dropped 0  overruns 0  frame 0
        TX packets 0  bytes 0 (0.0 B)
        TX errors 0  dropped 0 overruns 0  carrier 0  collisions 0

[root@node102.yinzhengjie.org.cn ~]#
[root@node102.yinzhengjie.org.cn ~]# systemctl start keepalived            #启动keepalived后发现多出来一个"eth1:0"的子接口,IP地址就是咱们配置的"172.30.1.200"
[root@node102.yinzhengjie.org.cn ~]#
[root@node102.yinzhengjie.org.cn ~]# ifconfig
eth0: flags=4163<UP,BROADCAST,RUNNING,MULTICAST>  mtu 1500
        inet 10.0.2.15  netmask 255.255.255.0  broadcast 10.0.2.255
        ether 08:00:27:50:b8:26  txqueuelen 1000  (Ethernet)
        RX packets 1  bytes 590 (590.0 B)
        RX errors 0  dropped 0  overruns 0  frame 0
        TX packets 3  bytes 522 (522.0 B)
        TX errors 0  dropped 0 overruns 0  carrier 0  collisions 0

eth1: flags=4163<UP,BROADCAST,RUNNING,MULTICAST>  mtu 1500
        inet 172.30.1.102  netmask 255.255.255.0  broadcast 172.30.1.255
        ether 08:00:27:1d:d2:80  txqueuelen 1000  (Ethernet)
        RX packets 850  bytes 76539 (74.7 KiB)
        RX errors 0  dropped 0  overruns 0  frame 0
        TX packets 620  bytes 87369 (85.3 KiB)
        TX errors 0  dropped 0 overruns 0  carrier 0  collisions 0

eth1:0: flags=4163<UP,BROADCAST,RUNNING,MULTICAST>  mtu 1500
        inet 172.30.1.200  netmask 255.255.255.255  broadcast 0.0.0.0
        ether 08:00:27:1d:d2:80  txqueuelen 1000  (Ethernet)

lo: flags=73<UP,LOOPBACK,RUNNING>  mtu 65536
        inet 127.0.0.1  netmask 255.0.0.0
        loop  txqueuelen 1000  (Local Loopback)
        RX packets 12  bytes 1248 (1.2 KiB)
        RX errors 0  dropped 0  overruns 0  frame 0
        TX packets 12  bytes 1248 (1.2 KiB)
        TX errors 0  dropped 0 overruns 0  carrier 0  collisions 0

[root@node102.yinzhengjie.org.cn ~]#
[root@node103.yinzhengjie.org.cn ~]# ifconfig
eth0: flags=4163<UP,BROADCAST,RUNNING,MULTICAST>  mtu 1500
        inet 10.0.2.15  netmask 255.255.255.0  broadcast 10.0.2.255
        ether 08:00:27:ef:75:60  txqueuelen 1000  (Ethernet)
        RX packets 268  bytes 40307 (39.3 KiB)
        RX errors 0  dropped 0  overruns 0  frame 0
        TX packets 298  bytes 28199 (27.5 KiB)
        TX errors 0  dropped 0 overruns 0  carrier 0  collisions 0

eth1: flags=4163<UP,BROADCAST,RUNNING,MULTICAST>  mtu 1500
        inet 172.30.1.103  netmask 255.255.255.0  broadcast 172.30.1.255
        ether 08:00:27:3a:da:a7  txqueuelen 1000  (Ethernet)
        RX packets 1736  bytes 146445 (143.0 KiB)
        RX errors 0  dropped 0  overruns 0  frame 0
        TX packets 1154  bytes 141857 (138.5 KiB)
        TX errors 0  dropped 0 overruns 0  carrier 0  collisions 0

lo: flags=73<UP,LOOPBACK,RUNNING>  mtu 65536
        inet 127.0.0.1  netmask 255.0.0.0
        loop  txqueuelen 1000  (Local Loopback)
        RX packets 0  bytes 0 (0.0 B)
        RX errors 0  dropped 0  overruns 0  frame 0
        TX packets 0  bytes 0 (0.0 B)
        TX errors 0  dropped 0 overruns 0  carrier 0  collisions 0

[root@node103.yinzhengjie.org.cn ~]#
[root@node103.yinzhengjie.org.cn ~]#
[root@node103.yinzhengjie.org.cn ~]# systemctl start keepalived        #同样的操作在"node103.yinzhengjie.org.cn"上操作发现没有任何变化,这很正常,稍安勿躁。
[root@node103.yinzhengjie.org.cn ~]#
[root@node103.yinzhengjie.org.cn ~]# ifconfig
eth0: flags=4163<UP,BROADCAST,RUNNING,MULTICAST>  mtu 1500
        inet 10.0.2.15  netmask 255.255.255.0  broadcast 10.0.2.255
        ether 08:00:27:ef:75:60  txqueuelen 1000  (Ethernet)
        RX packets 280  bytes 42243 (41.2 KiB)
        RX errors 0  dropped 0  overruns 0  frame 0
        TX packets 310  bytes 29379 (28.6 KiB)
        TX errors 0  dropped 0 overruns 0  carrier 0  collisions 0

eth1: flags=4163<UP,BROADCAST,RUNNING,MULTICAST>  mtu 1500
        inet 172.30.1.103  netmask 255.255.255.0  broadcast 172.30.1.255
        ether 08:00:27:3a:da:a7  txqueuelen 1000  (Ethernet)
        RX packets 1784  bytes 150521 (146.9 KiB)
        RX errors 0  dropped 0  overruns 0  frame 0
        TX packets 1185  bytes 146795 (143.3 KiB)
        TX errors 0  dropped 0 overruns 0  carrier 0  collisions 0

lo: flags=73<UP,LOOPBACK,RUNNING>  mtu 65536
        inet 127.0.0.1  netmask 255.0.0.0
        loop  txqueuelen 1000  (Local Loopback)
        RX packets 0  bytes 0 (0.0 B)
        RX errors 0  dropped 0  overruns 0  frame 0
        TX packets 0  bytes 0 (0.0 B)
        TX errors 0  dropped 0 overruns 0  carrier 0  collisions 0

[root@node103.yinzhengjie.org.cn ~]#
[root@node103.yinzhengjie.org.cn ~]#
[root@node105.yinzhengjie.org.cn ~]# yum -y install tcpdump              #安装抓包工具
[root@node105.yinzhengjie.org.cn ~]#
[root@node105.yinzhengjie.org.cn ~]# ifconfig
eth0: flags=4163<UP,BROADCAST,RUNNING,MULTICAST>  mtu 1500
        inet 10.0.2.15  netmask 255.255.255.0  broadcast 10.0.2.255
        ether 08:00:27:81:8d:8d  txqueuelen 1000  (Ethernet)
        RX packets 1  bytes 590 (590.0 B)
        RX errors 0  dropped 0  overruns 0  frame 0
        TX packets 2  bytes 432 (432.0 B)
        TX errors 0  dropped 0 overruns 0  carrier 0  collisions 0

eth1: flags=4163<UP,BROADCAST,RUNNING,MULTICAST>  mtu 1500
        inet 172.30.1.105  netmask 255.255.255.0  broadcast 172.30.1.255
        ether 08:00:27:a5:ed:54  txqueuelen 1000  (Ethernet)
        RX packets 652  bytes 51232 (50.0 KiB)
        RX errors 0  dropped 0  overruns 0  frame 0
        TX packets 330  bytes 52830 (51.5 KiB)
        TX errors 0  dropped 0 overruns 0  carrier 0  collisions 0

lo: flags=73<UP,LOOPBACK,RUNNING>  mtu 65536
        inet 127.0.0.1  netmask 255.0.0.0
        loop  txqueuelen 1000  (Local Loopback)
        RX packets 0  bytes 0 (0.0 B)
        RX errors 0  dropped 0  overruns 0  frame 0
        TX packets 0  bytes 0 (0.0 B)
        TX errors 0  dropped 0 overruns 0  carrier 0  collisions 0

[root@node105.yinzhengjie.org.cn ~]#
[root@node105.yinzhengjie.org.cn ~]# tcpdump -i eth1 host -nn 224.0.0.18     #我们对224.0.0.18这个节点进行抓包,如下图所示。

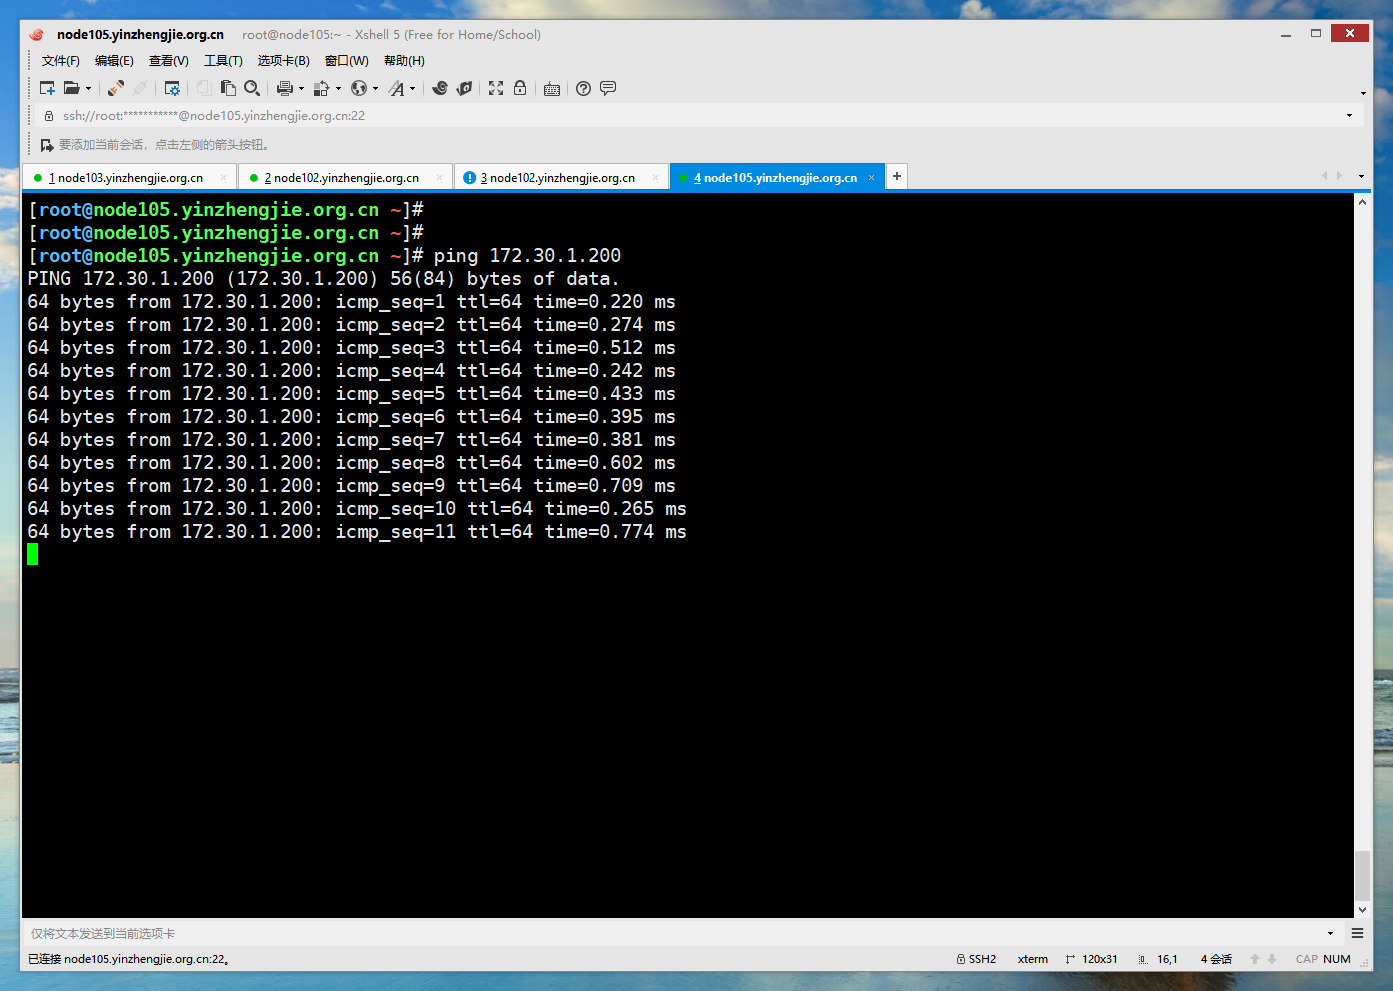
3>.使用"node105.yinzhengjie.org.cn"去ping"172.30.1.200"这个IP地址,于此同时将"node102.yinzhengjie.org.cn"节点的keepalived关闭。
[root@node102.yinzhengjie.org.cn ~]# ifconfig
eth0: flags=4163<UP,BROADCAST,RUNNING,MULTICAST>  mtu 1500
        inet 10.0.2.15  netmask 255.255.255.0  broadcast 10.0.2.255
        ether 08:00:27:50:b8:26  txqueuelen 1000  (Ethernet)
        RX packets 1  bytes 590 (590.0 B)
        RX errors 0  dropped 0  overruns 0  frame 0
        TX packets 3  bytes 522 (522.0 B)
        TX errors 0  dropped 0 overruns 0  carrier 0  collisions 0

eth1: flags=4163<UP,BROADCAST,RUNNING,MULTICAST>  mtu 1500
        inet 172.30.1.102  netmask 255.255.255.0  broadcast 172.30.1.255
        ether 08:00:27:1d:d2:80  txqueuelen 1000  (Ethernet)
        RX packets 3251  bytes 279834 (273.2 KiB)
        RX errors 0  dropped 0  overruns 0  frame 0
        TX packets 2587  bytes 311804 (304.4 KiB)
        TX errors 0  dropped 0 overruns 0  carrier 0  collisions 0

eth1:0: flags=4163<UP,BROADCAST,RUNNING,MULTICAST>  mtu 1500
        inet 172.30.1.200  netmask 255.255.255.255  broadcast 0.0.0.0
        ether 08:00:27:1d:d2:80  txqueuelen 1000  (Ethernet)

lo: flags=73<UP,LOOPBACK,RUNNING>  mtu 65536
        inet 127.0.0.1  netmask 255.0.0.0
        loop  txqueuelen 1000  (Local Loopback)
        RX packets 128  bytes 13312 (13.0 KiB)
        RX errors 0  dropped 0  overruns 0  frame 0
        TX packets 128  bytes 13312 (13.0 KiB)
        TX errors 0  dropped 0 overruns 0  carrier 0  collisions 0

[root@node102.yinzhengjie.org.cn ~]#
[root@node102.yinzhengjie.org.cn ~]# systemctl stop keepalived            #当停掉master节点的keepalvied服务,我们发现"172.30.1.200"的IP地址不存在但依旧可以ping通,如下图所示。
[root@node102.yinzhengjie.org.cn ~]#
[root@node102.yinzhengjie.org.cn ~]# ifconfig
eth0: flags=4163<UP,BROADCAST,RUNNING,MULTICAST>  mtu 1500
        inet 10.0.2.15  netmask 255.255.255.0  broadcast 10.0.2.255
        ether 08:00:27:50:b8:26  txqueuelen 1000  (Ethernet)
        RX packets 1  bytes 590 (590.0 B)
        RX errors 0  dropped 0  overruns 0  frame 0
        TX packets 3  bytes 522 (522.0 B)
        TX errors 0  dropped 0 overruns 0  carrier 0  collisions 0

eth1: flags=4163<UP,BROADCAST,RUNNING,MULTICAST>  mtu 1500
        inet 172.30.1.102  netmask 255.255.255.0  broadcast 172.30.1.255
        ether 08:00:27:1d:d2:80  txqueuelen 1000  (Ethernet)
        RX packets 3315  bytes 285222 (278.5 KiB)
        RX errors 0  dropped 0  overruns 0  frame 0
        TX packets 2636  bytes 319524 (312.0 KiB)
        TX errors 0  dropped 0 overruns 0  carrier 0  collisions 0

lo: flags=73<UP,LOOPBACK,RUNNING>  mtu 65536
        inet 127.0.0.1  netmask 255.0.0.0
        loop  txqueuelen 1000  (Local Loopback)
        RX packets 128  bytes 13312 (13.0 KiB)
        RX errors 0  dropped 0  overruns 0  frame 0
        TX packets 128  bytes 13312 (13.0 KiB)
        TX errors 0  dropped 0 overruns 0  carrier 0  collisions 0

[root@node102.yinzhengjie.org.cn ~]#
[root@node102.yinzhengjie.org.cn ~]#
[root@node103.yinzhengjie.org.cn ~]# ifconfig                 #我们发现"172.30.1.200"这个IP地址飘到了backup节点上来啦。
eth0: flags=4163<UP,BROADCAST,RUNNING,MULTICAST>  mtu 1500
        inet 10.0.2.15  netmask 255.255.255.0  broadcast 10.0.2.255
        ether 08:00:27:ef:75:60  txqueuelen 1000  (Ethernet)
        RX packets 304  bytes 45830 (44.7 KiB)
        RX errors 0  dropped 0  overruns 0  frame 0
        TX packets 337  bytes 31957 (31.2 KiB)
        TX errors 0  dropped 0 overruns 0  carrier 0  collisions 0

eth1: flags=4163<UP,BROADCAST,RUNNING,MULTICAST>  mtu 1500
        inet 172.30.1.103  netmask 255.255.255.0  broadcast 172.30.1.255
        ether 08:00:27:3a:da:a7  txqueuelen 1000  (Ethernet)
        RX packets 1866  bytes 155913 (152.2 KiB)
        RX errors 0  dropped 0  overruns 0  frame 0
        TX packets 1268  bytes 153687 (150.0 KiB)
        TX errors 0  dropped 0 overruns 0  carrier 0  collisions 0

eth1:0: flags=4163<UP,BROADCAST,RUNNING,MULTICAST>  mtu 1500
        inet 172.30.1.200  netmask 255.255.255.255  broadcast 0.0.0.0
        ether 08:00:27:3a:da:a7  txqueuelen 1000  (Ethernet)

lo: flags=73<UP,LOOPBACK,RUNNING>  mtu 65536
        inet 127.0.0.1  netmask 255.0.0.0
        loop  txqueuelen 1000  (Local Loopback)
        RX packets 0  bytes 0 (0.0 B)
        RX errors 0  dropped 0  overruns 0  frame 0
        TX packets 0  bytes 0 (0.0 B)
        TX errors 0  dropped 0 overruns 0  carrier 0  collisions 0

[root@node103.yinzhengjie.org.cn ~]#
[root@node103.yinzhengjie.org.cn ~]#