原文:http://blog.csdn.net/huaweitman/article/details/52351394
Eclipse在新建项目的时候会自动生成一些文件。这些文件比如.project、.classpath、.settings目录下的所有文件等。这些文件是Eclipse项目的元数据,描述了一个Eclipse项目。
通常这些文件里的内容可以通过配置具体Eclipse项目的Properties来进行修改,而且普通用户无需知道这些文件具体的用处。
但是,当熟悉了这些文件的内容后,往往在项目配置中可以直接查看和修改文件内容,出现问题时可以很好的定位。
一. 项目根目录下的文件
Eclipse项目根目录下通常有两个文件:.project和.classpath,.project是Eclipse项目必须有的文件,而.classpath是Java项目必须有的文件。这两个文件均是XML格式的文本文件,用普通文本编辑器即可打开。
1. 文件:.project
.project描述了一个Eclipse项目。
典型内容
<?xml version="1.0" encoding="UTF-8"?>
<projectDescription>
    <!-- name里的内容代表项目名字,对应了Eclipse项目的名称,不是Maven的finalName -->
    <name>demo</name>
    <!-- 项目的注释 -->
    <comment></comment>
    <!-- 引用的项目的名字 -->
    <projects>
    </projects>
    <!-- 有序的列表,定义了一系列的构建命令(buildCommand) -->
    <buildSpec>
        <buildCommand>
            <!-- 项目构建命令的名字 -->
            <name>org.eclipse.wst.jsdt.core.javascriptValidator</name>
            <!-- 构建命令初始化时需要传递的参数(一般看到的都是空的) -->
            <arguments>
            </arguments>
        </buildCommand>
        <buildCommand>
            <name>org.eclipse.jdt.core.javabuilder</name>
            <arguments>
            </arguments>
        </buildCommand>
        <buildCommand>
            <name>org.eclipse.wst.common.project.facet.core.builder</name>
            <arguments>
            </arguments>
        </buildCommand>
        <buildCommand>
            <name>org.eclipse.m2e.core.maven2Builder</name>
            <arguments>
            </arguments>
        </buildCommand>
    </buildSpec>
    <!-- 项目中用到的一些特性的列表 -->
    <natures>
        <!-- 每一个特性的的名字 -->
        <nature>org.eclipse.jem.workbench.JavaEMFNature</nature>
        <nature>org.eclipse.wst.common.modulecore.ModuleCoreNature</nature>
        <nature>org.eclipse.jdt.core.javanature</nature>
        <nature>org.eclipse.m2e.core.maven2Nature</nature>
        <nature>org.eclipse.wst.common.project.facet.core.nature</nature>
        <nature>org.eclipse.wst.jsdt.core.jsNature</nature>
    </natures>
</projectDescription>
使用示例
-
Maven项目的配置
一个Maven项目要确保有如下的内容,如果没有,可以手工加上下面的BuildCommand和natures:
<projectDescription>
    <buildSpec>
        <buildCommand>
            <name>org.eclipse.m2e.core.maven2Builder</name>
            <arguments>
            </arguments>
        </buildCommand>
    </buildSpec>
    <natures>
        <nature>org.eclipse.m2e.core.maven2Nature</nature>
    </natures>
</projectDescription>
2. 禁止Javascript的正确性校验
其实禁止正确性校验是一个不好的习惯,但很多人有这样的需求(唐僧:配置一下exclude路径多好啊,即能进行正确性校验又不会太影响速度),这里给出方案。删除如下的buildCommand即可,也可选择性的删除如下的nature:
<buildCommand>
    <name>org.eclipse.wst.jsdt.core.javascriptValidator</name>
    <arguments>
    </arguments>
</buildCommand>
<natures>
    <nature>org.eclipse.wst.jsdt.core.jsNature</nature>
</natures>
3. 把一个Java项目变为dynamic web项目
加入如下的buildSpec、nature元素即可:
<buildSpec>
    <buildCommand>
        <name>org.eclipse.wst.common.project.facet.core.builder</name>
        <arguments>
        </arguments>
    </buildCommand>
</buildSpec>
<natures>
    <nature>org.eclipse.wst.common.modulecore.ModuleCoreNature</nature>
    <nature>org.eclipse.wst.common.project.facet.core.nature</nature>
</natures>
拷贝攻略
.project文件可以从同类型的项目中直接拷贝,但需要修改/projectDescription/name里的项目名称。
2. 文件:.classpath
.classpath描述了一个Eclipse项目。
典型内容
<?xml version="1.0" encoding="UTF-8"?>
<classpath>
    <!-- 含义:src/main/java属于源码,编译后放到target/classes目录下 -->
    <classpathentry kind="src" output="target/classes" path="src/main/java">
        <attributes>
            <attribute name="optional" value="true"/>
            <attribute name="maven.pomderived" value="true"/>
        </attributes>
    </classpathentry>
    <classpathentry excluding="**" kind="src" output="target/classes" path="src/main/resources">
        <attributes>
            <!-- 代表了配置是从POM.xml里来的,受maven管理,非maven项目可以去掉这个 -->
            <attribute name="maven.pomderived" value="true"/>
        </attributes>
    </classpathentry>
    <!-- 这里的including代表了目录下所有.java文件才会被处理,其他文件一概忽略,不会出现在target/test-classes目录下 -->
    <classpathentry including="**/*.java" kind="src" output="target/test-classes" path="src/test/java">
        <attributes>
            <attribute name="optional" value="true"/>
            <attribute name="maven.pomderived" value="true"/>
        </attributes>
    </classpathentry>
    <classpathentry excluding="**" kind="src" output="target/test-classes" path="src/test/resources">
        <attributes>
            <attribute name="maven.pomderived" value="true"/>
        </attributes>
    </classpathentry>
    <!-- 这里代表使用标准的JavaSE-1.7 JDK,相比来说如果用default和直接写当前系统中安装的JDK是不推荐的 -->
    <classpathentry kind="con" path="org.eclipse.jdt.launching.JRE_CONTAINER/org.eclipse.jdt.internal.debug.ui.launcher.StandardVMType/JavaSE-1.7">
        <attributes>
            <attribute name="maven.pomderived" value="true"/>
        </attributes>
    </classpathentry>
    <!-- 代表了Maven中的dependencies也都放到classpath里 -->
    <classpathentry kind="con" path="org.eclipse.m2e.MAVEN2_CLASSPATH_CONTAINER">
        <attributes>
            <attribute name="maven.pomderived" value="true"/>
            <!-- web工程中把依赖的jar都放到输出的webapp里/WEB-INF/lib下面 -->
            <attribute name="org.eclipse.jst.component.dependency" value="/WEB-INF/lib"/>
        </attributes>
    </classpathentry>
    <!--  -->
    <classpathentry kind="con" path="org.eclipse.jst.server.core.container/org.eclipse.jst.server.tomcat.runtimeTarget/Apache-Tomcat v7.0">
        <attributes>
            <attribute name="owner.project.facets" value="jst.web"/>
        </attributes>
    </classpathentry>
    <!-- 统一的输出为target/classes -->
    <classpathentry kind="output" path="target/classes"/>
</classpath>
使用示例
-
项目有test/resources或test/java目录,但是不识别为classpath
酌情加入如下的classpathentry:
<classpathentry including="**/*.java" kind="src" output="target/test-classes" path="src/test/java" />
<classpathentry excluding="**" kind="src" output="target/test-classes" path="src/test/resources" />
2. 项目是maven工程,但是构建路径貌似怎么也配置不对
Maven是约定优于配置(convention over configuration)的,但是.classpath是配置型的,一般不会出现这种情况,如果出现了,检查maven约定的类路径(比如src/main/java、org.eclipse.m2e.MAVEN2_CLASSPATH_CONTAINER)中是否有如下的元素:
<attributes>
    <attribute name="maven.pomderived" value="true"/>
</attributes>
3. Maven的依赖jar文件放不到/WEB-INF/lib里
确认或加入如下的配置
<classpathentry kind="con" path="org.eclipse.m2e.MAVEN2_CLASSPATH_CONTAINER">
    <attributes>
        <attribute name="maven.pomderived" value="true"/>
        <attribute name="org.eclipse.jst.component.dependency" value="/WEB-INF/lib"/>
    </attributes>
</classpathentry>
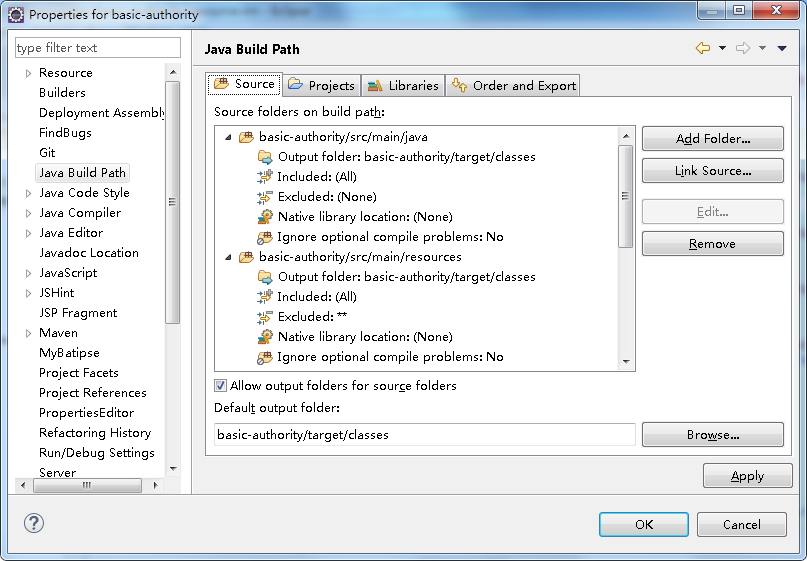
4. 界面配置方法
在项目Properties配置界面中,具体位置参考下图:
- 可移植的JDK配置
JDK配置
拷贝攻略
.classpath文件可以从同类型的项目中直接拷贝,有些目录没有的话,注意删掉对应的classpathentry,其他基本无需修改,如果有问题再考虑去改。但如果从别人的机器里拷贝,需要关注三点:
-
Java SDK的配置:如果Java SDK类型设置的是配置界面中的“Alternate JRE”,那么除非自己机器上装了对方机器名字一样的JDK(不是类型或者版本,而是Installed JREs配置中的名字),否则就需要修改JDK的配置。推荐使用配置界面中的“Execution Environment”来配置,避免绑定具体的JDK版本和实现,如
<classpathentry kind="con" path="org.eclipse.jdt.launching.JRE_CONTAINER/org.eclipse.jdt.internal.debug.ui.launcher.StandardVMType/JavaSE-1.7" /> -
如果Web项目使用了Web容器且绑定了project facet,那么就需要考虑Web容器配置的问题了,以Apache-tomcat为例,需要增加
<classpathentry kind="con" path="org.eclipse.jst.server.core.container/org.eclipse.jst.server.tomcat.runtimeTarget/Apache-Tomcat v7.0" />,而"Apache-Tomecat v7.0"字符串需要与Eclipse Preferences里Server/Runtime Environments里的name一列保持一致。
3. 文件:.mymetadata
1、部署项目用的,把项目部署到tomcat服务器上时,如果没有这个文件,用myeclipse/Eclipse部署是不能部署到关联的tomcat服务器。
<?xml version=”1.0” encoding=”UTF-8”?>
<!--
type : 工程类型
name : 工程名称
id : 工程在工作空间内的唯一标识
context-root : 网站根路径
j2ee-spec: J2EE标准
archive : 打包后war文件
-->
<project-module
type=”WEB”
name=”PheebsKM”
id=”myeclipse.1152954865843”
context-root=”/PheebsKM”
j2ee-spec=”1.4”
archive=”PheebsKM.war”>

<attributes>
  <!-- value : Web根目录名称 -->
    <attribute name=”webrootdir” value=”WebRoot” />
</attributes>
</project-module>
2、在MyEclipse/Eclipse更改项目发布到Tomcat的文件夹
(1)、在自己的workspace中找到当前使用的项目,找到文件.mymetadata,打开后就会看见标签context- root=”/example”(example是自己应用的名称),可以将其改为别的名称。
(2)、选择:工程右键 --》Properties --》Myeclipse --》 Web
[Web-root folder]:/WebRoot
[Web Context-root]:/ROOT,修改context-root对应的值即可。(默认值:当前项目名称)
二. .settings目录下的文件
。。。