|
byte[] data
|
The pixel data of the image.(图像的像素值)
|
|
int scanlinePad
|
The scanline padding.
(图像的扫描行的宽度,经常与图像的宽度值相同)
|
|
int type
|
The type of file from which the image was read.
(读取图像时图像的类型)
|
|
int depth
|
The color depth of the image, in bits per pixel.
(图像每个像素的位数,例如8位,16位,32位)
|
|
PaletteData palette
|
The color table for the image.(图像的颜色表)
|
|
int width
|
The width of the image, in pixels.
(图像的宽度,以像素为单位),同理有height高度
|
| RGB[] getRGBs |
Returns an array of
RGBs which comprise the indexed color table of the receiver, or null if the receiver has a direct color model.(如果是索引图像的话返回的是color table,如果是直接RGB颜色模型的话返回null)
|
import org.eclipse.swt.widgets.*;
import org.eclipse.swt.events.*;
import org.eclipse.swt.graphics.*;
import org.eclipse.swt.layout.*;
/**
* 画布Canvas的使用实例
*/
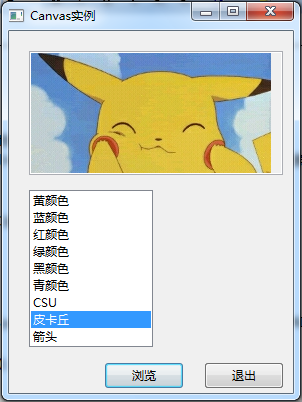
public class CanvasExample {
static Image image;
public CanvasExample() {
final Display display = Display.getDefault();
final Shell shell = new Shell(SWT.SHELL_TRIM);
shell.setSize(300, 400);
shell.setText("Canvas实例");
shell.setLayout(new GridLayout(4, false));
final Canvas canvas = new Canvas(shell, SWT.BORDER);
GridData gridA = new GridData();
gridA.horizontalIndent = 15;
gridA.widthHint = 250;
gridA.heightHint = 120;
gridA.horizontalSpan = 4;
gridA.verticalIndent = 15;
canvas.setLayoutData(gridA);
// 监听canvas重绘事件
canvas.addPaintListener(new PaintListener() {
public void paintControl(final PaintEvent event) {
if (image != null)//一定要首先判断一下图像是否为null
// 将其图像显示在canvas上,图像显示在canvas上的坐标为(0,0)
event.gc.drawImage(image, 0, 0);
//image = null;//注释掉这一句就可以避免下面的问题
}
});
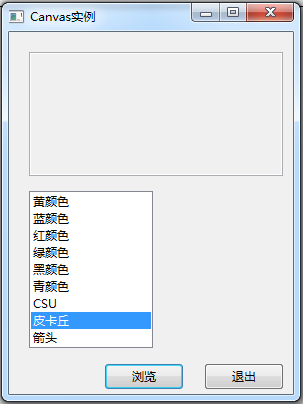
final List list = new List(shell, SWT.BORDER | SWT.V_SCROLL);
list.setItems(new String[] { "黄颜色", "蓝颜色", "红颜色", "绿颜色", "黑颜色", "青颜色", "CSU", "皮卡丘", "箭头" });
GridData gridB = new GridData();
gridB.horizontalIndent = 15;
gridB.widthHint = 100;
gridB.horizontalSpan = 4;
gridB.verticalIndent = 10;
list.setLayoutData(gridB);
Button buttonB = new Button(shell, SWT.NONE);
buttonB.setText("浏览");
GridData gridD = new GridData();
gridD.horizontalIndent = 90;
gridD.widthHint = 80;
gridD.horizontalSpan = 3;
gridD.verticalIndent = 10;
buttonB.setLayoutData(gridD);
buttonB.addSelectionListener(new SelectionAdapter() {
public void widgetSelected(SelectionEvent e) {
int selectionIndex = list.getSelectionIndex();
if (selectionIndex == 0) {
canvas.setBackground(display.getSystemColor(SWT.COLOR_YELLOW));
} else if (selectionIndex == 1) {
canvas.setBackground(display.getSystemColor(SWT.COLOR_BLUE));
} else if (selectionIndex == 2) {
canvas.setBackground(display.getSystemColor(SWT.COLOR_RED));
} else if (selectionIndex == 3) {
canvas.setBackground(display.getSystemColor(SWT.COLOR_GREEN));
} else if (selectionIndex == 4) {
canvas.setBackground(display.getSystemColor(SWT.COLOR_BLACK));
} else if (selectionIndex == 5) {
canvas.setBackground(display.getSystemColor(SWT.COLOR_CYAN));
} else if (selectionIndex == 6) {
image = new Image(display, "images/csu.jpg");
canvas.redraw();
} else if (selectionIndex == 7) {
image = new Image(display, "images/psu.jpg");
canvas.redraw();
} else if (selectionIndex == 8) {
image = new Image(display, "ico/current.ico");
canvas.redraw();
}
}
});
Button buttonC = new Button(shell, SWT.NONE);
buttonC.setText("退出");
GridData gridE = new GridData();
gridE.horizontalIndent = 15;
gridE.widthHint = 80;
gridE.verticalIndent = 10;
buttonC.setLayoutData(gridE);
buttonC.addSelectionListener(new SelectionAdapter() {
public void widgetSelected(SelectionEvent e) {
shell.dispose();
}
});
shell.open();
shell.layout();
while (!shell.isDisposed()) {
if (!display.readAndDispatch())
display.sleep();
}
}
public static void main(String[] args) {
new CanvasExample();
}
}
canvas.addPaintListener(new PaintListener() {
public void paintControl(final PaintEvent event) {
if (image != null){//一定要首先判断一下图像是否为null
gc = new GC(canvas);
gc.drawImage(image, 0, 0);
// 将其图像显示在canvas上,图像显示在canvas上的坐标为(0,0)
// event.gc.drawImage(image, 0, 0);
// image = null;
}
}
});
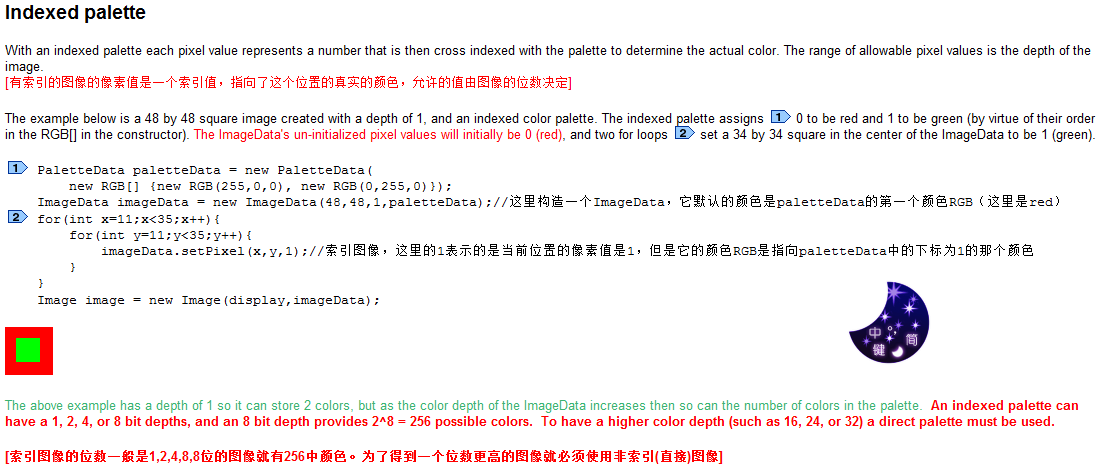
ImageData imageData = new ImageData(48, 48, 1, paletteData);// 这里构造一个ImageData,它默认的颜色是paletteData的第一个颜色RGB(这里是red)
for (int x = 11; x < 35; x++) {
for (int y = 11; y < 35; y++) {
imageData.setPixel(x, y, 1);// 索引图像,这里的1表示的是当前位置的像素值是1,但是它的颜色RGB是指向paletteData中的下标为1的那个颜色
}
}
imgdst = new Image(getDisplay(), imageData);
![]()
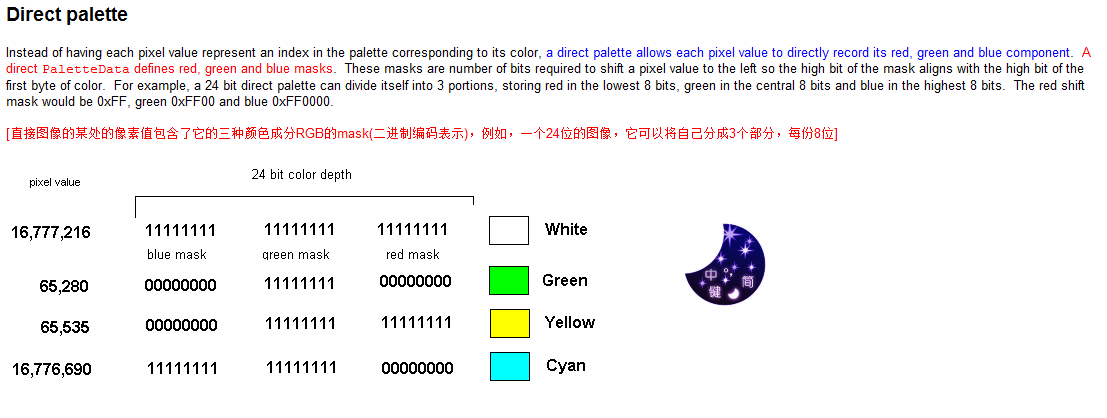
ImageData imageData = new ImageData(48, 48, 24, palette);//图像的位数是24位
for (int x = 0; x < 48; x++) {
for (int y = 0; y < 48; y++) {
if (y > 11 && y < 35 && x > 11 && x < 35) {//中心位置是green
imageData.setPixel(x, y, 0xFF00); // Set the center to green
} else {//其他地方是red
imageData.setPixel(x, y, 0xFF); // and everything else to red
}
}
}
imgdst = new Image(getDisplay(), imageData);
This creates the result below where the image is red with a green center.
![]()
Because you can use color depths of 16, 24 and 32 bits with direct palettes, you can represent more colors than are available with an indexed palette whose maximum depth is 8. A color depth of 24 allows you to represent 16 million colors (2^24). The tradeoff however is size, because an indexed palette with a depth of 8 requires one byte per image coordinate whereas a direct palette with a depth of 24 requires three bytes per image coordinate.
[使用directed image你可以使图像包含更多的颜色值,但是它的缺点就是图像的大小增大了!一个位数为8位的索引图像只需要1byte来保存图像的坐标信息,然而,一个24位的直接图像需要3bytes才行!]
With both direct and indexed palettes you can go from an RGB to a pixel value and vice-versa using the public methods int getPixel(RGB rgb) and RGB getRGB(int pixelValue).
[不管是直接还是索引图像,为了实现RGB到pixel的转换都可以使用PaletteData的方法 public int getPixel(RGB rgb) public RGB getRGB(int pixel) ]
例如实例一: