FluorineFx官方提供了安装包的下载和在线文档,可以帮助我们有效的利用FluorineFx来开发。
FluroineFx官方网站:http://www.fluorinefx.com/
FluroineFx下载地址:http://www.fluorinefx.com/download.html
FluroineFx在线文档:http://www.fluorinefx.com/docs/fluorine/index.html
一、服务端的开发
1、通过Microsoft Visual Studio 2008 创建创建解决方案,并添加FluroineFx服务器库
路径:E:\FlexDemo\FlexDemoTest1\ServiceLibrary1
2、添加FluorineFx 网站到解决方案,添加成功后网站会自动引用FluorineFx服务库的dll
路径:E:\FlexDemo\FlexDemoTest1\WebSite1
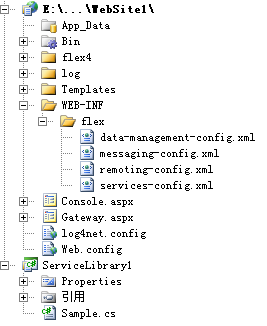
3、结构如下:
4、代码如下:
namespace ServiceLibrary1
{
/// <summary>
/// Fluorine sample service.
/// </summary>
[RemotingService("Fluorine sample service")]
public class Sample
{
public Sample()
{
}
public string Echo(string text)
{
return "Gateway echo: " + text;
}
public Contact GetContact()
{
Contact c = new Contact { Name = "Fred", Email = "fred@example.com", Phone = "555-1212" };
return c;
}
public FluorineFx.AMF3.ArrayCollection GetContacts()
{
FluorineFx.AMF3.ArrayCollection result =
new FluorineFx.AMF3.ArrayCollection{
new Contact { Name = "Fred", Email = "fred@example.com", Phone = "555-1212" },
new Contact { Name = "Jane", Email = "jane@example.com", Phone = "555-1213" },
new Contact { Name = "Bob", Email = "bob@example.com", Phone = "555-1214" }};
return result;
}
/// <summary>
/// 获取服务端的系统时间
/// </summary>
/// <returns></returns>
public string GetServerTime()
{
return DateTime.Now.ToString();
}
public ArrayCollection GetBooks()
{
ArrayCollection array = new ArrayCollection();
array.Add(new Book(1, "三国演义", "罗贯中", 100.00));
array.Add(new Book(2, "西游记", "吴承恩", 200.00));
array.Add(new Book(3, "水浒传", "施耐庵", 300.00));
array.Add(new Book(4, "红楼梦", "曹雪芹", 400.00));
return array;
}
}
[FluorineFx.TransferObject]
public class Book
{
public int ID { get; set; }
public string Name { get; set; }
public string Author { get; set; }
public double Price { get; set; }
public Book()
{ }
public Book(int id, string name, string author, double price)
{
this.ID = id;
this.Name = name;
this.Author = author;
this.Price = price;
}
}
}
二、客户端开发
1、首先创建Flex项目
Project location Floder设置为:E:\FlexDemo\FlexDemoTest1\WebSite1\flex4
Application type设置为:Web application,Application
2、 Flex项目创建完毕,下面在通过一些相应的配置就可以通过FluorineFx和.NET通信了。开发项目属性设置面板,设置
Flex Complier: -locale en_US -services "..\..\WEB-INF\flex\services-config.xml" -context-root "/WebSite1"
Flex Build Path:
output folder url:http://localhost:7217/WebSite1/flex4/bin-debug(注意路径大小写)
3、代码如下
<?xml version="1.0" encoding="utf-8"?>
<mx:Application xmlns:mx="http://www.adobe.com/2006/mxml" layout="absolute" creationComplete="init()">
<mx:RemoteObject id="service" destination="fluorine"
source="ServiceLibrary1.Sample">
<mx:method name="Echo" result="onResult1(event)">
</mx:method>
</mx:RemoteObject>
<mx:Script>
<![CDATA[
import mx.rpc.events.ResultEvent;
import mx.collections.ArrayCollection;
import mx.controls.List;
import mx.rpc.events.FaultEvent;
import mx.rpc.events.ResultEvent;
private var nc:NetConnection;
private var rs:Responder;
private var rs1:Responder;
private function init():void
{
nc = new NetConnection();
rs = new Responder(onResult,onStatus);
rs1=new Responder(onResult1,onStatus);
nc.objectEncoding = ObjectEncoding.AMF3;
nc.connect("http://localhost:7217/WebSite1/Gateway.aspx");
nc.client = this;
}
private function onResult(result:String):void
{
this.lbServerTime.text = "服务端系统时间为:" + result;
}
private function onStatus(event:Object):void
{
trace("Error");
}
private function getServerTime(event:MouseEvent):void
{
//服务器端所提供的RemotingService的全限定名
nc.call("ServiceLibrary1.Sample.GetServerTime",rs);
}
internal function onClick():void
{
service.Echo(txtInput.text);
}
internal function onResult1(evt:ResultEvent):void
{
txtResult.text = evt.result.toString();
}
]]>
</mx:Script>
<mx:Panel x="53" y="52" width="473" height="361" layout="absolute" title="FluorineFx" fontSize="12">
<mx:TextInput x="35" y="21" id="txtInput"/>
<mx:Button x="35" y="63" label="确 定" fontWeight="normal" click="onClick()"/>
<mx:Label x="35" y="95" text="结 果:"/>
<mx:TextInput x="35" y="123" width="160" id="txtResult"/>
<mx:Button x="35" y="176" label="获取服务器系统时间" click="getServerTime(event)"/>
<mx:Label x="23" y="249" width="402" id="lbServerTime"/>
<mx:Button x="237" y="125" label="Button"/>
</mx:Panel>
</mx:Application>