目录:
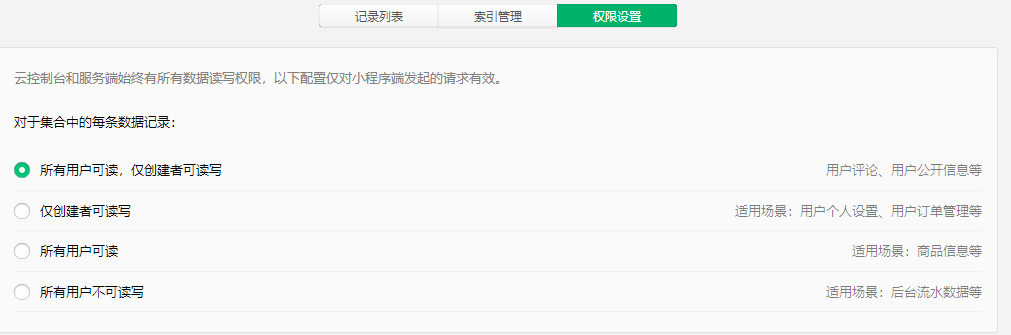
1、基于微信云数据库开发,如果数据库的表设置为所有用户可读,仅创建者可写时
此时如果你要更改其他用户的信息,从小程序客户端调用db操作是无效的,必须调用服务区端的云函数进行更新
举个例子:小A发送消息要添加你为好友,你点击了确认添加。那么此时有两个操作
a、在你的好友列表记录中添加小A的唯一ID进来 【这步可以在小程序直接调用db进行相应update操作】
b、在小A的好友列表记录中添加你的唯一ID进来 【这步就必须调用云函数来完成update操作】
这样你和小A之间才是相对的好友关系,你能在你的好友列表中看到他,他在他的好友列表中也能看到你。
2、wx:if vs hidden
因为 wx:if 之中的模板也可能包含数据绑定,所以当 wx:if 的条件值切换时,框架有一个局部渲染的过程,因为它会确保条件块在切换时销毁或重新渲染。
同时 wx:if 也是惰性的,如果在初始渲染条件为 false,框架什么也不做,在条件第一次变成真的时候才开始局部渲染。
相比之下,hidden 就简单的多,组件始终会被渲染,只是简单的控制显示与隐藏。
一般来说,wx:if 有更高的切换消耗而 hidden 有更高的初始渲染消耗。
总结:如果需要频繁切换的情景下,用 hidden 更好,如果在运行时条件不大可能改变则 wx:if 较好。
3、在获取用户位置信息时,需要弹框告知用户
微信提供了全局配置方法: 在app.json的pages同级添加以下代码


"permission": {
    "scope.userLocation": {
     "desc": "为了更好的服务,小程序将获取您当前的位置信息"
     }
}
ps:获取用户位置的api是:wx.getLocation
4、Command.geoNear的使用
a、首先在云数据库的对应表中创建location字段,用来构造一个地理位置 ”点“。关键语句:location: db.Geo.Point(113, 23)
db.collection('todos').add({
  data: {
    description: 'eat an apple',
    location: db.Geo.Point(113, 23)
  }
}).then(console.log).catch(console.error)
b、数据写入数据库表后,对location做对应的索引【建立索引的目的是为了增加查询效率】
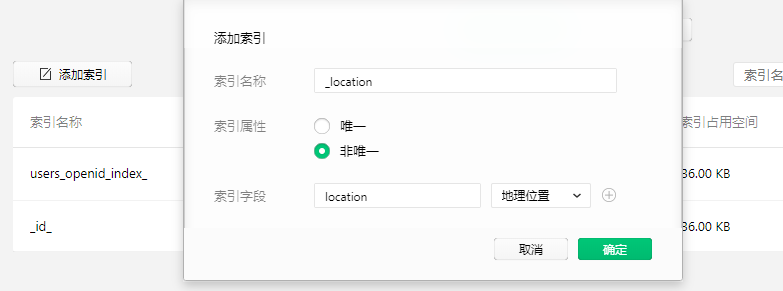
c、操作完以上两步后,前端搜索附近人就可以用command.getNear方法了
ps:wxml代码:
<map id="map" longitude="{{longitude}}" latitude="{{latitude}}" show-location="true" markers="{{markers}}" scale="14"></map>
//获取周围的用户
  getNearUsers() {
    db.collection('users')
      .where({
        location: _.geoNear({
          geometry: db.Geo.Point(this.data.longitude, this.data.latitude), //中心点位置
          minDistance: 0, //单位是米
          maxDistance: 5000, //单位是米
        }),
        isLocation: true //只有用户的共享位置开关是开的时候才让这个客户显示,否则不显示该客户
      })
      .field({
        userPhoto:true,
        longitude:true,
        latitude:true
      })
      .get()
      .then((res)=>{
        //console.log(res.data)
        let data = res.data;
        let result = [];
        if(data.length){
          for(let i=0;i<data.length;i++){
            result.push({
              iconPath: data[i].userPhoto,   //    显示的图标
              id: data[i]._id,
              latitude: data[i].latitude,
              longitude: data[i].longitude,
               30,   //图标宽度
              height: 30   //图标高度
            });
          }
          this.setData({
            markers:result
          });
        }
      });
  }
5、在map地图中要标记点,使用marker属性,它是一个数组,里面包含点的图标、点的经纬度、点图标的大小等
由于marker中图标的url只能支持网络地址,云存储中cloud打头的图片是无法正常渲染的,此时我们需要在组装数据时用wx.cloud.getTempFileURL方法获取cloud图片的临时Url地址
又因为wx.cloud.getTempFileURL方法是一个异步的,所以如果你只在for循环完做赋值操作那么图片还是没有的,此时用console.log也能正常看到图片,但是地图上不显示。解决方
法就是在获取临时url后直接赋值一次。详见代码
data: {
    longitude: 0, //定义中心点经度
    latitude: 0, //定义中心点纬度
    markers:[],    //定义标记点数组
    tempUrl:''       //定义临时图片url地址
  },

//获取周围的用户
  getNearUsers() {
    db.collection('users')
      .where({
        location: _.geoNear({
          geometry: db.Geo.Point(this.data.longitude, this.data.latitude), //中心点位置
          minDistance: 0, //单位是米
          maxDistance: 5000, //单位是米
        }),
        isLocation: true //只有用户的共享位置开关是开的时候才让这个客户显示,否则不显示该客户
      })
      .field({
        userPhoto:true,
        longitude:true,
        latitude:true
      })
      .get()
      .then((res)=>{
        //console.log(res.data)
        let data = res.data;
        let result = [];
        if(data.length){
          for(let i=0;i<data.length;i++){
            if (data[i].userPhoto.includes('cloud://')) {  //说明含有云存储文件ID
              wx.cloud.getTempFileURL({
                fileList: [data[i].userPhoto],
                success: res => {
                  result.push({
                    iconPath: res.fileList[0].tempFileURL,   //    显示的图标
                    id: data[i]._id,
                    latitude: data[i].latitude,
                    longitude: data[i].longitude,
                     30,   //图标宽度
                    height: 30   //图标高度
                  });
                  //因为请求临时图片的方法是异步的,所以每次完成后需要立刻赋值一次
                  this.setData({
                    markers: result
                  });
                },
                fail: console.error
              })
            }
            else{
              result.push({
                iconPath: data[i].userPhoto,   //    显示的图标
                id: data[i]._id,
                latitude: data[i].latitude,
                longitude: data[i].longitude,
                 30,   //图标宽度
                height: 30   //图标高度
              });
            }
          }
          //console.log(result)
          this.setData({
            markers:result
          });
        }
      });
  },
6、首先定义text的bindtap事件,其次自定义text的data-*属性并把item值赋上去,这样就可以在点击时获取对应text的文本信息了,详见代码
html代码:
<text wx:for="{{ historyList }}" wx:key="{{ index }}" data-text='{{item}}' bindtap="historyItemSearch">{{item}}</text>
js代码:
historyItemSearch(ev) {
      //console.log(ev.target.dataset.text)  在对应text控件给自定义属性data-text值为item,此处用target.dataset.text就可以拿到了
      this.setData({
        inputValue: ev.target.dataset.text
      });
    }
7、 注意事项:
a、正则表单式不能用于db.command.in方法
b、它不适用于长文本 / 大数据量的文本匹配 / 搜索,此种情况下建议使用ElasticSearch实现
// 原生 JavaScript 对象
db.collection('todos').where({
  description: /text/i
})

// 数据库正则对象
db.collection('todos').where({
  description: db.RegExp({
    regexp: 'text',
    options: 'i',  //i    大小写不敏感  m    跨行匹配;  s    让 . 可以匹配包括换行符在内的所有字符
  })
})
8、