pytest用例规则
- 测试文件以 test_开头(以_test 结尾也可以)
- 测试类以 Test 开头,并且不能带有 init 方法
- 测试函数以 test_开头
- 断言使用 assert
执行用例规则
1.某个目录下所有的用例
pytest 文件名/
2.执行某一个 py 文件下用例
pytest 脚本名称.py
3.-k 按关键字匹配
pytest -k "MyClass and not method"
4.按节点运行
运行.py 模块里面的某个函数
pytest test_mod.py::test_func
运行.py 模块里面,测试类里面的某个方法
pytest test_mod.py::TestClass::test_method
测试用例 setup 和 和 teardown
用例运行级别
- 模块级(setup_module/teardown_module)开始于模块始末,全局的
- 函数级(setup_function/teardown_function)只对函数用例生效,不在类中
- 类级(setup_class/teardown_class)只在类中前后运行一次(在类中)
- 方法级(setup_method/teardown_method)在类中,每个方法前后都会运行
- 类里面的(setup/teardown)每个方法前后都会运行(函数与类同样生效)
方法里面运行的优先级 setup_class>setup_method>setup
函数和类混合
函数和类混合时,模块级别的setup_module和teardown_module运行的优先级别最高,setup_function和setup_class互不干扰,按照代码编写的先后顺序来执行
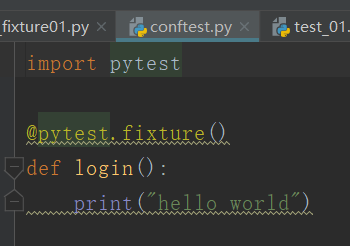
fixture 之 conftest.py(自定义测试用例的预置条件)
fixture 优势
- 命名方式灵活,不局限于 setup 呾和teardown 这几个命名
- conftest.py 配置里可以实现数据共享,不需要 import 就能自动找到一些配置
- scope="module" 可以实现多个.py 跨文件共享前置
- scope="session" 以实现多个.py 跨文件使用一个 session 来完成多个用例
fixture的四个参数
:arg scope: scope 有四个级别参数 "function" (默认), "class",module,session
:arg params: 一个可选的参数列表,它将导致多个参数调用fixture功能和所有测试使用它
:arg autouse: 如果为 True,则为所有测试激活 fixture ,如果为False,则需要显示激活fixture
:arg ids: 每个字符串 id 的列表,每个字符串对应于 params ,这样
他们就是测试 ID 的一部分。 如果没有提供 ID 它们将从 params 自动生成
:arg name: fixture 的名称。
使用方式

conftest.py 配置
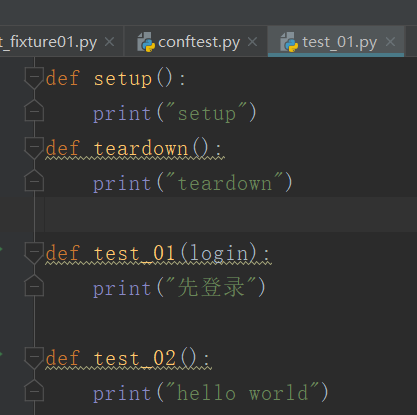
1.上面一个案例是在同一个.py 文件中,多个用例调用一个登陆功
能,如果有多个.py 的文件都需要调用返个登陆功能的话,那就不能把
登陆写到用例里面去了。
此时应该要有一个配置文件,单独管理一些预置的操作场景,pytest
里面默认读取 conftest.py 里面的配置
conftest.py 配置需要注意以下点:
- conftest.py 配置脚本名称是固定的,不能改名称
- conftest.py 不运行的用例要在同一个 pakage 下,并且有__init__.py 文件
- 不需要 import 导入 conftest.py,pytest 用例会自动查找

pytest 之yield和addfinalizer异同
相同点:
yield与addfinalizer后的代码都会在用例之后执行
不同点:
1:yield可以直接使用,addfinalizer需要在request-context对象中注册addfinalizer方法才可以使用
2:addfinalizer可以注册多个终结函数。
3:当setUp的代码执行错误,addfinalizer依旧会执行,而yield不会
fixture 之 autouse=True
fixture的参数autouse设置为True 的时候,case里面就无需再显示调用fixture,会自动根据scope设置的级别,去调用案例的一些前后置操作

调用 fixture 三种方法
- 1.函数或类里面方法直接传 fixture 的函数参数名称
- 2.使用装饰器@pytest.mark.usefixtures()修饰
- 3.autouse=True 自动使用
参数化 parametrize
在测试用例的前面加上:
@pytest.mark.parametrize("参数名",列表数据)
参数名:用来接收每一项数据,并作为测试用例的参数。
列表数据:一组测试数据。
装饰范围
装饰类,则类中所有的测试用例都是用这组参数
装饰测试函数,只有被装饰的函数使用这组参数
@pytest.mark.parametrize() 装饰的三种方式

参考链接:
https://www.cnblogs.com/gurenqi0705/p/14040053.html
pytest之assert断言
参考https://blog.csdn.net/lc_buzhidao/article/details/105177573,较为详细
pytest之mark
在案例上面加mark装饰器标记时,运行时可以指定运行或是不运行该用例
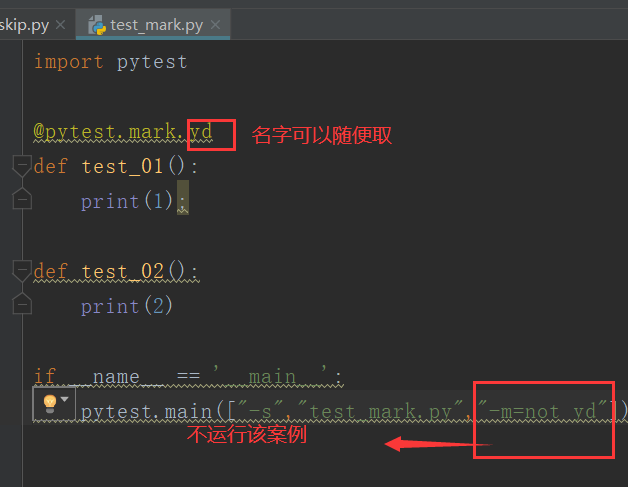
-v 指定的函数节点 id
如果想指定运行某个.py 模块下,类里面的一个用例,如:TestClass
里面 test 开头(或_test 结尾)的用例,函数(或方法)的名称就是用例的节
点 id,指定节点 id 运行用-v 参数
> pytest -v test_server.py::TestClass::test_method
pycharm 运行代码
if __name__ == "__main__":
pytest.main(["-v",
"test_server.py::TestClass::test_method"]),多个节点运行时,中间用空格分开
函数传参和fixture传参数request
参考https://www.cnblogs.com/yoyoketang/p/9492132.html链接
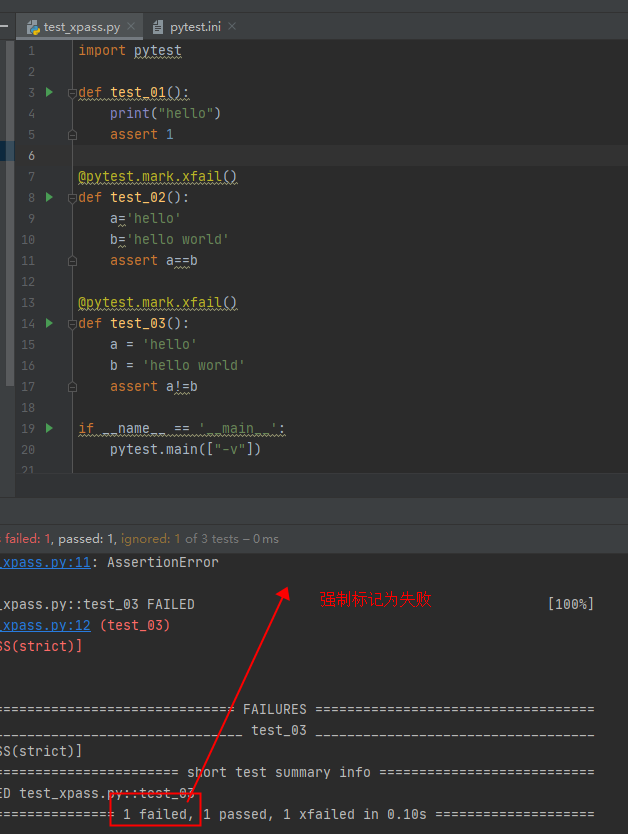
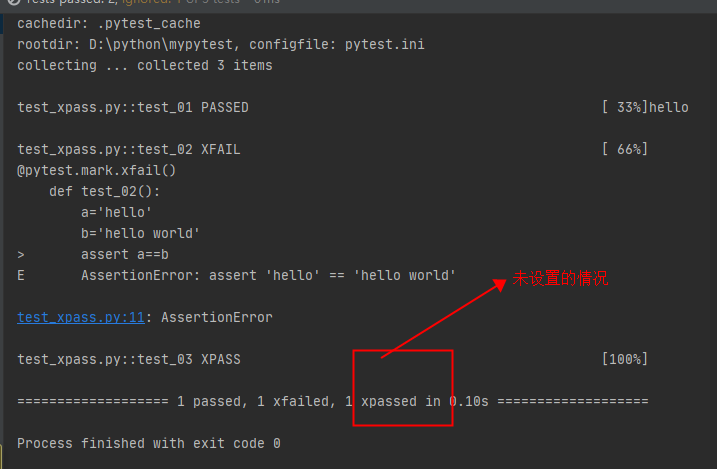
用例 a 失败,跳过测试用例 b 和 和 c 并标记失败 xfail
https://www.bbsmax.com/A/D854G4r2JE/
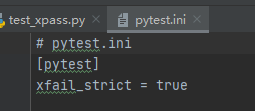
Pytest配置文件pytest.ini
https://blog.csdn.net/qq_36502272/article/details/108557806
禁用xpass
设置xfail_strict = true可以让那些标记为@pytest.mark.xfail但实际通过的测试用例被报告为失败
allure-pytest
allure-pytest 环境准备
windows环境相关:
python 3.6版本(3.7及以上应该也可以)
pytest(使用最新版吧,不然会有很多错误)
allure-pytest 最新版
使用pip安装pytest和allure-pytest,加上--index-url地址,下载会快一些
pip install pytest
pip install allure-pytest
安装完成之后,打开一个你之前写的pytest脚本,看能不正常使用,如果报错:AttributeError: module 'allure' has no attribute 'severity_level'
这个是之前 pytest-allure-adaptor(以前使用的是这个插件) 这个插件与 allure-pytest 不能共存,卸载掉 pytest-allure-adapt
pip uninstall pytest-allure-adaptor
allure命令行工具
allure是一个命令行工具,需要去github上下载最新版https://github.com/allure-framework/allure2/releases(一定要下载最新版,不然报告打开可能会是一片空白,打开开发者工具,会看到错误原因)
下载完成之后直接解压到本地,将bin所在目录配置到环境变量Path中
用例demo
import allure
import pytest

@allure.step("步骤1:点xxx")
def step_1():
    print("111")

@allure.step("步骤2:点xxx")
def step_2():
    print("222")

@allure.feature("编辑页面")
class TestEditPage():
    '''编辑页面'''

    @allure.story("这是一个xxx的用例")
    def test_1(self, login):
        '''用例描述:先登录,再去执行xxx'''
        step_1()
        step_2()
        print("xxx")


    @allure.story("打开a页面")
    def test_2(self, login):
        '''用例描述:先登录,再去执行yyy'''
        print("yyy")
运行用例
cd到test_allure_demo.py所在的目录文件,命令行执行
pytest --alluredir ./report/allure_raw
执行完成后,在当前目录下,report目录会生成一个allure_raw的原始文件,这个只是测试报告的原始文件,不能打开成html的报告
打开html的报告需要启动allure服务,启动命令如下
allure serve report/allure_raw
启动服务,它会自动给个端口,直接用默认浏览器打开了
参考连接:https://www.cnblogs.com/yoyoketang/p/12004145.html
pycharm里运行生产allure报告
在使用pycharm+pytest+allure生成测试报告遇到一个问题,运行时执行所有测试用例,但是没有生成任何测试报告,结果查了一下原因,
是由于,在运行代码时默认在pytest框架下运行了代码。而使用pytest测试框架时候,不需要main()函数,系统可以自动识别测试用例并执行。
如下图,设置Settings>Tools>Python Integrated Tools>Testing,将Default test runner 设置为Unittests即可解决问题。

生成报告:
可以在pycharm打开Terminal终端,执行allure generate report/allure_raw -o report/allure_report --clean后,会在report/allure_report目录生成html报告

或者

pytest遇到的问题:
pytest报错“ImportError while loading conftest ”“ImportMismatchError”
错误信息:
ImportError while loading conftest '/home/lenovo/Desktop/o/openai_jenkins_file_ch/conftest.py'.
ImportMismatchError: ('openai_jenkins_file_ch.conftest', '/home/lenovo/Desktop/openai_jenkins_file_ch/conftest.py', local('/home/lenovo/Desktop/o/openai_jenkins_file_ch/conftest.py'))
解决办法
删除 __pycache__文件夹(进入项目目录文件,搜索__pycache__,就可以看到好多这个文件夹)
allure的介绍
https://blog.csdn.net/weixin_44275820/article/details/105169996