一. 动态组件和keep-alive
1. 背景
比如我们要做一个动态组件的切换,传统的做法是通过v-if进行判断切换,核心代码如下:

2. 动态组件
(1). 基本使用
动态组件是使用 component 组件,通过一个特殊的attribute is 来实现:
代码分享:
<template>
    <div>
        <button v-for="(item,index) in tabs" :key="index" @click="tabClick(item)" :class="{active:currentTab===item}">{{item}}</button>

        <!-- 方案2:动态组件Component -->
        <!--2.1  is属性里存放的是Components里注册的组件名称 -->
        <component :is="currentTab"></component>

    </div>
</template>

<script>
    import Home1 from './pages/Home1.vue';
    import Home2 from './pages/Home2.vue';
    import Home3 from './pages/Home3.vue';

    export default {
        components: {
            Home1,
            Home2,
            Home3
        },
        data() {
            return {
                tabs: ['home1', 'home2', 'home3'],
                currentTab: 'home1',
                myAge: 20
            };
        },
        methods: {
            tabClick(item) {
                this.currentTab = item;
            }
        }

    }
</script>
(2). 传值给子组件 和 监听子组件事件
与普通的父子组件类似,子组件通过props接收,通过$emit对外传递。
父组件
<template>
    <div>
        <button v-for="(item,index) in tabs" :key="index" @click="tabClick(item)" :class="{active:currentTab===item}">{{item}}</button>
        <!-- 方案2:动态组件Component -->
        <!-- 2.2 传值和事件监听  在Home3组件上实现-->
        <component :is="currentTab" name="lmr" :age='myAge' @pageClick="pageClick"></component>
    </div>
</template>

<script>
    import Home1 from './pages/Home1.vue';
    import Home2 from './pages/Home2.vue';
    import Home3 from './pages/Home3.vue';

    export default {
        components: {
            Home1,
            Home2,
            Home3
        },
        data() {
            return {
                tabs: ['home1', 'home2', 'home3'],
                currentTab: 'home1',
                myAge: 20
            };
        },
        methods: {
            tabClick(item) {
                this.currentTab = item;
            },
            pageClick(v1, v2) {
                console.log(v1, v2);
            }
        }

    }
</script>

<style scoped>
    .active {
        color: red;
    }
</style>
子组件Home3
<template>
    <div @click="myClick1">
        我是Home3组件,{{name}}--{{age}}
    </div>
</template>

<script>
    export default {
        name:'myHome3',
        props: {
            name: {
                type: String,
                default: 'ypf'
            },
            age: {
                type: Number,
                default: 18
            }
        },
        emits: ['pageClick'],
        data() {
            return {};
        },
        methods: {
            myClick1() {
                this.$emit('pageClick', 20, 30, 40);
            }
        }
    }
</script>
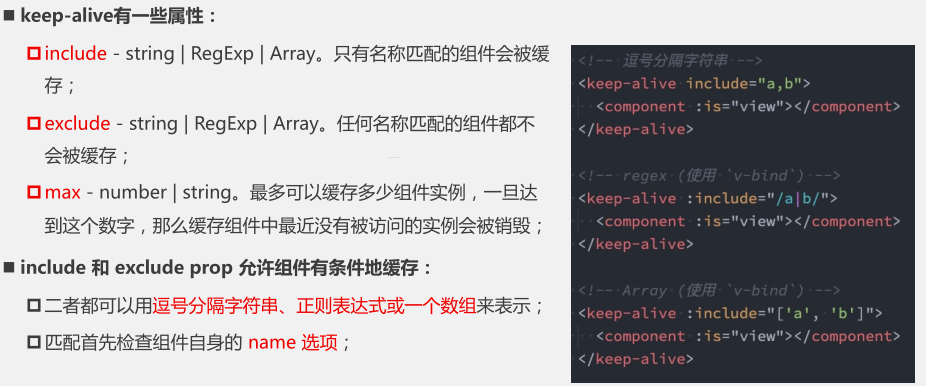
3. keep-alive缓存
默认情况下,切换组件,原组件就被销毁了,再次回来会重新创建组件。
代码分享:
        <!-- 方案3 keep-alive保持状态 -->
        <!-- 注意:不写include 默认所有都缓存,存在include时,优先匹配首先检查组件自身的 name 选项 -->
        <!-- 缓存生命周期测试,在Home2组件上改造 -->
        <keep-alive include="myHome1,myHome2">
            <component :is='currentTab' name='lmr' :age='myAge' @pageClick="pageClick"></component>
        </keep-alive>
剖析:
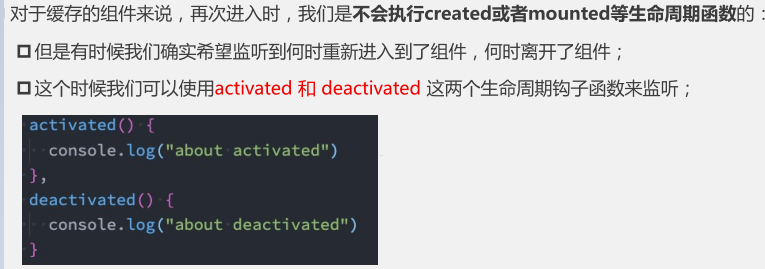
4. keep-alive缓存生命周期
二. Webpack分包和异步组件
1. Webpack实现js分包
(1). 背景
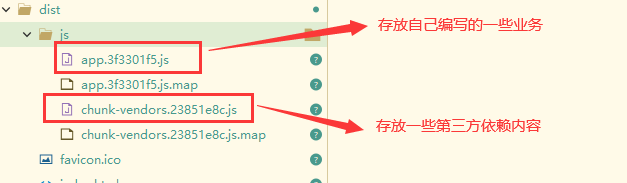
默认情况下,在构建整个组件树的过程中,因为组件和组件之间是通过模块化直接依赖的,那么webpack在打包时就会将组件模块打包到一起(比如 自己编写的一些业务都在这个app.xxxx.js中,一些三方依赖都打包在chunk-vendors.xxx.js中)
这个时候随着项目的不断庞大,app.js文件的内容过大,会造成首屏的渲染速度变慢;
(2). 代码分包
所以,对于一些不需要立即使用的组件,我们可以单独对它们进行拆分,拆分成一些小的代码块chunk.js; 这些chunk.js会在需要时从服务器加载下来,并且运行代码,显示对应的内容。
比如在mainjs入口中导入一段js代码,进行打包
// 普通导入js
import {sum} from './components/11_异步组件的使用/utils/test.js';
console.log(sum(10,20));
改成分包写法,进行打包
// 分包的写法
import("./components/11_异步组件的使用/utils/test.js").then(({sum})=>{
    console.log(sum(10,20));
});

2. Vue中实现异步组件
(1). 背景
A. 如果我们的项目过大了,对于某些组件我们希望通过异步的方式来进行加载(目的是可以对其进行分包处理),那么Vue中给我们提供了一个函数:defineAsyncComponent。
B. defineAsyncComponent接受两种类型的参数:
类型一:工厂函数,该工厂函数需要返回一个Promise对象;
类型二:接受一个对象类型,对异步函数进行配置;
(2). 代码分享
<script>
    // 同步写法
    import Loading from './Loading.vue';

    // 导入异步组件
    import { defineAsyncComponent } from 'vue';
    // 写法1
    const AsyncCpn1 = defineAsyncComponent(() => import('./AsyncCpn1.vue'));

    // 写法2
    const AsyncCpn2 = defineAsyncComponent({
        loader: () => import("./AsyncCpn2.vue"),
        // 加载异步组件时要使用的组件
        loadingComponent: Loading,
        // 在显示 loadingComponent 之前的延迟 | 默认值:200(单位 ms)
        delay: 200,
        /**
         *
         * @param {*} error 错误信息对象
         * @param {*} retry 一个函数,用于指示当 promise 加载器 reject 时,加载器是否应该重试
         * @param {*} fail  一个函数,指示加载程序结束退出
         * @param {*} attempts 允许的最大重试次数
         */
        onError: function(err, retry, attempts) {

        }
    })

    export default {
        components: {
            AsyncCpn1,
            AsyncCpn2,
            Loading
        },
        data() {
            return {};
        }
    }
</script>
打包后的资源文件如下图:

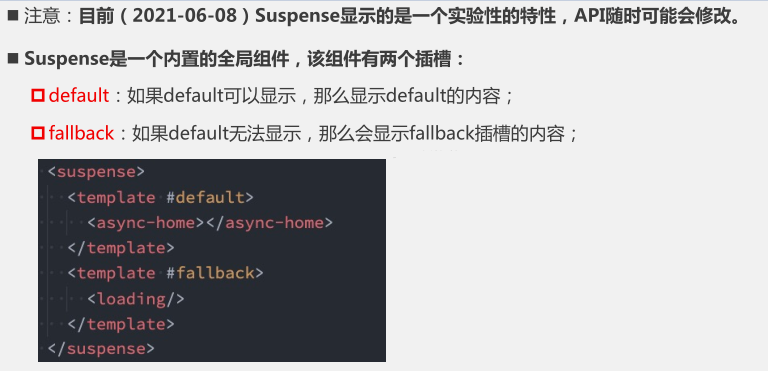
3. Suspense
三. 引用元素/组件($ref等)
1. $ref
某些情况下,我们在组件中想要直接获取到元素对象或者子组件实例:
(1). 在Vue开发中我们是不推荐进行DOM操作的。
(2). 这个时候,我们可以给元素或者组件绑定一个ref的attribute属性。
(1). 获取元素 或 组件
子组件代码


<template>
    <div>
        {{msg}}
        <p><button @click="getfather">获取父亲组件和根组件</button></p>
    </div>
</template>

<script>
    export default {
        data() {
            return {
                msg: 'hello Vue3'
            };
        },
        methods:{
            getfather(){
                console.log('-----------------我是子组件中业务---------------------');
                // 1.获取父元素
                {
                    console.log(this.$parent);
                    // 不建议这么用,因为一个组件会被多个父组件调用,并不是每一个父组件里都有test1属性和getInfo方法
                    console.log(this.$parent.test1);
                    this.$parent.getInfo();
                }

                // 2. 获取根元素
                // {
                //     console.log(this.$root);
                //     console.log(this.$root.test1);
                //     this.$root.getInfo();
                // }

            }
        }

    }
</script>
父组件代码
<template>
    <div>
        <!-- ref绑定到元素上 -->
        <div ref="t1">hello ypf</div>
        <!-- ref绑定到组件上 -->
        <child-msg1 ref='cMsg'></child-msg1>
        <p><button @click="getInfo">获取信息</button></p>
    </div>
</template>

<script>
    import ChildMsg1 from './ChildMsg1.vue';

    export default {
        components: {
            ChildMsg1
        },
        data() {
            return {
                test1: '我是test1'
            };
        },
        methods: {
            getInfo() {
                // 1.获取普通元素
                {
                    console.log(this.$refs.t1);
                    console.log(this.$refs.t1.innerHTML);
                }
                // 2. 获取组件元素
                {
                    console.log(this.$refs.cMsg);
                    // 获取组件中data数据
                    console.log(this.$refs.cMsg.msg);
                    // 调用组件中的方法
                    this.$refs.cMsg.getfather();
                }
            }
        }
    }
</script>
2. $parent 和 $root
$parent获取父元素。
$root获取根元素。
注意:在Vue3中已经移除了$children的属性,所以不可以使用了。
代码同上
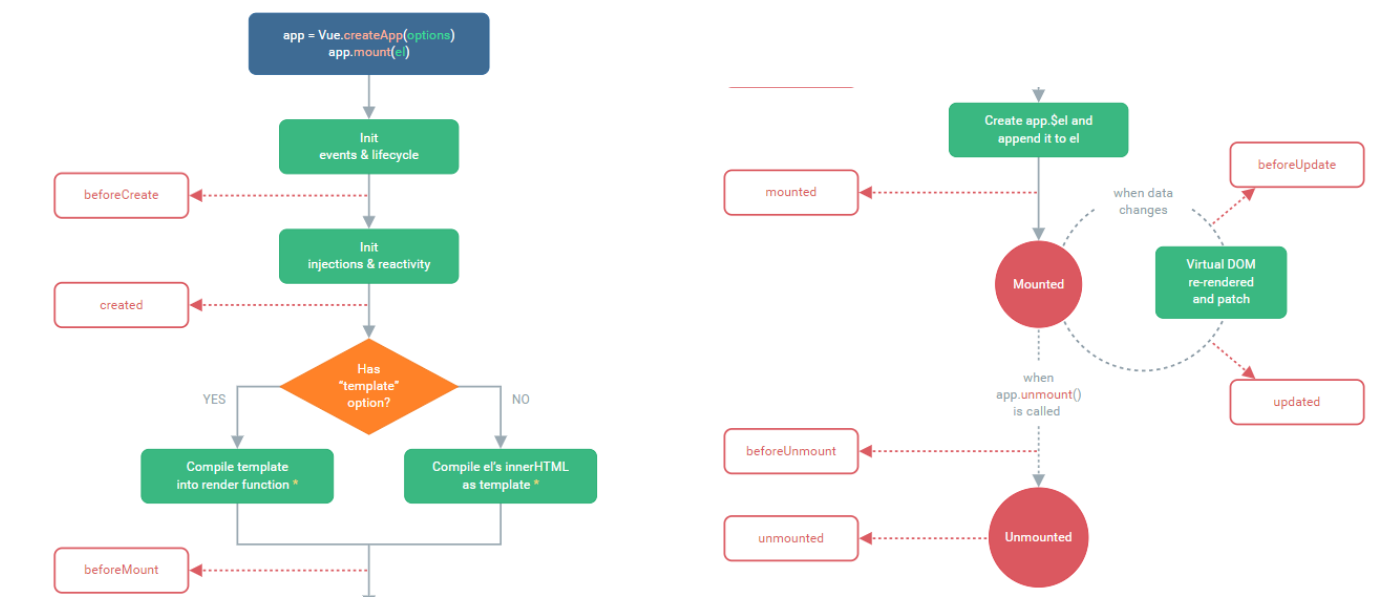
四. 组件生命周期
1. 简介
(1). 什么是生命周期呢?
每个组件都可能会经历从创建、挂载、更新、卸载等一系列的过程;
在这个过程中的某一个阶段,用于可能会想要添加一些属于自己的代码逻辑(比如组件创建完后就请求一些服务器数据);
但是我们如何可以知道目前组件正在哪一个过程呢?Vue给我们提供了组件的生命周期函数;
(2). 生命周期函数:
生命周期函数是一些钩子函数,在某个时间会被Vue源码内部进行回调;
通过对生命周期函数的回调,我们可以知道目前组件正在经历什么阶段;
那么我们就可以在该生命周期中编写属于自己的逻辑代码了;
2. 图例
每个钩子函数的作用详见:https://v3.cn.vuejs.org/api/options-lifecycle-hooks.html#beforecreate
3. 实操
代码分享:
<template>
    <div>
        <h4 ref="title"> {{msg}}</h4>
        <button @click="changeMessage">修改message</button>
    </div>
</template>

<script>
    export default {
        data() {
            return {
                msg: 'Hello Home'
            };
        },
        methods: {
            changeMessage() {
                this.msg = "你好啊, 李马儒"
            }
        },
        beforeCreate() {
            console.log("home beforeCreate");
        },
        created() {
            console.log("home created");
        },
        beforeMount() {
            console.log("home beforeMount");
        },
        mounted() {
            console.log("home mounted");
        },
        beforeUnmount() {
            console.log("home beforeUnmount");
        },
        unmounted() {
            console.log("home unmounted");
        },
        beforeUpdate() {
            console.log(this.$refs.title.innerHTML);
            console.log("home beforeUpdate");
        },
        updated() {
            console.log(this.$refs.title.innerHTML);
            console.log("home updated");
        }
    }
</script>

<style scoped>
</style>
五. 组件的v-model
1. 回顾input中使用v-model实现属性绑定
这里的v-model实现了两件事,v-bind:value的数据绑定和@input的事件监听。
     <div>{{message}}</div>
        <input v-model="message">
        <input :value="message" @input="message=$event.target.value">
2. 组件v-model的使用
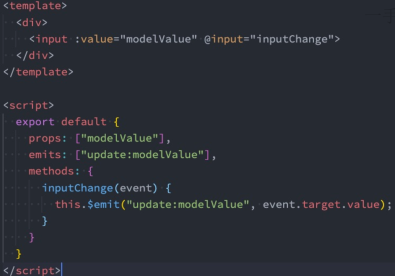
(1). 组件的写法
<template>
    <div>
        <input v-model="value">
    </div>
</template>

<script>
    export default {
        props: ['modelValue'],
        emits: ['update:modelValue'],
        computed: {
            // 这里是固定值,名字就得叫value
            value: {
                set(value) {
                    this.$emit('update:modelValue', value);
                },
                get() {
                    return this.modelValue;
                }
            }
        }
    }
</script>
也可以用@input监听
(2). 调用
        <!-- 2.1 按部就班调用-->
        <hy-input1 :modelValue="message" @update:modelValue="message = $event"></hy-input1>
        <!-- 2.2 直接使用v-model,等价于上面的代码 -->
        <hy-input1 v-model="message"></hy-input1>
3. 组件v-model绑定多个属性
(1). 子组件
<template>
    <div>
        <input v-model="value">
        <input v-model="myTitle">
    </div>
</template>

<script>
    export default {
        props: ['modelValue', 'title'],
        emits: ['update:modelValue', 'update:title'],
        computed: {
            value: {
                set(value) {
                    this.$emit('update:modelValue', value);
                },
                get() {
                    return this.modelValue;
                }
            },
            myTitle: {
                set(myTitle) {
                    this.$emit('update:title', myTitle);
                },
                get() {
                    return this.title;
                }
            }
        }
    }
</script>
(2). 调用
<hy-input2 v-model="message" v-model:title="title"></hy-input2>
!
- 作 者 : Yaopengfei(姚鹏飞)
- 博客地址 : http://www.cnblogs.com/yaopengfei/
- 声 明1 : 如有错误,欢迎讨论,请勿谩骂^_^。
- 声 明2 : 原创博客请在转载时保留原文链接或在文章开头加上本人博客地址,否则保留追究法律责任的权利。