一. Aop简介
1. AOP概念
-
-
AOP弥补了OOP的不足,基于OOP基础之上进行横向开发
-
uOOP规定程序开发以类为主体模型,一切围绕对象进行,完成某个任务先构建模型
-
-
2. AOP作用
3. AOP优势
-
-
业务代码编码更简洁
-
业务代码维护更高效
-
Target(目标对象):代理的目标对象
Proxy (代理):一个类被 AOP 织入增强后,就产生一个结果代理类
Joinpoint(连接点):所谓连接点是指那些被拦截到的点。在spring中,这些点指的是方法,因为spring只支持方法类型的连接点
Pointcut(切入点):所谓切入点是指我们要对哪些 Joinpoint 进行拦截的定义
Advice(通知/ 增强):所谓通知是指拦截到 Joinpoint 之后所要做的事情就是通知
Aspect(切面):是切入点和通知(引介)的结合
Weaving(织入):是指把增强应用到目标对象来创建新的代理对象的过程。spring采用动态代理织入,而AspectJ采用编译期织入和类装载期织入
二. 基于xml的Aop
前提:导入相应坐标(spring标准库、spring整合Junit、Aspect织入)


    <dependencies>
        <!--Spring标准库-->
        <dependency>
            <groupId>org.springframework</groupId>
            <artifactId>spring-context</artifactId>
            <version>5.3.7</version>
        </dependency>
        <!-- Spring整合Junit -->
        <dependency>
            <groupId>junit</groupId>
            <artifactId>junit</artifactId>
            <version>4.13.2</version>
        </dependency>
        <dependency>
            <groupId>org.springframework</groupId>
            <artifactId>spring-test</artifactId>
            <version>5.3.7</version>
        </dependency>
        <!-- 新组件 aspect植入 -->
        <dependency>
            <groupId>org.aspectj</groupId>
            <artifactId>aspectjweaver</artifactId>
            <version>1.9.7</version>
        </dependency>
    </dependencies>
1. 切点表达式的写法
execution([修饰符] 返回值类型 包名.类名.方法名(参数))
(1). 访问修饰符可以省略
(2). 返回值类型、包名、类名、方法名可以使用星号* 代表任意
(3). 包名与类名之间一个点 . 代表当前包下的类,两个点 .. 表示当前包及其子包下的类
(4). 参数列表可以使用两个点 .. 表示任意个数,任意类型的参数列表
例子:
execution(public void com.ypf.aop.Target.Test1())    直接定位到具体的Test1方法
execution(void com.ypf.aop.Target.*(..))             包括com.ypf.aop.Target下的所有方法
execution(* com.ypf.aop.*.*(..))                     包括com.ypf.aop包下所有类的所有方法
execution(* com.ypf.aop..*.*(..))                    包括com.ypf.aop包及其子包下所有类的所有方法
execution(* *..*.*(..))                              该项目下所有方法
2. 切点配置的三种方式
<aop:config>
    <!--配置公共切入点-->
    <aop:pointcut id="pt1" expression="execution(* *(..))"/>
    <aop:aspect ref="myAdvice">
        <!--配置局部切入点-->
        <aop:pointcut id="pt2" expression="execution(* *(..))"/>
        <!--引用公共切入点-->
        <aop:before method="logAdvice" pointcut-ref="pt1"/>
        <!--引用局部切入点-->
        <aop:before method="logAdvice" pointcut-ref="pt2"/>
        <!--直接配置切入点-->
        <aop:before method="logAdvice" pointcut="execution(* *(..))"/>
    </aop:aspect>
</aop:config>
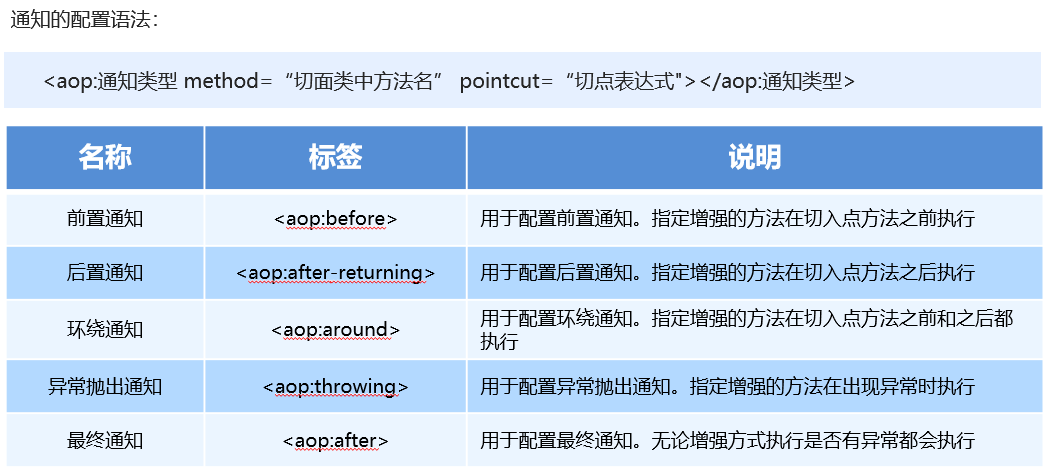
3. 通知类型
4. Aop织入配置

5. 案例实操
(1). 声明目标接口、目标类、切面类
//目标接口
public interface UserService {

    public  void save();

    public void save2();

}
//目标类
public class UserServiceImpl implements UserService {
    @Override
    public void save() {
        System.out.println("UserService is running");
    }

    @Override
    public void save2() {
        System.out.println("UserService is running");
       /* int i = 1/0;*/
    }
}

//切面类
public class MyAspect {


    public void mybefore(){
        System.out.println("前置增强..........");
    }

    public void afterReturning(){
        System.out.println("后置增强..........");
    }

    //Proceeding JoinPoint:  正在执行的连接点===切点
    public Object around(ProceedingJoinPoint pjp) throws Throwable {
        System.out.println("环绕前增强....");
        Object proceed = pjp.proceed();//切点方法
        System.out.println("环绕后增强....");
        return proceed;
    }

    public void afterThrowing(){
        System.out.println("异常抛出增强..........");
    }

    public void myafter(){
        System.out.println("最终增强..........");
    }

}
(2). 在xml中注册目标类和切面类
    <!--注册目标对象-->
    <bean id="UserService1" class="com.ypf.aop.UserServiceImpl"></bean>
    <!--注册切面对象-->
    <bean id="myAspect1" class="com.ypf.aop.MyAspect"></bean>
(3). 配置Aop
这里主要两种写法,写法一:在每个植入方法上编写切入表达式 ; 写法二:单独抽取切点表达式。
 <!--配置织入:告诉spring框架 哪些方法(切点)需要进行哪些增强(前置、后置...)-->
    <aop:config>
        <!--声明切面  ref关联上面的切面对象-->
        <aop:aspect ref="myAspect1">
            <!--切面:切点+通知 -->

            <!--写法一-->
            <!--1.前置  给UserServiceImpl中save方法前运行mybefore方法-->
            <!--<aop:before method="mybefore" pointcut="execution(public void com.ypf.aop.UserServiceImpl.save())"/>-->
            <!--给com.ypf.aop下的所有方法添加前置方法mybefore-->
            <!--<aop:before method="mybefore" pointcut="execution(* com.ypf.aop.*.*(..))"/>-->
            <!--2.后置-->
            <!--<aop:after-returning method="afterReturning" pointcut="execution(* com.ypf.aop.*.*(..))"/>-->
            <!--3.环绕-->
            <!--<aop:around method="around" pointcut="execution(* com.ypf.aop.*.*(..))"/>-->
            <!--4.异常-->
           <!-- <aop:after-throwing method="afterThrowing" pointcut="execution(* com.ypf.aop.*.*(..))"/>-->
            <!--5.后置-->
            <!--<aop:after method="myafter" pointcut="execution(* com.ypf.aop.*.*(..))"/>-->

            <!--写法二-->
            <!--抽取切点表达式-->
            <aop:pointcut id="myPointcut" expression="execution(* com.ypf.aop.*.*(..))"></aop:pointcut>
            <aop:before method="mybefore"  pointcut-ref="myPointcut"/>
            <aop:after-returning method="afterReturning" pointcut-ref="myPointcut"/>
            <aop:around method="around" pointcut-ref="myPointcut"/>
            <aop:after-throwing method="afterThrowing" pointcut-ref="myPointcut"/>
            <aop:after method="myafter" pointcut-ref="myPointcut"/>

        </aop:aspect>
    </aop:config>
下面分享整个xml文件
<?xml version="1.0" encoding="UTF-8"?>
<beans xmlns="http://www.springframework.org/schema/beans"
       xmlns:xsi="http://www.w3.org/2001/XMLSchema-instance"
       xmlns:aop="http://www.springframework.org/schema/aop"
       xsi:schemaLocation="
       http://www.springframework.org/schema/beans http://www.springframework.org/schema/beans/spring-beans.xsd
       http://www.springframework.org/schema/aop http://www.springframework.org/schema/aop/spring-aop.xsd
">

    <!--注册目标对象-->
    <bean id="UserService1" class="com.ypf.aop.UserServiceImpl"></bean>
    <!--注册切面对象-->
    <bean id="myAspect1" class="com.ypf.aop.MyAspect"></bean>


    <!--配置织入:告诉spring框架 哪些方法(切点)需要进行哪些增强(前置、后置...)-->
    <aop:config>
        <!--声明切面  ref关联上面的切面对象-->
        <aop:aspect ref="myAspect1">
            <!--切面:切点+通知 -->

            <!--写法一-->
            <!--1.前置  给UserServiceImpl中save方法前运行mybefore方法-->
            <!--<aop:before method="mybefore" pointcut="execution(public void com.ypf.aop.UserServiceImpl.save())"/>-->
            <!--给com.ypf.aop下的所有方法添加前置方法mybefore-->
            <!--<aop:before method="mybefore" pointcut="execution(* com.ypf.aop.*.*(..))"/>-->
            <!--2.后置-->
            <!--<aop:after-returning method="afterReturning" pointcut="execution(* com.ypf.aop.*.*(..))"/>-->
            <!--3.环绕-->
            <!--<aop:around method="around" pointcut="execution(* com.ypf.aop.*.*(..))"/>-->
            <!--4.异常-->
           <!-- <aop:after-throwing method="afterThrowing" pointcut="execution(* com.ypf.aop.*.*(..))"/>-->
            <!--5.后置-->
            <!--<aop:after method="myafter" pointcut="execution(* com.ypf.aop.*.*(..))"/>-->


            <!--写法二-->
            <!--抽取切点表达式-->
            <aop:pointcut id="myPointcut" expression="execution(* com.ypf.aop.*.*(..))"></aop:pointcut>

            <aop:before method="mybefore"  pointcut-ref="myPointcut"/>
            <aop:after-returning method="afterReturning" pointcut-ref="myPointcut"/>
            <aop:around method="around" pointcut-ref="myPointcut"/>
            <aop:after-throwing method="afterThrowing" pointcut-ref="myPointcut"/>
            <aop:after method="myafter" pointcut-ref="myPointcut"/>


        </aop:aspect>
    </aop:config>


</beans>
(4). 使用Junit进行测试
@RunWith(SpringJUnit4ClassRunner.class)
@ContextConfiguration("classpath:applicationContext.xml")
public class AopXmlTest {

    @Autowired
    @Qualifier("UserService1")
    public UserService userService;

    @Test
    public  void test1(){
        userService.save();
    }

    /*测试异常抛出通知
    * (无法运行,有问题??)
    * */
    @Test
    public  void test2(){
        userService.save2();
    }


}
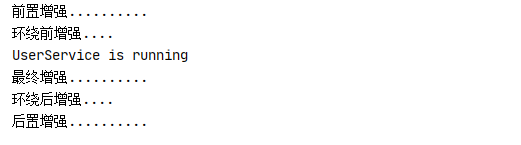
运行结果:
三. 基于注解的Aop
1. 常用注解
(1). @Aspect
声明该类为切面类
注:该切面类还需要加@Component标签
@Component("MyAspect")  //也必须加上这个注解, 和下面的@Aspect缺一不可
@Aspect //标注当前MyAspect是一个切面类
public class MyAspect {}
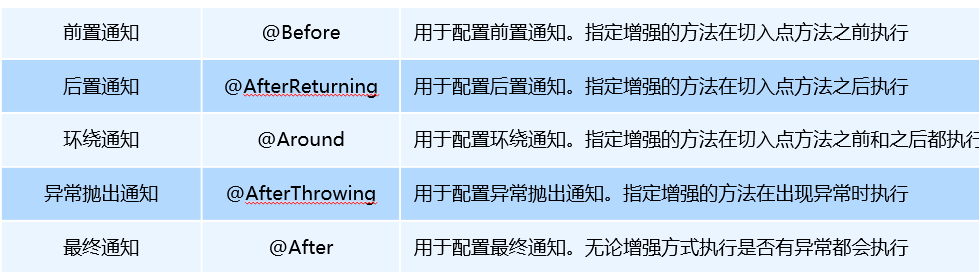
(2). 植入方法位置的注解
2. 案例剖析
(1). 目标类和目标接口
public interface UserService {

    public  void save();

    public void save2();

}
@Component("UserService1")
public class UserServiceImpl implements UserService {


    @Override
    public void save() {
        System.out.println("UserService is running");
    }

    @Override
    public void save2() {
        System.out.println("UserService is running");
       /* int i = 1/0;*/
    }
}
(2). 切面类和相关注解配置
这里主要有两种形式,一种是通过注解直接加在相关方法上,另外一种是借助一个空方法,抽离切点表达式。
@Component("MyAspect")  //也必须加上这个注解, 和下面的@Aspect缺一不可
@Aspect //标注当前MyAspect是一个切面类
public class MyAspect {

    @Before("execution(public void com.ypf.aop.UserServiceImpl.save())")  //仅仅给save方法加前置
//    @Before("execution(* com.ypf.aop.*.*(..))")
    public void mybefore(){
        System.out.println("前置增强..........");
    }

    @AfterReturning("execution(* com.ypf.aop.*.*(..))")
    public void afterReturning(){
        System.out.println("后置增强..........");
    }

    @Around("execution(* com.ypf.aop.*.*(..))")
    public Object around(ProceedingJoinPoint pjp) throws Throwable {
        System.out.println("环绕前增强....");
        Object proceed = pjp.proceed();//切点方法
        System.out.println("环绕后增强....");
        return proceed;
    }

    @AfterThrowing("execution(* com.ypf.aop.*.*(..))")
    public void afterThrowing(){
        System.out.println("异常抛出增强..........");
    }

    @After("execution(* com.ypf.aop.*.*(..))")
    public void myafter(){
        System.out.println("最终增强..........");
    }


    /*-------------------------------也可以抽取切点表达式-----------------------------------------*/

    //定义切点表达式
    @Pointcut("execution(* com.ypf.aop.*.*(..))")
    public void myExpression(){}

    @After("MyAspect.myExpression()")
    public void myafter3(){
        System.out.println("..........超级最后增强。。。。。。..........");
    }

}
(3). xml的配置
主要是配置开启组件扫码 和 Aop自动代理
<?xml version="1.0" encoding="UTF-8"?>
<beans xmlns="http://www.springframework.org/schema/beans"
       xmlns:xsi="http://www.w3.org/2001/XMLSchema-instance"
       xmlns:aop="http://www.springframework.org/schema/aop"
       xmlns:context="http://www.springframework.org/schema/context"
       xsi:schemaLocation="
       http://www.springframework.org/schema/beans http://www.springframework.org/schema/beans/spring-beans.xsd
       http://www.springframework.org/schema/aop http://www.springframework.org/schema/aop/spring-aop.xsd
       http://www.springframework.org/schema/context http://www.springframework.org/schema/context/spring-context.xsd
">

    <!--开启注解——组件扫描-->
    <context:component-scan base-package="com.ypf.aop"/>

    <!--aop注解自动代理-->
    <aop:aspectj-autoproxy/>


</beans>
(4). 使用Junit测试
@RunWith(SpringJUnit4ClassRunner.class)
@ContextConfiguration("classpath:applicationContext.xml")
public class AopAnnoTest {


    @Autowired
    @Qualifier("UserService1")
    public UserService userService;

    @Test
    public  void test1(){
        userService.save();
    }

}
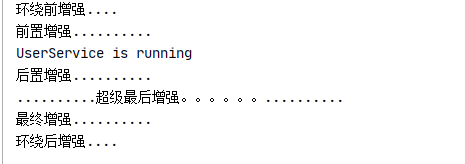
运行结果:
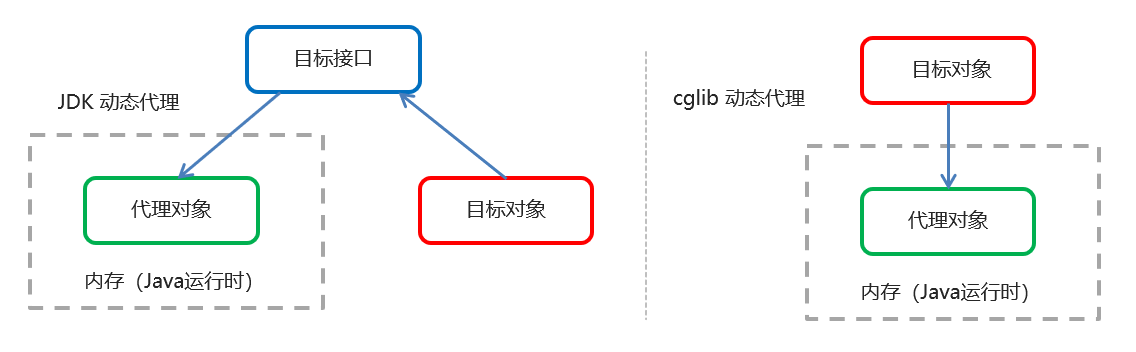
四. Aop动态代理
1. 常用的代理技术
JDK 代理 : 基于接口的动态代理技术
cglib 代理:基于父类的动态代理技术
2. JDK代理
(1). 目标接口和目标类
public class Target implements TargetInterface {
    public void save() {
        System.out.println("save running.....");
    }
}
public interface TargetInterface {
    public void save();
}
(2). 被植入方法类
public class Advice {

    public void before(){
        System.out.println("before is ....");
    }

    public void afterReturning(){
        System.out.println("after is....");
    }

}
(3). 动态代理代码
public class JdkTest {
    public static void main(String[] args) {

        //目标对象
        final Target target = new Target();

        //增强对象
        final Advice advice = new Advice();

        //返回值 就是动态生成的代理对象
        TargetInterface proxy = (TargetInterface) Proxy.newProxyInstance(
                target.getClass().getClassLoader(), //目标对象类加载器
                target.getClass().getInterfaces(), //目标对象相同的接口字节码对象数组
                new InvocationHandler() {
                    //调用代理对象的任何方法  实质执行的都是invoke方法
                    public Object invoke(Object proxy, Method method, Object[] args) throws Throwable {
                        advice.before(); //前置增强
                        Object invoke = method.invoke(target, args);//执行目标方法
                        advice.afterReturning(); //后置增强
                        return invoke;
                    }
                }
        );

        //调用代理对象的方法
        proxy.save();
    }
}
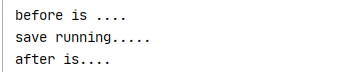
运行结果:
3. Cglib代理
(1). 目标类
public class Target {
    public void save() {
        System.out.println("save running.....");
    }
}
(2). 被植入方法类
public class Advice {

    public void before(){
        System.out.println("before is ....");
    }

    public void afterReturning(){
        System.out.println("after is....");
    }

}
(3). 动态代理代码
public class CglibTest {
    public static void main(String[] args) {

        //目标对象
        final Target target = new Target();

        //增强对象
        final Advice advice = new Advice();

        //返回值 就是动态生成的代理对象  基于cglib
        //1、创建增强器
        Enhancer enhancer = new Enhancer();
        //2、设置父类(目标)
        enhancer.setSuperclass(Target.class);
        //3、设置回调
        enhancer.setCallback(new MethodInterceptor() {
            public Object intercept(Object proxy, Method method, Object[] args, MethodProxy methodProxy) throws Throwable {
                advice.before(); //执行前置
                Object invoke = method.invoke(target, args);//执行目标
                advice.afterReturning(); //执行后置
                return invoke;
            }
        });
        //4、创建代理对象
        Target proxy = (Target) enhancer.create();


        proxy.save();
    }
}
运行结果:

!
- 作 者 : Yaopengfei(姚鹏飞)
- 博客地址 : http://www.cnblogs.com/yaopengfei/
- 声 明1 : 如有错误,欢迎讨论,请勿谩骂^_^。
- 声 明2 : 原创博客请在转载时保留原文链接或在文章开头加上本人博客地址,否则保留追究法律责任的权利。