一、整合JDBC
1、基本操作
1.1 创建项目
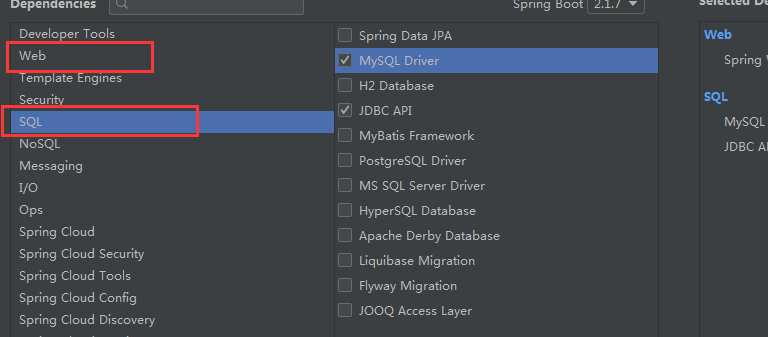
1.2 配置参数(application.properties)
spring.datasource.username=root
spring.datasource.password=123456
spring.datasource.url=jdbc:mysql://localhost:3306/javas1?serverTimezone=UTC
spring.datasource.driver-class-name=com.mysql.cj.jdbc.Driver
1.3 测试
    @Autowired
    DataSource dataSource;
    @Test
    public void test1() throws SQLException {
        System.out.println(dataSource.getClass());
        System.out.println(dataSource.getConnection());
    }
2、操作数据库(使用JdbcTemplate)
    @Autowired
    JdbcTemplate jdbcTemplate;
    @Test
    public void test2(){
        List<User> query = jdbcTemplate.query("select * from t_user", BeanPropertyRowMapper.newInstance(User.class));
        System.out.println(query);
    }
二、整合Druid
版本:http://central.maven.org/maven2/com/alibaba/druid/
<dependency>
		<groupId>com.alibaba</groupId>
		<artifactId>druid</artifactId>
		<version>${druid-version}</version>
</dependency>
1、配置Druid数据源
配置apllication.yml
spring:
  datasource:
    driver-class-name: com.mysql.cj.jdbc.Driver
    password: 123456
    type: com.alibaba.druid.pool.DruidDataSource
    url: jdbc:mysql://localhost:3306/javas1?serverTimezone=UTC
    username: root

    initialSize: 5
    minIdle: 5
    maxActive: 20
    maxWait: 60000
    timeBetweenEvictionRunsMillis: 60000
    minEvictableIdleTimeMillis: 300000
    validationQuery: SELECT * FROM t_user where id=1;
    testwhileIdle: true
    testOnBorrow: false
    testOnReturn: false
    poolPreparedStatements: true
    #配置监控统计拦截的filters,去掉后监控界面sql无法统计,‘wall'用于防火墙
    filters: stat,wall,logback
    maxPoolPreparedStatementPerConnectionSize: 20
    useGlobalDataSourceStat: true
    connectionProperties: druid.stat.mergeSql=true;druid.stat.slowSqlMillis=500
    #schema:
      #-classpath:department.sql  表示程序启动后执行resources目录下department.sql脚本(自己写脚本),一般为了创建数据表,或者导入数据等(创建完毕后,记得注释掉,不然每次启动都会重新执行)
配置类(注入上面的配置)
@Configuration
public class DruidConfig {
    @ConfigurationProperties(prefix = "spring.datasource")
    @Bean
    public DruidDataSource druidDataSource(){
        DruidDataSource druidDataSource = new DruidDataSource();
        return druidDataSource;
    }
}
2、配置Druid监控
在DruidConfig配置类中添加 servlet 和 fillter
@Configuration
public class DruidConfig {
    //配置数据源
    @ConfigurationProperties(prefix = "spring.datasource")
    @Bean
    public DruidDataSource druidDataSource(){
        DruidDataSource druidDataSource = new DruidDataSource();
        return druidDataSource;
    }

    //配置管理后台的Servlet
    @Bean
    public ServletRegistrationBean servletRegistrationBean(){
        ServletRegistrationBean<Servlet> servletServletRegistrationBean = new ServletRegistrationBean<>(new StatViewServlet(),"/druid/*");
        HashMap<String, String> initParameter = new HashMap<String, String>();
        //具体参数可以查看StatViewServlet(以及它的父类)
        initParameter.put("loginUsername","root");
        initParameter.put("loginPassword","123456");

        initParameter.put("allow","192.168.1.101"); //不写默认允许所有人访问
        //initParameter.put("deny","192.168.x.x");

        servletServletRegistrationBean.setInitParameters(initParameter);
        return servletServletRegistrationBean;
    }

    //配置一个web监控的filter
    @Bean
    public FilterRegistrationBean webStatFilter(){
        FilterRegistrationBean<Filter> bean = new FilterRegistrationBean<>();
        bean.setFilter(new WebStatFilter());
        HashMap<String, String> initParameter = new HashMap<>();
        initParameter.put("exclusions","*.js,*.css,/druid/*");
        bean.setInitParameters(initParameter);
        bean.setUrlPatterns(Arrays.asList("/*"));
        return bean;
    }
}
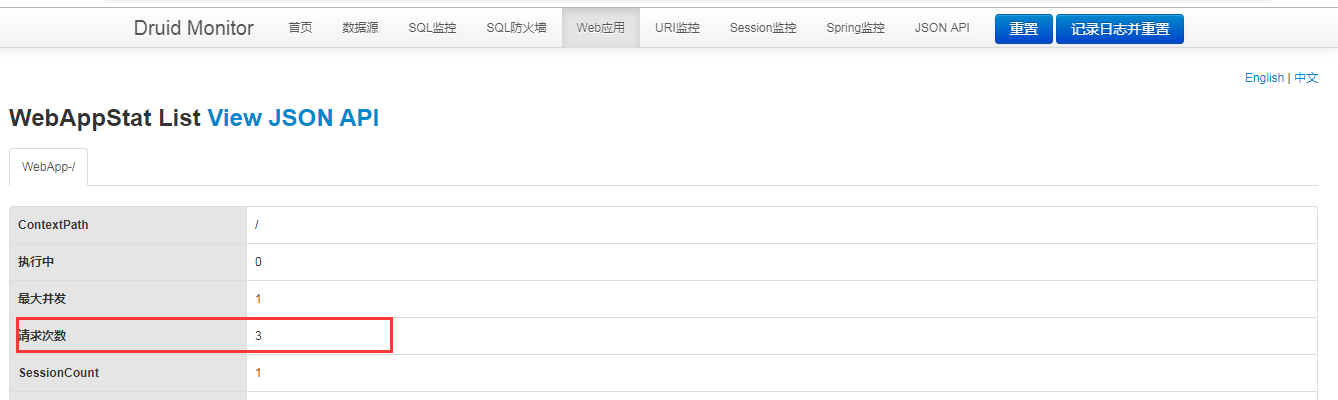
配置一个web监控的filter可以对web应用,url,session产生监控(如图)
使用Druid和SpringBoot整合包
<dependency>
            <groupId>com.alibaba</groupId>
            <artifactId>druid-spring-boot-starter</artifactId>
</dependency>
application.yml (省略了上面的所有的配置)
spring:
  application:
    name: provider
  datasource:
    driver-class-name: com.mysql.cj.jdbc.Driver
    password: 123456
    type: com.alibaba.druid.pool.DruidDataSource
    url: jdbc:mysql://localhost:3306/javas1?serverTimezone=UTC
    username: root
    druid:
      # 初始化大小,最小,最大
      initial-size: 5
      min-idle: 5
      maxActive: 20
      # 配置获取连接等待超时的时间
      maxWait: 60000
      # 配置间隔多久才进行一次检测,检测需要关闭的空闲连接,单位是毫秒
      timeBetweenEvictionRunsMillis: 60000
      # 配置一个连接在池中最小生存的时间,单位是毫秒
      minEvictableIdleTimeMillis: 300000
      validationQuery: SELECT 1 FROM DUAL
      testWhileIdle: true
      testOnBorrow: false
      testOnReturn: false
      # 打开PSCache,并且指定每个连接上PSCache的大小
      poolPreparedStatements: true
      maxPoolPreparedStatementPerConnectionSize: 20
      # 配置监控统计拦截的filters,去掉后监控界面sql无法统计,'wall'用于防火墙
      filters: stat,wall,log4j
      # 通过connectProperties属性来打开mergeSql功能;慢SQL记录
      connectionProperties: druid.stat.mergeSql=true;druid.stat.slowSqlMillis=5000
      # 配置DruidStatFilter
      web-stat-filter:
        enabled: true
        url-pattern: "/*"
        exclusions: "*.js,*.gif,*.jpg,*.bmp,*.png,*.css,*.ico,/druid/*"
      # 配置DruidStatViewServlet
      stat-view-servlet:
        url-pattern: "/druid/*"
        # IP白名单(没有配置或者为空,则允许所有访问)
        allow: 127.0.0.1
        # IP黑名单 (存在共同时,deny优先于allow)
        deny: 192.168.1.73
        #  禁用HTML页面上的“Reset All”功能
        reset-enable: false
        # 登录名
        login-username: admin
        # 登录密码
        login-password: 123456