-
背景
用户需要通过前端HTML页面的noVNC(noVNC是什么?)客户端连接底层VNC Server服务端,为了防止VNC Server的IP暴露,因此需要做一层代理。正常情况下使用Nginx、Apache等都可以搞定,但是由于项目架构的一些问题,暂时不能再加一台反向代理服务器,所以决定写一个单独的模块实现反向代理的功能。
在网上和Github上找了一下,使用了HTTP-Proxy-Servlet,引入该依赖搭建一个Spring Boot项目。
-
搭建
-
引入代理的依赖
<dependency> <groupId>org.mitre.dsmiley.httpproxy</groupId> <artifactId>smiley-http-proxy-servlet</artifactId> <version>1.12</version> </dependency> -
通过注册bean拦截指定URL路径进行自定义操作
@Configuration
public class ProxyServletConfiguration {

    // 拦截所有请求交给下面的VNCProxyServlet去处理
    private final static String SERVLET_URL = "/*";

    @Bean
    public ServletRegistrationBean<VNCProxyServlet> servletServletRegistrationBean() {
        ServletRegistrationBean<VNCProxyServlet> servletRegistrationBean = new ServletRegistrationBean<>(new VNCProxyServlet(), SERVLET_URL);
        //设置网址以及参数
        Map<String, String> params = ImmutableMap.of(
                "targetUri", "null", //这里写null是因为targetUri是在自定义的VNCProxyServlet类中动态传入的,而且这里必须要有值
                ProxyServlet.P_LOG, "true",
                ProxyServlet.P_PRESERVEHOST,"true",
                ProxyServlet.P_PRESERVECOOKIES,"true"
        );
        servletRegistrationBean.setInitParameters(params);
        return servletRegistrationBean;
    }

}
这里遇到的坑:
刚开始其实是准备在已有的一个模块中加上这个代理功能,因为可以指定拦截的路径,比如只拦截请求路径为/proxy/*的,然后交给自定义的Servlet去代理,后来写好测试时,发现代理过去后代理目标主页一片空白,看了控制台的Network后,主页确实是返回200且加载正常,但是由主页发起的js、css和img等静态资源状态码都为404。


当时以为是代码的问题,后来发现静态资源都是相对路径的有问题,如果前端的静态资源是引入第三方的,比如从CDN中引入Vue.js则不会出现问题,都可以正常的被代理。既然状态码是404,那肯定是找不到这个资源,看了一下发现如果在静态资源的路径前加上指定拦截的路径/proxy/就可以被正常代理。此时才明白,因为访问首页的路径中带/proxy/是在地址栏主动输入的,所以请求到后台,后台Servlet拦截发现路径中带/proxy/,把该请求交给自定义的代理Servlet去处理然后返回。而主页上的js、css等静态资源发起请求的路径是不会带/proxy/*的,因此不会走到代理Servlet,并且代理模块中也没有相应资源路径,所以就理所应当的返回了404。
为此还专门在GitHub上问了一下作者,作者也是回复说这并不是这个代理模块该做的事,最好是前端处理,或者让前端使用绝对路径。附上地址(Discussions)

最后就是决定单独拉出来写一个Spring Boot项目做这个代理功能模块,直接代理/*,这样所有请求到这个模块的都会被代理。
-
自定义Servlet实现动态代理目标地址
// VNCProxyServlet继承了ProxyServlet 重写了service方法 在方法中添加自定义操作 从请求地址中动态获取 @Override protected void service(HttpServletRequest servletRequest, HttpServletResponse servletResponse) throws ServletException, IOException { // 获取请求地址 String targetUri = servletRequest.getRequestURL().toString(); // 正则取请求地址中的参数 参数是放在域名中的 Matcher matcher = DOMAIN_REX.matcher(targetUri); if(!matcher.find()){ // 自定义的异常 throw new GenericException("从域名中获取vmId异常!"); } // 取域名中的第一个 eg: http://vmId.xxx.cn得 [vmId,xxx,cn] 得 vmId Long vmId = Long.valueOf(matcher.group().split("\.")[0]); // eg:业务逻辑根据vmId去拿 targetUri targetUri = vmService.getTargetUrl(vmId); if (StringUtils.isEmpty(targetUri)) { throw new GenericException("代理路径不正确,请确认路径"); } // 设置Url if (servletRequest.getAttribute(ATTR_TARGET_URI) == null) { servletRequest.setAttribute(ATTR_TARGET_URI, targetUri); } // 设置Host if (servletRequest.getAttribute(ATTR_TARGET_HOST) == null) { URL trueUrl = URLUtil.url(targetUri); servletRequest.setAttribute(ATTR_TARGET_HOST, new HttpHost(trueUrl.getHost(), trueUrl.getPort(), trueUrl.getProtocol())); } // 下面大部分都是父类的源码 没有需要特别修改的地方 String method = servletRequest.getMethod(); // 替换多余路径 String proxyRequestUri = this.rewriteUrlFromRequest(servletRequest); HttpRequest proxyRequest; if (servletRequest.getHeader(HttpHeaders.CONTENT_LENGTH) != null || servletRequest.getHeader(HttpHeaders.TRANSFER_ENCODING) != null) { proxyRequest = new BasicHttpRequest(method, proxyRequestUri); } else { proxyRequest = this.newProxyRequestWithEntity(method, proxyRequestUri, servletRequest); } this.copyRequestHeaders(servletRequest, proxyRequest); setXForwardedForHeader(servletRequest, proxyRequest); HttpResponse proxyResponse = null; try { // Execute the request proxyResponse = this.doExecute(servletRequest, servletResponse, proxyRequest); // Process the response int statusCode = proxyResponse.getStatusLine().getStatusCode(); // "reason phrase" is deprecated but it's the only way to pass servletResponse.setStatus(statusCode, proxyResponse.getStatusLine().getReasonPhrase()); // copying response headers to make sure SESSIONID or other Cookie which comes from remote server // will be saved in client when the proxied url was redirected to another one. copyResponseHeaders(proxyResponse, servletRequest, servletResponse); if (statusCode == HttpServletResponse.SC_NOT_MODIFIED) { servletResponse.setIntHeader(HttpHeaders.CONTENT_LENGTH, 0); } else { copyResponseEntity(proxyResponse, servletResponse, proxyRequest, servletRequest); } } catch (Exception e) { handleRequestException(proxyRequest, proxyResponse, e); } finally { if (proxyResponse != null) { EntityUtils.consumeQuietly(proxyResponse.getEntity()); } } } 这里主要列出关键部分,因为方案还没有完结。
-
问题
本以为这样就成功了,但是测试之后发现页面和静态资源都代理过去了,但是有一个websocket请求失败了。像noVNC这种网页版的黑窗口,早就该想到肯定是用websocket这种长链接的请求进行交互的。后来去搜了一下这个叫websockify的请求,就是最开始介绍noVNC博客中介绍的:
浏览器不支持VNC,所以不能直接连接VNC,但是可以使用代理,使用noVNC通过WebSocket建立连接,而VNC Server不支持WebSocket,所以需要开启Websockify代理来做WebSocket和TCP Socket之间的转换,这个代理在noVNC的目录里,叫做websockify。
此时项目是能够拦截到websockify这个请求的,但是由于servlet把这个请求当成普通的请求去代理到目标服务器,这样是无法成功的,所以要做的就是类似实现一个websocket的反向代理,搜了一下的话发现例子不是很多,大多都是在前端做的,前端作为客户端与服务端建立websocket连接,但目前的状况很明显是需要这个代理模块既做websocket服务端与web端建立连接,再作为websocket客户端与VNC 服务端建立连接,然后进行交互传递通信。
后面也找到了这篇博客通过noVNC和websockify连接到QEMU/KVM,然后总结一下从用户发出请求到得到响应的流程:
PC Chrome(客户端) => noVNC Server(noVNC端) => websockify(websocket转TCP Socket) => VNC Server(VNC服务端) => websockify(TCP Socket转websocket) => noVNC Server(noVNC端)=> PC Chrome(客户端)
用户使用PC Chrome浏览器请求 noVNC端(因为无法直接访问VNC Server端,VNC Server是不支持Websocket连接),经由websockify将websocket转为TCP Socket请求到VNC服务端,返回TCP响应,经由websockify转换为websocket返回给客户端浏览器,这样来进行交互。整个过程 websockify 代理器是关键,noVNC 可以被放在浏览器端。
-
noVNC网页端与代理模块建立websocket通信
@Configuration
public class WebSocketConfig {
    @Bean
    public ServerEndpointExporter serverEndpointExporter() {
        return new ServerEndpointExporter();
    }
}
@ServerEndpoint("/websockify") @Component public class WebSocketServer { /** * 连接建立成功调用的方法 */ @OnOpen public void onOpen(Session session) { logger.info("open..."); } /** * 连接关闭调用的方法 */ @OnClose public void onClose() { logger.info("close..."); } /** * 收到客户端消息后调用的方法 */ @OnMessage public void onMessage(String message, Session session) { logger.info(message); } /** * 发生错误调用的方法 */ @OnError public void onError(Session session, Throwable error) { logger.error("用户错误原因:"+error.getMessage()); error.printStackTrace(); } } 都是很常用的websocket服务端的代码,唯一要注意的是前端请求'/websockify'地址发起websocket连接时,要注意用ip,尤其是本地,使用localhost会报错,要使用127.0.0.1。最后测试连接成功,返回状态码101,并且消息可以正常接收。noVNC网页端与代理模块建立websocket通信完成。
-
代理模块与VNC Server建立websocket通信
java后台作为websocket客户端很少,大多是用Netty去写的,但是不适合目前的情况,最后还是找到了一个感觉比较合适的
public class MyWebSocketClient { public static WebSocketClient mWs; public static void main(String[] args) { try { // String url = "ws://172.28.132.11:8888/websocketify"; URI uri = new URI(url); HashMap<String, String> httpHeadersMap = new HashMap<>(); httpHeadersMap.put("Sec-WebSocket-Version", "13"); httpHeadersMap.put("Sec-WebSocket-Key", "YBhzbbwLI83U5EH8Tlutwg=="); httpHeadersMap.put("Connection","Upgrade"); httpHeadersMap.put("Upgrade","websocket"); httpHeadersMap.put("User-Agent","Mozilla/5.0 (Windows NT 10.0; Win64; x64) AppleWebKit/537.36 (KHTML, like Gecko) Chrome/93.0.4577.82 Safari/537.36"); httpHeadersMap.put("Cookie","token=8asda2das-84easdac-asdaqwe4-2asda-asdsadas"); httpHeadersMap.put("Sec-WebSocket-Extensions","permessage-deflate; client_max_window_bits"); mWs = new WebSocketClient(uri,httpHeadersMap){ @Override public void onOpen(ServerHandshake serverHandshake) { System.out.println("open..."); System.out.println(serverHandshake.getHttpStatus()); mWs.send("666"); } @Override public void onMessage(String s) { System.out.println(s); } @Override public void onClose(int i, String s, boolean b) { System.out.println("close..."); System.out.println(i); System.out.println(s); System.out.println(b); } @Override public void onError(Exception e) { System.out.println("发生了错误..."); } }; mWs.connect(); } catch (Exception e) { e.printStackTrace(); } } } // 调用后报错 直接关闭了连接 状态码为1002 // close... // 1002 // Invalid status code received: 400 Status line: HTTP/1.1 400 Client must support 'binary' or 'base64' protocol 发生错误后,发现关键地方,客户端必须支持 binary或base64协议,一番搜索后再Stack Overflow找到了线索,并且是Kanaka(noVNC和websockify的开发者)亲自回答的,大概意思就是你需要在构造函数中提供这些协议。
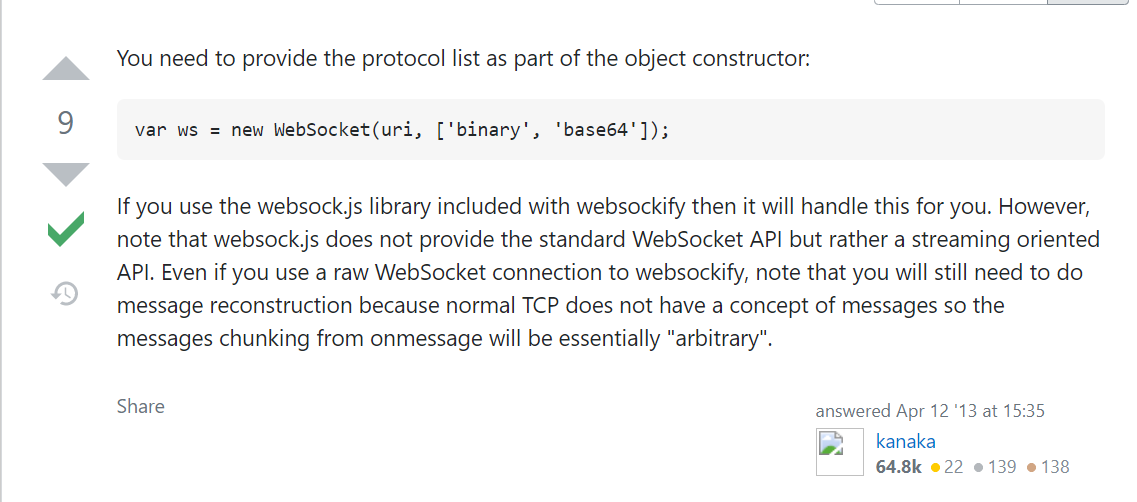
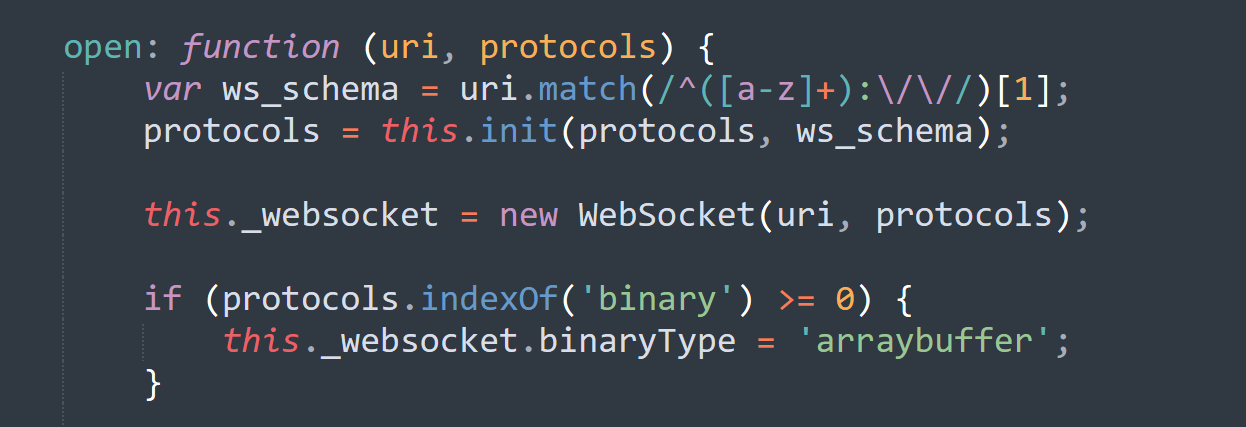
然后我又在websockify.js的源码中找到了这个构造,确实需要传递一个protocols的数组参数,可是这是前端,并不知道Java如何完成这个操作。
-
后续
首先再次感谢开源项目和各位博主大佬的分享,依旧在寻找解决方案......