gh-ost 原理
一 简介
上一篇文章介绍 gh-ost 参数和具体的使用方法,以及核心特性-可动态调整 暂停,动态修改参数等等。本文分几部分从源码方面解释gh-ost的执行过程,数据迁移,切换细节设计。
二 原理
2.1 执行过程
本例基于在主库上执行ddl 记录的核心过程。核心代码在
github.com/github/gh-ost/go/logic/migrator.go 的Migrate()
func (this *Migrator) Migrate() //Migrate executes the complete migration logic. This is the major gh-ost function.
1 检查数据库实例的基础信息
a 测试db是否可连通,
b 权限验证
  show grants for current_user()
c 获取binlog相关信息,包括row格式和修改binlog格式后的重启replicate
  select @@global.log_bin, @@global.binlog_format
  select @@global.binlog_row_image
d 原表存储引擎是否是innodb,检查表相关的外键,是否有触发器,行数预估等操作,需要注意的是行数预估有两种方式  一个是通过explain 读执行计划 另外一个是select count(*) from table ,遇到几百G的大表,后者一定非常慢。

  explain select /* gh-ost */ * from `test`.`b` where 1=1
2 模拟slave,获取当前的位点信息,创建binlog streamer监听binlog
2019-09-08T22:01:20.944172+08:00	17760 Query	show /* gh-ost readCurrentBinlogCoordinates */ master status
2019-09-08T22:01:20.947238+08:00	17762 Connect	root@127.0.0.1 on  using TCP/IP
2019-09-08T22:01:20.947349+08:00	17762 Query	SHOW GLOBAL VARIABLES LIKE 'BINLOG_CHECKSUM'
2019-09-08T22:01:20.947909+08:00	17762 Query	SET @master_binlog_checksum='NONE'
2019-09-08T22:01:20.948065+08:00	17762 Binlog Dump	Log: 'mysql-bin.000005'  Pos: 795282
3 创建 日志记录表 xx_ghc 和影子表 xx_gho 并且执行alter语句将影子表 变更为目标表结构。如下日志记录了该过程,gh-ost会将核心步骤记录到 _b_ghc 中。
2019-09-08T22:01:20.954866+08:00	17760 Query	create /* gh-ost */ table `test`.`_b_ghc` (
			id bigint auto_increment,
			last_update timestamp not null DEFAULT CURRENT_TIMESTAMP ON UPDATE CURRENT_TIMESTAMP,
			hint varchar(64) charset ascii not null,
			value varchar(4096) charset ascii not null,
			primary key(id),
			unique key hint_uidx(hint)
		) auto_increment=256
2019-09-08T22:01:20.957550+08:00	17760 Query	create /* gh-ost */ table `test`.`_b_gho` like `test`.`b`
2019-09-08T22:01:20.960110+08:00	17760 Query	alter /* gh-ost */ table `test`.`_b_gho` engine=innodb
2019-09-08T22:01:20.966740+08:00	17760 Query
   insert /* gh-ost */ into `test`.`_b_ghc`(id, hint, value)values (NULLIF(2, 0), 'state', 'GhostTableMigrated') on duplicate key update last_update=NOW(),value=VALUES(value)
4 insert into xx_gho select * from xx 拷贝数据
获取当前的最大主键和最小主键 然后根据命令行传参 chunk 获取数据 insert到影子表里面
获取最小主键 select `id` from `test`.`b` order by `id` asc limit 1;
获取最大主键 soelect `id` from `test`.`b` order by `id` desc limit 1;
获取第一个 chunk:
select  /* gh-ost `test`.`b` iteration:0 */ `id` from `test`.`b` where ((`id` > _binary'1') or ((`id` = _binary'1'))) and ((`id` < _binary'21') or ((`id` = _binary'21'))) order by `id` asc limit 1 offset 999;

循环插入到目标表:
insert /* gh-ost `test`.`b` */ ignore into `test`.`_b_gho` (`id`, `sid`, `name`, `score`, `x`) (select `id`, `sid`, `name`, `score`, `x` from `test`.`b` force index (`PRIMARY`)  where (((`id` > _binary'1') or ((`id` = _binary'1'))) and ((`id` < _binary'21') or ((`id` = _binary'21')))) lock in share mode;

循环到最大的id,之后依赖binlog 增量同步
需要注意的是
rowcopy过程中是对原表加上 lock in share mode,防止数据在copy的过程中被修改。这点对后续理解整体的数据迁移非常重要。因为gh-ost在copy的过程中不会修改这部分数据记录。对于解析binlog获得的 INSERT ,UPDATE,DELETE事件我们只需要分析copy数据之前log before copy 和copy数据之后 log after copy。整体的数据迁移会在后面做详细分析。
5 增量应用binlog迁移数据
核心代码在 gh-ost/go/sql/builder.go 中,这里主要做DML转换的解释,当然还有其他函数做辅助工作,比如数据库 ,表名校验 以及语法完整性校验。
解析到delete语句 对应转换为delete语句
func BuildDMLDeleteQuery(databaseName, tableName string, tableColumns, uniqueKeyColumns *ColumnList, args []interface{}) (result string, uniqueKeyArgs []interface{}, err error) {
   ....省略代码...
	result = fmt.Sprintf(`
			delete /* gh-ost %s.%s */
				from
					%s.%s
				where
					%s
		`, databaseName, tableName,
		databaseName, tableName,
		equalsComparison,
	)
	return result, uniqueKeyArgs, nil
}
解析到insert语句 对应转换为replace into语句
func BuildDMLInsertQuery(databaseName, tableName string, tableColumns, sharedColumns, mappedSharedColumns *ColumnList, args []interface{}) (result string, sharedArgs []interface{}, err error) {
   ....省略代码...
	result = fmt.Sprintf(`
			replace /* gh-ost %s.%s */ into
				%s.%s
					(%s)
				values
					(%s)
		`, databaseName, tableName,
		databaseName, tableName,
		strings.Join(mappedSharedColumnNames, ", "),
		strings.Join(preparedValues, ", "),
	)
	return result, sharedArgs, nil
}
解析到update语句 对应转换为语句
func BuildDMLUpdateQuery(databaseName, tableName string, tableColumns, sharedColumns, mappedSharedColumns, uniqueKeyColumns *ColumnList, valueArgs, whereArgs []interface{}) (result string, sharedArgs, uniqueKeyArgs []interface{}, err error) {
   ....省略代码...
	result = fmt.Sprintf(`
 			update /* gh-ost %s.%s */
 					%s.%s
				set
					%s
				where
 					%s
 		`, databaseName, tableName,
		databaseName, tableName,
		setClause,
		equalsComparison,
	)
	return result, sharedArgs, uniqueKeyArgs, nil
}
数据迁移的数据一致性分析
gh-ost 做ddl变更期间对原表和影子表的操作有三种:对原表的row copy (我们用A操作代替),业务对原表的DML操作(B),对影子表的apply binlog(C)。而且binlog是基于dml 操作产生的,因此对影子表的apply binlog 一定在 对原表的dml之后,共有如下几种顺序:
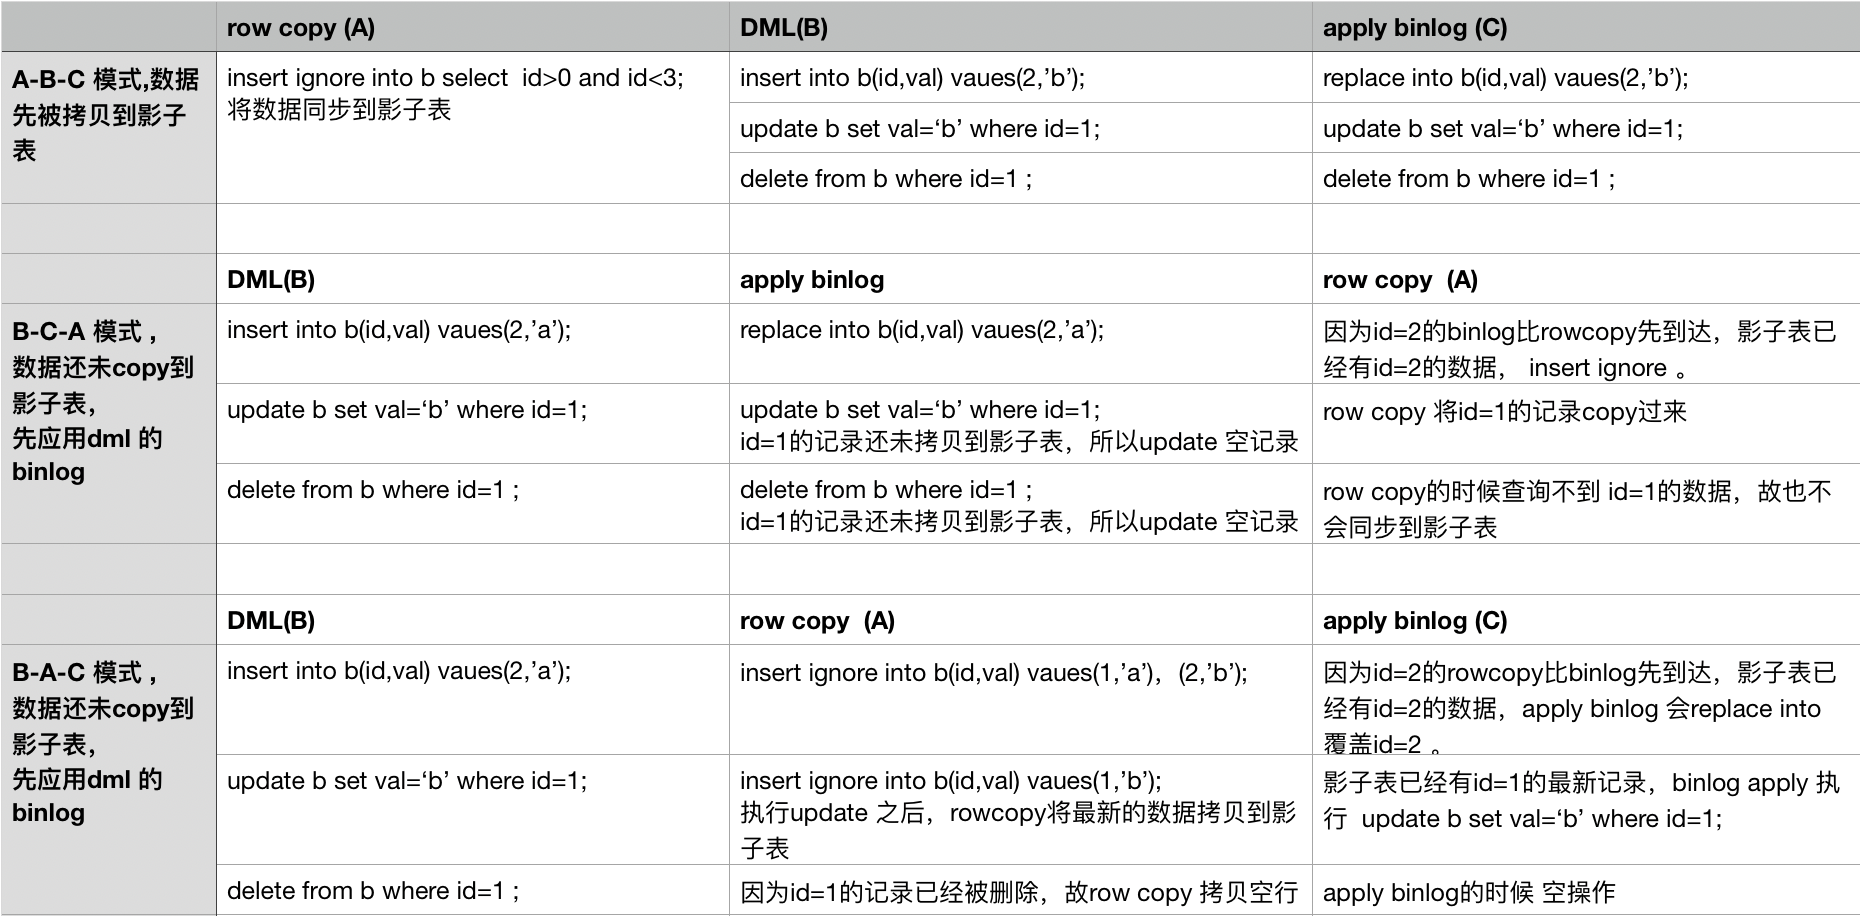
通过上面的几种组合操作的分析,我们可以看到 数据最终是一致的。尤其是当copy 结束之后,只剩下apply binlog,情况更简单。
6 copy完数据之后进行原始表和影子表cut-over 切换
gh-ost的切换是原子性切换,基本是通过两个会话的操作来完成 。作者写了三篇文章解释cut-over操作的思路和切换算法。详细的思路请移步到下面的链接。
http://code.openark.org/blog/mysql/solving-the-non-atomic-table-swap-take-iii-making-it-atomic
http://code.openark.org/blog/mysql/solving-the-non-atomic-table-swap-take-ii
http://code.openark.org/blog/mysql/solving-the-facebook-osc-non-atomic-table-swap-problem
这里将第三篇文章描述核心切换逻辑摘录出来。其原理是基于MySQL 内部机制:被lock table 阻塞之后,执行rename的优先级高于dml,也即先执行rename table ,然后执行dml 。假设gh-ost操作的会话是c10 和c20 ,其他业务的dml请求的会话是c1-c9,c11-c19,c21-c29。
1 会话 c1..c9: 对b表正常执行DML操作。
2 会话 c10 : 创建_b_del 防止提前rename 表,导致数据丢失。
      create /* gh-ost */ table `test`.`_b_del` (
			id int auto_increment primary key
		) engine=InnoDB comment='ghost-cut-over-sentry'

3 会话 c10 执行LOCK TABLES b WRITE, `_b_del` WRITE。
4 会话c11-c19 新进来的dml或者select请求,但是会因为表b上有锁而等待。
5 会话c20:设置锁等待时间并执行rename
	set session lock_wait_timeout:=1
	rename /* gh-ost */ table `test`.`b` to `test`.`_b_20190908220120_del`, `test`.`_b_gho` to `test`.`b`
  c20 的操作因为c10锁表而等待。

6 c21-c29 对于表 b 新进来的请求因为lock table和rename table 而等待。
7 会话c10 通过sql 检查会话c20 在执行rename操作并且在等待mdl锁。
select id
			from information_schema.processlist
			where
				id != connection_id()
				and 17765 in (0, id)
				and state like concat('%', 'metadata lock', '%')
				and info  like concat('%', 'rename', '%')

8 c10 基于步骤7 执行drop table `_b_del` ,删除命令执行完,b表依然不能写。所有的dml请求都被阻塞。

9 c10 执行UNLOCK TABLES; 此时c20的rename命令第一个被执行。而其他会话c1-c9,c11-c19,c21-c29的请求可以操作新的表b。
划重点点(敲黑板)
1 创建
_b_del表是为了防止cut-over提前执行,导致数据丢失。
2 同一个会话先执行write lock之后还是可以drop表的。
3 无论rename table和dml操作谁先执行,被阻塞后rename table总是优先于dml被执行。
大家可以一边自己执行gh-ost ,一边开启general log 查看具体的操作过程。
2019-09-08T22:01:24.086734	17765	create /* gh-ost */ table `test`.`_b_20190908220120_del` (
			id int auto_increment primary key
		) engine=InnoDB comment='ghost-cut-over-sentry'
2019-09-08T22:01:24.091869	17760 Query	lock /* gh-ost */ tables `test`.`b` write, `test`.`_b_20190908220120_del` write
2019-09-08T22:01:24.188687	17765	START TRANSACTION
2019-09-08T22:01:24.188817	17765  	select connection_id()
2019-09-08T22:01:24.188931	17765  	set session lock_wait_timeout:=1
2019-09-08T22:01:24.189046	17765  	rename /* gh-ost */ table `test`.`b` to `test`.`_b_20190908220120_del`, `test`.`_b_gho` to `test`.`b`
2019-09-08T22:01:24.192293+08:00	17766 Connect	root@127.0.0.1 on test using TCP/IP
2019-09-08T22:01:24.192409	17766  	SELECT @@max_allowed_packet
2019-09-08T22:01:24.192487	17766  	SET autocommit=true
2019-09-08T22:01:24.192578	17766  	SET NAMES utf8mb4
2019-09-08T22:01:24.192693	17766  	select id
			from information_schema.processlist
			where
				id != connection_id()
				and 17765 in (0, id)
				and state like concat('%', 'metadata lock', '%')
				and info  like concat('%', 'rename', '%')
2019-09-08T22:01:24.193050	17766 Query	select is_used_lock('gh-ost.17760.lock')
2019-09-08T22:01:24.193194	17760 Query	drop /* gh-ost */ table if exists `test`.`_b_20190908220120_del`
2019-09-08T22:01:24.194858	17760 Query	unlock tables
2019-09-08T22:01:24.194965	17760 Query	ROLLBACK
2019-09-08T22:01:24.197563	17765 Query	ROLLBACK
2019-09-08T22:01:24.197594	17766 Query	show /* gh-ost */ table status from `test` like '_b_20190908220120_del'
2019-09-08T22:01:24.198082	17766 Quit
2019-09-08T22:01:24.298382	17760 Query	drop /* gh-ost */ table if exists `test`.`_b_ghc`
如果cut-over过程的各个环节执行失败会发生什么? 其实除了安全,什么都不会发生。
如果c10的create `_b_del` 失败,gh-ost 程序退出。

如果c10的加锁语句失败,gh-ost 程序退出,因为表还未被锁定,dml请求可以正常进行。

如果c10在c20执行rename之前出现异常

 A. c10持有的锁被释放,查询c1-c9,c11-c19的请求可以立即在b执行。
 B. 因为`_b_del`表存在,c20的rename table b to  `_b_del`会失败。
 C. 整个操作都失败了,但没有什么可怕的事情发生,有些查询被阻止了一段时间,我们需要重试。

如果c10在c20执行rename被阻塞时失败退出,与上述类似,锁释放,则c20执行rename操作因为——b_old表存在而失败,所有请求恢复正常。

如果c20异常失败,gh-ost会捕获不到rename,会话c10继续运行,释放lock,所有请求恢复正常。

如果c10和c20都失败了,没问题:lock被清除,rename锁被清除。 c1-c9,c11-c19,c21-c29可以在b上正常执行。
整个过程对应用程序的影响
应用程序对表的写操作被阻止,直到交换影子表成功或直到操作失败。如果成功,则应用程序继续在新表上进行操作。如果切换失败,应用程序继续继续在原表上进行操作。
对复制的影响
slave因为binlog文件中不会复制lock语句,只能应用rename 语句进行原子操作,对复制无损。
7 处理收尾工作
最后一部分操作其实和具体参数有一定关系。最重要必不可少的是
关闭binlogsyncer连接
至于删除中间表 ,其实和参数有关 --initially-drop-ghost-table --initially-drop-old-table。
三 小结
纵观gh-ost的执行过程,查看源码算法设计, 尤其是cut-over设计思路之精妙,原子操作,任何异常都不会对业务有严重影响。欢迎已经使用过的朋友分享各自遇到的问题,也欢迎还未使用过该工具的朋友大胆尝试。
参考文章
https://www.cnblogs.com/mysql-dba/p/9901589.html
本公众号长期关注于数据库技术以及性能优化,故障案例分析,数据库运维技术知识分享,个人成长和自我管理等主题,欢迎扫码关注。