缓存,两个字经常出现在我们的耳旁,它被用作数据的高性能读写,防止每次都需要进行数据库的读写,减少性能消耗。Spring从3.1版本开始就提供了cache支持,SpringBoot更是提供了spring-boot-starter-cache用于我们快速进行缓存开发,支持多种缓存组件整合:Redis、EhCache、Hazelcast等。接下来我们就以当前最火的Redis来为大家介绍cache的使用。
简介
Spring虽然提供了cache支持,但是它只提供org.springframework.cache.Cache和 org.springframework.cache.CacheManager两个接口做缓存逻辑抽象,不做具体的数据存储,所以我们需要选择一种数据库去存储,这里选择Redis。
cache的核心思想:Spring会去检查缓存方法,若该方法已经被执行过并且已经缓存数据,则下次调用该方法会直接从缓存中获取数据,而不是每次调用都执行处理逻辑。使用缓存,在多次调用结果返回值都一样的情况下,性能特别好,缓解数据库压力,提高响应速度。即使数据库数据发生变化,大家也不用担心,缓存数据也会进行相应更改。至于是如何做到的,先不用深究,我们先来一个示例,展示一下cache如何使用,再来思考为什么。
项目搭建
在这里,我们使用Idea+Maven的方式创建项目,大家应该清楚,就不展示具体步骤了。
项目版本:SpringBoot (2.1.4)
首先,引入redis和cache依赖:
pom.xml:
<!--cache公共依赖-->
<dependency>
<groupId>org.springframework.boot</groupId>
<artifactId>spring-boot-starter-cache</artifactId>
</dependency>
<!--redis依赖-->
<dependency>
<groupId>org.springframework.boot</groupId>
<artifactId>spring-boot-starter-data-redis</artifactId>
</dependency>
<!--redis pool 依赖-->
<dependency>
<groupId>org.apache.commons</groupId>
<artifactId>commons-pool2</artifactId>
<version>2.6.1</version>
</dependency>
-------------------------------------------------------
SpringBoot会根据依赖自动配置redis缓存,我们无需做过多的配置,只需添加如下参数。
application.properties:
#开启redis缓存
spring.cache.type=redis
#redis地址
spring.redis.host=192.168.159.130
#redis cache默认配置 非必须
spring.cache.redis.cache-null-values=true
spring.cache.redis.key-prefix=REDIS_CACHE_
spring.cache.redis.time-to-live=600000
spring.cache.redis.use-key-prefix=true
User:
@Data
@AllArgsConstructor
@NoArgsConstructor
public class User implements Serializable {
private Integer id;
private String name;
private Date birth;
}
UserService:
@Service
public class UserService {
/**
* 第一次,会执行业务逻辑,获取用户数据并缓存到user中
* 第二次,会直接从user缓存中获取数据
* ...
* @param id id
* @return user
*/
@Cacheable(value = "user", key = "#id")
public User findUserById(Integer id) {
System.out.println("查找" + id + "用户并缓存");
return new User(id, "张三", new Date());
}
/**
* 删除user::id的缓存数据
* @param id id
*/
@CacheEvict(value = "user", key = "#id")
public void deleteUserById(Integer id) {
System.out.println("删除" + id + "用户及缓存");
}
/**
* 在修改{id}用户数据之后,更新user::id缓存数据
* @param user 用户
* @return user
*/
@CachePut(value = "user", key = "#user.id")
public User updateUserById(User user) {
System.out.println("更新" + user + "用户并更新缓存");
return user;
}
}
UserController:
@RestController
@RequestMapping("/user")
public class UserController {
@Resource
private UserService userService;
@GetMapping("/{id}")
public User findUserById(@PathVariable Integer id) {
return userService.findUserById(id);
}
@DeleteMapping("/{id}")
public void deleteUserById(@PathVariable Integer id) {
userService.deleteUserById(id);
}
@PutMapping("/{id}/update")
public void updateUserById(@PathVariable Integer id) {
User user = new User(id, "李四", new Date());
userService.updateUserById(user);
}
}
大家可以运行一下上述的代码,若大家发现缓存失败,请在启动类上加上@EnableCaching,用于开启缓存。现在一个简单的用户缓存系统就做好了,大家是不是觉得特别简单,我们都没有做过多的配置,就已经实现了缓存的效果。下面,我们就来逐步分析。
基于注解的缓存
上述UserService中,我们使用了几个注解来支持不同情况下的缓存处理,它们是Spring提供的基于JSR-107 的缓存注解。
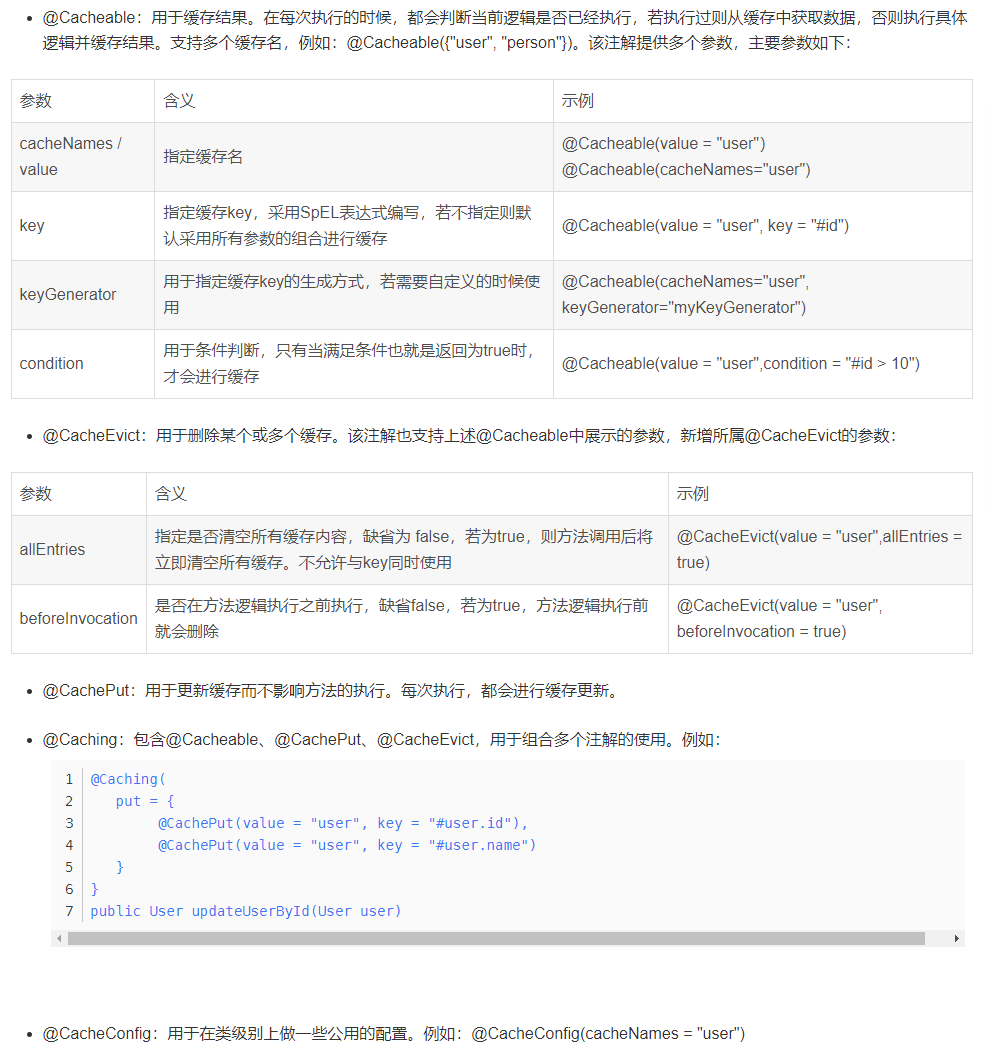
--------------------------------------------
其它:
参考1
与
与
与