本节目录
Axios 是一个基于 promise 的 HTTP 库,可以用在浏览器和 node.js 中,promise是es6里面的用法。
axios能做的事情:官网地址

从浏览器中创建 XMLHttpRequests
从 node.js 创建 http 请求
支持 Promise API
拦截请求和响应
转换请求数据和响应数据
取消请求
自动转换 JSON 数据
客户端支持防御 XSRF
我们先看一下promise对象,看文档。
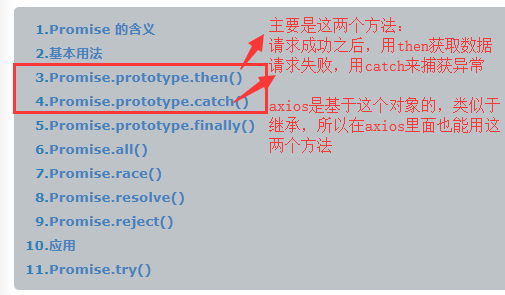
axios是基于promise对象的,axios的用法类似于jQuery的链式用法,就是.then().catch().then().catch()连着用等等,每个方法都相当于给你返回了一个promise对象,接着可以调用这个对象的其他方法
好,那么首先现在安装一下axios,两种方式:
直接下载安装:
$ npm install axios  //在咱们模块化开发的项目中,一定要使用这个来下载

cdn的方式引入:
<script src="https://unpkg.com/axios/dist/axios.min.js"></script>  //这个做简单的演示的时候可以用
其实用法官网写的很详细了,这里你可以去直接看官网,我这里就简单看一下get请求和post请求的使用方法:
get请求的写法:
// 为给定 ID 的 user 创建请求
axios.get('/user?ID=12345') //get方法then方法等都给你返回了一个promise对象,接着可以调用这个对象的方法
  .then(function (response) { //response请求成功接收的数据
    console.log(response);
  })
  .catch(function (error) { //error请求错误捕获的异常
    console.log(error);
  });

// 可选地,上面的请求可以这样做
axios.get('/user', {  //请求的查询参数还可以这样写
    params: {
      ID: 12345
    }
  })
  .then(function (response) {
    console.log(response);
  })
  .catch(function (error) {
    console.log(error);
  });
post请求的写法:
axios.post('/user', { //后面这个大括号里面写请求体里面的请求数据,就是jQuery的ajax里面的data属性
    firstName: 'Fred',
    lastName: 'Flintstone'
  })
  .then(function (response) {
    console.log(response);
  })
  .catch(function (error) {
    console.log(error);
  });
好,接下来在们上篇博客最后通过webpack做的那个项目来演示一下axios的使用,首先在我们的项目目录下执行下载安装axios的指令:
npm install axios -S //为什么要下载项目下呢,因为将来打包项目推送到线上的时候,打包我们的项目,全局的那些环境你是打包不上的,你线上环境里面可能没有我们下载的这些环境或者说工具,所以直接在我们的项目环境中下载,打包的时候一同打包给线上
那么接下来axios这个东西怎么用呢,我们是不是可能在好多个组件中都要发送请求啊,首先看一下我们开发时的结构:
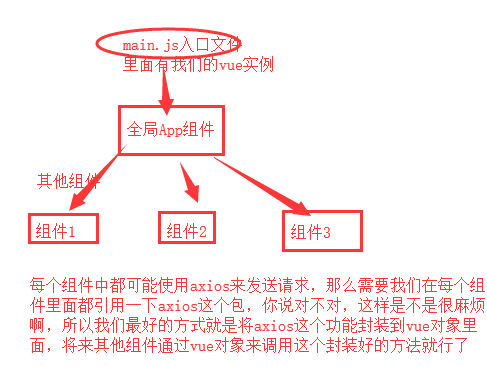
那这个怎么玩呢,原型链技术:
vue对象实例在我们的mian.js里面引用的,那么我们就在main.js里面引入axios,并且封装给vue实例,那么其他组件就能用了(继承),在mian.js里面加上下面两句:
import Axios from 'axios'
Vue.prototype.$http = Axios; //Vue.prototype.名字(这个名字随便起,一般是叫$http或者$https,那么一看就明白,你这是在往后端发送请求)
看mian.js代码:
// The Vue build version to load with the `import` command
// (runtime-only or standalone) has been set in webpack.base.conf with an alias.
import Vue from 'vue'
import App from './App'
import router from './router'

//引入axios,封装axios,注意不用使用Vue.use()昂,人家官网也没说让你用,用use的一般是在vue的基础上封装的一些框架或者模块,但是这个axios不是vue的,是一个新的基于es6的http库,在哪个语言里面都可以用这个库,它是一个独立的内容,vue里面一般不用jQuery的ajax,人间jQuery也是前端的一个框架可以这么说,人家vue也是前端的框架,两者做的事情差不多,人家不想用jQuery的
import Axios from 'axios'
Vue.prototype.$http = Axios; //Vue.prototype.名字(这个名字随便起,一般是叫$http或者$https,那么一看就明白,你这是在往后端发送请求)

import ElementUI from 'element-ui';
import 'element-ui/lib/theme-chalk/index.css';
Vue.use(ElementUI);
import '../static/global/index.css'

Vue.config.productionTip = false

/* eslint-disable no-new */
new Vue({
  el: '#app',
  router,
  components: { App },
  template: '<App/>'
})
然后我们启动我们的项目,执行npm run dev,然后在我们的组件中使用一下axios,我在我们之前创建的那个Course.vue组件中使用了一下,也算是写一下前面布置的那个练习吧,大家看看代码,看看你能看懂不:
<template>
  <!--<div>-->
    <!--这是Course页面-->
  <!--</div>-->

  <div>
    <div class="categorylist">
    <span v-for="(item,index) in categoryList" :key="item.id" :class="{active:currentIndex===index}" @click="clickCategoryHandler(index,item.id)">{{ item.name }}</span>
  </div>

    <div class="course">
      <ul>
        <li v-for="(course,index) in courseList" :key="course.id">
          <h3>{{ course.name }}</h3>  <!-- 这里就拿个name的值演示一下效果 -->
        </li>
      </ul>
    </div>

  </div>

</template>

<script>
export default {
  name: 'Course',
  data(){
    return{
      categoryList:[],//用来接收请求回来的数据,一般都和我们后端返回回来的数据的数据类型对应好,所以我写了个空列表(空数组),那么在使用这个数据属性的地方就变成了你请求回来的数据
      currentIndex:0, //为了让我们上面渲染的第一个span标签有个默认样式
      courseList:[],  //存放免费课程页里面的课程分类标签页对应的数据
      courseId:0,     //用来记录用户点击的哪个课程标签,根据这个id动态的往后端请求数据
    }
  },
  //发送请求获取这个组件的数据,我们随便找个网站,找个数据接口昂,比如这里用的是https://www.luffycity.com/courses这个网址里面的组件的数据接口,我们访问这个网址,你在浏览器调试台的network的地方能看到,它发送了两个请求,一个是请求了这个网址https://www.luffycity.com/api/v1/course_sub/category/list/,一个是请求了这个网址https://www.luffycity.com/api/v1/courses/?sub_category=0&ordering=
  //好,那么我们就通过axios来请求一下这两个接口的数据,自己写一个getCategoryList方法,封装请求逻辑,在created钩子函数中使用一下,直接在created里面写请求逻辑也是可以的,只不过结构不太清晰而已
  //我们发现,我们要请求的这两个url'https://www.luffycity.com/api/v1/courses/?sub_category=0&ordering='和https://www.luffycity.com/api/v1/course_sub/category/list/,你会发现这些url的前面部分https://www.luffycity.com/api/v1/都是一样的,能不能做一个公用的部分存起来啊,省去了很多的代码,好,axios也提供了一个对应的方法defaults.baseURl,怎么用这个东西呢,在我们引入axios的方法配置,也就是在我们的main.js里面配置,看我们的main.js内容
  methods:{
    //获取标题栏的数据
    getCategoryList(){
        // this.$https.get('https://www.luffycity.com/api/v1/course_sub/category/list/'),配置了公用的url,所以我们下面就写这个公用url的后面的部分就可以了
        // var _this = this; 可以先将this保存下来,下面的方法中也可以不写成箭头函数了,直接使用_this变量就是我们的当前组件对象
        this.$https.get('course_sub/category/list/')
          .then((response)=>{  //注意我们写箭头函数,因为写普通函数的话,里面使用this的时候,this指向的当前调用该方法的对象,就是axios,而我们像让this指向定义当前对象的父类,也就是我们的当前组件对象,所以要改变一下this的指向,不用箭头函数也能搞定,把this先保存一下,赋值给一个变量
            // console.log(response);  //响应数据的对象
            // console.log(response.data.data);  //响应回来的数据
            // console.log(response.data.error_no); //响应数据的状态
            if (response.data.error_no === 0){
              this.categoryList = response.data.data;
              let obj = {  //因为我们的免费课程里面的子组件的标签页最前面还有个'全部'功能,所以把它加上
                id:0,
                name:'全部',
                category:0,
                hide:false,
              };
              this.categoryList.unshift(obj);//数组头部追加元素
              //数据删除任意一个指定的元素,按照索引来删除对应元素,splice(2,2,'a')方法还记得吗,三个参数,第一个2是从索引2开始删,第二个2,是删除几个,第三个'a',第三个参数可以不写,就成了单纯的删除操作,是删除元素的地方替换成'a',突然想起来了,就在这里提一嘴
            }
          })
          .catch((error)=>{
            console.log('获取数据失败,错误是:',error);//后端返回的错误
          })

    },
    //获取标题栏中免费课程的标签页列表数据
    getCourseList(){
      // this.$https.get('courses/?sub_category=0&ordering=') 通过this.courseId的值来改变sub_category=0的这个0,来发送动态的请求,获取不同课程标签对应的不同的数据,别忘了用反引号,模板字符串,键盘上tab键上面那个键
      this.$https.get(`courses/?sub_category=${this.courseId}&ordering=`)
        .then((response)=>{
          // console.log(response);
          // console.log(response.data);
          // console.log(response.data.data);
          if (response.data.error_no === 0){
            this.courseList = response.data.data;
          }
        })
        .catch((error)=>{
          console.log('标题栏中免费课程的标签页列表数据获取失败,错误是:',error)
        })
    },


    //点击span标签变css样式的,并且发送另外一个这个标签对应的请求,请求的url是https://www.luffycity.com/api/v1/courses/?sub_category=0&ordering=,这些url的数据是我们点击免费课程那个组件的时候发送的请求,返回给我们的,然后我们渲染到这个我们这里点击的每个span标签的
    clickCategoryHandler(val,course_id){
      this.currentIndex = val;
      this.courseId = course_id; //将用户点击的课程标签的id赋值给我们设置的这个数据属性,将来通过这个数据属性来动态的发送请求,执行下面的方法来发送请求
      this.getCourseList(); //根据用户点击的课程标签传过来的courseid的值来动态获取对应的数据

    }
  },
  //免费课程页面刚加载完就发送了下面的两个请求,拿到了数据,渲染在页面上了,所以我们通过一个created钩子函数搞一下
  created(){
    this.getCategoryList();
    this.getCourseList();
  }
}
</script>

<style scoped>
  span{
    padding: 0 20px;
  }
  span.active{
    color:blue;
  }

</style>
里面涉及到了mian.js文件的一个配置,我把main.js的代码也放到这里吧:
// The Vue build version to load with the `import` command
// (runtime-only or standalone) has been set in webpack.base.conf with an alias.
import Vue from 'vue'
import App from './App'
import router from './router'
import Axios from 'axios'

//看这里,看这里!!!
Vue.prototype.$https = Axios; //Vue.prototype.名字(这个名字随便起,一般是叫$http或者$https,那么一看就明白,你这是在往后端发送请求)
//给Axios设置一个将来发送请求时的公用的url,那么将来通过axios请求网址时,就只需要写这个公用url的后面的部分
Axios.defaults.baseURL = 'https://www.luffycity.com/api/v1/';  //axios官网上有


//引入element-ui
import ElementUI from 'element-ui';
//引入element-ui的css样式,这个需要单独引入
import 'element-ui/lib/theme-chalk/index.css';
//给Vue添加一下这个工具
Vue.use(ElementUI);
import '../static/global/index.css'

Vue.config.productionTip = false

/* eslint-disable no-new */
new Vue({
  el: '#app',
  router,
  components: { App },
  template: '<App/>'
})
vuex官网地址:https://vuex.vuejs.org/zh/guide/
vuex是什么呢?官方说法是这样的:Vuex 是一个专为 Vue.js 应用程序开发的状态管理模式。它采用集中式存储管理应用的所有组件的状态,并以相应的规则保证状态以一种可预测的方式发生变化。
其实vuex简单来讲就是一个临时数据仓库,能够帮我们保存各个组件中的数据,也就是每个组件都能使用这个仓库里面的数据,只要修改了数据仓库里面的数据,使用了仓库中这个数据的组件中的这个数据都会跟着变化,非常适合各组件的一个传值,之前我们使用组件之间的传值都是用的父子组件传值或者平行组件传值的方式,这个vuex帮我们做了一个更方便的数据仓库来实现组件传值和各组件的数据共享,但是小型项目一般用它比较合适,大型项目还是用组件传值的方式,因为这个仓库对于大型项目来讲,比较笨重,共享数据量太大了也会对页面性能有所影响,所以我们今天学的这个vuex不是说必须要用的,还是看需求和业务场景的。
来看一个图:
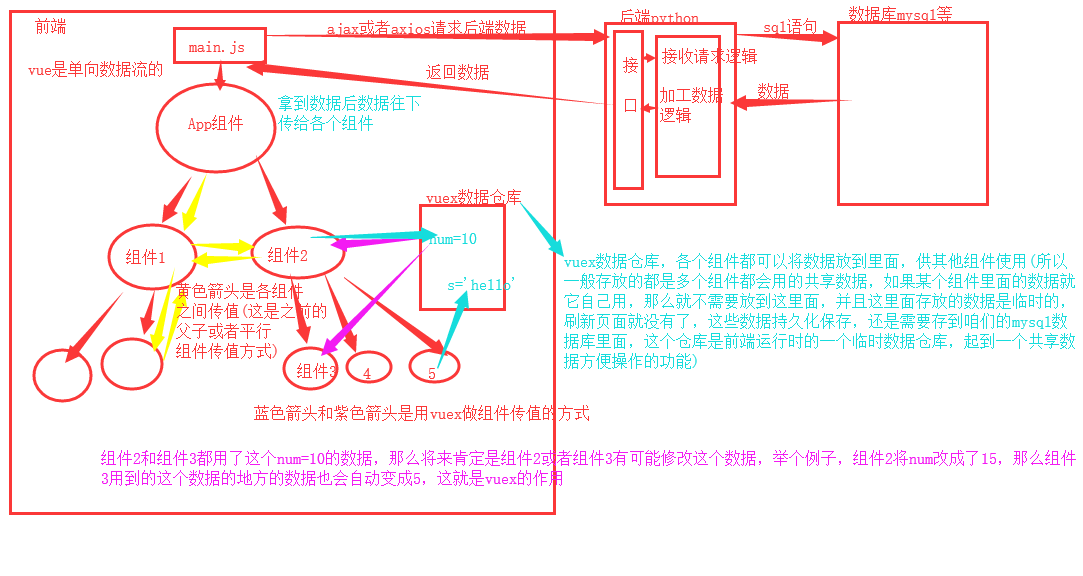
通过上面这个图我相信大家应该很清楚vuex是做什么的,好,既然涉及到组件往里面存值、取值、修改值的操作,那么我们就来看看怎么完成这些操作。
vuex就相当于一个仓库(store),首先我们说一下vuex的五大悍将:
state:状态,也就是共享数据
mutations:更改 Vuex 的 store 中的状态的唯一方法是提交 mutation。Vuex 中的 mutation 非常类似于事件:每个 mutation 都有一个字符串的 事件类型 (type) 和 一个 回调函数 (handler)。这个回调函数就是我们实际进行状态更改的地方,并且它会接受 state 作为第一个参数,但是所有修改数据的操作通过mutations都是同步(串行)操作,目的应该是为了保证数据安全,大家应该能够发现,多个组件可能都会执行修改一个共享数据的操作(异步操作,定时器,ajax都是异步的),那么异步操作共享数据,就容易出现数据混乱的问题,所以凡是通过mutations的数据操作都变成了同步状态。
actions:Action 类似于 mutation,不同在于:Action 提交的是 mutation,也就是提交的是mutations中的函数(方法),而不是直接变更状态(共享数据)。Action 可以包含任意异步操作,也就是说异步操作可以同时提交给actions,通过dispatch方法,但是action提交数据的操作必须经过mutations,通过commit方法提交给mutations,又变成了同步,为了数据安全可靠不混乱。也就是说操作数据的方式有两个: 1.操作数据--> commit -->mutations(同步) 2.操作数据--> dispatch -->actions(异步)--> commit -->mutations(同步),如果将异步任务直接交给mutations,就会出现数据混乱不可靠的问题。
getters:相当于store的计算属性
modules:模块
getters和modules不常用,我们后面的项目也用不到,所以这里就不做详细的解释了,我们只要学习前三个悍将(state、mutations、actions),这些悍将都是写在我们创建的store对象里面的属性,具体他们几个怎么搞,先看图:

首先下载安装,项目目录下在终端执行一下下面的指令:
npm i vuex -S
由于vuex这个仓库所有的组件都要使用,所以我们需要将它挂载到我们的全局vue实例里面,vue实例我们是在main.js里面引入并创建的,所以我们看main.js代码如下:
// The Vue build version to load with the `import` command
// (runtime-only or standalone) has been set in webpack.base.conf with an alias.
import Vue from 'vue'
import App from './App'
import router from './router'
import Axios from 'axios'
Vue.prototype.$https = Axios;
Axios.defaults.baseURL = 'https://www.luffycity.com/api/v1/';
import ElementUI from 'element-ui';
import 'element-ui/lib/theme-chalk/index.css';
Vue.use(ElementUI);
import '../static/global/index.css'
Vue.config.productionTip = false;

//引入vuex
import Vuex from 'vuex'
Vue.use(Vuex); //必须use一下
//创建vuex的store实例,这个实例就是我们的vuex仓库
const store = new Vuex.Store({
  //这里面使用vuex的五大悍将
  state:{
    num:1, //state状态有个num=1,也就是有个共享数据num=1,组件中使用它
  },
  mutations:{
    //mutations里面的函数第一个参数就是上面这个state属性,其他的参数是调用这个这函数时给传的参数
    setNum(state,val){
      // console.log(val);
      state.num += val;
    },
  },
 //此时还没有用到actions异步提交仓库的一些数据操作的任务
  actions:{
  }
});

/* eslint-disable no-new */
new Vue({
  el: '#app',
  router,
  store, // 必须将创建的vuex.Store对象挂载到vue实例中,那么相当于给我们的vue对象添加了一个$store属性,将来组件中通过this.$store就能调用这个对象,this虽然是组件对象,但是组件对象都是相当于继承了vue对象,还记得router吗,使用router的时候有两个对象,通过vue对象调用,this.$router,this.$route,和它类似的用法
  components: { App },
  template: '<App/>'
});
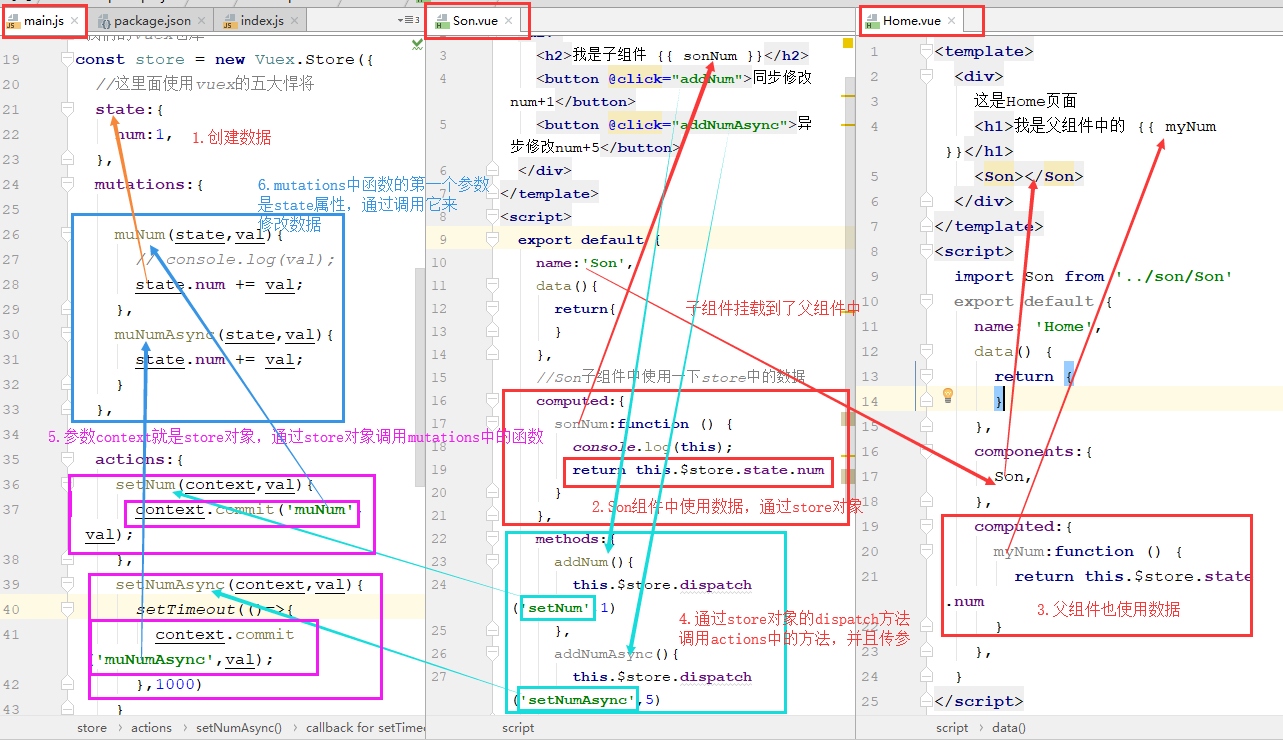
然后我们创建两个组件,一个叫做Home.vue,一个叫做Son.vue,这个Son组件是Home组件的子组件,我们就玩一下这两个组件对vuex仓库的一个共享数据的一系列操作,下面完成了组件从仓库中取值(必须通过组件的计算属性完成这个事情),还有通过mutations来完成的一个同步方式修改数据的操作,看代码:
Home.vue文件的代码如下:
<template>
  <div>
    这是Home页面
    <h1>我是父组件中的 {{ myNum }}</h1>
    <Son></Son>
  </div>
</template>
<script>
  //引入子组件
  import Son from '../son/Son'
  export default {
    name: 'Home',
    data() {
      return {
      }
    },
    //挂载Son子组件
    components:{
      Son,
    },
    //组件中想操作store中的数据,必须通过计算属性来监听vuex的store中的state里面的数据,组件中才能获取到并使用store中的这个数据
    computed:{
      //在模板语法中使用{{ myNum }},就能用myNum对应函数里面的返回值
      myNum:function () {
        // console.log(this);//还记得这个this指的是谁吗,就是当前的组件对象,组件是不是都相当于继承于我们的vue对象,而store又挂载到了我们的vue实例上,那么通过组件对象.$store就能获得咱们的vuex仓库store
        return this.$store.state.num  //获取到我们store中的state里面的数据
      }
    },
  }
</script>

<style>
</style>
Son.vue文件代码如下:我们在子组件中来个button按钮,点击一下这个按钮,就给store仓库中的数据num加1,然后Home组件中使用了这个num地方的num值也自动跟着发生改变,实现了一个父子组件传值的效果。
<template>
  <div>
    <h2>我是子组件 {{ sonNum }}</h2>
    <button @click="addNum">同步修改num+1</button>
  </div>
</template>
<script>
  export default {
    name:'Son',
    data(){
      return{
      }
    },
    //Son子组件中使用一下store中的数据
    computed:{
      sonNum:function () {
        console.log(this);
        return this.$store.state.num
      }
    },
    methods:{
      //给button绑定了一个点击事件,这个事件做的事情是点击一下,给store中的state中的num + 1
      addNum(){
        //不能直接修改store中的数据,这是vuex限定死的,必须通过mutations里面的方法来修改
        this.$store.commit('setNum',1) //注意,commit里面的第一个参数是我们在vuex的store对象中的mutations里面定义的方法,第二个参数1就是要传给mutations中的setNum函数的数据,也就是第二个参数val
      },

    }
  }

</script>

<style></style>
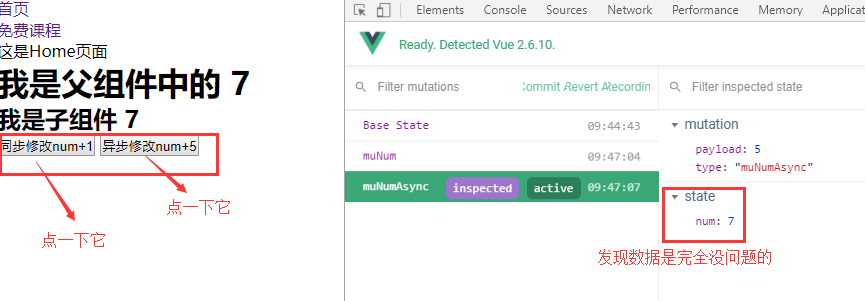
然后我们看页面效果:

这就是我们直接通过mutations中的函数完成的一个同步修改数据的操作,
下面我们再来一个通过mutations中的函数完成做一个异步修改数据的操作,看一下上面说的会造成数据不可靠的问题的效果:
首先看main.js的内容如下:
// The Vue build version to load with the `import` command
// (runtime-only or standalone) has been set in webpack.base.conf with an alias.
import Vue from 'vue'
import App from './App'
import router from './router'
import Axios from 'axios'
Vue.prototype.$https = Axios;
Axios.defaults.baseURL = 'https://www.luffycity.com/api/v1/';
import ElementUI from 'element-ui';
import 'element-ui/lib/theme-chalk/index.css';
Vue.use(ElementUI);
import '../static/global/index.css'
Vue.config.productionTip = false;

//引入vuex
import Vuex from 'vuex'
Vue.use(Vuex); //必须use一下
//创建vuex的store实例,这个实例就是我们的vuex仓库
const store = new Vuex.Store({
  //这里面使用vuex的五大悍将
  state:{
    num:1, //state状态有个num=1,也就是有个共享数据num=1,组件中使用它
  },
  mutations:{//异步数据操作要执行的对应的mutations中的函数
    setNumAsync(state,val){
      setTimeout(()=>{  //还记得吗,定时器是个异步任务,你页面随便操作,它自己玩自己的
        state.num += val;
      },1000)
    }
  },

  actions:{

  }
});

/* eslint-disable no-new */
new Vue({
  el: '#app',
  router,
  store, // 必须将创建的vuex.Store对象挂载到vue实例中,那么相当于给我们的vue对象添加了一个$store属性,将来组件中通过this.$store就能调用这个对象,this虽然是组件对象,但是组件对象都是相当于继承了vue对象,还记得router吗,使用router的时候有两个对象,通过vue对象调用,this.$router,this.$route,和它类似的用法
  components: { App },
  template: '<App/>'
});
Home.vue中的代码没有变化,还是之前的代码,不用改,所以我们直接看Son.vue文件中的代码如下:
<template>
  <div>
    <h2>我是子组件 {{ sonNum }}</h2>

    <button @click="addNumAsync">异步修改num+5</button>
  </div>
</template>
<script>
  // <button @click="addNum">同步修改num+1</button>
  export default {
    name:'Son',
    data(){
      return{
      }
    },
    //Son子组件中使用一下store中的数据
    computed:{
      sonNum:function () {
        console.log(this);
        return this.$store.state.num
      }
    },
    methods:{
      //给button绑定了一个点击事件,这个事件做的事情是点击一下,给store中的state中的num + 1
      addNum(){
        //不能直接修改store中的数据,这是vuex限定死的,必须通过mutations里面的方法来修改
        this.$store.commit('setNum',1) //注意,commit里面的第一个参数是我们在vuex的store对象中的mutations里面定义的方法,第二个参数1就是要传给mutations中的setNum函数的数据,也就是第二个参数val
      },
      //异步提交数据加1操作
      addNumAsync(){
        this.$store.commit('setNum',5) //每次都加5
      }
    }
  }

</script>

<style></style>
效果如下:

所以,我们提交异步任务操作数据的时候,必须遵循人家vuex说的,异步的任务先提交给actions,再有actions提交给mutations,那么将来,同步的数据操作,我们也是先给actions,再给mutations,在mutations中进行数据操作,看代码,将异步和同步操作放到actions中:
mian.js文件代码如下:
// The Vue build version to load with the `import` command
// (runtime-only or standalone) has been set in webpack.base.conf with an alias.
import Vue from 'vue'
import App from './App'
import router from './router'
import Axios from 'axios'
Vue.prototype.$https = Axios;
Axios.defaults.baseURL = 'https://www.luffycity.com/api/v1/';
import ElementUI from 'element-ui';
import 'element-ui/lib/theme-chalk/index.css';
Vue.use(ElementUI);
import '../static/global/index.css'
Vue.config.productionTip = false;

//引入vuex
import Vuex from 'vuex'
Vue.use(Vuex); //必须use一下
//创建vuex的store实例,这个实例就是我们的vuex仓库
const store = new Vuex.Store({
  //这里面使用vuex的五大悍将
  state:{
    num:1, //state状态有个num=1,也就是有个共享数据num=1,组件中使用它
  },
  mutations:{
    //mutations里面的函数第一个参数就是上面这个state属性,其他的参数是调用这个这函数时给传的参数
    // setNum(state,val){
    //   // console.log(val);
    //   state.num += val;
    // },
    muNum(state,val){
      // console.log(val);
      state.num += val;
    },
    //在actions中调用这个方法,还是mutations中这个方法来进行数据操作
    muNumAsync(state,val){
      state.num += val;
    }
  },

  actions:{
    //同步数据操作,我们也通过actions来提交给mutations
    setNum(context,val){
      context.commit('muNum',val);
    },
    //异步数据操作要执行的对应的actions中的函数,actions中的函数在调用mutations中的函数,actions中的函数的第一个参数是我们的store对象
    setNumAsync(context,val){
      setTimeout(()=>{  //还记得吗,定时器是个异步任务,你页面随便操作,它自己玩自己的
        context.commit('muNumAsync',val);
      },1000)
    }
  }

});

/* eslint-disable no-new */
new Vue({
  el: '#app',
  router,
  store,
  components: { App },
  template: '<App/>'
});
Home.vue组件没有改动,所以我只把改动的Son.vue组件的代码拿出来了,看代码:
<template>
  <div>
    <h2>我是子组件 {{ sonNum }}</h2>
    <button @click="addNum">同步修改num+1</button>
    <button @click="addNumAsync">异步修改num+5</button>
  </div>
</template>
<script>
  // <button @click="addNum">同步修改num+1</button>
  export default {
    name:'Son',
    data(){
      return{
      }
    },
    //Son子组件中使用一下store中的数据
    computed:{
      sonNum:function () {
        console.log(this);
        return this.$store.state.num
      }
    },
    methods:{
      //给button绑定了一个点击事件,这个事件做的事情是点击一下,给store中的state中的num + 1
      addNum(){
        //同步的数据操作,也通过dispatch方法调用actions中的函数,将数据操作提交给actions中的函数
        this.$store.dispatch('setNum',1)
      },
      //异步提交数据加1操作
      addNumAsync(){
        //为了必须通过actions来提交数据操作,这里面我们就不能直接commit了,而是用dispatch方法调用actions中的函数,将数据操作提交给actions中的函数
        // this.$store.commit('setNum',5)
        this.$store.dispatch('setNumAsync',5) //每次都加5,setNumAsync是actions中的函数
      }
    }
  }

</script>

<style></style>
然后看页面效果:
然后看一下上面代码的逻辑图:
vuex用起来比较麻烦,但是对于组件传值来说方便了一些,哈哈,也没太大感觉昂,没关系,用熟练了就好了,现在再回去看一下vuex的那个图,应该就清晰了。好,这就是我们讲到的vuex仓库store,我们使用vuex来搞一搞异步操作,完成的事情就是点击对应课程,展示课程详细信息:
先看目录结构:

然后我们直接上代码了
Coures.vue代码如下:
<template>
<!--<div>-->
<!--这是Course页面-->
<!--</div>-->
<div>
<div class="categorylist">
<span v-for="(item,index) in categoryList" :key="item.id" :class="{active:currentIndex===index}" @click="clickCategoryHandler(index,item.id)">{{ item.name }}</span>
</div>
<div class="course">
<ul>
<li v-for="(course,index) in courseList" :key="course.id">
<h3 @click="showDetail(course.id)">{{ course.name }}</h3> <!-- 点击它,跳转到对应课程的详情数据页面 -->
</li>
</ul>
</div>
</div>
</template>
<script>
export default {
name: 'Course',
data(){
return{
categoryList:[],//用来接收请求回来的数据,一般都和我们后端返回回来的数据的数据类型对应好,所以我写了个空列表(空数组),那么在使用这个数据属性的地方就变成了你请求回来的数据
currentIndex:0, //为了让我们上面渲染的第一个span标签有个默认样式
courseList:[], //存放免费课程页里面的课程分类标签页对应的数据
courseId:0, //用来记录用户点击的哪个课程标签,根据这个id动态的往后端请求数据
}
},
methods:{
getCategoryList(){
this.$https.get('course_sub/category/list/')
.then((response)=>{
if (response.data.error_no === 0){
this.categoryList = response.data.data;
let obj = {
id:0,
name:'全部',
category:0,
hide:false,
};
this.categoryList.unshift(obj);//数组头部追加元素
}
})
.catch((error)=>{
console.log('获取数据失败,错误是:',error);//后端返回的错误
})
},
//获取标题栏中免费课程的标签页列表数据
getCourseList(){
this.$https.get(`courses/?sub_category=${this.courseId}&ordering=`)
.then((response)=>{
if (response.data.error_no === 0){
this.courseList = response.data.data;
}
})
.catch((error)=>{
console.log('标题栏中免费课程的标签页列表数据获取失败,错误是:',error)
})
},
//点击span变色,获取对应的数据
clickCategoryHandler(val,course_id){
this.currentIndex = val;
this.courseId = course_id;
this.getCourseList();
},
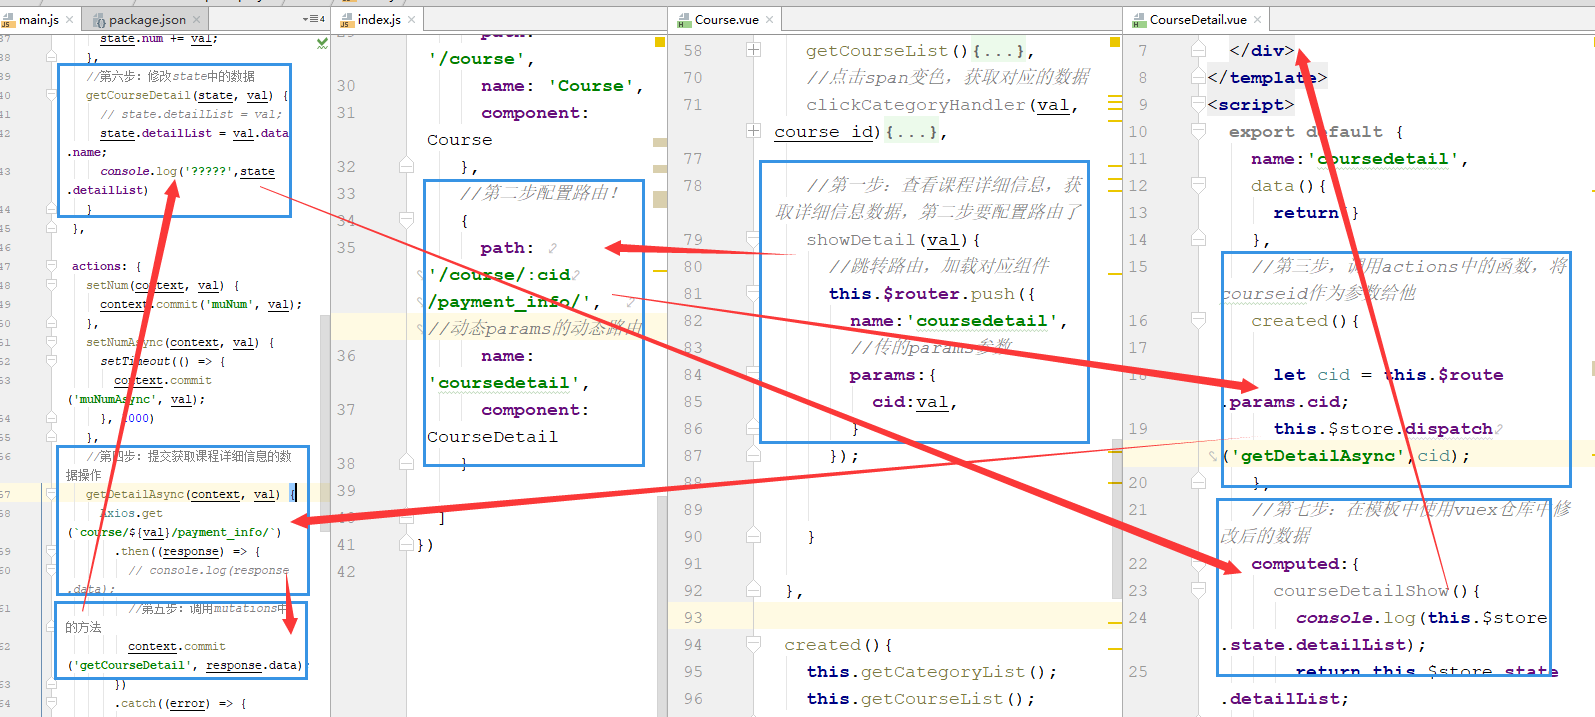
//第一步:查看课程详细信息,获取详细信息数据,第二步要配置路由了
showDetail(val){
//跳转路由,加载对应组件
this.$router.push({
name:'coursedetail',
//传的params参数
params:{
cid:val,
}
});
}
},
created(){
this.getCategoryList();
this.getCourseList();
}
}
</script>
<style scoped>
span{
padding: 0 20px;
}
span.active{
color:blue;
}
</style>
路由配置信息index.js文件代码如下:
import Vue from 'vue'
import Router from 'vue-router'
// import HelloWorld from '@/components/HelloWorld' //@还记得吗,表示src文件夹的根路径
//引入组件
import Course from '@/components/Course/Course'
import Home from '@/components/Home/Home'
import CourseDetail from '@/components/CourseDetail/CourseDetail'
// console.log(Course);
//给Vue添加vue-router功能,使用别人提供的功能都要用Vue来use一下
Vue.use(Router)

//创建路由对象
export default new Router({
  mode:'history', //去掉浏览器地址栏的#号
  //配置路由信息
  routes: [

    {
      path: '/',
      // redirect:'Home' //直接跳转Home名字对应的path路径上
      redirect:'/home'
    },
    {
      path: '/home',
      name: 'Home',
      component: Home
    },
    {
      path: '/course',
      name: 'Course',
      component: Course
    },
    //第二步配置路由!
    {
      path: '/course/:cid/payment_info/',  //动态params的动态路由
      name: 'coursedetail',
      component: CourseDetail
    }

  ]
})
课程详细信息插件CoureDetail.vue文件代码如下:
<template>
  <div>
    我是课程详情组件
    <h3>
      {{ courseDetailShow }}  <!-- 简单展示了详细信息数据中的一个name数据 -->
    </h3>
  </div>
</template>
<script>
  export default {
    name:'coursedetail',
    data(){
      return{}
    },
    //第三步,调用actions中的函数,将courseid作为参数给他
    created(){

      let cid = this.$route.params.cid;
      this.$store.dispatch('getDetailAsync',cid);
    },
    //第七步:在模板中使用vuex仓库中修改后的数据
    computed:{
      courseDetailShow(){
        console.log(this.$store.state.detailList);
        return this.$store.state.detailList;
      }
    }
  }

</script>
<style></style>
mian.js代码如下:
// The Vue build version to load with the `import` command
// (runtime-only or standalone) has been set in webpack.base.conf with an alias.
import Vue from 'vue'
import App from './App'
import router from './router'
import Axios from 'axios'

Vue.prototype.$https = Axios;
Axios.defaults.baseURL = 'https://www.luffycity.com/api/v1/';

import ElementUI from 'element-ui';
import 'element-ui/lib/theme-chalk/index.css';

Vue.use(ElementUI);
import '../static/global/index.css'

Vue.config.productionTip = false;

//引入vuex
import Vuex from 'vuex'

Vue.use(Vuex); //必须use一下
//创建vuex的store实例,这个实例就是我们的vuex仓库
const store = new Vuex.Store({
  //这里面使用vuex的五大悍将
  state: {
    num: 1,
    detailList:''
  },
  mutations: {

    muNum(state, val) {
      // console.log(val);
      state.num += val;
    },
    muNumAsync(state, val) {
      state.num += val;
    },
    //第六步:修改state中的数据
    getCourseDetail(state, val) {
      // state.detailList = val;
      state.detailList = val.data.name; //这里我只是简单的获取了一下详情信息中的name属性的数据
      console.log('?????',state.detailList)
    }
  },

  actions: {
    setNum(context, val) {
      context.commit('muNum', val);
    },
    setNumAsync(context, val) {
      setTimeout(() => {
        context.commit('muNumAsync', val);
      }, 1000)
    },
    //第四步:提交获取课程详细信息的数据操作
    getDetailAsync(context, val) {
      Axios.get(`course/${val}/payment_info/`)
        .then((response) => {
          // console.log(response.data);
          //第五步:调用mutations中的方法
          context.commit('getCourseDetail', response.data);
        })
        .catch((error) => {
          console.log(error);
        });

    }
  }


});

/* eslint-disable no-new */
new Vue({
  el: '#app',
  router,
  store, // 必须将创建的vuex.Store对象挂载到vue实例中,那么相当于给我们的vue对象添加了一个$store属性,将来组件中通过this.$store就能调用这个对象,this虽然是组件对象,但是组件对象都是相当于继承了vue对象,还记得router吗,使用router的时候有两个对象,通过vue对象调用,this.$router,this.$route,和它类似的用法
  components: {App},
  template: '<App/>'
});
代码流程图如下:
再补充一点:
将Home组件组成全局组件,在main.js中做,看main.js内容:
// The Vue build version to load with the `import` command
// (runtime-only or standalone) has been set in webpack.base.conf with an alias.
import Vue from 'vue'
import App from './App'
import router from './router'
import Axios from 'axios'

Vue.prototype.$https = Axios;
Axios.defaults.baseURL = 'https://www.luffycity.com/api/v1/';

import ElementUI from 'element-ui';
import 'element-ui/lib/theme-chalk/index.css';

Vue.use(ElementUI);
import '../static/global/index.css'

Vue.config.productionTip = false;

//引入vuex
import Vuex from 'vuex'

//将Home组件做成全局组件的方法,看这里看这里!!!!
import Home from './components/Home/Home'
Vue.component(Home.name,Home);


Vue.use(Vuex); //必须use一下
//创建vuex的store实例,这个实例就是我们的vuex仓库
const store = new Vuex.Store({
  //这里面使用vuex的五大悍将
  state: {
    num: 1,
    detailList:''
  },
  mutations: {

    muNum(state, val) {
      // console.log(val);
      state.num += val;
    },
    muNumAsync(state, val) {
      state.num += val;
    },
    //第六步:修改state中的数据
    getCourseDetail(state, val) {
      // state.detailList = val;
      state.detailList = val.data.name;
      console.log('?????',state.detailList)
    }
  },

  actions: {
    setNum(context, val) {
      context.commit('muNum', val);
    },
    setNumAsync(context, val) {
      setTimeout(() => {
        context.commit('muNumAsync', val);
      }, 1000)
    },
    //第四步:提交获取课程详细信息的数据操作
    getDetailAsync(context, val) {
      Axios.get(`course/${val}/payment_info/`)
        .then((response) => {
          // console.log(response.data);
          //第五步:调用mutations中的方法
          context.commit('getCourseDetail', response.data);
        })
        .catch((error) => {
          console.log(error);
        });

    }
  }


});

/* eslint-disable no-new */
new Vue({
  el: '#app',
  router,
  store, // 必须将创建的vuex.Store对象挂载到vue实例中,那么相当于给我们的vue对象添加了一个$store属性,将来组件中通过this.$store就能调用这个对象,this虽然是组件对象,但是组件对象都是相当于继承了vue对象,还记得router吗,使用router的时候有两个对象,通过vue对象调用,this.$router,this.$route,和它类似的用法
  components: {App},
  template: '<App/>'
});
在Course.vue组件中使用这个组件
<template>
  <!--<div>-->
    <!--这是Course页面-->
  <!--</div>-->

  <div>
    <div class="categorylist">
    <span v-for="(item,index) in categoryList" :key="item.id" :class="{active:currentIndex===index}" @click="clickCategoryHandler(index,item.id)">{{ item.name }}</span>
  </div>

    <div class="course">
      <ul>
        <li v-for="(course,index) in courseList" :key="course.id">
          <h3 @click="showDetail(course.id)">{{ course.name }}</h3>  <!-- 点击它,跳转到对应课程的详情数据页面 -->
        </li>
      </ul>
    </div>
    <div>  <!-- 看这里看这里,全局组件不需要挂载,直接在template中使用 -->
      <Home></Home>
    </div>
  </div>

</template>

<script>
export default {
  name: 'Course',
  data(){
    return{
      categoryList:[],//用来接收请求回来的数据,一般都和我们后端返回回来的数据的数据类型对应好,所以我写了个空列表(空数组),那么在使用这个数据属性的地方就变成了你请求回来的数据
      currentIndex:0, //为了让我们上面渲染的第一个span标签有个默认样式
      courseList:[],  //存放免费课程页里面的课程分类标签页对应的数据
      courseId:0,     //用来记录用户点击的哪个课程标签,根据这个id动态的往后端请求数据
    }
  },

  methods:{
    getCategoryList(){

        this.$https.get('course_sub/category/list/')
          .then((response)=>{
            if (response.data.error_no === 0){
              this.categoryList = response.data.data;
              let obj = {
                id:0,
                name:'全部',
                category:0,
                hide:false,
              };
              this.categoryList.unshift(obj);//数组头部追加元素

            }
          })
          .catch((error)=>{
            console.log('获取数据失败,错误是:',error);//后端返回的错误
          })

    },
    //获取标题栏中免费课程的标签页列表数据
    getCourseList(){
      this.$https.get(`courses/?sub_category=${this.courseId}&ordering=`)
        .then((response)=>{

          if (response.data.error_no === 0){
            this.courseList = response.data.data;
          }
        })
        .catch((error)=>{
          console.log('标题栏中免费课程的标签页列表数据获取失败,错误是:',error)
        })
    },
    //点击span变色,获取对应的数据
    clickCategoryHandler(val,course_id){
      this.currentIndex = val;
      this.courseId = course_id;
      this.getCourseList();

    },

    //第一步:查看课程详细信息,获取详细信息数据,第二步要配置路由了
    showDetail(val){
      //跳转路由,加载对应组件
      this.$router.push({
        name:'coursedetail',
        //传的params参数
        params:{
          cid:val,
        }
      });


    }

  },

  created(){
    this.getCategoryList();
    this.getCourseList();
  }
}
</script>

<style scoped>
  span{
    padding: 0 20px;
  }
  span.active{
    color:blue;
  }

</style>
最后给大家说一些做单页面应用的问题:
通过vue这种框架做的单页面应用,如果没有做vue服务器渲染(类似于django的模板渲染),SEO很难搜索到你的网站,爬虫也不能直接在你的页面上爬出数据,但是即便是单页面应用,前端页面的数据不是前端写死的,就是从接口获取的,我们找接口就行了,接口的数据不能完全满足你,你在爬页面上的。
那SEO问题怎么办,nodejs服务器(前端做),,或者后端服务器配合渲染,前端和后端都要做vue,相互渲染来完成页面解析,让SEO能搜索到你所有的页面,有缺陷,如果在公司写这种单页面应用,一定要注意SEO的问题,那有这么多问题,怎么还用单页应用啊,单页应用可以提高用户体验,防止白屏现象,页面更好维护。
那么SEO是什么呢,我找了一些资料给大家,看看就明白了,页面越多,百度收录的机会越大
 收录和索引的区别
解决SEO的大概思路,看图:

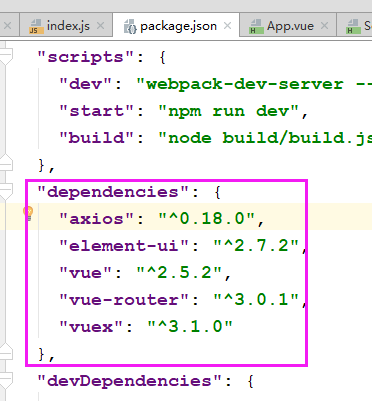
还有一点跟大家说一下,以后我们通过脚手架的webpack模块创建完项目之后,下面这几个必须要有,没有的自己npm安装一下:
直接看代码吧:
main.js代码如下:
// The Vue build version to load with the `import` command
// (runtime-only or standalone) has been set in webpack.base.conf with an alias.
import Vue from 'vue'
import App from './App'
import router from './router'

Vue.config.productionTip = false;

//平行组件传值,通过bus对象,然后我们将bus对象挂载到Vue对象上,那么其他组件通过this.$bus就能用这个公交车对象了
let bus = new Vue();
Vue.prototype.$bus = bus;

/* eslint-disable no-new */
new Vue({
  el: '#app',
  router,
  components: { App },
  template: '<App/>'
});
App.vue组件代码如下:
<template>
  <div id="app">

    <router-view/>
  </div>
</template>

<script>
export default {
  name: 'App'
}
</script>

<style>

</style>
Home.vue组件代码如下:
<template>
  <div>
    我是Home组件
    <!--<Son title="Jaden"></Son> 传静态数据给子组件 -->
    <Son :title="title" :msg="msg" @handler="handlerClick"></Son> <!-- 传动态数据给子组件 -->
    <button @click="busHandler">通过bus对象传值</button>
  </div>
</template>
<script>
  import Son from './Son'
  export default {
    name:'Home',
    data(){
      return{
        title:'test1',
        msg:'test2',
      }
    },
    components:{
      Son,
    },
    methods:{
      handlerClick(val){
        this.msg = val;
      },
      //平行组件传值
      busHandler(){
        this.$bus.$emit('homeClick',2);
      },
    }

  }

</script>
<style></style>
Son.vue组件代码如下,Son.vue组件是Home组件的父级组件,我们除了做了父子、子父组件传值外还做了平行组件传值,都在这几个文件的代码里面了
<template>
  <div>
    我是Son组件 {{ msg }} -- {{ title }} -- {{ number }}
  </div>
</template>
<script>
  export default {
    name:'Son',
    data(){
      return{
        number:0,
      }
    },
    props:['msg','title'],
    created(){
      this.$emit('handler',1);
      this.$bus.$on('homeClick',(val)=>{
        this.number = val;
      })
    }

  }

</script>
<style></style>
router路由配置信息的index.js内容如下:
import Vue from 'vue'
import Router from 'vue-router'
import Home from '@/components/Home/Home'

Vue.use(Router);

export default new Router({
  mode:'history',
  routes: [
    {
      path: '/',
      redirect:{name:'Home'}
    },
    {
      path: '/',
      name: 'Home',
      component: Home
    }
  ]
})