我们知道,界面布局可以用Storyboard或Xib结合Autolayout实现,如果用纯代码布局,比较热门的有Masonry、SDAutoLayout,下面的简单demo,采用纯代码布局,实现不定高tableview。
实现方式:Masonry + FDTemplateLayoutCell
先上图:
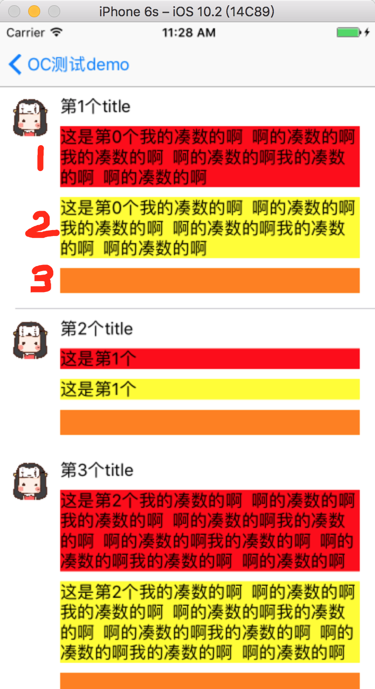
其中:1和2都是UILabel,内容不固定,所以高度也不固定,3是view,可用作点赞和评论或其他用途。
话不多说,上代码:
1、准备工作
pods集成:
pod 'UITableView+FDTemplateLayoutCell'
pod 'Masonry'
2、新建cell,由于头像我用的网络图片,要事先集成一下SDWebImage
#import "FDTMasoryCell.h"
#import "Masonry.h"
#import "UIImageView+WebCache.h"
-(instancetype)initWithStyle:(UITableViewCellStyle)style reuseIdentifier:(NSString *)reuseIdentifier{
    self = [super initWithStyle:style reuseIdentifier:reuseIdentifier];
    if (self) {
        self.backgroundColor = [UIColor clearColor];
        [self initViews];
    }
    return self;
}

-(void)initViews{
    //头像icon
    icon = [[UIImageView alloc] init];
    [self.contentView addSubview:icon];
    //高宽40,顶端和左边距离10px
    [icon mas_makeConstraints:^(MASConstraintMaker *make) {
        make.left.equalTo(self.contentView).offset(10);
        make.top.equalTo(self.contentView).offset(10);
        make.width.and.height.offset(40);
    }];

    //标题title
    lblTitle = [UILabel new];
    [self.contentView addSubview:lblTitle];
    //高20,左边距离头像10px,顶部距离contentview10px,右边距离15px(为什么是-15,因为ios内原点是左上角,所以右边和底部间距要负数)
    [lblTitle mas_makeConstraints:^(MASConstraintMaker *make) {
        make.left.equalTo(icon.mas_right).offset(10);
        make.top.equalTo(self.contentView).offset(10);
        make.right.equalTo(self.contentView).offset(-15);
        make.height.mas_equalTo(20);
    }];

    //描述内容1
    lblDesc = [UILabel new];
    lblDesc.backgroundColor = [UIColor redColor];
    lblDesc.numberOfLines = 0;
    [self.contentView addSubview:lblDesc];
    //不定高label,顶端距离title 10px,左边距离icon 10px, 右边距离 15px
    [lblDesc mas_makeConstraints:^(MASConstraintMaker *make) {
        make.top.equalTo(lblTitle.mas_bottom).offset(10);
        make.left.equalTo(icon.mas_right).offset(10);
        make.right.equalTo(self.contentView).offset(-15);
    }];

    //描述内容2
    lblDesc2 = [UILabel new];
    lblDesc2.numberOfLines = 0;
    lblDesc2.backgroundColor = [UIColor yellowColor];
    [self.contentView addSubview:lblDesc2];
    //不定高label,顶端距离描述内容1 10px,左边距离icon 10px, 右边距离 15px
    [lblDesc2 mas_makeConstraints:^(MASConstraintMaker *make) {
        make.top.equalTo(lblDesc.mas_bottom).offset(10);
        make.left.equalTo(icon.mas_right).offset(10);
        make.right.equalTo(self.contentView).offset(-15);
    }];

    //其他
    viewComment = [[UIView alloc] init];
    viewComment.backgroundColor = [UIColor orangeColor];
    [self.contentView addSubview:viewComment];
    //高25,顶端距离内容2 10px,左边距离和内容2齐平, 右边距离 15px
    [viewComment mas_makeConstraints:^(MASConstraintMaker *make) {
        make.top.equalTo(lblDesc2.mas_bottom).offset(10);
        make.left.equalTo(lblDesc2);
        make.height.mas_equalTo(25);
        make.right.bottom.equalTo(self.contentView).offset(-15);
    }];

}

-(void)fill:(FDTModel *)model{
    [icon sd_setImageWithURL:[NSURL URLWithString:model.iconUrl] placeholderImage:[UIImage imageNamed:@"iconDefault"]];
    lblTitle.text = model.title;
    lblDesc.text = model.desc;
    lblDesc2.text = model.desc;
}
3、控制器 tableviewview
#import "FDTMasoryCell.h"
#import "FDTModel.h"
#import "UITableView+FDTemplateLayoutCell.h"
- (void)viewDidLoad {
    [super viewDidLoad];
    // Do any additional setup after loading the view.
    self.view.backgroundColor = [UIColor whiteColor];

    _tableview = [[UITableView alloc] initWithFrame:CGRectMake(0, 0, KScreenWidth, KScreenHeight) style:UITableViewStylePlain];
    _tableview.delegate = self;
    _tableview.dataSource = self;
    //[_tableview registerNib:[UINib nibWithNibName:@"FDTCell" bundle:nil] forCellReuseIdentifier:cellID];
    [_tableview registerClass:[FDTMasoryCell class] forCellReuseIdentifier:cellMasonryID];
    [self.view addSubview:_tableview];


}

#pragma mark - tableview
-(NSInteger)tableView:(UITableView *)tableView numberOfRowsInSection:(NSInteger)section{
    return self.dataArry.count;
}

-(UITableViewCell *)tableView:(UITableView *)tableView cellForRowAtIndexPath:(NSIndexPath *)indexPath{
    //FDTCell *cell = [tableView dequeueReusableCellWithIdentifier:cellID];
    FDTMasoryCell *cell = [tableView dequeueReusableCellWithIdentifier:cellMasonryID];
    FDTModel *model = self.dataArry[indexPath.row];
    [cell fill:model];
    return  cell;

}

-(CGFloat)tableView:(UITableView *)tableView heightForRowAtIndexPath:(NSIndexPath *)indexPath{
    return [tableView fd_heightForCellWithIdentifier:cellMasonryID cacheByIndexPath:indexPath configuration:^(id cell) {
        FDTModel *model = self.dataArry[indexPath.row];
        [cell fill:model];
    }];

}
PS:
1、tableview这里用法跟平常一样,唯一区别以及最关键的就是代理内的:heightForRowAtIndexPath方法
这里用到了 UITableView+FDTemplateLayoutCell 处理高度,用法简单明了,再也不用自己根据内容一个个计算了!
2、cell内,我是简单用了三层view,大家也可以按自己需求改动cell即可。
3、这里cell,我是用masonry布局,当然也可以用系统Autolayout添加约束实现布局,有时候cell内如果内容不多,用约束反而更简单。
Last,经过以上三步,一个简单的排列效果就出来了,大家都试试吧。。
有任何疑问,欢迎留言~~~