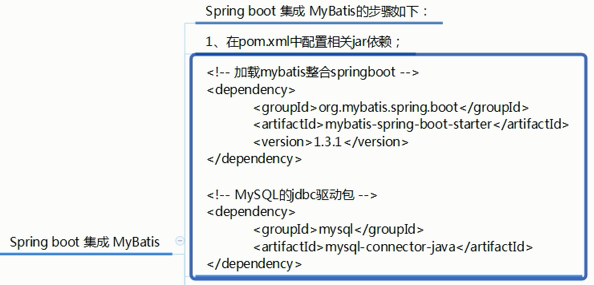
1、SpringBoot集成MyBatis
2、SpringBoot配置事务
3、demo
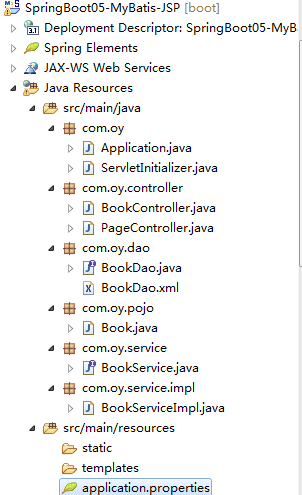
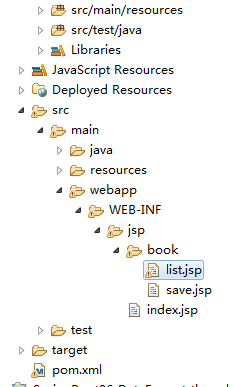
3.1、项目结构
3.2、代码
3.3、本地启动
3.4、打成war部署到tomcat
1、SpringBoot集成MyBatis <--返回目录
另外可以参考:Spring Security(一)自定义表单及认证授权(整合mybatis generator和mybatis)
2、SpringBoot配置事务 <--返回目录

@Transactional既可以使用在方法上,也可以使用在类上。
3、demo <--返回目录
3.1、项目结构 <--返回目录
3.2、代码 <--返回目录
pom.xml
<?xml version="1.0" encoding="UTF-8"?>
<project xmlns="http://maven.apache.org/POM/4.0.0"
    xmlns:xsi="http://www.w3.org/2001/XMLSchema-instance"
    xsi:schemaLocation="http://maven.apache.org/POM/4.0.0 http://maven.apache.org/xsd/maven-4.0.0.xsd">
    <modelVersion>4.0.0</modelVersion>
    <parent>
        <groupId>org.springframework.boot</groupId>
        <artifactId>spring-boot-starter-parent</artifactId>
        <version>2.1.1.RELEASE</version>
        <relativePath /> <!-- lookup parent from repository -->
    </parent>
    <groupId>com.example</groupId>
    <artifactId>SpringBoot05-MyBatis-JSP</artifactId>
    <version>0.0.1-SNAPSHOT</version>
    <packaging>war</packaging>
    <name>SpringBoot05-MyBatis-JSP</name>
    <description>Demo project for Spring Boot</description>

    <properties>
        <java.version>1.8</java.version>
    </properties>

    <dependencies>
        <dependency>
            <groupId>org.springframework.boot</groupId>
            <artifactId>spring-boot-starter-web</artifactId>
        </dependency>
        <dependency>
            <groupId>org.springframework.boot</groupId>
            <artifactId>spring-boot-configuration-processor</artifactId>
            <optional>true</optional>
        </dependency>
        <dependency>
            <groupId>org.springframework.boot</groupId>
            <artifactId>spring-boot-starter-test</artifactId>
            <scope>test</scope>
        </dependency>
        <dependency>
            <groupId>org.springframework.boot</groupId>
            <artifactId>spring-boot-starter-tomcat</artifactId>
            <scope>provided</scope>
        </dependency>

        <dependency>
            <groupId>org.mybatis.spring.boot</groupId>
            <artifactId>mybatis-spring-boot-starter</artifactId>
            <version>1.3.2</version>
        </dependency>
        <dependency>
            <groupId>mysql</groupId>
            <artifactId>mysql-connector-java</artifactId>
            <version>5.1.40</version>
            <scope>runtime</scope>
        </dependency>

        <dependency>
            <groupId>org.apache.tomcat.embed</groupId>
            <artifactId>tomcat-embed-jasper</artifactId>
            <scope>provided</scope>
        </dependency>
        <dependency>
            <groupId>javax.servlet</groupId>
            <artifactId>jstl</artifactId>
            <!-- <scope>provided</scope> -->
        </dependency>

    </dependencies>

    <build>
        <resources>
            <!-- 编译之后包含xml和properties -->
            <resource>
                <directory>src/main/java</directory>
                <includes>
                    <include>**/*.properties</include>
                     <include>**/*.xml</include>
                </includes>
                <filtering>true</filtering>
            </resource>
        </resources>

        <plugins>
            <plugin>
                <groupId>org.springframework.boot</groupId>
                <artifactId>spring-boot-maven-plugin</artifactId>
            </plugin>
        </plugins>
    </build>

</project>
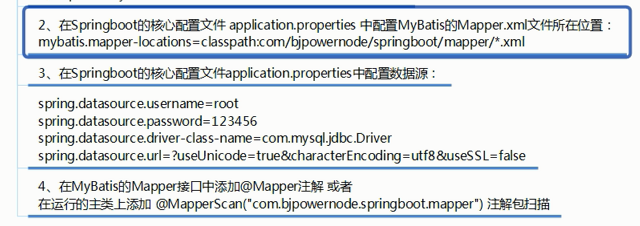
application.properties
server.port=80
server.servlet.context-path=/

spring.mvc.view.prefix=/WEB-INF/jsp/
spring.mvc.view.suffix=.jsp

spring.datasource.driver-class-name=com.mysql.jdbc.Driver
spring.datasource.url=jdbc:mysql://localhost:3306/db_springbootJPA?useUnicode=true&characterEncoding=utf8&serverTimezone=GMT%2B8
spring.datasource.username=root
spring.datasource.password=

##################### MyBatis相关配置 #####################
#MyBatis映射文件
mybatis.mapper-locations=classpath:com/oy/dao/*.xml
#扫描生成实体的别名,需要和注解@Alias联合使用
mybatis.type-aliases-package=com.oy.pojo
#MyBatis配置文件,当你的配置比较复杂的时候,可 以使用
#mybatis.config-location=
#级联延迟加载。true:开启延迟加载
mybatis.configuration.lazy-loading-enabled=true
#积极的懒加载。false:按需加载
mybatis.configuration.aggressive-lazy-loading=false

#日志配置
#logging.level.root=DEBUG
#logging.level.org.springFrameWork=DEBUG
#logging.level.org.org.mybatis=DUBUG
logging.level.root=info
#logging.path=/var/logs/
#logging.file=/var/logs/helloworld.log

#logging.file=d:/logs/helloworld.log
ServletInitializer:作用打war包


public class ServletInitializer extends SpringBootServletInitializer {

    @Override
    protected SpringApplicationBuilder configure(SpringApplicationBuilder application) {
        return application.sources(Application.class);
    }

}
主启动类 Application, @MapperScan("com.oy.dao") 扫描生成dao的实现
@SpringBootApplication
@MapperScan("com.oy.dao")
public class Application {

    public static void main(String[] args) {
        SpringApplication.run(Application.class, args);
    }

}
PageController
@Controller
public class PageController {

    @GetMapping({"/", "/index"})
    public String toIndex() {
        return "index";
    }

    @GetMapping("/page/{pageName}")
    public String toPage(@PathVariable String pageName) {
        return pageName;
    }
}
BookController
/**
 * @author oy
 * @version 1.0
 * @date 2019年1月9日
 * @time 下午7:32:15
 */
@Controller
@RequestMapping("/book")
public class BookController {

    @Autowired
    private BookService bookService;

    /**
     * 查询所有图书
     * @return
     */
    @RequestMapping("/list")
    public ModelAndView list() {
        ModelAndView mv = new ModelAndView();
        mv.addObject("bookList", bookService.list());
        mv.setViewName("book/list");
        return mv;
    }
}
BookServiceImpl
@Service
public class BookServiceImpl implements BookService {
    @Autowired
    private BookDao bookDao;

    @Override
    public List<Book> list() {
        return bookDao.findAll();
    }
}
BookDao
public interface BookDao {
    List<Book> findAll();
}
BookDao.xml
<?xml version="1.0" encoding="UTF-8" ?>
<!DOCTYPE mapper
PUBLIC "-//mybatis.org//DTD Mapper 3.0//EN"
"http://mybatis.org/dtd/mybatis-3-mapper.dtd">
<mapper namespace="com.oy.dao.BookDao">

    <!--<resultMap type="account" id="AccountResult">
        <id property="id" column="id"/>
        <result property="username" column="username"/>
        <result property="password" column="password"/>
    </resultMap> -->

    <select id="findAll" resultType="book">
        select * from t_book
    </select>

</mapper>
Book 实体类
@Alias("book")
public class Book {
    private Integer id; // 编号,主键
    private String name; // 书名
    private String author; // 作者
    // getXxx和setXxx省略
}
index.jsp
<%@ page language="java" contentType="text/html; charset=UTF-8" pageEncoding="UTF-8"%>
<!DOCTYPE html>
<html>
<head>
<meta http-equiv="Content-Type" content="text/html; charset=UTF-8">
<title>index</title>
</head>
<body>
首页index.jsp<br/>

<a href="/book/list">点击跳转到/book/list</a>
</body>
</html>
list.jsp
<%@ page language="java" contentType="text/html; charset=UTF-8" pageEncoding="UTF-8"%>
<%@ taglib prefix="c" uri="http://java.sun.com/jsp/jstl/core" %>
<!DOCTYPE html>
<html>
<head>
<meta charset="UTF-8">
<title>图书列表</title>
</head>
<body>
    <a href="/book/toPage/save">添加</a><br/>
    <table border="1" cellspacing="0">
        <tr>
            <td>编号</td>
            <td>书名</td>
            <td>作者</td>
            <td>操作</td>
        </tr>
        <c:forEach items="${bookList }" var="book">
            <tr>
                <td>${book.id}</td>
                <td>${book.name}</td>
                <td>${book.author}</td>
                <td>
                    <a href="/book/toPageWithData/save/${book.id}">修改</a>
                    <a href="/book/delete/${book.id}">删除</a>
                </td>
            </tr>
        </c:forEach>
    </table>

</body>
</html>
save.jsp
<%@ page language="java" contentType="text/html; charset=UTF-8" pageEncoding="UTF-8"%>
<!DOCTYPE html>
<html>
<head>
<meta charset="UTF-8">
<title>保存图书</title>
</head>
<body>
    <form action="/book/save" method="post">
        <input type="hidden" name="id" value="${book.id}"/>
        书名:<input type="text" name="name" value="${book.name}"/><br/>
        作者:<input type="text" name="author" value="${book.author}"/><br/>
        <input type="submit" value="保存"/>
    </form>
</body>
</html>
3.3、本地启动 <--返回目录
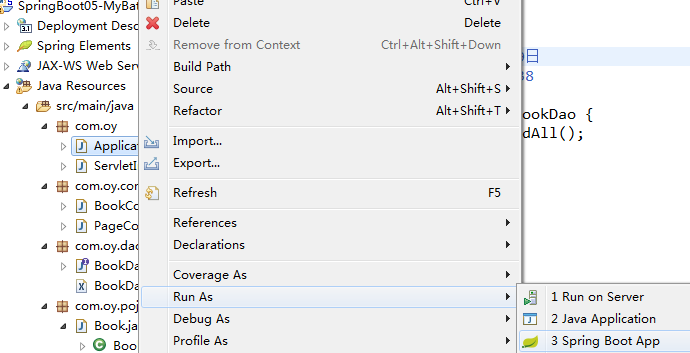
选中Application,右键
访问:http://localhost/book/list

3.4、打成war部署到tomcat <--返回目录
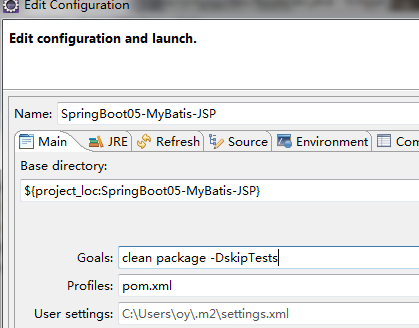
选中项目,Run as -> Maven build...
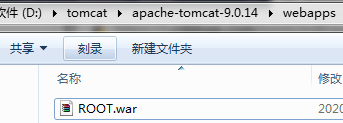
将打成的war,改名为ROOT.war(改名为ROOT访问时就无需加项目名),复制到tomcat的webapps目录下
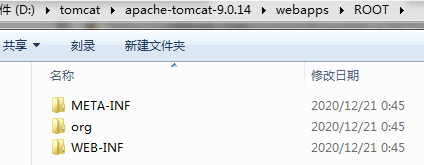
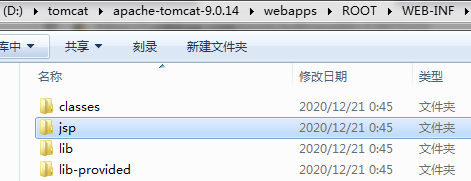
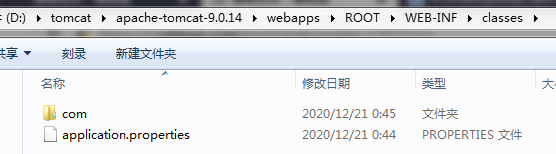
双击 bin/startup.bat, 启动tomcat。查看ROOT.war解压后的目录结构

---