1、spring介绍
2、Spring IoC helloworld
3、依赖注入DI,setter方法注入,构造方法注入
4、bean的实例化方式(三种)
5、Spring 容器类
6、基于xml装配bean---作用域
7、属性注入
8、bean之间的关系
9、p命令空间和SpEL
10、Spring容器中bean的生命周期
11、装配Bean--基于注解Annotation
1、spring介绍 <--返回目录
* 什么是spring:
- Spring是一个开放源代码的设计层面框架,他解决的是业务逻辑层和其他各层的松耦合问题,
因此它将面向接口的编程思想贯穿整个系统应用。Spring是于2003 年兴起的一个轻量级的Java 开发框架,
由Rod Johnson创建。简单来说,Spring是一个分层的JavaSE/EE full-stack(一站式) 轻量级开源框架。
- 轻量级:与EJB对比,依赖资源少,消耗的资源少。
- 分层: 一站式,每一个层都提供的解决方案
web层:struts,spring-MVC
service层:spring
dao层:hibernate,mybatis , jdbcTemplate --> spring-data
* Spring的核心:控制反转(IoC,Inverse of Control)和面向切面编程(AOP,)
* IoC意思:将创建对象的控制权反转给了spring,换一句话说就是,以后对象全部由spring创建
* spring的优点
- 方便解耦,简化开发 (高内聚低耦合)
Spring就是一个大工厂(容器),可以将所有对象创建和依赖关系维护,交给Spring管理
spring工厂是用于生成bean
- AOP编程的支持
Spring提供面向切面编程,可以方便的实现对程序进行权限拦截、运行监控等功能
- 声明式事务的支持
只需要通过配置就可以完成对事务的管理,而无需手动编程
- 方便程序的测试
Spring对Junit4支持,可以通过注解方便地测试Spring程序
- 方便集成各种优秀框架
Spring不排斥各种优秀的开源框架,其内部提供了对各种优秀框架(如:Struts、Hibernate、MyBatis、Quartz等)的直接支持
- 降低JavaEE API的使用难度
Spring 对JavaEE开发中非常难用的一些API(JDBC、JavaMail、远程调用等),都提供了封装,使这些API应用难度大大降低
* spring 体系

2、Spring IoC helloworld <--返回目录
定义 bean
public class HelloWorld {
    public void sayHi() {
        System.out.println("hello,你好!!!");
    }
}
beans.xml
<?xml version="1.0" encoding="UTF-8"?>
<beans xmlns="http://www.springframework.org/schema/beans"
    xmlns:xsi="http://www.w3.org/2001/XMLSchema-instance"
    xsi:schemaLocation="http://www.springframework.org/schema/beans
        http://www.springframework.org/schema/beans/spring-beans.xsd">

    <!-- 装配bean -->
    <bean id="HelloWorldBeanId" class="com.oy.entity.HelloWorld"/>

</beans>
测试类
package com.oy.test;

import org.junit.jupiter.api.Test;
import org.springframework.context.ApplicationContext;
import org.springframework.context.support.ClassPathXmlApplicationContext;

import com.oy.entity.HelloWorld;

/**
 * HelloWorld演示:
 *         1)编写JavaBean类
 *         2)配置<bean>
 *         3)初始化Spring IoC容器
 *         4)获取bean实例
 *
 * @author oy
 * @version 1.0
 * @date 2018年12月29日
 * @time 上午1:25:43
 */
class HelloWorldTest {

    @Test
    public void test() {
        // 初始化Spring IoC容器
        ApplicationContext ctx = new ClassPathXmlApplicationContext("beans.xml");
        // 根据name获取bean实例
        HelloWorld hw = (HelloWorld)ctx.getBean("HelloWorldBeanId");
        hw.sayHi();
    }

}
3、依赖注入DI,setter方法注入,构造方法注入 <--返回目录
* DI:Dependency Injection , 依赖注入
* 什么叫依赖?
- is a:是一个,继承;子类继承父类==>子类is a 父类
- has a:有一个,成员变量,依赖。
public B {
private A a; //B类依赖A类
}
* 注入:通过setter方法进行另一个对象实例设置
public B {
private A a; //B类依赖A类
public A setA(A a) {
this.a = a; //注入
}
}
* 例如:
class BookServiceImpl{
//之前开发:接口 = 实现类 (service和dao耦合)
//private BookDao bookDao = new BookDaoImpl();
//spring之后 (解耦:service实现类使用dao接口,不知道具体的实现类,后面使用setter注入实现类)
private BookDao bookDao;
setter方法
}
模拟spring执行过程
创建service实例:BookService bookService = new BookServiceImpl() -->IoC <bean>
创建dao实例:BookDao bookDao = new BookDaoImple() -->IoC
将dao设置给service:bookService.setBookDao(BookDao); -->DI <property>
People
package com.oy.entity;

/**
 * @author oy
 * @version 1.0
 * @date 2018年12月29日
 * @time 上午7:32:23
 */
public class People {
    private Integer id;
    private String name;
    private Integer age;

    public People() {
        System.out.println("调用People的无参构造。。。");
    }

    public People(Integer id, String name, Integer age) {
        super();
        System.out.println("调用People的有参构造。。。");
        this.id = id;
        this.name = name;
        this.age = age;
    }
    // getXxx 和 setXxx
}
PeopleTest
package com.oy.test;

import org.junit.jupiter.api.Test;
import org.springframework.context.ApplicationContext;
import org.springframework.context.support.ClassPathXmlApplicationContext;

import com.oy.entity.People;

/**
 * 2种依赖注入方法:
 *  1.setter方法注入
 *  2.构造方法注入
 *
 * @author oy
 * @version 1.0
 * @date 2018年12月29日
 * @time 上午7:37:57
 */
public class PeopleTest {
    @SuppressWarnings("resource")
    @Test
    public void test1() {
        // 初始化Spring IoC容器
        ApplicationContext ctx = new ClassPathXmlApplicationContext("beans.xml");

        // 根据name获取bean实例
        // =====测试依赖注入:setter方法注入=====
        People p = (People)ctx.getBean("people");
        System.out.println(p.getId() + "---" + p.getName() + "---" + p.getAge());

        // =====测试依赖注入:构造方法注入=====
        // 通过索引
        People p2 = (People)ctx.getBean("people2");
        System.out.println(p2.getId() + "---" + p2.getName() + "---" + p2.getAge());
        // 通过类型
        People p3 = (People)ctx.getBean("people3");
        System.out.println(p3.getId() + "---" + p3.getName() + "---" + p3.getAge());
        // 通过索引和类型
        People p4 = (People)ctx.getBean("people4");
        System.out.println(p4.getId() + "---" + p4.getName() + "---" + p4.getAge());
    }
}
beans.xml
<?xml version="1.0" encoding="UTF-8"?>
<beans xmlns="http://www.springframework.org/schema/beans"
    xmlns:xsi="http://www.w3.org/2001/XMLSchema-instance"
    xsi:schemaLocation="http://www.springframework.org/schema/beans
        http://www.springframework.org/schema/beans/spring-beans.xsd">

    <!-- ==========依赖注入:使用setter方法========== -->
    <!-- 装配bean过程:
        IoC容器初始化时,调用People类的无参构造创建bean实例,
        然后调用People类的setter方法给属性注入值
    -->
    <bean id="people" class="com.oy.entity.People">
        <!-- 依赖注入:使用setter方法注入 -->
        <property name="id" value="1"></property>
        <property name="name" value="张三1"></property>
        <property name="age" value="15"></property>
    </bean>


    <!-- ==========依赖注入:使用构造方法========== -->
    <!-- 装配bean过程:
        IoC容器初始化时,调用People类的有参构造创建bean实例
    -->
    <bean id="people2" class="com.oy.entity.People">
        <!-- 依赖注入:使用有参构造注入 -->
        <!-- 通过索引 -->
        <constructor-arg index="0" value="2"></constructor-arg>
        <constructor-arg index="1" value="李四2"></constructor-arg>
        <constructor-arg index="2" value="25"></constructor-arg>
    </bean>

    <bean id="people3" class="com.oy.entity.People">
        <!-- 依赖注入:使用有参构造注入 -->
        <!-- 通过类型 -->
        <constructor-arg type="Integer" value="3"></constructor-arg>
        <constructor-arg type="String" value="李四3"></constructor-arg>
        <constructor-arg type="Integer" value="35"></constructor-arg>
    </bean>

    <bean id="people4" class="com.oy.entity.People">
        <!-- 依赖注入:使用有参构造注入 -->
        <!-- 通过类型和索引 -->
        <constructor-arg index="0" type="Integer" value="4"></constructor-arg>
        <constructor-arg index="1" type="String" value="李四4"></constructor-arg>
        <constructor-arg index="2" type="Integer" value="45"></constructor-arg>
    </bean>

</beans>
4、bean的实例化方式(三种) <--返回目录
方式一:默认构造 <bean id="" class=""> 必须提供默认构造
方式二:静态工厂
方式三:实例工厂
PeopleFactory
package com.oy.entity;

/**
 * 定义了一个非静态工厂
 * @author oy
 * @version 1.0
 * @date 2018年12月29日
 * @time 上午8:10:25
 */

public class PeopleFactory {

    public People createPeople() {
        People p = new People();
        p.setId(5);
        p.setName("李四5");
        p.setAge(55);
        return p;
    }
}
PeopleStaticFactory
package com.oy.entity;

/**
 * 静态工厂
 * @author oy
 * @version 1.0
 * @date 2018年12月29日
 * @time 上午8:25:21
 */

public class PeopleStaticFactory {
    public static People createPeople() {
        People p = new People();
        p.setId(6);
        p.setName("李四6");
        p.setAge(66);
        return p;
    }
}
测试类
package com.oy.test;

import org.junit.jupiter.api.Test;
import org.springframework.context.ApplicationContext;
import org.springframework.context.support.ClassPathXmlApplicationContext;

import com.oy.entity.People;

/**
 * bean的实例化方式 :
 *     1.无参构造
 *         <bean id="" class=""> 或 使用setter方法注入属性时都是调用无参构造来实例化bean
 *  2.有参构造
 *      使用构造方法注入属性时调用有参构造
 *  3.非静态工厂
 *  4.静态工厂
 */
public class PeopleTest {
    @SuppressWarnings("resource")
    @Test
    public void test1() {
        // 初始化Spring IoC容器
        ApplicationContext ctx = new ClassPathXmlApplicationContext("beans.xml");

        // =====测试bean的实例化方式:非静态工厂=====
        People p5 = (People)ctx.getBean("people5");
        System.out.println(p5.getId() + "---" + p5.getName() + "---" + p5.getAge());

        // =====测试bean的实例化方式:静态工厂=====
        People p6 = (People)ctx.getBean("people6");
        System.out.println(p6.getId() + "---" + p6.getName() + "---" + p6.getAge());

    }
}
beans.xml
<?xml version="1.0" encoding="UTF-8"?>
<beans xmlns="http://www.springframework.org/schema/beans"
    xmlns:xsi="http://www.w3.org/2001/XMLSchema-instance"
    xsi:schemaLocation="http://www.springframework.org/schema/beans
        http://www.springframework.org/schema/beans/spring-beans.xsd">

    <!-- ==========bean的实例化方式:使用非静态工厂========== -->
    <bean id="peopleFactory" class="com.oy.entity.PeopleFactory"/>
    <!-- 装配bean过程:
        IoC容器初始化时,调用factory-bean实例的createPeople()方法
    -->
    <bean id="people5" factory-bean="peopleFactory" factory-method="createPeople"/>

      <!-- ==========bean的实例化方式:使用静态工厂========== -->
      <!-- 装配bean过程:
        IoC容器初始化时,调用静态工厂的createPeople()方法
    -->
      <bean id="people6" class="com.oy.entity.PeopleStaticFactory" factory-method="createPeople"/>

</beans>
5、Spring 容器类 <--返回目录
* api整体了解,之后不使用,在学习过程需要使用,所以了解即可。
* BeanFactory :这是一个工厂,用于生成任意bean。
- 【采取延迟加载,第一次getBean时才会初始化Bean】
* ApplicationContext:是BeanFactory的子接口,功能更强大。
- (国际化处理、事件传递、Bean自动装配、各种不同应用层的Context实现)。
- 【当配置文件被加载,就进行对象实例化】
* ClassPathXmlApplicationContext 用于加载classpath(类路径、src)下的xml
加载xml运行时位置 --> /WEB-INF/classes/*.xml
* FileSystemXmlApplicationContext 用于加载指定盘符下的xml
一般加载xml运行时位置 --> /WEB-INF/*.xml
也就是说如果xml文件放在/WEB-INF/*.xml,可以使用FileSystemXmlApplicationContext
通过java web ServletContext.getRealPath() 获得具体盘符
6、基于xml装配bean---作用域 <--返回目录
* 作用域:用于确定spring创建bean实例个数
* 取值:
- singleton 单例,默认值。
- prototype 多例,每执行一次getBean将获得一个实例。例如:struts整合spring,配置action多例。
* 如何配置:<bean id="" class="" scope="singleton|prototype">
7、属性注入 <--返回目录

public class Dog {
    private String name;
    public Dog() {
        System.out.println("调用Dog的无参构造。。。");
    }
    // getXxx和setXxx
}
public class People {
    private Integer id;
    private String name;
    private Integer age;
    private Dog dog;
    private List<String> hobbies = new ArrayList<String>();
    private Map<String, Object> map = new HashMap<String, Object>();
    private Properties props = new Properties();

    public People() {
        System.out.println("调用People的无参构造。。。");
    }

    public People(Integer id, String name, Integer age) {
        super();
        System.out.println("调用People的有参构造。。。");
        this.id = id;
        this.name = name;
        this.age = age;
    }
    // getXxx和setXxx
}
beans.xml
<?xml version="1.0" encoding="UTF-8"?>
<beans xmlns="http://www.springframework.org/schema/beans"
    xmlns:xsi="http://www.w3.org/2001/XMLSchema-instance"
    xsi:schemaLocation="http://www.springframework.org/schema/beans
        http://www.springframework.org/schema/beans/spring-beans.xsd">

    <!-- 依赖注入:属性是基本数据类型 -->
    <bean id="people" class="com.oy.entity.People">
        <property name="id" value="1"></property>
        <property name="name" value="张三1"></property>
        <property name="age" value="15"></property>
    </bean>

    <!-- 依赖注入:属性是bean,注入外部bean -->
      <bean id="people2" class="com.oy.entity.People">
        <property name="id" value="1"></property>
        <property name="name" value="张三1"></property>
        <property name="age" value="15"></property>
        <property name="dog" ref="dog"></property>
    </bean>
    <!-- dog配置在people2后面也是可以的 -->
    <bean id="dog" class="com.oy.entity.Dog">
        <property name="name" value="jack"></property>
    </bean>

    <!-- 依赖注入:属性是bean,注入内部bean -->
      <bean id="people3" class="com.oy.entity.People">
        <property name="id" value="1"></property>
        <property name="name" value="张三1"></property>
        <property name="age" value="15"></property>
        <property name="dog">
            <bean class="com.oy.entity.Dog">
                <property name="name" value="tom"></property>
            </bean>
        </property>
    </bean>

    <!-- 依赖注入:属性是bean,注入null -->
      <bean id="people4" class="com.oy.entity.People">
        <property name="id" value="1"></property>
        <property name="name" value="张三1"></property>
        <property name="age" value="15"></property>
        <property name="dog">
            <null></null>
        </property>
    </bean>

    <!-- 依赖注入:属性是List集合 -->
      <bean id="people5" class="com.oy.entity.People">
        <property name="id" value="1"></property>
        <property name="name" value="张三1"></property>
        <property name="age" value="15"></property>
        <property name="hobbies">
            <list>
                <value>吃饭</value>
                <value>睡觉</value>
                <value>打豆豆</value>
            </list>
        </property>
    </bean>

    <!-- 依赖注入:属性是Map集合 -->
      <bean id="people6" class="com.oy.entity.People">
        <property name="id" value="1"></property>
        <property name="name" value="张三1"></property>
        <property name="age" value="15"></property>
        <property name="map">
            <map>
                <entry key="key1" value="value1"/>
                <entry key="key2" value="value2"/>
            </map>
        </property>
    </bean>

    <!-- 依赖注入:属性是Properties -->
      <bean id="people7" class="com.oy.entity.People">
        <property name="id" value="1"></property>
        <property name="name" value="张三1"></property>
        <property name="age" value="15"></property>
        <property name="props">
            <props>
                <prop key="username">张三</prop>
                <prop key="password">123</prop>
            </props>
        </property>
    </bean>

</beans>
测试类
package com.oy.test;

import org.junit.jupiter.api.BeforeEach;
import org.junit.jupiter.api.Test;
import org.springframework.context.ApplicationContext;
import org.springframework.context.support.ClassPathXmlApplicationContext;

import com.oy.entity.People;

/**
 * 测试依赖注入
 * 属性的类型分为:
 *     1.基本数据类型
 *     2.bean
 *         通过ref引用注入外部bean
 *         注入内部bean
 *         注入null
 *  3.List集合  (数组Array类似)
 *  4.Map集合
 *  5.Properties类型
 *
 * @author oy
 * @version 1.0
 * @date 2018年12月29日
 * @time 上午8:57:22
 */
class PeopleTest {

    ApplicationContext ctx = null;

    @BeforeEach
    void setUp() throws Exception {
        ctx = new ClassPathXmlApplicationContext("beans.xml");
    }

    /**
     * 依赖注入:属性是基本数据类型
     */
    @Test
    void test1() {
        People p = (People)ctx.getBean("people");
        System.out.println(p.getId() + "---" + p.getName() + "---" + p.getAge());
    }

    /**
     * 依赖注入:属性是bean,注入外部bean
     */
    @Test
    void test2() {
        People p2 = (People)ctx.getBean("people2");
        System.out.println(p2.getId() + "---" + p2.getName() + "---"
                + p2.getAge() + "---" + p2.getDog().getName());
    }

    /**
     * 依赖注入:属性是bean,注入内部bean
     */
    @Test
    void test3() {
        People p3 = (People)ctx.getBean("people3");
        System.out.println(p3.getId() + "---" + p3.getName() + "---"
                + p3.getAge() + "---" + p3.getDog().getName());
    }

    /**
     * 依赖注入:属性是bean,注入null
     */
    @Test
    void test4() {
        People p4 = (People)ctx.getBean("people4");
        System.out.println(p4.getId() + "---" + p4.getName() + "---"
                + p4.getAge() + "---" + p4.getDog());
    }

    /**
     * 依赖注入:属性是List集合
     */
    @Test
    void test5() {
        People p5 = (People)ctx.getBean("people5");
        System.out.println(p5.getId() + "---" + p5.getName() + "---"
                + p5.getAge() + "---" + p5.getHobbies());
    }

    /**
     * 依赖注入:属性是Map集合
     */
    @Test
    void test6() {
        People p6 = (People)ctx.getBean("people6");
        System.out.println(p6.getId() + "---" + p6.getName() + "---"
                + p6.getAge() + "---" + p6.getMap());
    }

    /**
     * 依赖注入:属性是Properties
     */
    @Test
    void test7() {
        People p7 = (People)ctx.getBean("people7");
        System.out.println(p7.getId() + "---" + p7.getName() + "---" + p7.getAge() + "---"
        + p7.getProps().getProperty("username") + p7.getProps().getProperty("password"));
    }
}
8、bean之间的关系 <--返回目录
public class People {
    private Integer id;
    private String name;
    private Integer age;
    private String className;

    public People() {
        System.out.println("调用People的无参构造。。。");
    }
    // getXxx和setXxx
    @Override
    public String toString() {
        return "People [id=" + id + ", name=" + name + ", age=" + age + ", className=" + className + "]";
    }
}
public class User {
    private Integer id;
    private String username;
    private String password;

    public User() {
        System.out.println("调用User的无参构造。。。");
    }
    // getXxx和setXxx
    @Override
    public String toString() {
        return "User [id=" + id + ", username=" + username + ", password=" + password + "]";
    }

}
beans.xml
<?xml version="1.0" encoding="UTF-8"?>
<beans xmlns="http://www.springframework.org/schema/beans"
    xmlns:xsi="http://www.w3.org/2001/XMLSchema-instance"
    xsi:schemaLocation="http://www.springframework.org/schema/beans
        http://www.springframework.org/schema/beans/spring-beans.xsd">

    <!-- bean之间的关系:继承 -->
    <bean id="peopleParent" class="com.oy.entity.People" abstract="true">
        <property name="age" value="18"></property>
        <property name="className" value="高三1班"></property>
    </bean>

    <bean id="zhangsan" parent="peopleParent" depends-on="user">
        <property name="id" value="1"></property>
        <property name="name" value="zhangsan"></property>
        <property name="age" value="19"></property>
    </bean>

    <bean id="lisi" parent="peopleParent">
        <property name="id" value="2"></property>
        <property name="name" value="lisi"></property>
    </bean>

    <bean id="user" class="com.oy.entity.User">
        <property name="id" value="1"></property>
        <property name="username" value="zhangsan"></property>
        <property name="password" value="123"></property>
    </bean>

</beans>
测试类
package com.oy.test;

import org.junit.Before;
import org.junit.Test;
import org.springframework.context.ApplicationContext;
import org.springframework.context.support.ClassPathXmlApplicationContext;

import com.oy.entity.People;
import com.oy.entity.User;

/**
 * bean之间的关系:
 *         1.继承
 *             定义抽象bean:<bean id="parent" class="" abstract="true">
 *             继承:<bean id="" parent="parent">
 *
 *         2.依赖
 *             <bean id="bean1" class="" depends-on="bean2"/>
 *             bean1依赖bean2,bean2必须要在bean1之前初始化
 *
 *         3.引用  ref
 *             <bean id="" class="">
 *                 <property name="dog" ref="dog"/>
 *             </bean>
 *
 * @author oy
 * @version 1.0
 * @date 2018年12月29日
 * @time 上午10:51:26
 */
public class PeopleTest {
    ApplicationContext ctx = null;
    @Before
    public void before() {
        ctx = new ClassPathXmlApplicationContext("beans.xml");
    }

    /**
     * bean之间的关系:继承
     */
    @Test
    public void test1() {
        People zhangsan = (People)ctx.getBean("zhangsan");
        System.out.println(zhangsan);

        People lisi = (People)ctx.getBean("lisi");
        System.out.println(lisi);
    }

    /**
     * bean之间的关系:依赖
     * Spring IoC容器初始化bean是按配置文件从上到下
     * 需求:假设初始化<bean id="zhangsan">这个bean之前,必须先初始化<bean id="user">,
     *      便认为<bean id="zhangsan">依赖<bean id="user">
     * 配置:<bean id="zhangsan" depends-on="user">
     */
    @Test
    public void test2() {
        People zhangsan = (People)ctx.getBean("zhangsan");
        System.out.println(zhangsan);

        People lisi = (People)ctx.getBean("lisi");
        System.out.println(lisi);

        User user = (User)ctx.getBean("user");
        System.out.println(user);

    }
}
9、p命令空间和SpEL <--返回目录
public class Address {
    private Integer id;
    private String addrName;

    public String fun() {
        return "abc";
    }
    // getXxx和setXxx
}
public class Customer {
    private String cname = "jack";
    private Double pi;
    private Address address;
    private String addressName;
    private String str;
    // getXxx和setXxx
}
public class Student {
    private Integer id;
    private String name;
    private Integer age;
    private Address address;
    // getXxx和setXxx
}
beans.xml
<?xml version="1.0" encoding="UTF-8"?>
<beans xmlns="http://www.springframework.org/schema/beans"
    xmlns:xsi="http://www.w3.org/2001/XMLSchema-instance"
    xmlns:p="http://www.springframework.org/schema/p"
    xsi:schemaLocation="http://www.springframework.org/schema/beans
        http://www.springframework.org/schema/beans/spring-beans.xsd">

    <bean id="student1" class="com.oy.entity.Student">
        <property name="id" value="1"></property>
        <property name="name" value="张三"></property>
        <property name="age" value="10"></property>
        <property name="address" ref="address"></property>
    </bean>

    <!-- 使用P命名空间 -->
    <bean id="student2" class="com.oy.entity.Student"
        p:id="2" p:name="张三2" p:age="20" p:address-ref="address">
    </bean>

    <bean id="address" class="com.oy.entity.Address"
        p:id="1" p:addrName="深圳">
    </bean>

    <!-- 使用SpEL -->
    <bean id="customer" class="com.oy.entity.Customer">
        <!-- <property name="cname" value="#{'李四'}"></property> -->
        <!-- 如果customer.cname?为null,不再调用后面方法 -->
        <property name="cname" value="#{customer.cname?.toUpperCase()}"></property>
        <property name="pi" value="#{T(Math).PI}"></property>
        <property name="address" value="#{address}"></property>
        <property name="addressName" value="#{address.addrName}"></property>
        <property name="str" value="#{address.fun()}"></property>
    </bean>
</beans>
测试类
package com.oy.test;

import org.junit.After;
import org.junit.Before;
import org.junit.Test;
import org.springframework.context.support.ClassPathXmlApplicationContext;

import com.oy.entity.Customer;
import com.oy.entity.Student;

/**
 * P命名空间
 *         1)P命名空间使用前提,必须添加命名空间。
 *         2)对"setter方法注入"进行简化,替换<property name="属性名" value/ref="属性值">,
 *         在<bean p:属性名="普通值"  p:属性名-ref="引用值">
 *
 * SpEL:
 *         1)对<property>进行统一编程,所有的内容都使用value
 *         2)<property name="" value="#{表达式}">
 *             #{123}、#{'jack'} : 数字、字符串
 *             #{beanId} :另一个bean引用
 *            #{beanId.propName}    :操作数据
 *            #{beanId.toString()}    :执行方法
 *            #{T(类).静态字段|静态方法}    :静态方法或字段
 *
 * @author oy
 * @version 1.0
 * @date 2018年12月30日
 * @time 上午12:15:58
 */
public class StudentTest {
    ClassPathXmlApplicationContext ctx = null;

    @Before
    public void setUp() throws Exception {
        ctx = new ClassPathXmlApplicationContext("beans.xml");
    }

    @After
    public void tearDown() throws Exception {
        ctx.close();
    }

    /**
     * 测试P命名空间
     */
    @Test
    public void test() {
        Student stu1 = (Student)ctx.getBean("student1");
        System.out.println(stu1);

        Student stu2 = (Student)ctx.getBean("student2");
        System.out.println(stu2);
    }

    /**
     * 测试SpEL
     */
    @Test
    public void test2() {
        Customer customer = (Customer)ctx.getBean("customer");
        System.out.println(customer.getCname());
        System.out.println(customer.getPi());
        System.out.println(customer.getAddress());
        System.out.println(customer.getAddressName());
        System.out.println(customer.getStr());
    }
}
10、Spring容器中bean的生命周期 <--返回目录
* 1.bean的初始化方法和销毁方法:
* 容器加载配置文件初始化后,将调用People的无参构造进行bean实例化,
* 然后调用bean实例的初始化方法 init-method="myInit"。
* 什么时候调用销毁方法 destroy-method="myDestroy"?容器关闭时,且bean是单例的。
* 2.BeanPostProcessor接口: 后处理Bean
* spring 提供一种机制,只要实现此接口BeanPostProcessor,并将实现类提供给spring容器,
* spring容器将自动执行,在容器每个bean的初始化方法前执行before(),在容器每个bean初始化方法后执行after()。
* 3.模拟Spring IoC实例化bean的过程,即bean的生命周期:
A a =new A();    --> 调用无参构造创建对象

a = B.before(a); --> 将a的实例对象传递给后处理bean,可以生成代理对象并返回。
a.init();          --> 调用bean的初始化方法
a = B.after(a);

a.addUser();      //生成代理对象,目的是在目标方法前后执行(例如:开启事务、提交事务、性能监控)

a.destroy()
Spring容器中bean的生命周期
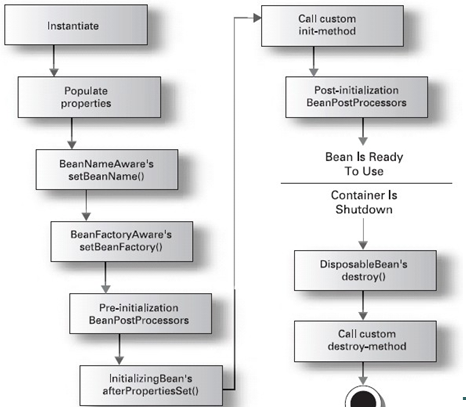
1、instantiate bean对象实例化
2、populate properties 封装属性
3、如果Bean实现BeanNameAware 执行 setBeanName
4、如果Bean实现BeanFactoryAware 或者 ApplicationContextAware 设置工厂 setBeanFactory 或者上下文对象 setApplicationContext
5、如果存在类实现 BeanPostProcessor(后处理Bean) ,执行postProcessBeforeInitialization
6、如果Bean实现InitializingBean 执行 afterPropertiesSet
7、用<bean init-method="myInit"> 指定初始化方法 myInit
8、如果存在类实现 BeanPostProcessor(处理Bean),执行postProcessAfterInitialization
9、执行业务处理(执行目标方法)
10、如果Bean实现 DisposableBean 执行 destroy
11、调用<bean destroy-method="myDestroy"> 指定销毁方法 myDestroy
IPeople
public interface IPeople {
    public void add();
    public void delete();
}
People
public class People implements IPeople{
    private Integer id;
    private String name;
    private Integer age;
    private String className;

    public People() {
        System.out.println();
        System.out.println("==========调用People无参构造==========");
    }

    public void myInit() {
        System.out.println("调用People初始化方法。。。");
    }

    public void myDestroy() {
        System.out.println("调用People销毁方法。。。");
    }

    @Override
    public void add() {
        System.out.println("调用People目标方法:add()。。。");
        long sum = 0;
        for (int j = 0; j < 1000; j++) {
            sum = 0;
            for (long i = 0; i < 100000; i++) {
                sum += i;
            }
        }

        System.out.println(sum);
    }

    @Override
    public void delete() {
        System.out.println("调用People目标方法:delete()。。。");
        long sum = 0;
        for (int j = 0; j < 1000; j++) {
            sum = 0;
            for (long i = 0; i < 100000; i++) {
                sum += i;
            }
        }
        System.out.println(sum);
    }
    // getXxx和setXxx
}
IUserService
public interface IUserService {
    public void add();
    public void delete();
}
UserServiceImpl
public class UserServiceImpl implements IUserService{
    private Integer id;
    private String username;
    private String password;

    public UserServiceImpl() {
        System.out.println();
        System.out.println("==========调用UserServiceImpl无参构造==========");
    }

    public void myInit() {
        System.out.println("调用UserServiceImpl初始化方法。。。");
    }

    public void myDestroy() {
        System.out.println("调用UserServiceImpl销毁方法。。。");
    }

    @Override
    public void add() {
        System.out.println("调用UserServiceImpl目标方法:add()。。。");
    }

    @Override
    public void delete() {
        System.out.println("调用UserServiceImpl目标方法:delete()。。。");
    }
    // getXxx和setXxx
}
StudentService
public interface StudentService {
    void add();
}
StudentServiceImpl
package com.oy.entity;

import org.springframework.beans.BeansException;
import org.springframework.beans.factory.BeanNameAware;
import org.springframework.context.ApplicationContext;
import org.springframework.context.ApplicationContextAware;

public class StudentServiceImpl implements StudentService,BeanNameAware,ApplicationContextAware {
    private String beanName;
    private ApplicationContext applicationContext;

    // 无参构造
    public StudentServiceImpl() {
        System.out.println();
        System.out.println("==========调用StudentServiceImpl无参构造==========");
    }

    // 初始化方法
    public void myInit() {
        System.out.println("调用StudentServiceImpl初始化方法。。。");
    }

    // 销毁方法
    public void myDestroy() {
        System.out.println("调用StudentServiceImpl销毁方法。。。");
    }

    // 目标方法
    public void add() {
        System.out.println("调用StudentServiceImpl目标方法:add()。。。");
    }

    /**
     * 在bean实例化过程中,调用此方法,将beanName注入给bean实例,
     * 那么可以在此方法外面定义一个属性beanName,将注入的beanName保存起来,
     * 从而其他方法也可以用。
     */
    @Override
    public void setBeanName(String beanName) {
        this.beanName = beanName;
        System.out.println("给StudentServiceImpl注入属性值beanName:" + this.beanName);
    }

    /**
     * 给StudentServiceImpl注入属性值applicationContext。
     * 打印applicationContext类型名称
     */
    @Override
    public void setApplicationContext(ApplicationContext applicationContext) throws BeansException {
        this.applicationContext = applicationContext;
        System.out.println("给StudentServiceImpl注入属性值applicationContext:" + this.applicationContext.getClass().getName());
    }

}
Spring后处理 BeanPostProcessor 的实现类 BeanPostProcessorImpl
package com.oy.entity;

import java.lang.reflect.InvocationHandler;
import java.lang.reflect.Method;
import java.lang.reflect.Proxy;

import org.springframework.beans.BeansException;
import org.springframework.beans.factory.config.BeanPostProcessor;

public class BeanPostProcessorImpl implements BeanPostProcessor {

    public BeanPostProcessorImpl() {
        System.out.println();
        System.out.println("==========调用BeanPostProcessorImpl无参构造==========");
    }

    @Override
    public Object postProcessBeforeInitialization(Object bean, String beanName) throws BeansException {
        System.out.println("前处理方法,beanName为:" + beanName);
        return bean;
    }

    /**
     * 参数bean:目标对象,即被代理的bean对象
     * 参数beanName:被代理对象的名字,即bean的id属性值
     */
    @Override
    public Object postProcessAfterInitialization(Object bean, String beanName) throws BeansException {
        System.out.println("后处理方法,bean的类型为:" + bean.getClass().getName());

        // 通过beanName过滤,对不同的bean进行处理
        if ("userService".equals(beanName)) {
            // 生成jdk代理
            return Proxy.newProxyInstance(
                    BeanPostProcessorImpl.class.getClassLoader(),
                    bean.getClass().getInterfaces(),
                    new InvocationHandler() {

                        @Override
                        public Object invoke(Object proxy, Method method, Object[] args) throws Throwable {
                            System.out.println("===开启事务===");
                            Object obj = method.invoke(bean, args);
                            System.out.println("===提交事务===");
                            return obj;
                        }

                    });
        } else if ("people".equals(beanName)) {
            // 生成jdk代理
            return Proxy.newProxyInstance(
                    BeanPostProcessorImpl.class.getClassLoader(),
                    bean.getClass().getInterfaces(),
                    new InvocationHandler() {

                        @Override
                        public Object invoke(Object proxy, Method method, Object[] args) throws Throwable {

                            //System.out.println(proxy.getClass().getName()); // com.sun.proxy.$Proxy6

                            long start = System.currentTimeMillis();
                            Object obj = method.invoke(bean, args);
                            long time = System.currentTimeMillis() - start;

                            System.out.println("方法" + method.getName() + "()共耗时:" + time + "毫秒");
                            return obj;
                        }

                    });
        } else {
            // 直接返回bean,不生成代理对象
            return bean;
        }
    }
}
DisPosableBeanImpl
public class DisPosableBeanImpl implements DisposableBean {

    public DisPosableBeanImpl() {
        System.out.println();
        System.out.println("==========调用DisPosableBeanImpl无参构造==========");
    }

    @Override
    public void destroy() throws Exception {
        System.out.println("");
        System.out.println("");
        System.out.println("Spring IoC容器关闭。。。");
    }

}
beans.xml
<?xml version="1.0" encoding="UTF-8"?>
<beans xmlns="http://www.springframework.org/schema/beans"
    xmlns:xsi="http://www.w3.org/2001/XMLSchema-instance"
    xsi:schemaLocation="http://www.springframework.org/schema/beans
        http://www.springframework.org/schema/beans/spring-beans.xsd">

    <bean id="people" class="com.oy.entity.People" init-method="myInit" destroy-method="myDestroy"></bean>

    <bean id="userService" class="com.oy.entity.UserServiceImpl" init-method="myInit" destroy-method="myDestroy"></bean>

    <bean id="stuServiceId" class="com.oy.entity.StudentServiceImpl" init-method="myInit" destroy-method="myDestroy"></bean>


    <!-- 将后处理BeanPostProcessor接口的实现类注册到Spring容器 -->
    <!-- spring将首先初始化该bean,与在xml配置的位置无关 -->
    <bean class="com.oy.entity.BeanPostProcessorImpl"/>

    <!-- 将DisPosableBean接口的实现注册到Spring容器 -->
    <bean id="disPosableBeanImpl" class="com.oy.entity.DisPosableBeanImpl"/>

</beans>
测试类
package com.oy.test; import org.junit.Before; import org.junit.Test; import org.springframework.context.ApplicationContext; import org.springframework.context.support.ClassPathXmlApplicationContext; import com.oy.entity.IPeople; import com.oy.entity.IUserService; /** * bean的生命周期: * 1.bean的初始化方法和销毁方法 * <bean id="" class="" init-method="" destroy-method=""/> * 2.BeanPostProcessor接口: 后处理Bean * * @author oy * @version 1.0 * @date 2018年12月29日 * @time 上午10:51:26 */ public class PeopleTest { ApplicationContext ctx = null; @Before public void before() { ctx = new ClassPathXmlApplicationContext("beans.xml"); } /** * 1.bean的初始化方法和销毁方法: * 容器加载配置文件初始化后,将调用People的无参构造进行bean实例化, * 然后调用bean实例的初始化方法 init-method="myInit"。 * 什么时候调用销毁方法 destroy-method="myDestroy"?容器关闭时,且bean是单例的。 * 2.BeanPostProcessor接口: 后处理Bean * spring 提供一种机制,只要实现此接口BeanPostProcessor,并将实现类提供给spring容器, * spring容器将自动执行,在容器每个bean的初始化方法前执行before(),在容器每个bean初始化方法后执行after()。 * 3.模拟Spring IoC实例化bean的过程,即bean的生命周期: A a =new A(); --> 调用无参构造创建对象 a = B.before(a); --> 将a的实例对象传递给后处理bean,可以生成代理对象并返回。 a.init(); --> 调用bean的初始化方法 a = B.after(a); a.addUser(); //生成代理对象,目的是在目标方法前后执行(例如:开启事务、提交事务、性能监控) a.destroy() * @throws Exception */ @Test public void test1() throws Exception { System.out.println("=======容器初始化完毕======="); IPeople p = (IPeople)ctx.getBean("people"); //目标方法 p.add(); p.delete(); // 容器关闭时,调用销毁方法 destroy-method="myDestroy",要保证bean是单例的。 //ctx.getClass().getMethod("close").invoke(ctx); // 事实上,close()方法是ClassPathXmlApplicationContext类中提供的 // 使用多态(子类对象指向父类引用),不能直接调用子类特有的方法 // 向下强转 ((ClassPathXmlApplicationContext)ctx).close(); } @Test public void test2() throws Exception { System.out.println("=======容器初始化完毕======="); IUserService u = (IUserService)ctx.getBean("userService"); //目标方法 u.add(); u.delete(); // 容器关闭时,调用销毁方法 destroy-method="myDestroy",要保证bean是单例的。 ((ClassPathXmlApplicationContext)ctx).close(); } }
package com.oy.test;

import org.junit.After;
import org.junit.Before;
import org.junit.Test;
import org.springframework.context.support.ClassPathXmlApplicationContext;

import com.oy.entity.StudentService;

/**
 * @author oy
 * @version 1.0
 * @date 2019年1月1日
 * @time 上午3:26:32
 */
public class StudentTest {

    ClassPathXmlApplicationContext ctx = null;
    @Before
    public void setUp() throws Exception {
        ctx = new ClassPathXmlApplicationContext("beans.xml");
    }

    @After
    public void tearDown() throws Exception {
        System.out.println();
        System.out.println("===========销毁IoC容器===========");
        ctx.close();
    }

    /* 测试结果:
        ==========调用BeanPostProcessorImpl无参构造==========

        ==========调用DisPosableBeanImpl无参构造==========
        前处理方法,beanName为:disPosableBeanImpl
        后处理方法,bean的类型为:com.oy.entity.DisPosableBeanImpl

        ==========调用People无参构造==========
        前处理方法,beanName为:people
        调用People初始化方法。。。
        后处理方法,bean的类型为:com.oy.entity.People

        ==========调用UserServiceImpl无参构造==========
        前处理方法,beanName为:userService
        调用UserServiceImpl初始化方法。。。
        后处理方法,bean的类型为:com.oy.entity.UserServiceImpl

        ==========调用StudentServiceImpl无参构造==========
        给StudentServiceImpl注入属性值beanName:stuServiceId
        给StudentServiceImpl注入属性值applicationContext:org.springframework.context.support.ClassPathXmlApplicationContext
        前处理方法,beanName为:stuServiceId
        调用StudentServiceImpl初始化方法。。。
        后处理方法,bean的类型为:com.oy.entity.StudentServiceImpl
        调用StudentServiceImpl目标方法:add()。。。

        ===========销毁IoC容器===========
        调用StudentServiceImpl销毁方法。。。
        调用UserServiceImpl销毁方法。。。
        调用People销毁方法。。。


        Spring IoC容器关闭。。。
     */
    @Test
    public void test() {
        StudentService studentService = (StudentService)ctx.getBean("stuServiceId");
        studentService.add();
    }

}
11、装配Bean--基于注解Annotation <--返回目录
注解使用前提:添加schema命名空间,让spring扫描含有注解的类
<beans xmlns="http://www.springframework.org/schema/beans"
       xmlns:xsi="http://www.w3.org/2001/XMLSchema-instance"
       【xmlns:context="http://www.springframework.org/schema/context"】
       xsi:schemaLocation="http://www.springframework.org/schema/beans
                           http://www.springframework.org/schema/beans/spring-beans.xsd
                          【http://www.springframework.org/schema/context
                           http://www.springframework.org/schema/context/spring-context.xsd">】
    <!-- 组件扫描,扫描含有注解的类 base-package:指定包 -->
    <context:component-scan base-package="com.oy"></context:component-scan>
</beans>
@Component取代<bean class=""/>
@Component("userDaoid")取代<bean id="userDaoId" class="UserDaoImpl"/>
在UserDaoImpl类定义中添加注解@Component("userDaoId")===>这就相当于在配置文件中写了<bean id="userDaoId" class="UserDaoImpl"/>
* web开发,提供3个@Component注解衍生注解(功能一样)取代<bean class="">
@Repository :dao层
@Service:service层
@Controller:web层
* 依赖注入,给私有字段设置,也可以给setter方法设置
普通值:@Value("")
引用值:
方式1:按照【类型】注入
@Autowired
方式2:按照【名称】注入1
@Autowired
@Qualifier("名称")
方式3:按照【名称】注入2
@Resource[("名称")]
* 注意:
@Resource不写名称,就是根据【类型】注入
@Resource是JDK提供的,jdk1.5没有
@Autowired是由spring提供的
* 生命周期
初始化:@PostConstruct
销毁: @PreDestroy
* 作用域
@Scope("prototype") 多例