1、默认表单认证
2、自定义表单登陆页
3、自定义数据库模型的认证和授权
3.1、使用 mysql 创建数据库
3.2、mybatis generator 生成代码
3.3、springboot 整合 mybatis
3.4、实现 UserDetails
3.5、实现 UserDetailsService
1、默认表单认证 <--返回目录
创建 springboot 项目,依赖:
<dependency>
    <groupId>org.springframework.boot</groupId>
    <artifactId>spring-boot-starter-web</artifactId>
</dependency>

<dependency>
    <groupId>org.springframework.boot</groupId>
    <artifactId>spring-boot-starter-security</artifactId>
</dependency>
写一个测试 controller
@RestController
@RequestMapping("/index")
public class IndexController {
    @RequestMapping("/test1")
    public String test1(String name, Integer age) {
        return "test1";
    }
}
启动项目,访问 http://localhost:8089/BootDemo/index/test1,弹出默认表单认证

默认用户名为 user, 密码是动态生成并打印到控制台的一窜随机码。当然,用户名和密码可以在application.properties 中配置
spring.security.user.name=test
spring.security.user.password=123
2、自定义表单登陆页 <--返回目录
虽然spring security 自带的表单登陆页可以方便快速地启动,但大多数应用程序更希望提供自己的的表单登陆页,此时就需要自定义表单登陆页。
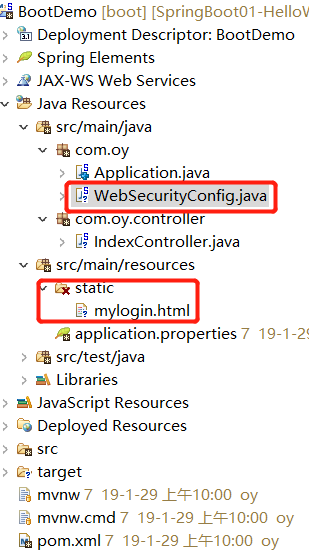
WebSecurityConfig
package com.oy;

import org.springframework.security.config.annotation.web.builders.HttpSecurity;
import org.springframework.security.config.annotation.web.configuration.EnableWebSecurity;
import org.springframework.security.config.annotation.web.configuration.WebSecurityConfigurerAdapter;

@EnableWebSecurity
public class WebSecurityConfig extends WebSecurityConfigurerAdapter {

    @Override
    protected void configure(HttpSecurity http) throws Exception {
        http.authorizeRequests().anyRequest().authenticated()
            .and().formLogin().loginPage("/mylogin.html")
            .loginProcessingUrl("/login") // 指定处理登陆请求的路径
            .permitAll() // 登陆页和 "/login" 不设置权限
            .and().csrf().disable();
    }
}
表单登陆页


<!DOCTYPE html> <html> <head> <meta charset="UTF-8"> <title>Insert title here</title> </head> <body> <h2>自定义表单登陆页</h2> <form action="login" method="post"> 用户名:<input type="text" name="username" /><br/> 密 码:<input type="text" name="password" /><br/> <input type="submit" value="提交" /> </form> </body> </html>
启动项目,访问 localhost:8089/BootDemo/index/test1,自动跳转到登陆页(浏览器地址为 http://localhost:8089/BootDemo/mylogin.html)。
输入test/123, 登陆成功,拿到响应结果:

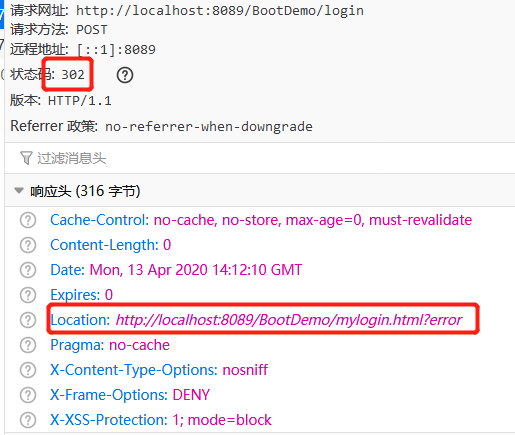
如果输入错误的用户名或密码,响应结果(状态码 302,重定向到登陆页)
对现在前后端分离的项目而言,重定向不在需要后端做,后端一般返回 json 数据,告知前端登陆成功与否,由前端决定如何处理后续逻辑,而非由服务器主动执行页面跳转。这在 Spring Security 中同样可以实现。
@EnableWebSecurity
public class WebSecurityConfig extends WebSecurityConfigurerAdapter {

    @Override
    protected void configure(HttpSecurity http) throws Exception {
        http.authorizeRequests().anyRequest().authenticated().and()
            .formLogin().loginPage("/mylogin.html")
            .loginProcessingUrl("/login") // 指定处理登陆请求的路径
            // 指定登陆成功时的处理逻辑
            .successHandler(new AuthenticationSuccessHandler() {

                @Override
                public void onAuthenticationSuccess(HttpServletRequest request, HttpServletResponse response,
                        Authentication authentication) throws IOException, ServletException {
                    response.setContentType("application/json;charset=utf-8");
                    response.getWriter().write("{"code":0, "data":{}}");
                }

            })
            // 指定登陆失败时的处理逻辑
            .failureHandler(new AuthenticationFailureHandler() {

                @Override
                public void onAuthenticationFailure(HttpServletRequest request, HttpServletResponse response,
                        AuthenticationException exception) throws IOException, ServletException {
                    response.setContentType("application/json;charset=utf-8");
                    response.setStatus(401);
                    response.getWriter().write("{"code":0, "msg":"用户名或密码错误"}");
                }

            })

            .permitAll().and()
            .csrf().disable();
    }
}
其中,successHandler()方法带有一个 Authentication 参数,携带当前登陆用户名及其角色等信息;而 failureHandler() 方法携带一个AuthenticationException 异常参数。
3、自定义数据库模型的认证和授权 <--返回目录
前面沿用了 Spring Security 默认的安全机制:仅有一个用户,仅有一种角色。在实际开发中,这自然是无法满足要求的。
编写三个 controller 进行测试,其中 /admin/api 下的内容是系统后台管理相关的API,必须拥有管理员权限(具有 "admin" 角色)才能访问; /user/api 必须在用户登陆并且具有 “user” 角色才能访问。
@RestController
@RequestMapping("/admin/api")
public class AdminController {
    @GetMapping("/hello")
    public String hello() {
        return "hello, admin";
    }
}
@RestController
@RequestMapping("/user/api")
public class UserController {
    @GetMapping("/hello")
    public String hello() {
        return "hello, user";
    }
}
@RestController
@RequestMapping("/app/api")
public class AppController {
    @GetMapping("/hello")
    public String hello() {
        return "hello, app";
    }
}
启动项目,访问 http://localhost:8089/BootDemo/user/api/hello,跳转到登陆页面,使用 test/123 登陆后。再次访问 http://localhost:8089/BootDemo/user/api/hello,此时服务器返回 403,表示用户授权失败(401 代表用户认证失败)。
3.1、使用 mysql 创建数据库 <--返回目录
create database security_test charset=utf8;
use security_test;
create table user (
    `id` bigint not null auto_increment,
    `username` varchar(100) not null,
    `password` varchar(100) not null,
    `enable` tinyint not null default 1 comment '用户是否可用,1:可用,2:禁用',
    `roles` varchar(500) comment '角色,多个角色用逗号隔开',
    primary key (`id`),
    key username (`username`)
);

insert into user(username,password,roles) values('admin','123','ROLE_user,ROLE_admin');
insert into user(username,password,roles) values('user','123','ROLE_user');
3.2、mybatis generator 生成代码 <--返回目录
新建一个普通 Java Project
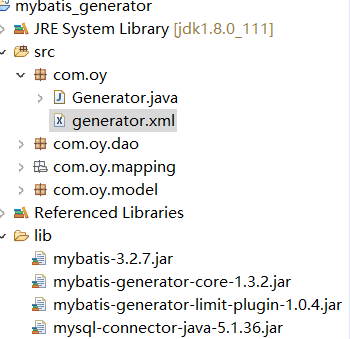
Generator 类
package com.oy;

import java.io.File;
import java.util.ArrayList;
import java.util.List;

import org.mybatis.generator.api.MyBatisGenerator;
import org.mybatis.generator.config.Configuration;
import org.mybatis.generator.config.xml.ConfigurationParser;
import org.mybatis.generator.internal.DefaultShellCallback;

public class Generator {
    public static void main(String[] args) throws Exception {
        List<String> warnings = new ArrayList<String>();
        boolean overwrite = true;
        File configFile = new File("src/com/oy/generator.xml");
        ConfigurationParser cp = new ConfigurationParser(warnings);
        Configuration config = cp.parseConfiguration(configFile);
        DefaultShellCallback callback = new DefaultShellCallback(overwrite);
        MyBatisGenerator myBatisGenerator = new MyBatisGenerator(config, callback, warnings);
        myBatisGenerator.generate(null);
    }
}
generator.xml
<?xml version="1.0" encoding="UTF-8"?>
<!DOCTYPE generatorConfiguration
  PUBLIC "-//mybatis.org//DTD MyBatis Generator Configuration 1.0//EN"
  "http://mybatis.org/dtd/mybatis-generator-config_1_0.dtd">
<generatorConfiguration>
    <!-- 数据库驱动-->
    <!-- <classPathEntry  location="C:Usersxxx.m2
epositorymysqlmysql-connector-java5.1.38mysql-connector-java-5.1.38.jar"/> -->

    <context id="DB2Tables"  targetRuntime="MyBatis3">
        <plugin type="com.qiukeke.mybatis.plugins.MySQLLimitPlugin"></plugin>

        <commentGenerator>
            <property name="suppressDate" value="true"/>
            <property name="suppressAllComments" value="true"/>
        </commentGenerator>

        <jdbcConnection driverClass="com.mysql.jdbc.Driver" connectionURL="jdbc:mysql://127.0.0.1:3306/security_test"
            userId="root" password="123456">
        </jdbcConnection>

        <javaTypeResolver>
            <property name="forceBigDecimals" value="false"/>
        </javaTypeResolver>


        <javaModelGenerator targetPackage="com.oy.model" targetProject=".src">
            <property name="enableSubPackages" value="true"/>
            <property name="trimStrings" value="true"/>
        </javaModelGenerator>
        <sqlMapGenerator targetPackage="com.oy.mapping" targetProject=".src">
            <property name="enableSubPackages" value="true"/>
        </sqlMapGenerator>
        <javaClientGenerator type="XMLMAPPER" targetPackage="com.oy.dao" targetProject=".src">
            <property name="enableSubPackages" value="true"/>
        </javaClientGenerator>

        <table tableName="user" domainObjectName="User" enableCountByExample="true" enableUpdateByExample="true" enableDeleteByExample="true" enableSelectByExample="true" selectByExampleQueryId="true"></table>
    </context>

</generatorConfiguration>
运行 Generator#main(),即可生成代码。
上面的 jar 可以从 maven 仓库下载(建个 maven 工程,jar包下载到本地仓库,手动复制到上面的项目中)
<dependency>
    <groupId>org.mybatis</groupId>
    <artifactId>mybatis-spring</artifactId>
    <version>1.3.0</version>
</dependency>
<dependency>
    <groupId>org.mybatis</groupId>
    <artifactId>mybatis</artifactId>
    <version>3.2.6</version>
</dependency>
<dependency>
    <groupId>mysql</groupId>
    <artifactId>mysql-connector-java</artifactId>
    <version>5.1.36</version>
</dependency>
<!-- limit selection -->
<dependency>
    <groupId>com.qiukeke</groupId>
    <artifactId>mybatis-generator-limit-plugin</artifactId>
    <version>1.0.4</version>
</dependency>
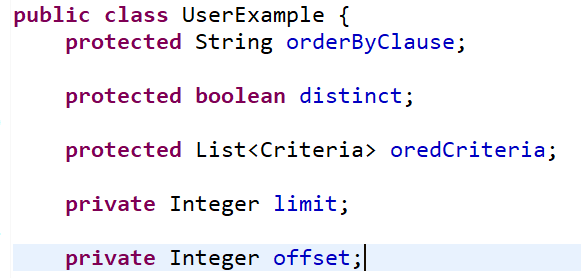
mybatis-generator-limit-plugin-1.0.4.jar 是个 mybatis 分页插件,会在 实体 example 类中添加 limit、offset 两个字段(同时 mapping.xml 文件中也加入了分页功能)
3.3、springboot 整合 mybatis <--返回目录
依赖:
<!-- mybatis 相关 [start] -->
<dependency>
    <groupId>org.mybatis.spring.boot</groupId>
    <artifactId>mybatis-spring-boot-starter</artifactId>
    <version>1.3.2</version>
</dependency>
<!-- <dependency>
    <groupId>org.mybatis</groupId>
    <artifactId>mybatis-spring</artifactId>
    <version>1.3.0</version>
</dependency>
<dependency>
    <groupId>org.mybatis</groupId>
    <artifactId>mybatis</artifactId>
    <version>3.2.6</version>
</dependency> -->
<dependency>
    <groupId>mysql</groupId>
    <artifactId>mysql-connector-java</artifactId>
    <version>5.1.36</version>
</dependency>
<!-- mybatis 相关 [end] -->
配置:
#datasource
spring.datasource.driver-class-name=com.mysql.jdbc.Driver
spring.datasource.url=jdbc:mysql://127.0.0.1:3306/security_test?useUnicode=true&characterEncoding=utf8&serverTimezone=GMT%2B8
spring.datasource.username=root
spring.datasource.password=123456
spring.datasource.tomcat.min-idle=5

##################### MyBatis相关配置 [start] #####################
#MyBatis映射文件
mybatis.mapper-locations=classpath:com/oy/mapping/*.xml
#扫描生成实体的别名,需要和注解@Alias联合使用
mybatis.type-aliases-package=com.oy.model
#MyBatis配置文件,当你的配置比较复杂的时候,可 以使用
#mybatis.config-location=
#级联延迟加载。true:开启延迟加载
mybatis.configuration.lazy-loading-enabled=true
#积极的懒加载。false:按需加载
mybatis.configuration.aggressive-lazy-loading=false
##################### MyBatis相关配置 [end]  ######################
在主 springboot 配置类上添加注解 @MapperScan 扫描 dao 接口生成代理对象
@SpringBootApplication
@MapperScan("com.oy.dao")
public class Application {

    public static void main(String[] args) {
        SpringApplication.run(Application.class, args);
    }

}
写测试代码,进行测试:
@RestController
@RequestMapping("/app/api")
public class AppController {

    @Autowired
    private UserService userService;

    @RequestMapping("/{id}")
    public String findById(@PathVariable Long id) {
        User dbUser = userService.getUserById(id);
        return JSONObject.toJSONString(dbUser);
    }

    @GetMapping("/hello")
    public String hello() {
        return "hello, app";
    }
}

@Service
public class UserServiceImpl implements UserService {

    @Autowired
    private UserDao userDao;

    @Override
    public User getUserById(Long id) {
        return userDao.selectByPrimaryKey(id);
    }

}
访问 http://localhost:8089/BootDemo/app/api/1,结果:

3.4、实现 UserDetails <--返回目录
Spring Security 中,使用 UserDetails 来封装用户信息,包含一系列在验证时要用到的信息,比如用户名、密码、权限及其他信息,Spring Security 会根据这些信息来校验。
UserDetails 有这样一些方法:
public interface UserDetails extends Serializable {
    /**
     * Returns the authorities granted to the user. Cannot return <code>null</code>.
     *
     * @return the authorities, sorted by natural key (never <code>null</code>)
     */
    Collection<? extends GrantedAuthority> getAuthorities();

    /**
     * Returns the password used to authenticate the user.
     *
     * @return the password
     */
    String getPassword();

    /**
     * Returns the username used to authenticate the user. Cannot return <code>null</code>.
     *
     * @return the username (never <code>null</code>)
     */
    String getUsername();

    /**
     * Indicates whether the user's account has expired. An expired account cannot be
     * authenticated.
     *
     * @return <code>true</code> if the user's account is valid (ie non-expired),
     * <code>false</code> if no longer valid (ie expired)
     */
    boolean isAccountNonExpired();

    /**
     * Indicates whether the user is locked or unlocked. A locked user cannot be
     * authenticated.
     *
     * @return <code>true</code> if the user is not locked, <code>false</code> otherwise
     */
    boolean isAccountNonLocked();

    /**
     * Indicates whether the user's credentials (password) has expired. Expired
     * credentials prevent authentication.
     *
     * @return <code>true</code> if the user's credentials are valid (ie non-expired),
     * <code>false</code> if no longer valid (ie expired)
     */
    boolean isCredentialsNonExpired();

    /**
     * Indicates whether the user is enabled or disabled. A disabled user cannot be
     * authenticated.
     *
     * @return <code>true</code> if the user is enabled, <code>false</code> otherwise
     */
    boolean isEnabled();
}
为了程序的可维护性,我没有修改 mybatis generator 根据数据库 user 表映射生成的 User 类,而是写一个新类继承 User 类,并实现 UserDetails 接口。
package com.oy.security;

import java.util.Collection;
import java.util.List;

import org.springframework.security.core.GrantedAuthority;
import org.springframework.security.core.userdetails.UserDetails;

import com.oy.model.User;

public class SecurityUser extends User implements UserDetails {

    private static final long serialVersionUID = 1L;
    private List<GrantedAuthority> authorities;

    public void setAuthorities(List<GrantedAuthority> authorities) {
        this.authorities = authorities;
    }

    /**
     * getAuthorities() 方法本身对应的是 roles 字段,但由于结构不一样,
     * 所以此类中添加一个 authorities 字段,后面自己手动设置
     */
    @Override
    public Collection<? extends GrantedAuthority> getAuthorities() {
        return this.authorities;
    }

    @Override
    public boolean isAccountNonExpired() {
        return true;
    }

    @Override
    public boolean isAccountNonLocked() {
        return true;
    }

    @Override
    public boolean isCredentialsNonExpired() {
        return true;
    }

    @Override
    public boolean isEnabled() {
        return true;
    }

    @Override
    public String toString() {
        return "SecurityUser [id=" + getId() + ", username=" + getUsername() + ", password="
                + getPassword() + ", enable=" + getEnable() + ", roles=" + getRoles() + "]";
    }


}
3.5、实现 UserDetailsService <--返回目录
UserDetailsService 仅定义了一个 loadUserByUsername() 方法,用于获取一个 UserDetails 对象。UserDetails 对象包含一系列在验证时会用到的信息,包括用户名、密码、权限等。
package com.oy.security;

import java.util.List;

import org.springframework.beans.factory.annotation.Autowired;
import org.springframework.security.core.authority.AuthorityUtils;
import org.springframework.security.core.userdetails.UserDetails;
import org.springframework.security.core.userdetails.UserDetailsService;
import org.springframework.security.core.userdetails.UsernameNotFoundException;
import org.springframework.stereotype.Service;

import com.oy.dao.UserDao;
import com.oy.model.User;
import com.oy.model.UserExample;

/**
 * @author oy
 * @version 1.0
 * @date 2020年4月14日
 * @time 上午10:25:02
 */
@Service
public class MyUserDetailsService implements UserDetailsService {
    @Autowired
    private UserDao userDao;

    @Override
    public UserDetails loadUserByUsername(String username) throws UsernameNotFoundException {
        // 从数据库尝试获取该用户
        UserExample example = new UserExample();
        UserExample.Criteria criteria = example.createCriteria();
        criteria.andUsernameEqualTo(username);
        List<User> userList = userDao.selectByExample(example);

        if (userList == null || userList.size() == 0) {
            throw new RuntimeException("该用户不存在");
        }

        SecurityUser sUser = getUser(userList.get(0));
        System.out.println("sUser: " + sUser);
        // 将数据库 roles 字段解析成 UserDetails 的权限集
        sUser.setAuthorities(AuthorityUtils.commaSeparatedStringToAuthorityList(sUser.getRoles()));
        return sUser;
    }

    /**
     * 读取 User 对象的属性,封装一个 SecurityUser 对象
     * @param user
     * @return
     */
    private SecurityUser getUser(User user) {
        if (user == null) {
            throw new RuntimeException("该用户不存在");
        }

        SecurityUser sUser = new SecurityUser();
        sUser.setEnable(user.getEnable());
        sUser.setId(user.getId());
        sUser.setPassword(user.getPassword());
        sUser.setRoles(user.getRoles());
        sUser.setUsername(user.getUsername());
        return sUser;
    }

}
3.6、其他
1)测试时报 java.lang.IllegalArgumentException: There is no PasswordEncoder mapped for the id "null" 这个错误。原因是5.x 版本后默认开启了委派密码编码器,所以本文暂时将密码编码器设置为 noOpPasswordEncoder。
@Bean
public PasswordEncoder passwordEncoder() {
    return NoOpPasswordEncoder.getInstance();
}
PasswordEncoder 接口有两个方法
public interface PasswordEncoder {
    String encode(CharSequence var1);
    boolean matches(CharSequence var1, String var2);
}
实际开发中,可以使用
@Bean
PasswordEncoder passowrdEncoder() {
    return new BCryptPasswordEncoder();
}
所以,当用户注册,保存用户的密码时,从 Spring 容器中获取 PasswordEncoder 实例,调用 PasswordEncoder 实例的 encode() 方法对密码进行加密(数据库存的是加密后的密码)。
2)UserDetails 接口中包含的一些方法,比如 isEnabled() 可以用来校验用户状态(是否删除),isAccountNonLocked() 可以用来校验用户状态(是否冻结)等。可以根据业务场景进行实现,比如:
@Override
public boolean isEnabled() {
    if (getEnable().intValue() == 2) {
        return false;
    }
    return true;
}
===================================================================================================
至此,代码写完了。当使用 admin/123 登陆后,再次访问 http://localhost:8089/BootDemo/admin/api/1, 就不会返回 403 了。
总结一下认证和授权过程:
1) 用户使用 admin/123 登陆时,Spring Security 调用 UserDetailsService#loadUserByUsername() 读取数据库,查出是否有 admin 这个用户名,有则读取,并将用户名、密码、权限封装成一个 UserDetails 对象返回。然后,Spring Security 根据UserDetails 对象的密码与表单传来的密码比较。
2) 当访问非公开权限的资源时,调用UserDetails#getAuthorities() 进行权限校验。
本文内容包括:
处理用户信息获取逻辑 UserDetailsService
处理用户校验逻辑 UserDetails
处理密码加密解密 PasswordEncoder

自定义登陆页面
自定义登陆成功处理 AuthenticationSuccessHandler
自定义登陆失败处理 AuthenticationFailureHandler
参考:
1)《Spring Security 实战》-- 陈木鑫