1. spring概述
- spring是一个开源框架
- spring为简化企业级应用开发而生,解决的是业务逻辑层和其他各层的松耦合问题,他将面向接口的编程思想贯穿整个系统应用。
- spring是javaSE/EE的一站式框架。web层有spring-mvc,业务层有spring ioc、事务等机制,持久层提供了spring-jdbc或者直接整合现有的框架(mybatis)
1.1 spring的优点
- 方便解耦,简化开发
- spring就是一个大工厂,可以将所有对象创建和依赖关系维护等工作交给spring管理。
- AOP编程的支持
- spring提供面向切面的编程,可以方便的实现对程序进行权限拦截、运行监控等功能。
- 声明式事务的支持
- 只需要通过配置就可以完成对事务的管理,而无需手动编程。
- 方便程序的测试
- spring对junit4支持,可以通过注解方便的测试spring程序
- 方便集成各种优秀的框架
- spring不排斥各种优秀的开源框架,其内部提供了对各种优秀框架(如Structs、Hibernate、Mybatis等)的直接支持。
- 降低可javaEE api的使用难度
- spring对javaEE开发中非常难用的一些api(JDBC、远程调用等)都进行了封装,是这些api应用难度降低。
1.2 spring的模块

2. spring IOC的引入
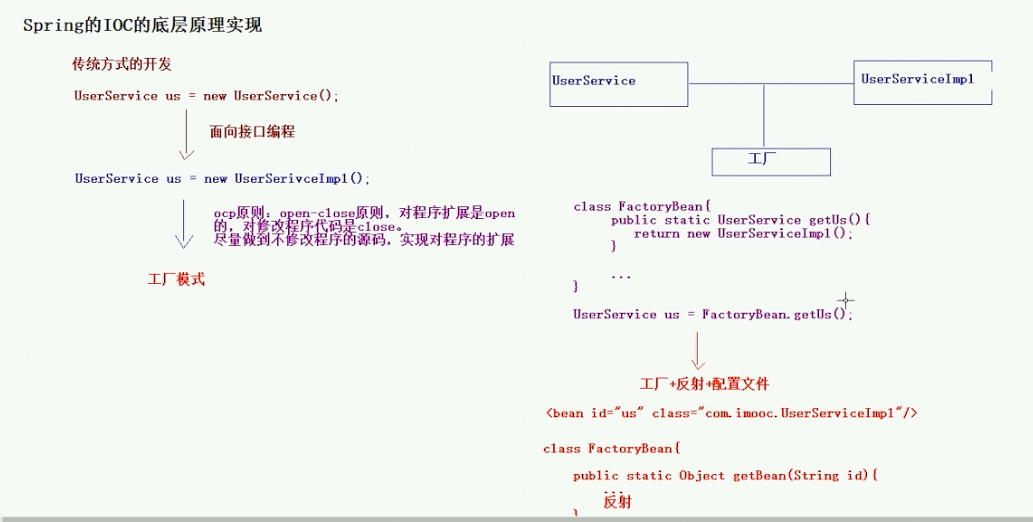
- 传统的开发方式下,我们直接使用new,获取相关的服务对象。
- 但是这样不符合面向接口的编程思想(关于面向接口的好处,可以参考https://blog.csdn.net/qq376430645/article/details/9927225)。于是把接口和其对应的实现类分开,做到面向接口的编程模式。
- 但是这样又不符合OCP原则(open-close原则),就是尽量不修改源码做到对程序的扩展。于是引入了工厂模式,负责生成接口的实现类。做到接口和实现的解耦。
- 但是标准的工厂类依然会同接口和实现类耦合,故引入了一种新的设计模式:工厂模式+反射+配置文件,在工厂类中读入同源码无关的配置文件,使用反射的方式对实现类进行实例化,做到最终的解耦。bingo!
3. spring IOC helloworld
-
引入spring的依赖,直接引入context即可,因为会将其依赖的所有包全部引入。
<dependency> <groupId>org.springframework</groupId> <artifactId>spring-context</artifactId> <version>4.3.18.RELEASE</version> </dependency> -
实现简单的bean类
-
UserService Interface
package com.ioc.demo1; public interface UserService { public void sayHello(); } -
UserService 实现类
package com.ioc.demo1;
public class UserServiceImpl implements UserService {
	public void sayHello() {
		System.out.println("Hello Spring");
	}
}
-
-
编写spring核心配置文件
-
在resources中创建xml配置文件application-context.xml
<?xml version="1.0" encoding="UTF-8"?>
<beans xmlns="http://www.springframework.org/schema/beans"
	xmlns:xsi="http://www.w3.org/2001/XMLSchema-instance"
	xsi:schemaLocation="http://www.springframework.org/schema/beans
	http://www.springframework.org/schema/beans/spring-beans.xsd">

	<!-- UserService的创建权交给spring -->
	<bean id="userService" class="com.ioc.demo1.UserServiceImpl"></bean>

</beans>
-
-
在程序中读取spring的配置文件,通过spring框架获得bean,完成相应的操作
package com.ioc.demo1;

import org.junit.Test;
import org.springframework.context.ApplicationContext;
import org.springframework.context.support.ClassPathXmlApplicationContext;

public class SpringDemo1 {

	@Test
	/**
	 * 传统方式开发
	 */
	public void demo1() {
		UserService userService = new UserServiceImpl();
		userService.sayHello();
	}

	@Test
	/**
	 * spring的方式实现
	 */
	public void demo2() {
		// spring工厂
		ApplicationContext applicationContext = new ClassPathXmlApplicationContext("application-context.xml");
		// 通过工厂获取类对象
		UserService userService = (UserService) applicationContext.getBean("userService");
		userService.sayHello();
	}
}
4. IOC和DI的基本概念
- IOC Inverse of Control 反转控制的概念,就是将原本在程序中手动创建UserService对象的控制权,交由Spring框架管理。
- 简单说,就是创建UserService对象控制权被反转到了Spring框架。
- DI Dependency Injection 依赖注入的概念,就是在Spring创建这个对象的过程中,将这个对象所依赖的属性注入进去。
关于DI我们这边再实例讲一下,我们的UserServiceImpl由于业务的需求,新增一个name的string字段。
package com.ioc.demo1;
public class UserServiceImpl implements UserService {
	private String name;
	public void sayHello() {
		System.out.println("Hello Spring " + name);
	}
	public String getName() {
		return name;
	}
	public void setName(String name) {
		this.name = name;
	}
}
由于该处的修改,在调用处需要做出相应的修改,首先UserService接口中没有name字段,需要将接口类改成实现类,再加上属性赋值的语句。如下所示:
	@Test
	/**
	 * 传统方式开发,增加了name字段
	 */
	public void demo11() {
		UserServiceImpl userService = new UserServiceImpl();
		userService.setName("xxx");
		userService.sayHello();
	}
而spring开发模式中,由于DI的存在,我们只需要修改配置文件即可,在调用处无需修改任何代码。
	<bean id="userService" class="com.ioc.demo1.UserServiceImpl">
		<property name="name" value="xxx"></property>
	</bean>