发布-订阅消息模式与点对点模式类似,只不过在session创建消息队列时,由session.createQuene()变为session.createTopic()。
消息发布者代码:
package com.feiyang.activemq2;
import javax.jms.Connection;
import javax.jms.ConnectionFactory;
import javax.jms.Destination;
import javax.jms.JMSException;
import javax.jms.MessageProducer;
import javax.jms.Session;
import javax.jms.TextMessage;
import org.apache.activemq.ActiveMQConnectionFactory;
/**
* 消息发布者
*
* @author MCL
*
*/
public class JMSProducer {
private static final String USERNAME = ActiveMQConnectionFactory.DEFAULT_USER;// 默认的连接的用户名
private static final String PASSWORD = ActiveMQConnectionFactory.DEFAULT_PASSWORD;// 默认的连接密码
private static final String BROKEURL = ActiveMQConnectionFactory.DEFAULT_BROKER_URL;// 默认的连接地址
private static final int SENDNUM = 10;// 发送消息的数量
public static void main(String[] args) {
ConnectionFactory connectionFactory;// 连接工厂
Connection connection = null;// 连接
Session session;// 会话 发送或者接受消息的线程
Destination destination;// 消息的目的地
MessageProducer messageProducer;// 消息生产者
// 实例化连接工厂
connectionFactory = new ActiveMQConnectionFactory(JMSProducer.USERNAME, JMSProducer.PASSWORD,
JMSProducer.BROKEURL);
try {
// 通过连接工厂获取连接
connection = connectionFactory.createConnection();
// 启动连接
connection.start();
session = connection.createSession(true, Session.AUTO_ACKNOWLEDGE);
destination = session.createTopic("FirstTopic");// 创建消息队列
messageProducer = session.createProducer(destination);// 创建消息生产者
sendMessage(session, messageProducer);
// 由于设置添加事务,这里需要使用提交才能将数据发送出去
session.commit();
} catch (JMSException e) {
// TODO Auto-generated catch block
e.printStackTrace();
} finally {
if (connection != null) {
try {
connection.close();
} catch (JMSException e) {
// TODO Auto-generated catch block
e.printStackTrace();
}
}
}
}
// 发送消息
public static void sendMessage(Session session, MessageProducer messageProducer) {
for (int i = 0; i < JMSProducer.SENDNUM; i++) {
try {
TextMessage message = session.createTextMessage("Active MQ发送消息" + i);
System.out.println("发布消息:Active MQ发送消息");
messageProducer.send(message);
} catch (JMSException e) {
// TODO Auto-generated catc h block
e.printStackTrace();
}
}
}
}
消息订阅者代码:
package com.feiyang.activemq2;
import javax.jms.Connection;
import javax.jms.ConnectionFactory;
import javax.jms.Destination;
import javax.jms.JMSException;
import javax.jms.MessageConsumer;
import javax.jms.Session;
import org.apache.activemq.ActiveMQConnection;
import org.apache.activemq.ActiveMQConnectionFactory;
/**
* 消息订阅者一
* @author MCL
*
*/
public class JMSConsumer {
private static final String USERNAME = ActiveMQConnection.DEFAULT_USER;// 默认的连接的用户名
private static final String PASSWORD = ActiveMQConnection.DEFAULT_PASSWORD;// 默认的连接密码
private static final String BROKEURL = ActiveMQConnection.DEFAULT_BROKER_URL;// 默认的连接地址
public static void main(String[] args) {
ConnectionFactory connectionFactory; // 连接工厂
Connection connection = null; // 连接
Session session; // 会话 接受或者发送消息的线程
Destination destination; // 消息的目的地
MessageConsumer messageConsumer; // 消息的消费者
connectionFactory = new ActiveMQConnectionFactory(JMSConsumer.USERNAME, JMSConsumer.PASSWORD,
JMSConsumer.BROKEURL);
try {
// 通过连接工厂获取连接
connection=connectionFactory.createConnection(); // 通过连接工厂获取连接
connection.start(); // 启动连接
session=connection.createSession(Boolean.FALSE, Session.AUTO_ACKNOWLEDGE); // 创建Session
destination=session.createTopic("FirstTopic");
messageConsumer=session.createConsumer(destination); // 创建消息消费者
messageConsumer.setMessageListener(new Listener()); // 注册消息监听
} catch (JMSException e) {
// TODO Auto-generated catch block
e.printStackTrace();
}
}
}
监听器代码:
package com.feiyang.activemq2;
import javax.jms.JMSException;
import javax.jms.Message;
import javax.jms.MessageListener;
import javax.jms.TextMessage;
/**
* 消息监听器
* @author MCL
*
*/
public class Listener implements MessageListener{
@Override
public void onMessage(Message message) {
// TODO Auto-generated method stub
try {
System.out.println("消息订阅者一收到的消息:"+((TextMessage)message).getText());
} catch (JMSException e) {
// TODO Auto-generated catch block
e.printStackTrace();
}
}
}
我们可以定义多个消息订阅者及其监听器。这里定义了两个订阅者,由于代码相似所以只粘贴一份。
由于发布-订阅模型的关系,需要先进行订阅后,才能接收发布者的消息。
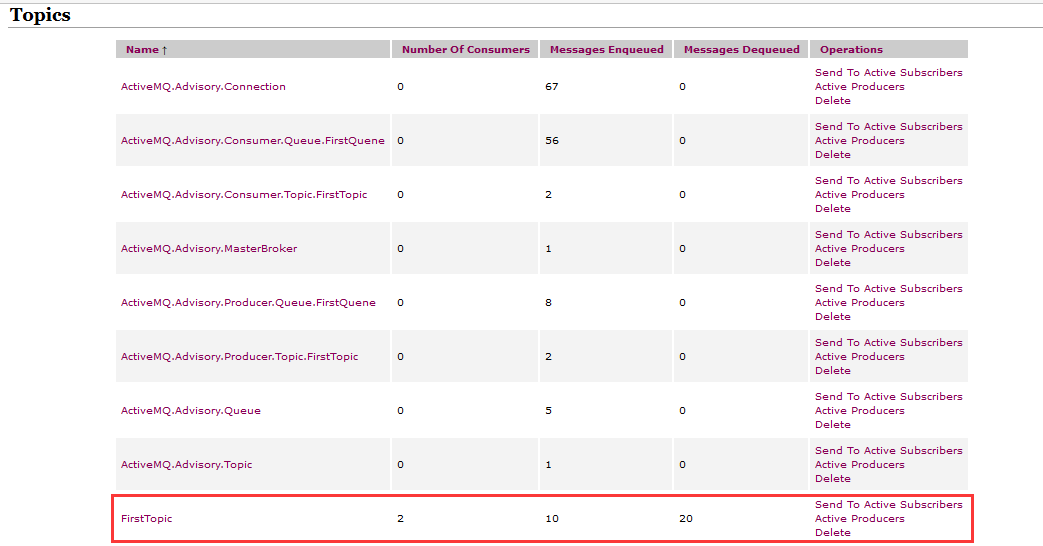
先启动 订阅者一和订阅者二的线程,然后用发布者 发布消息。打开后台管理界面,点击Topics
有上述图片可以看出,FirstTopic中,消息发布者发布了10条信息,并由两个订阅者进行消费,每人消费10条信息。
