在 3.1 版本中, Spring 引入了 bean profile 的功能。要使用 profile ,你首先要将所有不同的 bean 定义整理到一个或多个 profile 之中,在将应用部署到每个环境时,要确保对应的 profile 处于激活( active )的状态。
在 Java 配置中,可以使用 @Profile 注解指定某个 bean 属于哪一个 profile 。
@Service
@Profile("prod")
public class TestImpl implements ITest {
    public void show() {
        System.out.println("正式环境!");
    }
}
注意:Profile注解可以用到配置类上,配置类方法上,以及Bean类上等地方。在 Spring 3.1 中,只能在类级别上使用 @Profile 注解。不过,从 Spring 3.2 开始,你也可以在方法级别上使用 @Profile 注解,与 @Bean 注解一同使用。
在xml配置中:
<beans ... profile="prod"></beans>
注意:beans标签可以嵌套的。
Spring 在确定哪个 profile 处于激活状态时,需要依赖两个独立的属性: spring.profiles.active 和spring.profiles.default 。如果设置了 spring.profiles.active 属性的话,那么它的值就会用来确定哪个 profile 是激活的。但如果没有设置 spring.profiles.active 属性的话,那 Spring 将会查找 spring.profiles.default 的值。如果spring.profiles.active 和 spring.profiles.default 均没有设置的话,那就没有激活的 profile ,因此只会创建那些没有定义在profile 中的 bean 。
有多种方式来设置这两个属性:
-
作为 DispatcherServlet 的初始化参数;
-
作为 Web 应用的上下文参数;
-
作为 JNDI 条目;
-
作为环境变量;
-
作为 JVM 的系统属性;
-
在集成测试类上,使用 @ActiveProfiles 注解设置。
作为servlet参数
//方式一 package com.mkyong.servlet3; import javax.servlet.ServletContext; import javax.servlet.ServletException; public class MyWebInitializer extends AbstractAnnotationConfigDispatcherServletInitializer { //... @Override public void onStartup(ServletContext servletContext) throws ServletException { super.onStartup(servletContext); servletContext.setInitParameter("spring.profiles.active", "live"); //Set multiple active profile //servletContext.setInitParameter("spring.profiles.active", "dev, testdb"); } } //方式二 package com.mkyong.servlet3; import org.springframework.core.env.ConfigurableEnvironment; import org.springframework.web.context.WebApplicationContext; import org.springframework.web.servlet.support.AbstractAnnotationConfigDispatcherServletInitializer; public class MyWebInitializer extends AbstractAnnotationConfigDispatcherServletInitializer { //If the @Profile beans are loaded via root context @Override protected WebApplicationContext createRootApplicationContext() { WebApplicationContext context = (WebApplicationContext)super.createRootApplicationContext(); ((ConfigurableEnvironment)context.getEnvironment()).setActiveProfiles("live"); //Set multiple active profiles //((ConfigurableEnvironment)context.getEnvironment()) // .setActiveProfiles(new String[]{"live", "testdb"}); return context; } }
jvm参数

3.2 条件化的bean
假设你希望一个或多个 bean 只有在应用的类路径下包含特定的库时才创建。或者我们希望某个 bean 只有当另外某个特定的 bean 也声明了之后才会创建。我们还可能要求只有某个特定的环境变量设置之后,才会创建某个 bean 。 在 Spring 4 之前,很难实现这种级别的条件化配置,但是 Spring 4 引入了一个新的 @Conditional 注解,它可以用到带有 @Bean 注解的方法上。如果给定的条件计算结果为 true ,就会创建这个 bean ,否则的话,这个 bean 会被忽略
@Bean
@Conditional(MagicExitisCondition.class)
public MagicBean magicBean(){
    return new MagicBean();
}
可以看到, @Conditional 中给定了一个 Class ,它指明了条件 —— 在本例中,也就是 MagicExistsCondition 。 @Conditional 将会通过 Condition 接口进行条件对比:
public interface Condition{
    boolean matches(ConditionContext ctxt,AnnotatedTypeMetadata metadata);
}
如果 matches() 方法返回 true ,那么就会创建带有 @Conditional 注解的 bean 。如果 matches() 方法返回 false ,将不会创建这些 bean 。
public class MagicExitisCondition implements Condition{
    public boolean matches(ConditionContext context,AnnotatedTypeMetadata metadata){
        Environment env = context.getEnvironment();
        //检查magic变量是否存在
        return env.containsProperty("magic");
    }
}
通过 ConditionContext ,我们可以做到如下几点:
-
借助 getRegistry() 返回的 BeanDefinitionRegistry 检查 bean 定义;
-
借助 getBeanFactory() 返回的 ConfigurableListableBeanFactory 检查 bean 是否存在,甚至探查 bean 的属性;
-
借助 getEnvironment() 返回的 Environment 检查环境变量是否存在以及它的值是什么;
-
读取并探查 getResourceLoader() 返回的 ResourceLoader 所加载的资源;
-
借助 getClassLoader() 返回的 ClassLoader 加载并检查类是否存在。
AnnotatedTypeMetadata 则能够让我们检查带有 @Bean 注解的方法上还有什么其他的注解。像 ConditionContext 一样, AnnotatedTypeMetadata 也是一个接口。
从 Spring 4 开始, @Profile 注解进行了重构,使其基于 @Conditional 和 Condition 实现。
3.3 处理自动装配的歧义性
当一个接口有多个实现时,使用Autowired注解自动注入时,程序不知道采用哪个实现会出现问题。
标示首选bean ,使用注解@Primary。
限定自动装配的bean,使用注解@Qualifier。
@Component @Qualifier("cold") public class IceCream implements Dessert{...} @Autowired @Qualifier("cold") public void setDessert(Dessert desert){ this.desert = desert; }
注意:@Qualifier注解可以多个并用。
3.4 bean的作用域
Spring 定义了多种作用域,可以基于这些作用域创建 bean ,包括:
-
单例( Singleton ):在整个应用中,只创建 bean 的一个实例。
-
原型( Prototype ):每次注入或者通过 Spring 应用上下文获取的时候,都会创建一个新的 bean 实例。
-
会话( Session ):在 Web 应用中,为每个会话创建一个 bean 实例。
-
请求( Rquest ):在 Web 应用中,为每个请求创建一个 bean 实例。
单例是默认的作用域,如果选择其他的作用域,要使用 @Scope 注解,它可以与 @Component 或 @Bean 一起使用。
//这里,使用 ConfigurableBeanFactory 类的 SCOPE_PROTOTYPE 常量设置了原型作用域。你当然也可以使用 @Scope("prototype") ,但是使用 SCOPE_PROTOTYPE 常量更加安全并且不易出错。
@Bean
@Scope(ConfigurableBeanFactory.SCOPE_PROTOTYPE)
public Notepad notepad(){
    return new Notepad();
}
<bean id="notepad" class="com.myapp.Notepad" scope="prototype"/>
使用会话和请求作用域
@Component
@Scope(value = WebApplicationContext.SCOPE_SESSION ,proxyMode = ScopedProxyMode.TARGET_CLASS)
public class ShoppingCart {

}
我们将 value 设置成了 WebApplicationContext 中的 SCOPE_SESSION 常量(它的值是 session )。这会告诉 Spring 为 Web 应用中的每个会话创建一个 ShoppingCart 。这会创建多个 ShoppingCart bean 的实例,但是对于给定的会话只会创建一个实例,在当前会话相关的操作中,这个 bean 实际上相当于单例的。
现在,我们带着对这个作用域的理解,讨论一下 proxyMode 属性。如配置所示, proxyMode 属性被设置成了 ScopedProxyMode.INTERFACES ,这表明这个代理要实现 ShoppingCart 接口,并将调用委托给实现 bean 。如果 ShoppingCart 是接口而不是类的话,这是可以的(也是最为理想的代理模式)。但如果 ShoppingCart 是一个具体的类的话, Spring就没有办法创建基于接口的代理了。此时,它必须使用 CGLib 来生成基于类的代理。所以,如果 bean 类型是具体类的话,我们必须要将 proxyMode 属性设置为 ScopedProxyMode.TARGET_CLASS,以此来表明要以生成目标类扩展的方式创建代理。
在 XML 中声明作用域代理:
<bean id="cart" class="com.myapp.ShoppingCart" scope="session">
    <aop:scoped-proxy/>
</bean>
<aop:scoped-proxy> 是与 @Scope 注解的 proxyMode 属性功能相同的 Spring XML 配置元素。它会告诉 Spring 为 bean 创建一个作用域代理。默认情况下,它会使用 CGLib 创建目标类的代理。但是我们也可以将 proxy-target-class 属性设置为 false ,进而要求它生成基于接口的代理。
3.5 运行时注入值
Spring 提供了两种在运行时求值的方式:
-
属性占位符( Property placeholder )。
-
Spring 表达式语言( SpEL )。
app.properties
test.name = haha
test.intt = 1
RootConfig.java
@Configuration @ComponentScan(basePackages = {"ch03.service"}) @PropertySource("classpath:app.properties") public class RootConfig { @Bean public Root createRoot(){ return new Root(); } @Bean(name = "placeholderConfigurer") public static CustomizedPropertySourcesPlaceholderConfigurer placeholderConfigurer() { return new CustomizedPropertySourcesPlaceholderConfigurer(); } }
使用
  @Value("${test.name}")
  String name;
属性文件会加载到 Spring 的 Environment 中。
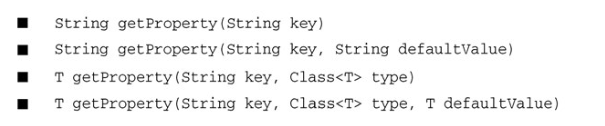
使用@Value注解是一种简便方式,当然也可以获取到spring容器中的Environment调用其方法来获取属性,例如env.getProperty("test.name")。
除了属性相关的功能以外, Environment 还提供了一些方法来检查哪些 profile 处于激活状态:
-
String[] getActiveProfiles() :返回激活 profile 名称的数组;
-
String[] getDefaultProfiles() :返回默认 profile 名称的数组;
-
boolean acceptsProfiles(String... profiles) :如果 environment 支持给定 profile 的话,就返回 true
为了使用占位符${...},我们必须要配置一个 PropertyPlaceholderConfigurer bean 或PropertySourcesPlaceholderConfigurerbean 。从 Spring 3.1 开始,推荐使用 PropertySourcesPlaceholderConfigurer ,因为它能够基于 Spring Environment 及其属性源来解析占位符。
@Bean(name = "placeholderConfigurer") public static CustomizedPropertySourcesPlaceholderConfigurer placeholderConfigurer() { return new CustomizedPropertySourcesPlaceholderConfigurer(); }
使用 Spring 表达式语言进行装配
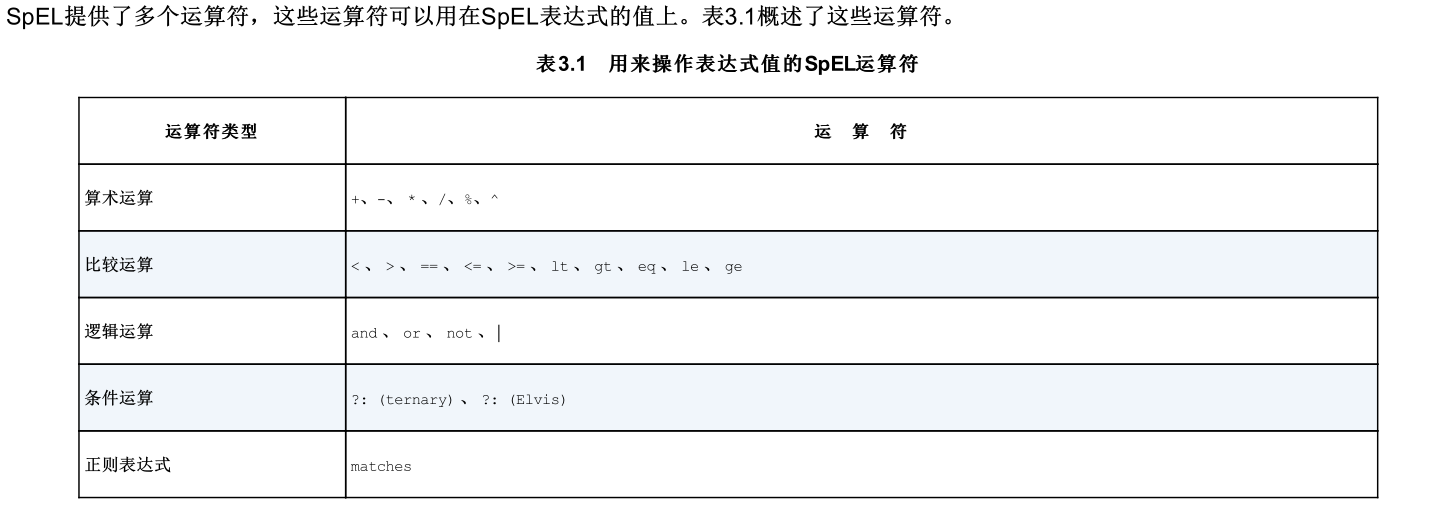
SpEL 拥有很多特性,包括:
-
使用 bean 的 ID 来引用 bean ;
-
调用方法和访问对象的属性;
-
对值进行算术、关系和逻辑运算;
-
正则表达式匹配;
-
集合操作。
需要了解的第一件事情就是 SpEL 表达式要放到 “#{ ... }” 之中,这与属性占位符有些类似,属性占位符需要放到 “${ ... }” 之中。
T()表达式会将 java.lang.System 视为 Java 中对应的类型,因此可以调用其 static 修饰的 currentTimeMillis() 方法。
正则例子:
“[]” 运算符用来从集合或数组中按照索引获取元素。SpEL 还提供了查询运算符( .?[] ),它会用来对集合进行过滤,得到集合的一个子集。SpEL 还提供了另外两个查询运算符: “.^[]” 和 “.$[]” ,它们分别用来在集合中查询第一个匹配项和最后一个匹配项。 SpEL 还提供了投影运算符( .![] ),它会从集合的每个成员中选择特定的属性放到另外一个集合中。实际上,投影操作可以与其他任意的 SpEL 运算符一起使用。
@Value(value = "#{placeholderConfigurer.getProperty('test.name')}")
String name1;
@Value("#{T(java.lang.Integer).valueOf(placeholderConfigurer.getProperty('test.intt')) + 10}")
Integer intt;