前言
一、zuul是什么
zuul 是netflix开源的一个API Gateway 服务器, 本质上是一个web servlet应用。
Zuul 在云平台上提供动态路由,监控,弹性,安全等边缘服务的框架。Zuul 相当于是设备和 Netflix 流应用的 Web 网站后端所有请求的前门。
zuul的例子可以参考 netflix 在github上的 simple webapp,可以按照netflix 在github wiki 上文档说明来进行使用。
二、zuul的工作原理
过滤器机制
zuul的核心是一系列的filters, 其作用可以类比Servlet框架的Filter,或者AOP。
zuul把Request route到 用户处理逻辑 的过程中,这些filter参与一些过滤处理,比如Authentication,Load Shedding等。
Zuul提供了一个框架,可以对过滤器进行动态的加载,编译,运行。
Zuul的过滤器之间没有直接的相互通信,他们之间通过一个RequestContext的静态类来进行数据传递的。RequestContext类中有ThreadLocal变量来记录每个Request所需要传递的数据。
Zuul的过滤器是由Groovy写成,这些过滤器文件被放在Zuul Server上的特定目录下面,Zuul会定期轮询这些目录,修改过的过滤器会动态的加载到Zuul Server中以便过滤请求使用。
下面有几种标准的过滤器类型:
Zuul大部分功能都是通过过滤器来实现的。Zuul中定义了四种标准过滤器类型,这些过滤器类型对应于请求的典型生命周期。
(1) PRE:这种过滤器在请求被路由之前调用。我们可利用这种过滤器实现身份验证、在集群中选择请求的微服务、记录调试信息等。
(2) ROUTING:这种过滤器将请求路由到微服务。这种过滤器用于构建发送给微服务的请求,并使用Apache HttpClient或Netfilx Ribbon请求微服务。
(3) POST:这种过滤器在路由到微服务以后执行。这种过滤器可用来为响应添加标准的HTTP Header、收集统计信息和指标、将响应从微服务发送给客户端等。
(4) ERROR:在其他阶段发生错误时执行该过滤器。
内置的特殊过滤器
zuul还提供了一类特殊的过滤器,分别为:StaticResponseFilter和SurgicalDebugFilter
StaticResponseFilter:StaticResponseFilter允许从Zuul本身生成响应,而不是将请求转发到源。
SurgicalDebugFilter:SurgicalDebugFilter允许将特定请求路由到分隔的调试集群或主机。
自定义的过滤器
除了默认的过滤器类型,Zuul还允许我们创建自定义的过滤器类型。
例如,我们可以定制一种STATIC类型的过滤器,直接在Zuul中生成响应,而不将请求转发到后端的微服务。
主要议题
- Zuul基本使用
- 整合Ribbon
- 整合Eureka
- 整合Hystrix
- 整合Feign
- 整合Config Server
- 问题总结
主体内容
一、Zuul基本使用
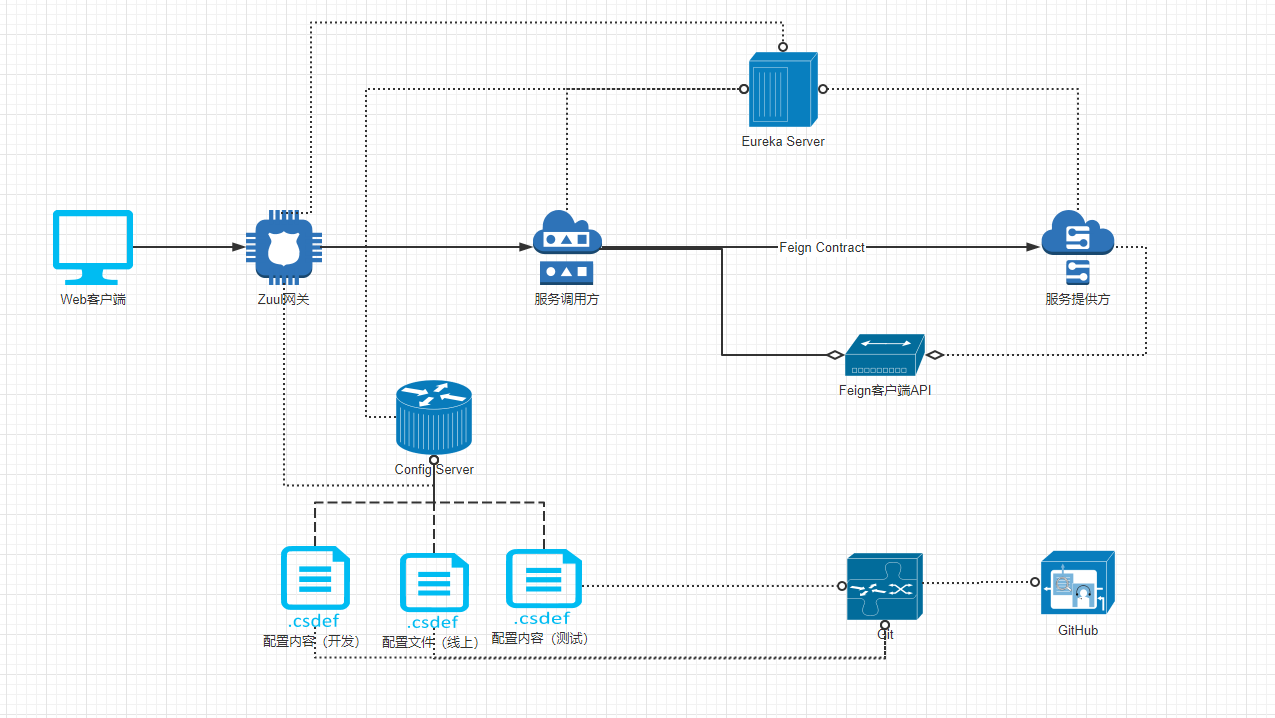
之前我们的架构图现在加入Zuul就该变成这样了。那么为什么我们要加入Config Server呢?我们在做网关的时候,不太可能是一个静态的配置,而是将采用动态的配置。
补充一个知识点:Nginx+Lua也可以实现。可以参考https://www.linux78.com/Nginx+lua%E5%8A%9F%E8%83%BD%E5%BA%94%E7%94%A8自行学习。
二、整合Ribbon
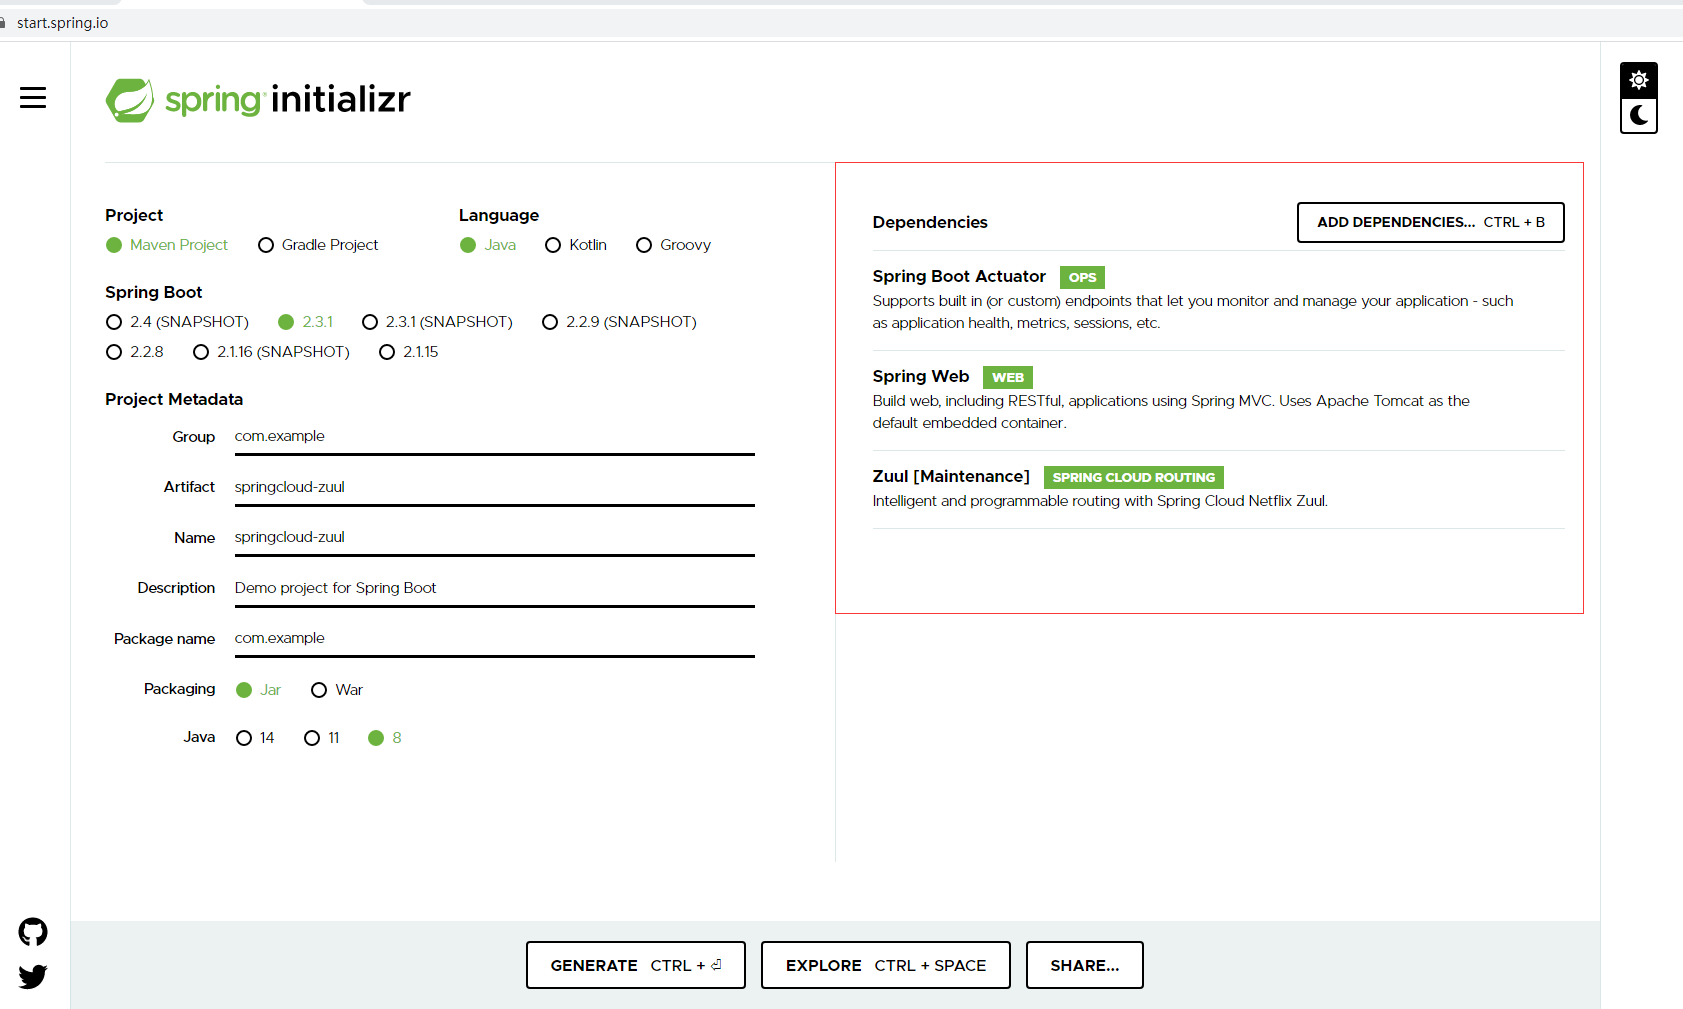
我们先去start.spring.io构建项目,首先整合ribbon。
1.启动类增加@EnableZuulProxy注解,激活zuul。
2.application.properties增加如下配置,解释见注释。
server.port=7070
#整合ribbon-去除eureka注册
eureka.client.register-with-eureka=false
# 不获取注册列表信息, 是否从eureka服务器获取注册信息 , false = 不获取,true = 获取
eureka.client.fetch-registry=false

#Eureka Server服务URL,用于客户端注册
eureka.client.serviceUrl.defaultZone=http://localhost:12345/eureka

#配置“person-service”的负载均衡服务器列表
person-service.ribbon.listOfServers=http://localhost:9090

#Zuul配置person-service服务调用  形式如:zuul.routes.${app-name}=/${app-url-profile}/**   (**代表目录的所有子目录包含父目录,*只包含当前目录)
zuul.routes.person-service=/person-service/**
3.新增spring boot security依赖,添加config包,包下类SecurityConfig.java,用于关闭安全。
(1)依赖
<dependency>
   <groupId>org.springframework.boot</groupId>
   <artifactId>spring-boot-starter-security</artifactId>
</dependency>
(2)类SecurityConfig.java
import org.springframework.context.annotation.Configuration;
import org.springframework.security.config.annotation.web.builders.WebSecurity;
import org.springframework.security.config.annotation.web.configuration.EnableWebSecurity;
import org.springframework.security.config.annotation.web.configuration.WebSecurityConfigurerAdapter;

@Configuration
@EnableWebSecurity
public class SecurityConfig extends WebSecurityConfigurerAdapter {

        @Override
        public void configure(WebSecurity web) throws Exception {
            web.ignoring().antMatchers("/**");
        }
}
4.接着,我们打开上一篇文章中创建的Eureka server项目,启动Eureka Server。
5.然后,我们打开上一篇文章中创建的feign项目,先启动provider-server,也就是person-service。
6.启动postman,这里post形式访问http://localhost:9090/person/save,(由于我们启动的是9090服务提供者),先把数据存到内存中,然后访问http://localhost:9090/person/findAll发现可以正常返回数据。
7.启动zuul项目。
8.浏览器访问http://localhost:7070/person-service/person/findAll,注意:这里解释一下这个路由的规则,zuul ip:端口/服务提供方的服务名称/具体的提供方法。结果如下,说明服务已经成功被代理:

三、整合Eureka
那么其实在一般场景,我们需要整合Eureka。那么以上我们将zuul项目eureka直接给关闭了,这里就不作关闭了,将其注册到注册中心。
1.zuul项目引入spring-cloud-starter-eureka依赖。
<dependency>
	<groupId>org.springframework.cloud</groupId>
	<artifactId>spring-cloud-starter-netflix-eureka-client</artifactId>
</dependency>
application.prperteis作出如下修改,注释掉关闭eureka的配置。顺便加上app-name。
spring.application.name=spring-cloud-zuul
server.port=7070

##整合ribbon-去除eureka注册
#eureka.client.register-with-eureka=false
## 不获取注册列表信息, 是否从eureka服务器获取注册信息 , false = 不获取,true = 获取
#eureka.client.fetch-registry=false

#Eureka Server服务URL,用于客户端注册
eureka.client.serviceUrl.defaultZone=http://localhost:12345/eureka

#配置“person-service”的负载均衡服务器列表
#person-service.ribbon.listOfServers=http://localhost:9090

#Zuul配置person-service服务调用  形式如:zuul.routes.${app-name}=/${app-url-profile}/**   (**代表目录的所有子目录包含父目录,*只包含当前目录)
zuul.routes.person-service=/person-service/**
2.激活Eureka客户端。zuul项目启动类增加@EnableDiscoveryClient,这个注解和之前我们加在eureka客户端上的@EnableEurekaClient注解作用是一样的,不要误解。此时启动类如下:
import org.springframework.boot.SpringApplication;
import org.springframework.boot.autoconfigure.SpringBootApplication;
import org.springframework.cloud.client.discovery.EnableDiscoveryClient;
import org.springframework.cloud.netflix.zuul.EnableZuulProxy;

@SpringBootApplication
@EnableZuulProxy
@EnableDiscoveryClient
public class SpringcloudZuulApplication {

   public static void main(String[] args) {
      SpringApplication.run(SpringcloudZuulApplication.class, args);
   }

}
3.这时启动zuul、项目,发现它也被注册到eureka了。
四、整合Hystrix
整合Hystrix和整合eureka一样简单。
1.在feign项目的服务端项目启动类上加上@EnableHystrix,激活断路器。具体如下:
import com.gupao.feign.api.service.PersonService;
import org.springframework.boot.SpringApplication;
import org.springframework.boot.autoconfigure.SpringBootApplication;
import org.springframework.cloud.netflix.eureka.EnableEurekaClient;
import org.springframework.cloud.netflix.hystrix.EnableHystrix;

/**
 * @ClassName
 * @Describe {@link PersonService}提供者应用
 * @Author 66477
 * @Date 2020/6/823:00
 * @Version 1.0
 */
@SpringBootApplication
@EnableEurekaClient
@EnableHystrix
public class PersonServiceProviderAppplication {
    public static void main(String[] args) {
        SpringApplication.run(PersonServiceProviderAppplication.class,args);
    }
}
2.配置短路规则(替代方法)
那么我们则在某个服务类上加上短路注解,这里举例,在feign项目的person-service的PersonServiceProviderController类的findAll方法上加上断路规则注解@HystrixCommnd,然后写一个替代方法。主方法findAll如果超过100毫秒未响应,则去访问替代方法fallbackForFindAll。我这里不做过多测试,如果想测试,就让主方法线sleep 100以上毫秒即可。
import com.gupao.feign.api.domain.Person;
import com.gupao.feign.api.service.PersonService;
import com.netflix.hystrix.contrib.javanica.annotation.HystrixCommand;
import com.netflix.hystrix.contrib.javanica.annotation.HystrixProperty;
import org.springframework.web.bind.annotation.GetMapping;
import org.springframework.web.bind.annotation.PostMapping;
import org.springframework.web.bind.annotation.RequestBody;
import org.springframework.web.bind.annotation.RestController;
import java.util.Collection;
import java.util.Collections;
import java.util.Map;
import java.util.concurrent.ConcurrentHashMap;

/**
 * @ClassName
 * @Describe {@link PersonService} 提供者控制器(可以实现{@link PersonService}接口 )
 * @Author 66477
 * @Date 2020/6/823:01
 * @Version 1.0
 */
@RestController

public class PersonServiceProviderController {

    private Map<Long,Person> persons = new ConcurrentHashMap<>();

    /**
     * 保存
     * @param person {@link Person}
     * @return 如果成功,<code>true</code>
     */
    @PostMapping(value = "/person/save")
   public boolean save(@RequestBody Person person){
        return persons.put(person.getId(),person) == null;
    }

    /**
     * 查找所有的服务
     * @return
     */
    @GetMapping(value="/person/findAll")
    @HystrixCommand(fallbackMethod = "fallbackForFindAll",
                    commandProperties =
                        @HystrixProperty(name="execution.isolation.thread.timeoutInMilliseconds",value = "100"))
    public  Collection<Person> findAll(){
        return persons.values();
    }

    /**
     * {@link #findAll()} fallback方法
     * @return 空集合
     */
    public Collection<Person> fallbackForFindAll(){
        return Collections.emptyList();
    }
}
五、整合Feign
那么此刻我们需要修改的是服务消费端,也就是feign项目里的person-client。
调用链路发生了改变,
spring-cloud-zuul(7070)->person-client(8080)->person-service(9090)(看不懂的话看上面的架构图)
1.person-client注册到Eureka Server。
注意:spring-cloud-zuul端口:7070 ,person-client端口:8080,person-service端口:9090,eureka-server端口:12345
注释person-client之前关闭eureka注册的配置。现在的配置如下就ok了
spring.application.name=person-client
server.port=8080
eureka.client.service-url.defaultZone=http://localhost:12345/eureka
management.endpoint.health.show-details=always
management.endpoints.web.exposure.include=*
然后启动person-client。
2.那么接下来,重点来了,现在我们要在网关应用,spring-cloud-zuul增加路由应用到person-client。将以下配置加入到zuul项目的application.properties下。
#Zuul配置person-client服务调用  形式如:zuul.routes.${app-name}=/${app-url-profile}/**   (**代表目录的所有子目录包含父目录,*只包含当前目录)
zuul.routes.person-client=/person-client/**
现在我们总共注册了两个路由,一个person-service,一个person-client。通过http://localhost:7070/person-service/person/findAll,http://localhost:7070/person-client/person/findAll就都可以访问了。
补充一点,如果不想走注册中心,通过ribbon负载均衡服务器列表也可以实现访问链路。(person-client的application.properties只不过是被我注释了)
#整合ribbon-配置“person-service"的负载均衡的服务器列表(它是可以多配置的,"逗号隔开即可")
#person-service.ribbon.listOfServers:http://localhost:9090

#整合ribbon-配置“person-client"的负载均衡的服务器列表(它是可以多配置的)
#person-client.ribbon.listOfServers:http://localhost:9090

##整合ribbon-去除eureka注册
#eureka.client.register-with-eureka=false
## 不获取注册列表信息, 是否从eureka服务器获取注册信息 , false = 不获取,true = 获取
#eureka.client.fetch-registry: false
六、整合Config Server
前面的配置是相对固定的,真实环境是需要一个动态路由,即需要动态配置。
1.我们把配置服务器配置到Eureka注册中心。复制之前第一篇文章的spring-cloud-config-server,我们先把配置文件app-name改了,改成spring-cloud-config-server,端口改成10000.
到目前为止,端口信息如下:
- spring-cloud-zuul端口:7070
- person-client端口:8080
- person-service端口:9090
- eureka-server端口:12345
- Config Server端口:10000
2.在resource下继续创建一个文件夹configs,更改application.propertes的本地仓库的GIT URI配置为
#${user.dir}是当前项目文件夹
spring.cloud.config.server.git.uri=file:///${user.dir}/src/main/resources/configs
这时我们application.properties整体就调整为
#定义服务名
spring.application.name=spring-cloud-config-server
#定义HTTP服务端口
server.port=10000
#本地仓库的GIT URI的配置
spring.cloud.config.server.git.uri=file:///${user.dir}/src/main/resources/configs

#全局关闭Actuator安全
#mangement.sercurity.enabled=false
#细粒度的开放Actuator EndPoints,注意:SpringBoot2.0版本后安全配置将不再是可定制,解决办法:
#在启动类上或者任意@Configure配置类上,移除默认自动启动的安全策略
#@EnableAutoConfiguration(exclude = {
#   org.springframework.boot.autoconfigure.security.servlet.SecurityAutoConfiguration.class
#})
#sensitive关注的是敏感,安全
#endpoints.env.sensitive=false

management.endpoints.enabled-by-default=true
management.endpoints.web.exposure.include=*
3.在configs下增加3个为zuul项目的配置文件
- zuul.properties
- zuul-test.properties
- zuul-prod.properties
(1)zuul.properties配person-service
#应用spring-cloud-zuul默认配置项(profile为空)

#Zuul配置person-service服务调用  形式如:zuul.routes.${app-name}=/${app-url-profile}/**   (**代表目录的所有子目录包含父目录,*只包含当前目录)
zuul.routes.person-service=/person-service/**
(2)zuul-test.properties配person-client
#应用spring-cloud-zuul默认配置项(profile为空)

#Zuul配置person-client服务调用  形式如:zuul.routes.${app-name}=/${app-url-profile}/**   (**代表目录的所有子目录包含父目录,*只包含当前目录)
zuul.routes.person-client=/person-client/**
(3)zuul-prod.properties都配
#应用spring-cloud-zuul默认配置项(profile为空)

#Zuul配置person-service服务调用  形式如:zuul.routes.${app-name}=/${app-url-profile}/**   (**代表目录的所有子目录包含父目录,*只包含当前目录)
zuul.routes.person-service=/person-service/**

#Zuul配置person-client服务调用  形式如:zuul.routes.${app-name}=/${app-url-profile}/**   (**代表目录的所有子目录包含父目录,*只包含当前目录)
zuul.routes.person-client=/person-client/**
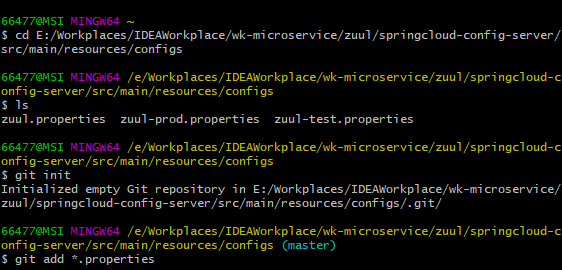
4.初始化configs目录(${user.dir}/src/main/resources/configs)为git根目录。
(1)打开git bash,进入到configs目录。
$ cd E:/Workplaces/IDEAWorkplace/wk-microservice/zuul/springcloud-config-server/src/main/resources/configs
(2)执行git初始化。
$ git init
(3)增加上述3个配置文件到git本地仓库。
$ git add *.properties
(4)提交到本地git仓库。
$ git commit -m "Temp commit"
过程图如下:
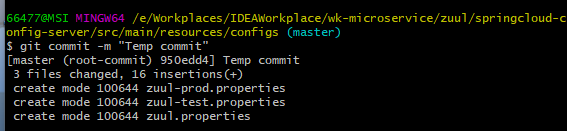
以上操作是为了让Spring Cloud Git配置服务器实现识别Git仓库,否则仅创建上面3个文件也没有效果。
5.注册到eureka server。
在config server项目下的application.properties增加服务注册。
#Eureka Server服务URL,用于客户端注册
eureka.client.serviceUrl.defaultZone=http://localhost:12345/eureka
记得还要引入eureka client依赖。
<dependency>
	<groupId>org.springframework.cloud</groupId>
	<artifactId>spring-cloud-starter-netflix-eureka-client</artifactId>
</dependency>
然后启动类加上@EnableDiscoveryClient/@EnableEurekaClient激活Eureka Client。
最后启动项目,首先访问http://localhost:10000/zuul/prod,http://localhost:10000/zuul/test,http://localhost:10000/zuul/default来看看返回结果。此时Eureka注册中心信息如下:

6.在调整zuul项目之前,我们需要在config server项目中增加zuul依赖。
7.调整zuul项目中。
(1)现在不是采用config server中的动态配置文件了嘛,所以我们要回到zuul项目的application.properties将服务调用配置注释掉。
##Zuul配置person-service服务调用  形式如:zuul.routes.${app-name}=/${app-url-profile}/**   (**代表目录的所有子目录包含父目录,*只包含当前目录)
#zuul.routes.person-service=/person-service/**
#
##Zuul配置person-client服务调用  形式如:zuul.routes.${app-name}=/${app-url-profile}/**   (**代表目录的所有子目录包含父目录,*只包含当前目录)
#zuul.routes.person-client=/person-client/**
(2)接着将以下依赖到zuul的pom中。(以下依赖其实就是config clientr中引入的那个依赖)
<!--增加配置客户端的依赖-->
<dependency>
		<groupId>org.springframework.cloud</groupId>
		<artifactId>spring-cloud-starter-config</artifactId>
</dependency>
(3)在zuul项目中resources下创建bootstrap.properties文件,大致复制于之前的config client项目,不过这里不能像之一样配置服务器URI了,我们得采用Discovery client连接方式,这里就是这些配置文件需要经过eureka注册中心再给到应用,相当于间接给配置文件;而以前我们都是直接给的。内容如下:
#bootstrap上下文配置

#配置客户端应用名称:zuul,可当前应用是spring-cloud-zuul
spring.cloud.config.name=zuul
#profile 是激活的配置
spring.cloud.config.profile=prod
#label在Git中指的是分支名称
spring.cloud.config.label=master

##采用Discovery client连接方式
#激活discovery连接配置项的方式
spring.cloud.config.discovery.enabled=true
#配置config server应用名称(spring-cloud-config-server就是config server应用名称)
spring.cloud.config.discovery.service-id=spring-cloud-config-server
注意!!!,我们之前讲过,bootstrap.properties加载优先级是高于application.properties的,所以我们需要将application.properties中的注册到eureka server的配置放到bootstrap.properties文件中来。就是下面这货:
#Eureka Server服务URL,用于客户端注册
eureka.client.serviceUrl.defaultZone=http://localhost:12345/eureka
此时在application.properties开启所有端点。
management.endpoints.web.exposure.include=*
然后重启项目,访问http://localhost:7070/actuator/env,你会发现服务配置都注册进来了。

这时我们跑一下http://localhost:7070/person-client/person/findAll,结果如下(如果没有重新访问person/save接口刷新下内存):
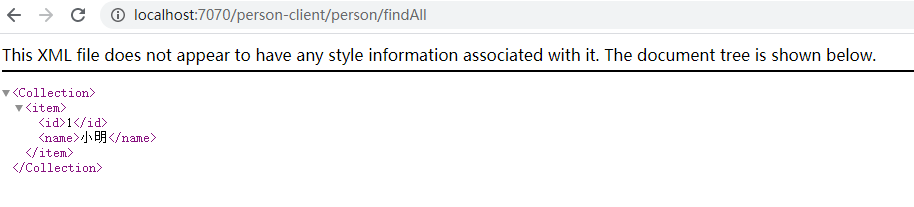
这时记得上面我们zuul项目中的设置的是prod-properties文件,里面配置了两个,一个person-service调用,一个person-client调用。
其中访问http://localhost:7070/person-client/person/findAll,调用链:spring-cloud-zuul->person-client->person-service
那么访问http://localhost:7070/person-service/person/findAll,调用链:spring-cloud-zuul->person-service
七、问题总结
1.看下来过程是:通过url去匹配zuul中配置的serviceId然后没整合ribbon时,直接去eureka中找服务实例去调用,如果整合了ribbon,直接去listOfService中取得一个实例,然后调用返回,对不?
解答:大致上可以这么理解,不过对应的listOfServicers不止是单个实例,而可能是一个集群,主要可以配置域名。
2.为什么要先调用client不直接调用,还是不太理解?
解答:这个只是一个演示程序,client在正式使用场景中,并不是以简单的调用,它可能是一个聚合服务。
3.zuul是不是更多的作为业务网关?
解答:是的,很多企业内部的服务通过Zuul做个服务网关。
4.RequestContext已经存在ThreadLocal中了,为什么还要使用ConcurrentHashMap?
解答:ThreadLocal只能管当前的线程,不能管理子线程。子线程需要使用InheritableThreadLocal。试想一下,如果上下文处于多线程环境,比如传递到了薪酬。比如:T1在管理RequestContext,但是T1又创建了多个线程(t1,t2),这个时候,把上下文传递到了子线程t1和t2.
java的进程所对应的线程main线程(group:main),main线程是所有子线程的父线程,main线程T1,T1又可以创建t1和t2。
5.ZuulServlet已经管理了RequestContext的生命周期了,为什么ContextLifecycleFilter还要再做一遍?
解答:ZuulServlet最终也会清理掉RequestContext:注意最后的finally
public void service(ServletRequest servletRequest, ServletResponse servletResponse) throws ServletException, IOException {
    try {
        this.init((HttpServletRequest)servletRequest, (HttpServletResponse)servletResponse);
        RequestContext context = RequestContext.getCurrentContext();
        context.setZuulEngineRan();

        try {
            this.preRoute();
        } catch (ZuulException var12) {
            this.error(var12);
            this.postRoute();
            return;
        }

        try {
            this.route();
        } catch (ZuulException var13) {
            this.error(var13);
            this.postRoute();
            return;
        }

        try {
            this.postRoute();
        } catch (ZuulException var11) {
            this.error(var11);
        }
    } catch (Throwable var14) {
        this.error(new ZuulException(var14, 500, "UNHANDLED_EXCEPTION_" + var14.getClass().getName()));
    } finally {
        RequestContext.getCurrentContext().unset();
    }
}
问题是为什么ContextLifecycleFilter也这么干?
public void doFilter(ServletRequest req, ServletResponse res, FilterChain chain) throws IOException, ServletException {
    try {
        chain.doFilter(req, res);
    } finally {
        RequestContext.getCurrentContext().unset();
    }

}
不要忽略了ZuulServletFilter也是这么处理的。
RequestContext是任何Servlet或者Filter都能处理,那么为了防止不正确的关闭,那么ContextLifecycleFilter相当于兜底操作,就是防止ThreadLocal没有被remove掉。
ThreadLocal对应了一个Thread,那么是不是意味着Thread处理完了,那么ThreadLocal也随之GC呢?
所有的Servlet均采用线程池,因此,不清空的话,可能会出现意想不到的情况。除非,每次都异常!(这种情况也要依赖于线程池的实现)