用户在做好硬盘分区操作或部署RAID磁盘阵列之后,会面临一个痛点——无法修改硬盘分区的大小。如果用户想要根据实际需求的变化调整硬盘分区的大小时,就需要用到另外一种非常普及的硬盘设备资源管理技术了——LVM(逻辑卷管理器)。LVM可以允许用户对硬盘资源进行动态调整,解决了硬盘设备在创建分区后不易修改分区大小的缺陷。
LVM技术是在硬盘分区和文件系统之间加了一个逻辑层,它提供了一个抽象的卷组,可以把多块硬盘进行卷组合并。这样一来,用户就不必关心物理硬盘设备的底层架构和布局,就可以实现对硬盘分区的动态调整。LVM的技术架构如下图所示:

卷组[VG,Volume Group]、物理卷[PV,Physical Volume]、逻辑卷[LV,Logical Voume]、基本存储单元[PE,Physical Extent]。
物理卷处于LVM中最底层,可以理解为物理硬盘、硬盘分区或者RAID磁盘阵列。卷组建立在物理卷之上,一个卷组可以包含多个物理卷,而且卷组创建后可以继续向其中添加新的物理卷。逻辑卷是用卷组的中空闲的资源建立的,并且逻辑卷在建立后可以动态地扩展或缩小空间。这就是LVM的核心理念。
一、部署逻辑卷
在生产环境中,伴随着业务的增长,数据库、日志等文件夹的体积也不断变大,这些都导致原有的硬盘分区面临存储空间不足的压力。我们可以通过部署LVM来解决上述问题,在部署LVM的过程中,需要逐个配置物理卷、卷组和逻辑卷。常用的部署命令如下表所示:
| 命令功能 | 物理卷管理命令 | 卷组管理命令 | 逻辑卷管理命令 |
| 扫描 | pvscan | vgscan | lvscan |
| 建立 | pvcreate | vgcreate | lvcreate |
| 显示 | pvdisplay | vgdisplay | lvdispaly |
| 删除 | pvremove | vgremove | lvremove |
| 扩展 | vgextend | lvextend | |
| 缩小 | vgreduce | lvreduce |
实验1:把两块新硬盘添加为卷组,然后切割出一块150MB大小的逻辑卷设备。
第1步:对两块新硬盘进行创建物理卷操作(可以理解为让硬盘支持LVM技术)。

[root@linuxprobe ~]# pvcreate /dev/sdb /dev/sdc      //创建物理卷
  Physical volume "/dev/sdb" successfully created
  Physical volume "/dev/sdc" successfully created
第2步:创建一个名为storge_xl的卷组中,然后查看卷组的状态。
[root@linuxprobe ~]# vgcreate storge_xl /dev/sdb /dev/sdc    //将两块硬盘组成一个卷组
  Volume group "storge_xl" successfully created
[root@linuxprobe ~]# vgdisplay    //查看卷组状态

-------------------省略部分输出内容-------------------------------

  --- Volume group ---
  VG Name               storge_xl
  System ID
  Format                lvm2
  Metadata Areas        2
  Metadata Sequence No  1
  VG Access             read/write
  VG Status             resizable
  MAX LV                0
  Cur LV                0
  Open LV               0
  Max PV                0
  Cur PV                2
  Act PV                2
  VG Size               39.99 GiB     //卷组容量大小
  PE Size               4.00 MiB      //PE大小
  Total PE              10238
  Alloc PE / Size       0 / 0
  Free  PE / Size       10238 / 39.99 GiB
  VG UUID               8FgGhS-LUuV-OEqA-Qbv3-TwLk-vZLe-S0mASA
[root@linuxprobe dev]# ls -ald storge_xl/
drwxr-xr-x. 2 root root 60 Mar 14 10:53 storge_xl/       //可以看到在/dev文件夹下生成了一个名为storge_xl的目录
第3步:切割出一个约为150MB的逻辑卷设备。
这里需要注意,在对逻辑卷进行切割时有两种计量单位。第一种是使用-L参数,比如-L 150MB就表示生成一个150MB的逻辑卷。第二种是-l参数,每个基本单元默认大小为4MB,比如-l 37就表示生成一个大小为37x4MB=148MB的逻辑卷。
[root@linuxprobe ~]# lvcreate -n lv_xl -L 150M storge_xl        //-n参数代表设置逻辑卷名字
  Rounding up size to full physical extent 152.00 MiB
  Logical volume "lv_xl" created
[root@linuxprobe ~]# lvdisplay

--------------------省略部分输出内容-----------------------------------

  --- Logical volume ---
  LV Path                /dev/storge_xl/lv_xl
  LV Name                lv_xl
  VG Name                storge_xl
  LV UUID                WyNlzh-KFrd-A0qA-cXWw-uYLR-gtbm-tfgwxm
  LV Write Access        read/write
  LV Creation host, time linuxprobe.com, 2020-03-14 10:53:55 +0800
  LV Status              available
  # open                 0
  LV Size                152.00 MiB
  Current LE             38               //38*4=152MB
  Segments               1
  Allocation             inherit
  Read ahead sectors     auto
  - currently set to     8192
  Block device           253:2
第4步:把生成好的逻辑卷进行格式化。
Linux系统会在创建卷组的过程中,在/dev文件夹中生成一个与卷组同名的目录,其中保留了逻辑卷的设备映射文件(实际上是一个软链接),该设备映射文件的保存路径为"/dev/卷组名/逻辑卷名"。
[root@linuxprobe ~]# cd /dev/storge_xl/
[root@linuxprobe storge_xl]# ls -l
total 0
lrwxrwxrwx. 1 root root 7 Mar 14 10:53 lv_xl -> ../dm-2        //逻辑卷的设备映射文件lv_xl
[root@linuxprobe storge_xl]# mkfs.ext4 /dev/storge_xl/lv_xl       //格式化逻辑卷
mke2fs 1.42.9 (28-Dec-2013)
Filesystem label=
OS type: Linux
Block size=1024 (log=0)
Fragment size=1024 (log=0)
Stride=0 blocks, Stripe width=0 blocks
38912 inodes, 155648 blocks
7782 blocks (5.00%) reserved for the super user
First data block=1
Maximum filesystem blocks=33816576
19 block groups
8192 blocks per group, 8192 fragments per group
2048 inodes per group
Superblock backups stored on blocks:
    8193, 24577, 40961, 57345, 73729

Allocating group tables: done
Writing inode tables: done
Creating journal (4096 blocks): done
Writing superblocks and filesystem accounting information: done
第5步:挂载逻辑卷,并写入到配置文件中,使其永久生效。
[root@linuxprobe storge_xl]# mkdir /linuxprobe    //创建挂载目录
[root@linuxprobe storge_xl]# echo "/dev/storge_xl/lv_xl    /linuxprobe    ext4     defaults     0 0" >> /etc/fstab
[root@linuxprobe storge_xl]# mount -a
[root@linuxprobe storge_xl]# df -h
Filesystem                   Size  Used Avail Use% Mounted on
/dev/mapper/rhel-root         18G  3.1G   15G  18% /
devtmpfs                     985M     0  985M   0% /dev
tmpfs                        994M   80K  994M   1% /dev/shm
tmpfs                        994M  8.8M  986M   1% /run
tmpfs                        994M     0  994M   0% /sys/fs/cgroup
/dev/sr0                     3.5G  3.5G     0 100% /media/cdrom
/dev/sda1                    497M  119M  379M  24% /boot
/dev/mapper/storge_xl-lv_xl  144M  1.6M  132M   2% /linuxprobe
实验2:扩容逻辑卷
在前面的实验中,卷组是由两块硬盘设备共同组成的。用户在使用存储设备时,不用关心底层是由多少块硬盘组成的,只要卷组还有足够的存储资源,就可以为逻辑卷进行扩容。
第1步:取消逻辑卷的挂载
[root@linuxprobe ~]# umount /linuxprobe
第2步:将逻辑卷lv_xl扩容至300MB(注意不是增加300M)
[root@linuxprobe ~]# lvextend -L 300M /dev/storge_xl/lv_xl
  Extending logical volume lv_xl to 300.00 MiB
  Logical volume lv_xl successfully resized
第3步:检查逻辑卷的完整性
[root@linuxprobe ~]# e2fsck -f /dev/storge_xl/lv_xl
e2fsck 1.42.9 (28-Dec-2013)
Pass 1: Checking inodes, blocks, and sizes
Pass 2: Checking directory structure
Pass 3: Checking directory connectivity
Pass 4: Checking reference counts
Pass 5: Checking group summary information
/dev/storge_xl/lv_xl: 11/38912 files (0.0% non-contiguous), 10567/155648 blocks
第4步:重置逻辑卷的容量
[root@linuxprobe ~]# resize2fs /dev/storge_xl/lv_xl
resize2fs 1.42.9 (28-Dec-2013)
Resizing the filesystem on /dev/storge_xl/lv_xl to 307200 (1k) blocks.
The filesystem on /dev/storge_xl/lv_xl is now 307200 blocks long.
第4步:重新挂载逻辑卷,并查看挂载状态
[root@linuxprobe ~]# mount -a
[root@linuxprobe ~]# df -h
Filesystem                   Size  Used Avail Use% Mounted on
/dev/mapper/rhel-root         18G  3.1G   15G  18% /
devtmpfs                     985M     0  985M   0% /dev
tmpfs                        994M   80K  994M   1% /dev/shm
tmpfs                        994M  8.8M  986M   1% /run
tmpfs                        994M     0  994M   0% /sys/fs/cgroup
/dev/sr0                     3.5G  3.5G     0 100% /media/cdrom
/dev/sda1                    497M  119M  379M  24% /boot
/dev/mapper/storge_xl-lv_xl  287M  2.1M  266M   1% /linuxprobe       //逻辑卷已扩容至287MB
实验3:缩小逻辑卷
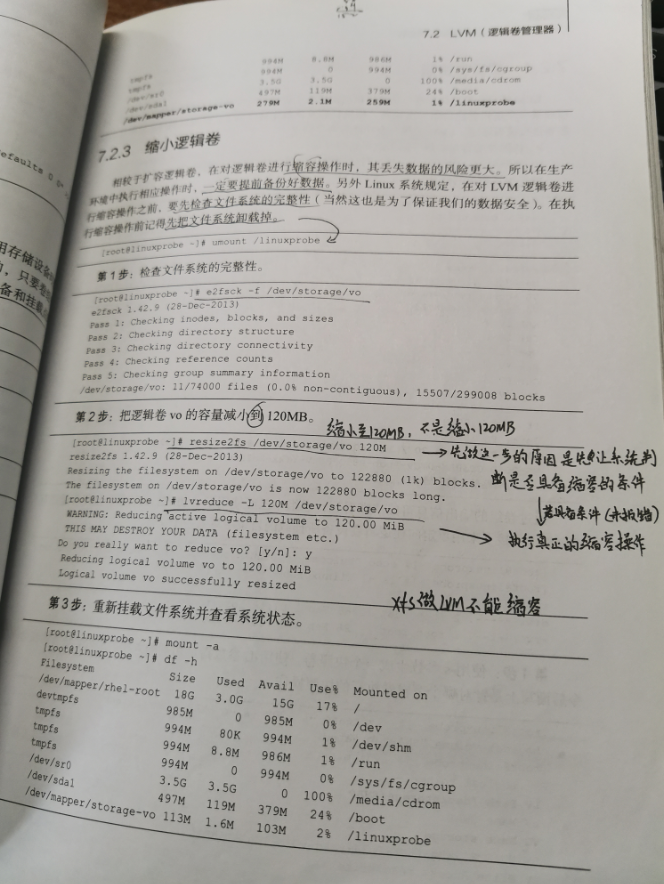
相较于逻辑卷的扩容,在对逻辑卷进行缩容操作时,其丢失数据的风险更大。所以在生产环境执行相应操作时,一定要提前做好数据备份。另外,与扩容操作不同,在进行缩容操作时,要先执行重置容量的命令,再执行缩容的命令。
第1步:取消逻辑卷的挂载
[root@linuxprobe ~]# umount /linuxprobe/
第2步:检查逻辑卷的完整性
[root@linuxprobe ~]# e2fsck -f /dev/storge_xl/lv_xl
e2fsck 1.42.9 (28-Dec-2013)
Pass 1: Checking inodes, blocks, and sizes
Pass 2: Checking directory structure
Pass 3: Checking directory connectivity
Pass 4: Checking reference counts
Pass 5: Checking group summary information
/dev/storge_xl/lv_xl: 11/77824 files (0.0% non-contiguous), 15987/307200 blocks
第3步:重置逻辑卷的容量,将其减小至120M
先做这一步的原因是让系统判断是否具备缩容的条件,若具备条件(即未报错),则可以执行真正的缩容命令。
[root@linuxprobe ~]# resize2fs /dev/storge_xl/lv_xl 120M
resize2fs 1.42.9 (28-Dec-2013)
Resizing the filesystem on /dev/storge_xl/lv_xl to 122880 (1k) blocks.   //无报错
The filesystem on /dev/storge_xl/lv_xl is now 122880 blocks long.     //目前逻辑卷上的文件系统已重置为120MB
第4步:将逻辑卷的容量减少至120M
[root@linuxprobe ~]# lvreduce -L 120M /dev/storge_xl/lv_xl
  WARNING: Reducing active logical volume to 120.00 MiB
  THIS MAY DESTROY YOUR DATA (filesystem etc.)
Do you really want to reduce lv_xl? [y/n]: y
  Reducing logical volume lv_xl to 120.00 MiB
  Logical volume lv_xl successfully resized       //缩容成功
第5步:重新挂载逻辑卷,并查看其状态
[root@linuxprobe ~]# mount -a
[root@linuxprobe ~]# df -h
Filesystem                   Size  Used Avail Use% Mounted on
/dev/mapper/rhel-root         18G  3.1G   15G  18% /
devtmpfs                     985M     0  985M   0% /dev
tmpfs                        994M   80K  994M   1% /dev/shm
tmpfs                        994M  8.8M  986M   1% /run
tmpfs                        994M     0  994M   0% /sys/fs/cgroup
/dev/sr0                     3.5G  3.5G     0 100% /media/cdrom
/dev/sda1                    497M  119M  379M  24% /boot
/dev/mapper/storge_xl-lv_xl  113M  1.6M  103M   2% /linuxprobe          //逻辑卷已缩容至113M
实验4:制作一个逻辑卷快照
LVM还具备"快照卷"功能,该功能类似于虚拟机软件的还原时间点功能。例如,可以对某一个逻辑卷设备做一次快照,如果日后发现数据被改错了,就可以利用之前做好的快照卷进行覆盖还原。LVM的快照卷功能有两个特点:
(1)快照卷的容量必须等同于逻辑卷的容量;
(2)快照卷仅一次有效,一旦执行还原操作后则会被立即自动删除。
第1步:首先查看卷组的信息
[root@linuxprobe ~]# vgdisplay

---------------------省略部分输出信息---------------------

  --- Volume group ---
  VG Name               storge_xl
  System ID
  Format                lvm2
  Metadata Areas        2
  Metadata Sequence No  4
  VG Access             read/write
  VG Status             resizable
  MAX LV                0
  Cur LV                1
  Open LV               1
  Max PV                0
  Cur PV                2
  Act PV                2
  VG Size               39.99 GiB       //总共容量
  PE Size               4.00 MiB
  Total PE              10238
  Alloc PE / Size       30 / 120.00 MiB     //已使用容量
  Free  PE / Size       10208 / 39.88 GiB    //空闲容量
  VG UUID               8FgGhS-LUuV-OEqA-Qbv3-TwLk-vZLe-S0mASA
第2步:在逻辑卷所挂载的目录中写入一个文件
[root@linuxprobe ~]# echo "hello everybody, let's moving" >> /linuxprobe/readme.txt
[root@linuxprobe ~]# ls -l /linuxprobe/
total 14
drwx------. 2 root root 12288 Mar 14 11:18 lost+found
-rw-r--r--. 1 root root    30 Mar 14 14:40 readme.txt
第3步:针对lv_xl逻辑卷生成一个名为SNAP的快照卷
[root@linuxprobe ~]# lvcreate -L 120M -n SNAP -s /dev/storge_xl/lv_xl      //-s参数表示生成一个快照卷
[root@linuxprobe ~]# lvdisplay

---------------省略部分输出内容------------------------------

 Logical volume "SNAP" created
  --- Logical volume ---
  LV Path                /dev/storge_xl/SNAP
  LV Name                SNAP
  VG Name                storge_xl
  LV UUID                H1IH9J-o3oW-dlmX-1If1-YpWD-aAFE-Q7lvfc
  LV Write Access        read/write
  LV Creation host, time linuxprobe.com, 2020-03-14 14:45:27 +0800
  LV snapshot status     active destination for lv_xl      //针对lv_xl的快照卷
  LV Status              available
  # open                 0
  LV Size                120.00 MiB     //容量大小为120M
  Current LE             30
  COW-table size         120.00 MiB
  COW-table LE           30
  Allocated to snapshot  0.01%
  Snapshot chunk size    4.00 KiB
  Segments               1
  Allocation             inherit
  Read ahead sectors     auto
  - currently set to     8192
  Block device           253:3
第4步:在逻辑卷所挂载的目录中创建一个100M的垃圾文件,然后查看快照卷的状态。
[root@linuxprobe ~]# dd if=/dev/zero of=/linuxprobe/files count=1 bs=100M
1+0 records in
1+0 records out
104857600 bytes (105 MB) copied, 3.40194 s, 30.8 MB/s
[root@linuxprobe ~]# ls -l /linuxprobe/
total 102416
-rw-r--r--. 1 root root 104857600 Mar 14 14:58 files     //新建的100M垃圾文件
drwx------. 2 root root     12288 Mar 14 11:18 lost+found
-rw-r--r--. 1 root root        30 Mar 14 14:40 readme.txt
[root@linuxprobe ~]# lvdisplay

------------------------省略部分输出信息-------------------------

  --- Logical volume ---
  LV Path                /dev/storge_xl/SNAP
  LV Name                SNAP
  VG Name                storge_xl
  LV UUID                H1IH9J-o3oW-dlmX-1If1-YpWD-aAFE-Q7lvfc
  LV Write Access        read/write
  LV Creation host, time linuxprobe.com, 2020-03-14 14:45:27 +0800
  LV snapshot status     active destination for lv_xl
  LV Status              available
  # open                 0
  LV Size                120.00 MiB
  Current LE             30
  COW-table size         120.00 MiB
  COW-table LE           30
  Allocated to snapshot  83.74%          //快照卷的存储空间占用量提升了
  Snapshot chunk size    4.00 KiB
  Segments               1
  Allocation             inherit
  Read ahead sectors     auto
  - currently set to     8192
  Block device           253:3
第5步:为了检验SNAP快照卷的效果,需要对逻辑卷进行快照还原的操作
[root@linuxprobe ~]# umount /linuxprobe/
[root@linuxprobe ~]# lvconvert --merge /dev/storge_xl/SNAP
  Merging of volume SNAP started.
  lv_xl: Merged: 25.5%
  lv_xl: Merged: 100.0%
  Merge of snapshot into logical volume lv_xl has finished.
  Logical volume "SNAP" successfully removed         //SNAP快照卷被成功删除
第6步:重新挂载逻辑卷,发现逻辑卷已经被还原
[root@linuxprobe ~]# mount -a
[root@linuxprobe ~]# ls -l /linuxprobe/
total 14
drwx------. 2 root root 12288 Mar 14 11:18 lost+found
-rw-r--r--. 1 root root    30 Mar 14 14:40 readme.txt      //之前创建的files文件已经不见了
实验5:删除逻辑卷
当生产环境中想要重新部署LVM或不再需要使用LVM时,则需要执行LVM的删除操作。为此,需要提前备份好数据信息,然后依次删除逻辑卷、卷组、物理卷设备,并且这个顺序不可颠倒。
第1步:取消逻辑卷的挂载,并删除配置文件中的参数信息。
[root@linuxprobe ~]# umount /linuxprobe/
[root@linuxprobe ~]# vim /etc/fstab
#
# /etc/fstab
# Created by anaconda on Sat Feb 15 12:19:36 2020
#
# Accessible filesystems, by reference, are maintained under '/dev/disk'
# See man pages fstab(5), findfs(8), mount(8) and/or blkid(8) for more info
#
/dev/mapper/rhel-root   /                       xfs     defaults        1 1
UUID=ba40f004-d75d-400f-b0e0-c4d395261e14 /boot                   xfs     defaults        1 2
/dev/mapper/rhel-swap   swap                    swap    defaults        0 0
/dev/cdrom              /media/cdrom            iso9660 defaults        0 0              //已删除逻辑卷的挂载信息
第2步:删除逻辑卷设备,需要输入y进行确认
[root@linuxprobe ~]# lvremove /dev/storge_xl/lv_xl
Do you really want to remove active logical volume lv_xl? [y/n]: y
  Logical volume "lv_xl" successfully removed
第3步:删除卷组,此处只写卷组名称即可,不需要设备的绝对路径
[root@linuxprobe ~]# vgremove storge_xl
  Volume group "storge_xl" successfully removed
第4步:删除物理卷
[root@linuxprobe ~]# pvremove /dev/sdb /dev/sdc
  Labels on physical volume "/dev/sdb" successfully wiped
  Labels on physical volume "/dev/sdc" successfully wiped
至此,LVM卸载完毕。