flask实现web端微信登录
1.flask实现微信登录准备工作
-
首先需要一个域名和一个服务器并进行备案。
-
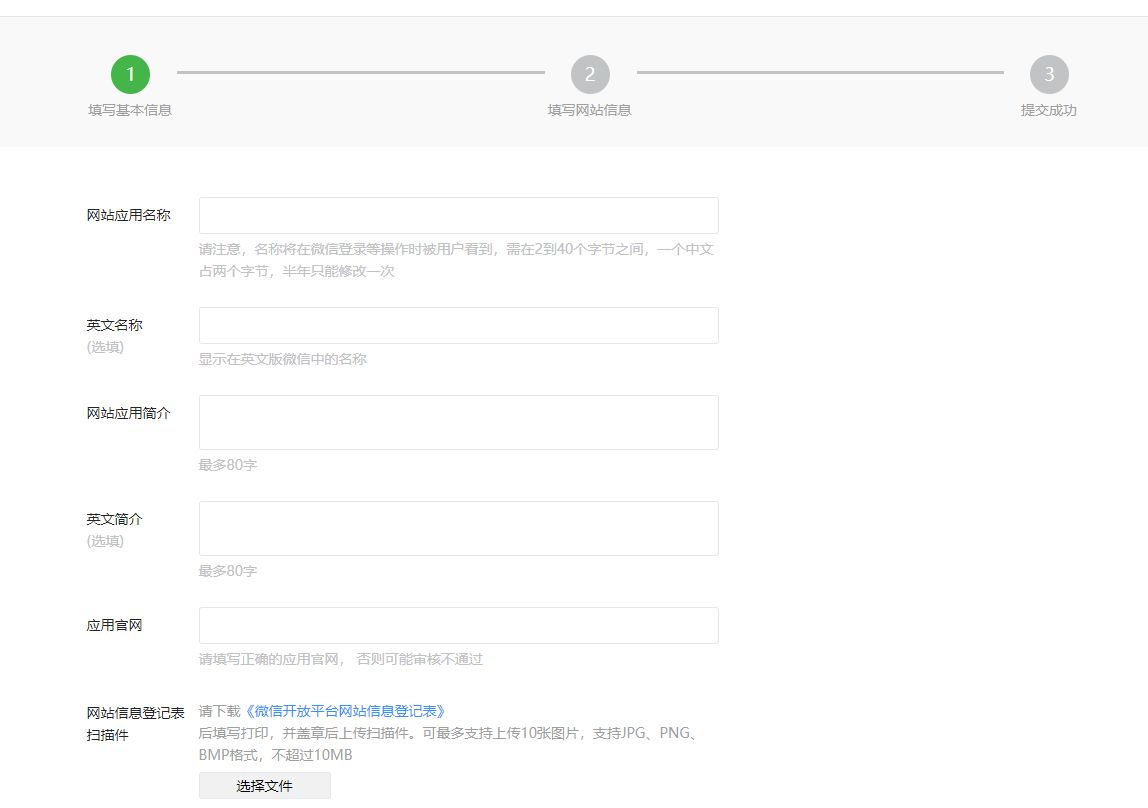
进入微信开放平台注册账号,点击管理中心,再点击网站应用,点击创建网站,填写信息,如下图:
- 等待审核.....
- 审核通过,点击查看,并申请开通微信登录。

- 待已开通。你需要记住AppID和AppSecret。

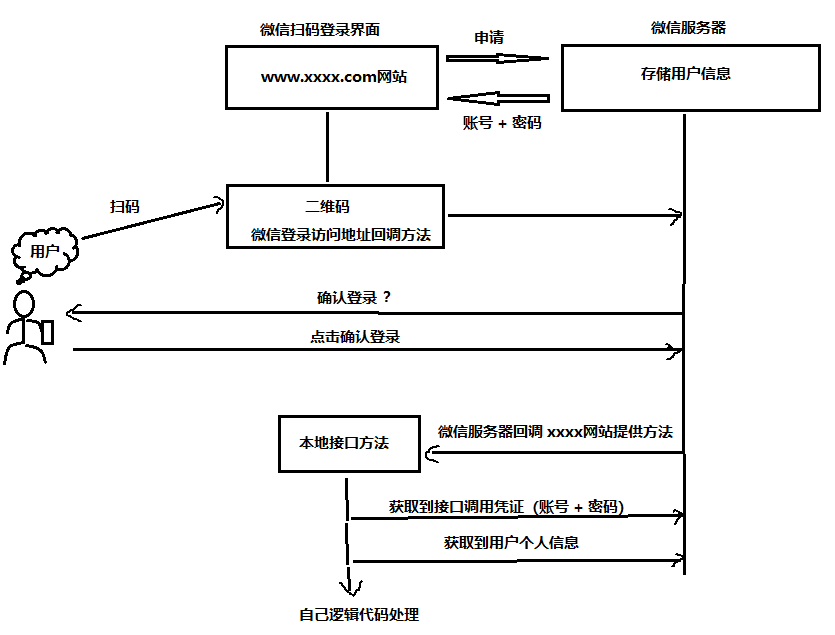
2.微信登录流程
3.简单代码实现:
-
为方便演示,使用本地方式测试。
-
修改
C:WindowsSystem32Driversetc下hosts文件域名和ip进行映射:127.0.0.0.1 www.xxxx.com -
windows启动服务80端口冲突解决:80端口占用解决
-
html页面:
// 使用weixin的js工具包
<div id="weixin"></div>
<script src="http://res.wx.qq.com/connect/zh_CN/htmledition/js/wxLogin.js"></script>
<script>
    $(function(){
        var obj = new WxLogin({
         self_redirect:true,// 允许重定向
         id:"weixin",// 指定dom标签id
         appid: "appid",// appid
         scope: "snsapi_login",// web端固定写法
         redirect_uri: "回调url",// www.xxxx.com/loginServlet
          state: "",
         style: "",
         href: ""
         });
    })
</script>
- flask简易代码
@app.route('/')
def hello_world():
    # 返回上例页面
    return render_template("./index.html")
- 登录逻辑
@app.route('/loginServlet')
def loginServlet():
	# 获取code
    code = request.args.get("code")
    # 获取接口凭证
    # AppID和AppSecret为上图中示例
    token_url = "https://api.weixin.qq.com/sns/oauth2/access_token?appid=AppID" + "&secret=AppSecret&code=" + code + "&grant_type=authorization_code"
    token_response = requests.get(url=token_url).json()
    """
    token_response返回信息:
    {
        "access_token": 接口调用凭证,
        "expires_in ":  access_token接口调用凭证超时时间(单位秒),
        "refresh_token ": 用户刷新access_token,
        "openid ": openid授权用户唯一标识,
        "scope ": scope用户授权作用域,使用逗号分隔,
        "unionid ": 当且仅当该网站应用已获取该用户的userinfo授权时才会出现字段
    }
    """
    # 拿取access_token 和 openid 获取用户信息
    access_token = token_response["access_token"]
    openid = token_response["openid"]
    user_url = "https://api.weixin.qq.com/sns/userinfo?access_token=" + access_token + "&openid=" + openid
    # 发送requests请求获取用户信息
    user_response = requests.get(url=user_url).json()
    # 这里返回用户信息,也可以做个人逻辑处理,如存入redis等...
    return jsonify(user_response)
- 80端口启动服务
python3 app.py run