- 什么是观察者模式
概念:一个对象状态改变,通知正在对他进行观察的对象,这些对象根据各自要求做出相应的改变。
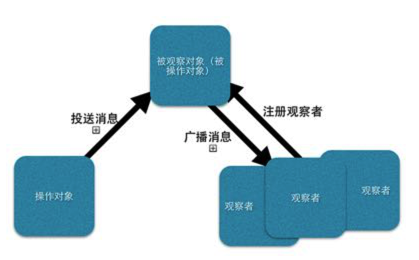
图解:操作对象向被观察者对象投送消息,使得被观察者的状态得以改变,在此之前已经有观察者向被观察对象注册,订阅它的广播,现在被观察对象将自己状态发生改变的消息广播出来,观察者接收到消息各自做出应变。
在IOS开发中我们可能会接触到的经典观察者模式的实现方式,有这么几种:NSNotificationCenter、KVO、Delegate等
下面介绍观察者模式的几种实现:
1、NSNotificationCenter (通知)

如图所示,在通知机制中对某个通知感兴趣的所有对象都可以成为接受者。
首先,这些对象需要向通知中心(NSNotificationCenter)发出addObserver:selector:name:object:消息进行注册,在投送对象投送通知送给通知中心时,通知中心就会把通知广播给注册过的接受者。所有的接受者不知道通知是谁投送的,不去关心它的细节。投送对象和接受者是一对多的关系。接受者如果对通知不再关注,会给通知中心发送removeObserver:name:Object:消息解除注册,以后不再接受通知。
实现代码如下:
AppDelegate.m
- (void)applicationDidEnterBackground:(UIApplication *)application {
    [[NSNotificationCenter defaultCenter]postNotificationName:@"APPTerminate" object:self];
}

//ViewController.m 的实现

#import "ViewController.h"

@interface ViewController ()

@end

@implementation ViewController

- (void)viewDidLoad {
    [super viewDidLoad];
    //注意此处的selector有参数,要加冒号
    [[NSNotificationCenter defaultCenter]addObserver:self selector:@selector(doSomething:) name:@"APPTerminate" object:nil];
    // Do any additional setup after loading the view, typically from a nib.
}

- (void)didReceiveMemoryWarning {
    [super didReceiveMemoryWarning];
    [[NSNotificationCenter defaultCenter]removeObserver:self];
    // Dispose of any resources that can be recreated.
}

#pragma mark -处理通知
-(void)doSomething:(NSNotification*)notification{
    NSLog(@"收到通知");
}

@end
2、KVO(Key-Value-Observing)

该机制下观察者的注册是在被观察者的内部进行的,不同于通知机制(由观察者自己注册),需要被观察者和观察者同时实现一个协议:NSKeyValueObserving,被观察者通过addObserver:forKeypath:options:context方法注册观察者,以及要被观察的属性。
实现代码如下:
//AppDelegate.h

#import <UIKit/UIKit.h>
#import <CoreData/CoreData.h>
#import "TestWatche.h"

@interface AppDelegate : UIResponder <UIApplicationDelegate>

@property (strong, nonatomic) UIWindow *window;

@property (readonly, strong, nonatomic) NSManagedObjectContext *managedObjectContext;
@property (readonly, strong, nonatomic) NSManagedObjectModel *managedObjectModel;
@property (readonly, strong, nonatomic) NSPersistentStoreCoordinator *persistentStoreCoordinator;
@property (strong,nonatomic) NSString *state;
@property (strong,nonatomic) TestWatche *watcher;


- (void)saveContext;
- (NSURL *)applicationDocumentsDirectory;

@end
AppDelegate.m 对如下方法做出修改
- (BOOL)application:(UIApplication *)application didFinishLaunchingWithOptions:(NSDictionary *)launchOptions {
      // Override point for customization after application launch.

    self.watcher = [TestWatche alloc];

    [self addObserver:self.watcher forKeyPath:@"state" options:NSKeyValueObservingOptionOld | NSKeyValueObservingOptionNew context:@"pass content"];
  self.state = @"launch";

  return YES;
}

- (void)applicationDidEnterBackground:(UIApplication *)application {
    self.state = @"backgroud";
}

//TestWatche.m(由于继承自NSObject,而NSObject已实现了NSKeyValueObserving协议,所以不需要做声明)

#import "TestWatche.h"

@implementation TestWatche

-(void)observeValueForKeyPath:(NSString *)keyPath ofObject:(id)object change:(NSDictionary *)change context:(void *)context{
    NSLog(@"state change:%@",change);
}
@end
//添加监听者
[self.tableView addObserver: self forKeyPath: @"contentOffset" options: NSKeyValueObservingOptionNew context: nil];

/**
 *  监听属性值发生改变时回调
 */
- (void)observeValueForKeyPath:(NSString *)keyPath ofObject:(id)object change:(NSDictionary<NSString *,id> *)change context:(void *)context
{
    CGFloat offset = self.tableView.contentOffset.y;
    CGFloat delta = offset / 64.f + 1.f;
    delta = MAX(0, delta);
    [self alphaNavController].barAlpha = MIN(1, delta);
}
3、委托模式
委托模式大多数人解释的复杂了,其实就像是java中的接口,类可以实现或不实现协议(接口)中的方法。通过此种方式,达到最大的解耦目的,方便项目的扩展。不过你需要设置应用的委托对象,以确定协议中的方法为谁服务。
实现代码如下:
- (void)viewDidLoad {

[super viewDidLoad];

self.title = _titleName;

UIButton *rigesterButton = [UIButton buttonWithType:UIButtonTypeCustom];

rigesterButton.frame = CGRectMake(150, 550, 100, 50);

[self.view addSubview:rigesterButton];

rigesterButton.backgroundColor = [UIColor orangeColor];

rigesterButton.showsTouchWhenHighlighted = YES;

rigesterButton.layer.cornerRadius = 10;

[rigesterButton setTitle:@"注册" forState:UIControlStateNormal];

[rigesterButton addTarget:self action:@selector(toRigester) forControlEvents:UIControlEventTouchUpInside ];

}

//什么时候触发这个代理方法

- (void)toRigester

{

[self.navigationController popViewControllerAnimated:YES];

// 4.通过协议的属性调用代理的方法

[self.delegate toLoginWithName:@"JZQ"];

}

- (void)didReceiveMemoryWarning {

[super didReceiveMemoryWarning];

// Dispose of any resources that can be recreated.

}

/*

#pragma mark - Navigation

// In a storyboard-based application, you will often want to do a little preparation before navigation

- (void)prepareForSegue:(UIStoryboardSegue *)segue sender:(id)sender {

// Get the new view controller using [segue destinationViewController].

// Pass the selected object to the new view controller.

}

*/

@end

@interface Rigester_ViewController ()

@end

@implementation Rigester_ViewController

- (void)viewDidLoad {

[super viewDidLoad];

self.title = _titleName;

UIButton *rigesterButton = [UIButton buttonWithType:UIButtonTypeCustom];

rigesterButton.frame = CGRectMake(150, 550, 100, 50);

[self.view addSubview:rigesterButton];

rigesterButton.backgroundColor = [UIColor orangeColor];

rigesterButton.showsTouchWhenHighlighted = YES;

rigesterButton.layer.cornerRadius = 10;

[rigesterButton setTitle:@"注册" forState:UIControlStateNormal];

[rigesterButton addTarget:self action:@selector(toRigester) forControlEvents:UIControlEventTouchUpInside ];

}

//什么时候触发这个代理方法

- (void)toRigester

{

[self.navigationController popViewControllerAnimated:YES];

// 4.通过协议的属性调用代理的方法

[self.delegate toLoginWithName:@"JZQ"];

}

- (void)didReceiveMemoryWarning {

[super didReceiveMemoryWarning];

// Dispose of any resources that can be recreated.

}

/*

#pragma mark - Navigation

// In a storyboard-based application, you will often want to do a little preparation before navigation

- (void)prepareForSegue:(UIStoryboardSegue *)segue sender:(id)sender {

// Get the new view controller using [segue destinationViewController].

// Pass the selected object to the new view controller.

}

*/

@end