LNMP安装与配置
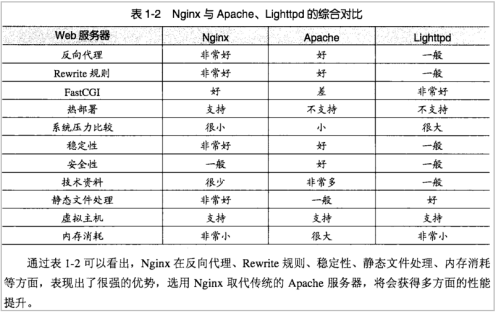
Nginx与apache、lighttp性能综合对比,如下图:
一.系统需求:
- CentOS/RHEL/Fedora/Debian/Ubuntu系统
- 需要3GB以上硬盘剩余空间
- MySQL 5.6及MariaDB 10必须1G以上内存。
- Linux下区分大小写,输入命令时请注意!
- 确定yum源正常使用!
二.安装步骤:
1、下载并安装LNMP一键安装包:
#tar -zxvf lnmp1.2-full.tar.gz
#cd lnmp1.2-full
#./install.sh lnmp
安装LNMP执行:wget -c http://soft.vpser.net/lnmp/lnmp1.2-full.tar.gz && tar zxf lnmp1.2-full.tar.gz && cd lnmp1.2-full && ./install.sh lnmp
如需要安装LNMPA或LAMP,将./install.sh 后面的参数替换为lnmpa或lamp即可。
按上述命令执行后,会出现如下提示:

需要设置MySQL的root密码(不输入直接回车将会设置为root),输入后回车进入下一步,如下图所示:
这里需要确认是否启用MySQL InnoDB,如果不确定是否启用可以输入 y ,输入 y 表示启用,输入 n 表示不启用。默认为y 启用,输入后回车进入下一步,选择MySQL版本: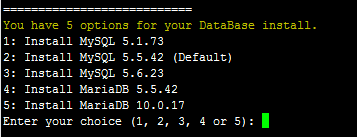
输入MySQL或MariaDB版本的序号,回车进入下一步,选择PHP版本:
输入PHP版本的序号,回车进入下一步,选择是否安装内存优化: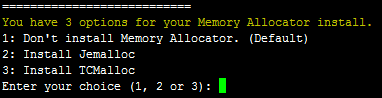
可以选择不安装、Jemalloc或TCmalloc,输入对应序号回车。
如果是LNMPA或LAMP的话还需要设置管理员邮箱
再选择Apache版本

提示"Press any key to install...or Press Ctrl+c to cancel"后,按回车键确认开始安装。
LNMP脚本就会自动安装编译Nginx、MySQL、PHP、phpMyAdmin、Zend Optimizer这几个软件。
3、安装完成
如果显示Nginx: OK,MySQL: OK,PHP: OK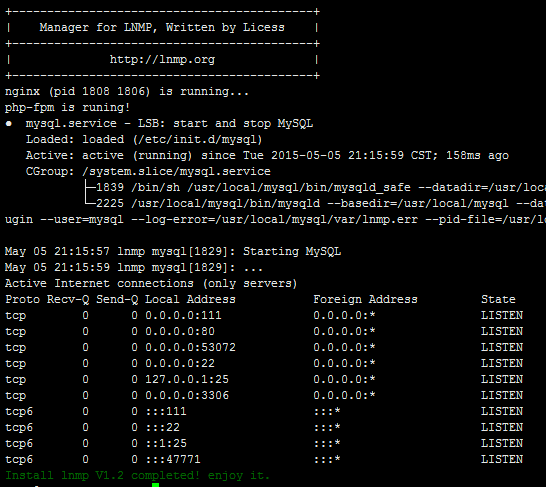
并且Nginx、MySQL、PHP都是running,80和3306端口都存在,并Install lnmp V1.2 completed! enjoy it.的话,说明已经安装成功。
4、安装失败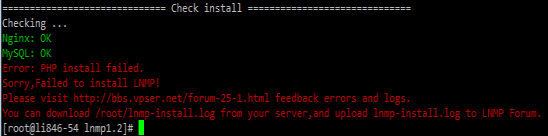
如果出现类似上图的提示,则表明安装失败,说明没有安装成功!!
二.LNMP相关软件安装目录
Nginx 目录: /usr/local/nginx/
MySQL 目录 : /usr/local/mysql/
MySQL数据库所在目录:/usr/local/mysql/var/
PHP目录 : /usr/local/php/
PHPMyAdmin目录 : /home/wwwroot/default/phpmyadmin/
默认网站目录 : /home/wwwroot/default/
Nginx日志目录:/home/wwwlogs/
三.LNMP相关配置文件位置
Nginx主配置文件:/usr/local/nginx/conf/nginx.conf
MySQL配置文件:/etc/my.cnf
PHP配置文件:/usr/local/php/etc/php.ini
php-fpm配置文件:/usr/local/php/etc/php-fpm.conf
四.LNMP状态管理命令
LNMP 状态管理: lnmp {start|stop|reload|restart|kill|status}
LNMP 各个程序状态管理: lnmp {nginx|mysql|mariadb|php-fpm|pureftpd} {start|stop|reload|restart|kill|status}
五.配置文件
#vi /usr/local/nginx/conf/nginx.conf
user www www;
worker_processes auto;
#启动进程
error_log /home/wwwlogs/nginx_error.log crit;
#错误日志
pid /usr/local/nginx/logs/nginx.pid;
#主进程PID保存文件
#Specifies the value for maximum file descriptors that can be opened by this process.
worker_rlimit_nofile 51200;
#文件描述符数量
events
{
use epoll;
#网络I/O模型,建议linux使用epoll,FreeBSD使用kqueue
#epoll是多路复用IO(I/O Multiplexing)中的一种方式,但是仅用于linux2.6以上内核,可以大大提高nginx的性能
worker_connections 51200;
#单个工作进程最大允许连接数
multi_accept on;
}
http
#整体环境配置
{
include mime.types;
default_type application/octet-stream;
#设定mime类型,文件传送类型由mime.type文件定义
server_names_hash_bucket_size 128; #保存服务器名字的hash表大小
client_header_buffer_size 32k; #客户端请求头部缓冲区大小
large_client_header_buffers 4 32k; #最大客户端头缓冲大小
client_max_body_size 50m; #客户端最大上传文件大小(M)
sendfile on;
#sendfile 指令指定 nginx 是否调用 sendfile 函数(zero copy 方式)来输出文件,对于普通应用,必须设为 on。如果用来进行下载等应用磁盘IO重负载应用,可设置为off,以平衡磁盘与网络I/O处理速度,降低系统的uptime.
#高效文件传输
tcp_nopush on;
#这个是默认的,结果就是数据包不会马上传送出去,等到数据包最大时,一次性的传输出去,这样有助于解决网络堵塞。(只在sendfile on时有效)
keepalive_timeout 60;
#连接超时时间
tcp_nodelay on;
#禁用nagle算法,也即不缓存数据。有效解决网络阻塞
fastcgi_connect_timeout 300;
fastcgi_send_timeout 300;
fastcgi_read_timeout 300;
fastcgi_buffer_size 64k;
fastcgi_buffers 4 64k;
fastcgi_busy_buffers_size 128k;
fastcgi_temp_file_write_size 256k;
#fastcgi设置
gzip on;
gzip_min_length 1k;
gzip_buffers 4 16k;
gzip_http_version 1.1;
gzip_comp_level 2;
gzip_types text/plain application/javascript application/x-javascript text/javascript text/css application/xml application/xml+rss;
gzip_vary on;
gzip_proxied expired no-cache no-store private auth;
gzip_disable "MSIE [1-6].";
#limit_conn_zone $binary_remote_addr zone=perip:10m;
##If enable limit_conn_zone,add "limit_conn perip 10;" to server section.
server_tokens off;
#隐藏nginx版本号(curl -I 192.168.4.154可以查看,更加安全)
#log format
log_format access '$remote_addr - $remote_user [$time_local] "$request" '
'$status $body_bytes_sent "$http_referer" '
'"$http_user_agent" $http_x_forwarded_for';
#定义日志格式
server
{
listen 80 default_server;
#listen [::]:80 default_server ipv6only=on;
#监听80端口
server_name www.lnmp.org;
#服务器名
index index.html index.htm index.php;
#默认网页文件
root /home/wwwroot/default;
#网页主目录
#error_page 404 /404.html;
include enable-php.conf;
location /nginx_status
{
stub_status on;
access_log off;
}
#开启status状态监测
location ~ .*.(gif|jpg|jpeg|png|bmp|swf)$
{
expires 30d;
}
#静态文件处理,保存期30天
location ~ .*.(js|css)?$
{
expires 12h;
}
#js和css文件处理,保存期12小时
location ~ /.
{
deny all;
}
access_log /home/wwwlogs/access.log access;
#正确访问日志
}
include vhost/*.conf;
#vhost/下子配置文件生效
}
检查nginx配置文件语句错误
/usr/local/nginx/sbin/nginx -t
平滑重启nginx进程
1)pkill -HUP nginx
2)kill -HUP `pgrep -uroot nginx`
Pgrep -uroot nginx 取出nginx主进程PID
3)/usr/local/nginx/sbin/nginx -s reload
六.配置实验
1.nginx虚拟主机
实验1 虚拟主机
1)域名解析 (文件解析)
C:WindowsSystem32driversetchosts
192.168.172.251 www.sina.com
192.168.172.251 www.sohu.com
2)网站目录规划
#mkdir /home/wwwroot/sina
#mkdir /home/wwwroot/sohu
#vim /home/wwwroot/sina/index.html
#vim /home/wwwroot/sohu/index.html
sina和sohu域名事先解析
3)修改配置文件
#vim /usr/local/nginx/conf/nginx.conf
66 listen 80;
#vim /usr/local/nginx/conf/vhost/v.conf
server
{
listen 80 ;
#listen [::]:80 default_server ipv6only=on;
server_name www.sina.com;
index index.html index.htm index.php;
root /home/wwwroot/sina;
#error_page 404 /404.html;
include enable-php.conf;
}
server
{
listen 80 ;
#listen [::]:80 default_server ipv6only=on;
server_name www.sohu.com;
index index.html index.htm index.php;
root /home/wwwroot/sohu;
#error_page 404 /404.html;
include enable-php.conf;
}
4)建立虚拟主机v.conf文件
#vim /usr/local/nginx/conf/vhost/v.conf
server {
listen 80;
server_name www.sina.com;
index index.html index.htm index.php;
root /home/wwwroot/sina/;
include enable-php.conf;
}
server {
listen 80;
server_name www.sohu.com;
index index.html index.htm index.php;
root /home/wwwroot/sohu/;
include enable-php.conf;
}
5)重启服务 测试
#pkill -HUP nginx
最后在客户端测试虚拟主机www.baidu.com和www.sina.com两家公司网站
2.列表页显示
1)修改配置文件
#vim /usr/local/nginx/conf/nginx.conf
server {
.......
autoindex on;
}
2)重启服务 测试
#pkill -HUP nginx
测试 192.168.172.251 看到目录结构
server
{
listen 80;
server_name www.sina.com;
index index.html index.htm index.php;
root /home/wwwroot/sina;
autoindex on;
3.nginx状态监控
location /nginx_status{
stub_status on;
access_log off;
}
#客户端访问网址:http://IP/nginx_status
4.rewrite正则过滤
location ~ .php$ {
proxy_pass http://127.0.0.1;
}
Rewrite指令最后一项参数为flag标记,支持的flag标记如下:
Last
停止执行当前这一轮的ngx_http_rewrite_module指令集,然后查找匹配改变后URI的新location;
Break
停止执行当前这一轮的ngx_http_rewrite_module指令集;
Redirect
在replacement字符串未以“http://”或“https://”开头时,使用返回状态码为302的临时重定向;
Permanent
返回状态码为301的永久重定向。
Last和break用来实现uri重写,浏览器地址栏的url地址不变,但在服务器访问的路径发生了变化,redirect和permanent用来实现url跳转,浏览器地址栏会显示跳转后的url地址,使用alias指令时必须使用last标记,使用proxy_pass指令时要使用break标记,last标记在本条rewrite规则执行完毕后,会对其所在的server{}标签重新发起请求,而break标记则在本条规则匹配完成后,终止匹配,不再匹配后面的规则.
例1:域名跳转
输入www.sina.com,跳转到www.sohu.com
server
{
listen 80;
server_name www.sina.com;
index index.html index.htm index.php;
root /home/wwwroot/sina;
if ($http_host = www.sina.com) {
rewrite (.*) http://www.sohu.com permanent;
}
}
server
{
listen 80;
server_name www.sohu.com;
index index.html index.htm index.php;
root /home/wwwroot/sohu;
}
修改配置文件
#vim /usr/local/nginx/conf/vhost/v.conf
server {
listen 80;
server_name www.sina.com;
index index.html index.htm index.php;
root /home/wwwroot/sina/;
if ($http_host = www.sina.com) {
rewrite (.*) http://www.sohu.com permanent;
}
include enable-php.conf;
}
2)重启服务 测试
#pkill -HUP nginx
测试 www.sina.com -> www.sohu.com
例2:文件跳转
server
{
listen 80;
server_name www.sina.com;
index index.html index.htm index.php;
root /home/wwwroot/sina;
rewrite index(d+).html /index.php?id=$1 last;
}
修改配置文件
#vim /usr/local/nginx/conf/vhost/v.conf
server {
listen 80;
server_name www.sina.com;
index index.html index.htm index.php;
root /home/wwwroot/sina/;
rewrite index(d+).html /index.php?id=$1 last;
include enable-php.conf;
}
2)建立index.php
#vim /home/wwwroot/sina/index.php
<?php
echo "nginx rewrite";
?>
3)重启服务 测试
#pkill -HUP nginx
测试 www.sina.com/index5.html
5.禁止IP地址访问
server {
listen 80 default;
return 500;
}
后面的default参数表示这个是默认虚拟主机。
比如别人通过ip或者未知域名访问你的网站的时候,你希望禁止显示任何有效内容,可以给他返回500.
6. 代理负载均衡技术(反向代理)
http
upstream myweb1 {
#定义地址池
server 192.168.242.100:80;
server 192.168.242.111:80;
}
准备工作: S 192.168.172.251 Linux Nginx
S1 192.168.172.124 Linux Apache
S2 192.168.172.39 Linux Apache
C 192.168.172.250 windows 测试
1)修改S 192.168.172.251 Nginx 服务配置文件
#vim /usr/local/nginx/conf/nginx.conf
upstream myweb1 {
server 192.168.172.124:80;
server 192.168.172.39:80;
}
server {
listen 80;
server_name www.sohu.com;
#使用www.sohu.com访问
location / {
proxy_pass http://myweb1;
#使用地址池
proxy_next_upstream http_500 http_502 http_503 error timeout invalid_header;
#定义故障转移。后端服务器节点返回500、502、503、504和超时等错误时,自动把请求转发到另一台服务器,转移故障。
proxy_set_header Host $host;
#利用HOST变量向后端服务器传递需要解析的客户端访问的域名(传递域名)
proxy_set_header X-Forwarded-For $remote_addr;
#$remote_addr 把客户端真实IP赋予X-Forwarded-For。后端服务器才能获取真实的客户端IP。以便记录日志,要不日志中记录的访问信息都是负载服务器,而不是客户端(传递IP)
}
}
server {
listen 80;
server_name www.sohu.com;
location / {
proxy_pass http://myweb1;
proxy_next_upstream http_500 http_502 http_503 error timeout invalid_header;
proxy_set_header Host $host;
proxy_set_header X-Forwarded-For $remote_addr;
}
}
2)修改S1 192.168.172.124 Apache正常访问
关闭虚拟主机 httpd-autoindex.conf
#vim /usr/local/apache2/htdocs/index.html
S1111111111111
3)修改S2 192.168.172.39 Apache正常访问
关闭虚拟主机 httpd-autoindex.conf
#vim /usr/local/apache2/htdocs/index.html
S2222222222222
4)重启S服务 测试
#pkill -HUP nginx
C 浏览器 www.sohu.com S1 S2