一、nginx介绍
1.nginx概述
Nginx是一个开源且高性能、可靠的Http Web服务、代理服务。
开源: 直接获取源代码
高性能: 支持海量并发
可靠: 服务稳定
2.nginx特点
1.配置文件简单易读
2.支持rewrite重写,根据域名、URL的不同,转发HTTP请求到不同的后端服务器组
3.高可用性,稳定性,宕机几率很低
4.节省资源,支持Gzip压缩静态资源
5.支持热部署,可以7*24小时不间断运行,数月不重启,#在kill进程的情况下对软件修改。
1)高性能高并发
性能高,支持海量并发,当并发特别高的时候,nginx比其他的web服务响应速度快
2)轻量且高扩展性
1.功能模块多,但仅需要保留必要的模块
2.需要哪个模块添加哪个模块,可以兼容第三方模块
3)高可靠性
很多web服务跑一段事件后需要重启,nginx不需要
nginx支持宕机时间级别为 9999、99999
4)支持热部署
nginx可以在开机情况下进行升级和重启
5)互联网公司使用nginx
nginx技术成熟,可以做负载,安全,web,缓存
6)nginx支持epoll网络模型
1.epoll:当用户发起请求,直接对请求的内容进行处理
2.select:当用户发起请求,先遍历扫描数据,然后对请求的内容进行处理

Select: 当用户发起一次请求,select模型就会进行一次遍历扫描,从而导致性能低下。
Epoll: 当用户发起请求,epoll模型会直接进行处理,效率高效,并无连接限制。
3.其他的web服务
1.apache:最早使用的web服务,难以掌握,性能不高
2.nginx
	1)Tengine:淘宝根据nginx进一步开发得到的服务
	2)openresty:是一个基于 Nginx 与 Lua 的高性能 Web 平台
3.lighttpd:消耗的内存和cpu较低
4.IIS:windows的web服务
5.GWS:Google web server
6.BWS:baidu web server
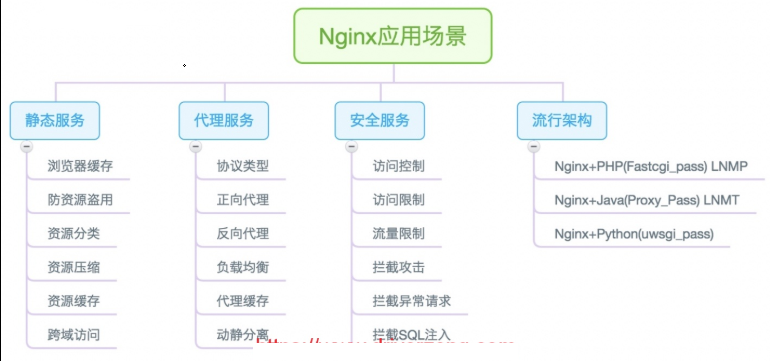
二、nginx应用场景
三、nginx安装
1.epel源安装
# yum自动安装,不支持自有扩展第三方功能
[root@web01 ~]# yum install -y nginx
# 基础依赖
[root@web02 ~]# yum install -y gcc gcc-c++ autoconf pcre pcre-devel make automake wget httpd-tools vim tree
2.官方源安装
1)配置官方源
[root@web02 ~]# vim /etc/yum.repos.d/nginx.repo
[nginx-stable]
name=nginx stable repo
baseurl=http://nginx.org/packages/centos/7/$basearch/
gpgcheck=1
enabled=1
gpgkey=https://nginx.org/keys/nginx_signing.key
module_hotfixes=true
2)安装环境依赖准备
	# 基础依赖
[root@web02 ~]# yum install -y gcc gcc-c++ autoconf pcre pcre-devel make automake wget httpd-tools vim tree

	# 进阶依赖
# 操作系统:CentOS Linux release 7.3.1611 (Core)
# GCC编译环境:
	yum install -y gcc gcc-c++ autoconf automake make
# 模块依赖性:Nginx支持的功能模块需要有第三方的库支持,例如gzip的zlib库,rewrite重写需要的pcre库,HTTPS需要的openssl库等等。
	yum install zlib zlib-devel openssl openssl-devel pcre pcre-devel wget httpd-tools vim

# 系统基础开发环境:
	yum groupinstall "Development Tools" "Basic Web Server"

# 确保防火墙关闭
	iptables -F
# 关闭selinux
# yum源配置正确
# 网络连接状态正常
3)安装nginx
[root@web02 ~]# yum install -y nginx
4)启动服务
[root@web02 ~]# systemctl start nginx
#或者
[root@web02 ~]# nginx
5)检验启动
#方式一:
	[root@web02 ~]# ps -ef | grep nginx
#方式二:
	[root@web02 ~]# netstat -lntp | grep 80
#方式三:
	访问页面 10.0.0.8:80
#方式四:
    #查看版本
    [root@web02 ~]# nginx -v
    #查看安装模块
    [root@web02 ~]# nginx -V
6)nginx常用命令
#注意,使用哪种方式启动就用哪种方式关闭
#启动命令
[root@web02 ~]# systemctl start nginx
#关闭命令
[root@web02 ~]# systemctl stop nginx
#nginx重启
[root@web02 ~]# systemctl restart nginx
#nginx重载配置文件
[root@web02 ~]# systemctl reload nginx

#启动命令
[root@web02 ~]# nginx
#强制停止命令
[root@web02 ~]# nginx -s stop
#nginx重启
[root@web02 ~]# nginx -s reopen
#nginx重载配置文件
[root@web02 ~]# nginx -s reload
#优雅地停止Nginx服务(即处理完所有请求后再停止服务)
[root@web02 ~]# nginx -s quit

1.检查nginx配置
[root@web01 ~]# nginx -t
nginx: the configuration file /etc/nginx/nginx.conf syntax is ok
nginx: configuration file /etc/nginx/nginx.conf test is successful

2.加入开机自启
[root@web01 ~]# systemctl enable nginx
Created symlink from /etc/systemd/system/multi-user.target.wants/nginx.service to /usr/lib/systemd/system/nginx.service.

3.CentOS6操作
#启动
[root@web01 ~]# nginx
[root@web01 ~]# /etc/init.d/nginx start
[root@web01 ~]# service nginx start
#配置开机自启
[root@web01 ~]# chkconfig nginx on
3.源码包安装
1.安装依赖
[root@web03 ~]# yum install -y gcc gcc-c++ autoconf pcre pcre-devel make automake wget httpd-tools vim tree

2.nginx.org官方下载 或者上传
[root@web03 ~]# wget http://nginx.org/download/nginx-1.18.0.tar.gz
#或者
[root@web03 ~]# rz nginx-1.18.0.tar.gz

3.解压缩Nginx源代码
[root@web03 ~]# tar xf nginx-1.18.0.tar.gz

4.创建用户
[root@web03 ~]# groupadd www -g 666
[root@web03 ~]# useradd www -u 666 -g 666

5.Nginx源代码目录介绍
auto 检测系统模块
CHANGES nginx更改记录文件
conf 存放nginx配置文件
configure 释放编译文件的定制脚本
contrib 提供了perl与vim插件
html 存放标准html页面语法
src 存放nginx源码

6.开始编译Nginx,扩展编译模块
#列出Nginx的编译选项,如制定安装路径,配置文件、日志文件等路径,指定开启模块功能等
[root@web03 ~]# ./configure --help

#编译Nginx初步,
[root@web03 ~]# cd nginx-1.18.0/
[root@web03 ~/nginx-1.18.0]# ./configure --prefix=/usr/local/nginx-1.18.0 --user=www --group=www --with-http_addition_module --with-http_auth_request_module --without-http_gzip_module

7.执行make编译
[root@web03 ~]# make

8.首次编译安装,生成Nginx的可执行命令
[root@web03 ~]# make install

9.检查Prefix指定的安装目录
[root@web03 ~]# ls /usr/local/nginx-1.18.0
nginx  nginx-1.14.0  nginx-1.14.0.tar.gz

10.配置system管理
[root@web03 ~]# vim /etc/systemd/system/nginx.service
[Unit]
Description=nginx - high performance web server
After=network.target remote-fs.target nss-lookup.target
[Service]
Type=forking
ExecStart=/usr/local/nginx/sbin/nginx -c /usr/local/nginx/conf/nginx.conf
ExecReload=/usr/local/nginx/sbin/nginx -s reload
ExecStop=/usr/local/nginx/sbin/nginx -s stop
[Install]
WantedBy=multi-user.target

11.做软链接
[root@web03 ~]# ln -s /usr/local/nginx-1.18.0 /usr/local/nginx
#配置环境变量
[root@web03 ~]# vim /etc/profile.d/nginx.sh
export PATH=/usr/local/nginx/sbin/:$PATH
#软连接的作用:
1.配置环境变量可以不加版本号
2.配置system启动可以不加版本号
3.升级直接切换软连接的链接文件即可

11.创建nginx的环境变量文件,修改如下,创建/etc/profile.d/nginx.sh脚本文件便于以后维护
[root@chaogelinux ~]# cat /etc/profile.d/nginx.sh
export PATH=/home/Learn_Nginx/nginx/sbin:$PATH

12.退出会话,重新登录终端,此时可以正常使用nginx
[root@chaogelinux ~]# echo $PATH
/home/Learn_Nginx/nginx/sbin:/usr/local/sbin:/usr/local/bin:/usr/sbin:/usr/bin:/root/bin

13.检查nginx的编译模块信息
[root@chaogelinux ~]# nginx -V

14.启动
[root@web03 ~]# systemctl daemon-reload
[root@web03 ~]# systemctl start nginx
#配置开机自启
[root@web03 ~]# systemctl enable nginx
4.nginx升级
1.下载新版本的包
[root@web03 ~]# wget http://nginx.org/download/nginx-1.19.2.tar.gz

2.解压
[root@web03 ~]# tar xf nginx-1.19.2.tar.gz

3.生成编译安装
[root@web03 ~]# cd nginx-1.19.2/
[root@web03 nginx-1.19.2]# ./configure --prefix=/usr/local/nginx-1.19.2 --user=www --group=www --with-http_addition_module --with-http_auth_request_module --without-http_gzip_module
[root@web03 nginx-1.19.2]# make && make install

4.替换配置文件
[root@web03 /usr/local]# cp nginx-1.18.0/conf/nginx.conf nginx-1.19.2/conf/
cp: overwrite ‘nginx-1.19.2/conf/nginx.conf’? y

5.重启nginx
[root@web03 /usr/local]# systemctl restart nginx
四、nginx相关配置文件
为了让大家更清晰的了解Nginx软件的全貌,可使用rpm -ql nginx查看整体的目录结构及对应的功能,如下表格整理了Nginx比较重要的配置文件
1.Nginx主配置文件
| 路径 |
类型 |
作用 |
| /etc/nginx/nginx.conf |
配置文件 |
nginx主配置文件 |
| /etc/nginx/conf.d/default.conf |
配置文件 |
默认网站配置文件 |
2.Nginx代理相关参数文件
| 路径 |
类型 |
作用 |
| /etc/nginx/fastcgi_params |
配置文件 |
Fastcgi代理配置文件(php) |
| /etc/nginx/scgi_params |
配置文件 |
scgi代理配置文件 |
| /etc/nginx/uwsgi_params |
配置文件 |
uwsgi代理配置文件(python) |
3.Nginx编码相关配置文件
| 路径 |
类型 |
作用 |
| /etc/nginx/win-utf |
配置文件 |
Nginx编码转换映射文件 |
| /etc/nginx/koi-utf |
配置文件 |
Nginx编码转换映射文件 |
| /etc/nginx/koi-win |
配置文件 |
Nginx编码转换映射文件 |
| /etc/nginx/mime.types |
配置文件 |
Content-Type与扩展名,nginx支持的数据类型 |
4.Nginx管理相关命令
| 路径 |
类型 |
作用 |
| /usr/sbin/nginx |
命令 |
Nginx命令行管理终端工具 |
| /usr/sbin/nginx-debug |
命令 |
Nginx命令行与终端调试工具 |
5.Nginx日志相关目录与文件
| 路径 |
类型 |
作用 |
| /var/log/nginx |
目录 |
Nginx默认存放日志目录 |
| /etc/logrotate.d/nginx |
配置文件 |
Nginx默认的日志切割 |
五、nginx主配置文件
Nginx主配置文件/etc/nginx/nginx.conf是一个纯文本类型的文件,整个配置文件是以区块的形式组织的。一般,每个区块以一对大括号{}来表示开始与结束。

Nginx主配置文件整体分为三块进行学习,分别是CoreModule(核心模块),EventModule(事件驱动模块),HttpCoreModule(http内核模块)
1.nginx.conf由指令与指令块构成
2.每行语句由盼号结束,指令和参数之间由空格分隔
3.指令块可以大括号{}组织多条指令块
4.配置文件中#号添加注释信息
5.支持 $变量 使用变量
6.支持include语句,组合多个配置文件
7.部分指令支持正则表达式
[root@web02 ~]# cat /etc/nginx/nginx.conf
#---------------------------核心模块------------------------------
#启动用户
user  www;
#工作进程数
worker_processes  1;
#错误日志		debug/info/notice/warn/error/emeor
error_log  /var/log/nginx/error.log warn;
#pid文件
pid        /var/run/nginx.pid;

#---------------------------事件驱动模块---------------------------
#事件
events {
	#工作进程的连接数
    worker_connections  1024;
}

#------------------------------http内核模块------------------------
#网站配置
http {
	#nginx包含的文件类型
    include       /etc/nginx/mime.types;
    #当遇到nginx不识别的文件就会下载
    default_type  application/octet-stream;
    #日志格式   日志格式的名字
    log_format  main  '$remote_addr - $remote_user [$time_local] "$request" '
                      '$status $body_bytes_sent "$http_referer" '
                      '"$http_user_agent" "$http_x_forwarded_for"';
	#访问日志及调用格式
    access_log  /var/log/nginx/access.log  main;
    #加快访问速度
    sendfile        on;
    #tcp_nopush     on;
	#保持长连接
    keepalive_timeout  65;
	#压缩
    #gzip  on;
	#包含的配置文件
    include /etc/nginx/conf.d/*.conf;

	server {
		#服务监听端口
        listen       80;
        #域名
        server_name  localhost;
        #字符集
        charset koi8-r;
        #请求的地址
        location / {
        	#站点目录,当访问/的时候跳转目录
            root   /usr/share/nginx/html;
            #默认访问页面
            index  index.html index.htm;
        }
    }
}
六、搭建小游戏
1.编写nginx配置文件
[root@web02 ~]# vim /etc/nginx/conf.d/default.conf
server {
    listen 80;
    server_name localhost;
    location / {
        root /code/mario;
        index index.html;
    }
}
2.创建目录
[root@web02 ~]# mkdir /code
3.上传代码
[root@web02 ~]# cd /code
[root@web02 /code]# rz mario.zip
4.解压代码
[root@web02 /code]# unzip mario.zip
#授权
[root@web02 /code]# chown -R www.www /code/
5.重启
[root@web02 /code]# nginx -t
nginx: the configuration file /etc/nginx/nginx.conf syntax is ok
nginx: configuration file /etc/nginx/nginx.conf test is successful

[root@web02 /code]# systemctl restart nginx
作业:
1.使用官方源和源码包安装nginx
2.搭建小游戏
1.web02官方源安装
# 配置官方源
[root@web02 ~]# vim /etc/yum.repos.d/nginx.repo
[nginx-stable]
name=nginx stable repo
baseurl=http://nginx.org/packages/centos/7/$basearch/
gpgcheck=1
enabled=1
gpgkey=https://nginx.org/keys/nginx_signing.key
module_hotfixes=true

# 安装nginx
[root@web02 ~]# yum install -y nginx
[root@web02 ~]# groupadd www -g 666 && useradd www -u 666 -g 666

# 修改Nginx配置文件
[root@web02 ~]# vim /etc/nginx/nginx.conf
user  www;

[root@web02 ~]# vim /etc/nginx/conf.d/default.conf
server {
    listen 80;
    server_name localhost;
    location / {
        root /games/mario;
        index index.html;
    }
}
server {
    listen 81;
    server_name localhost;
    location / {
        root /games/tank;
        index index.html;
    }
}

# 创建目录
[root@web02 ~]# mkdir /games
[root@web02 ~]# cd /games

# 上传代码解压码包
[root@web02 /games]# rz mario.zip
[root@web02 /games]# unzip mario.zip

[root@web02 /games]# rz tank.zip
[root@web02 /games]# unzip tank.zip
[root@web02 /games]# mv Battle_City tank
# 授权
[root@web02 /games]# chown -R www.www /games/

# 检查配置文件
[root@web02 /games]# nginx -t
nginx: the configuration file /etc/nginx/nginx.conf syntax is ok
nginx: configuration file /etc/nginx/nginx.conf test is successful

# 重启Nginx
[root@web02 /games]# systemctl restart nginx

# 检查Nginx
[root@web02 ~]# ps -aux | grep nginx

# 浏览器
10.0.0.8:80
10.0.0.8:81
2.web03源码安装
# 源码包安装
# 安装依赖
[root@web03 ~]# yum install -y gcc gcc-c++ autoconf pcre pcre-devel make automake wget httpd-tools vim tree


# 下载或者上传包
[root@web03 ~]# wget http://nginx.org/download/nginx-1.18.0.tar.gz
#或者
[root@web03 ~]# rz nginx-1.18.0.tar.gz

# 解压
[root@web03 ~]# tar xf nginx-1.18.0.tar.gz

# 创建用户
[root@web03 ~]# groupadd www -g 666
[root@web03 ~]# useradd www -u 666 -g 666


# 生成
[root@web03 ~]# cd nginx-1.18.0/
[root@web03 ~/nginx-1.18.0]# ./configure --prefix=/home/www/nginx-1.18.0 --user=www --group=www --with-http_addition_module --with-http_auth_request_module --without-http_gzip_module

#编译安装
[root@web03 ~/nginx-1.18.0]# make && make install


#配置system管理
[root@web03 ~]# vim /etc/systemd/system/nginx.service
[Unit]
Description=nginx - high performance web server
After=network.target remote-fs.target nss-lookup.target
[Service]
Type=forking
ExecStart=/usr/local/nginx/sbin/nginx -c /usr/local/nginx/conf/nginx.conf
ExecReload=/usr/local/nginx/sbin/nginx -s reload
ExecStop=/usr/local/nginx/sbin/nginx -s stop
[Install]
WantedBy=multi-user.target

# 做软链接
[root@web03 ~]# ln -s /usr/local/nginx-1.18.0 /usr/local/nginx

# 配置环境变量
[root@web03 ~]# cat /etc/profile.d/nginx.sh
export PATH=/usr/local/nginx/sbin/:$PATH
[root@web03 ~]# source /etc/profile.d/nginx.sh

# 启动
[root@web03 ~]# systemctl daemon-reload
[root@web03 ~]# systemctl start nginx

#配置开机自启
[root@web03 ~]# systemctl enable nginx


# 配置文件
[root@web03 ~]#  vim /home/www/nginx-1.18.0/conf/nginx.conf
user  www;
http {
	...
	include /usr/local/nginx/conf/default.conf;
	...
}

[root@web03 ~]# vim /home/www/nginx-1.18.0/conf/game.conf
server {
    listen 80;
    server_name localhost;
    location / {
        root /games/mario;
        index index.html;
    }
}

server {
    listen 81;
    server_name localhost;
    location / {
        root /games/tank;
        index index.html;
    }
}

# 创建目录
[root@web03 ~]# mkdir /games/{mario,tank}
[root@web03 ~]# cd /games

# 上传代码解压码包
[root@web03 /games]# rz mario.zip
[root@web03 /games]# unzip mario.zip

[root@web03 /games]# rz tank.zip
[root@web03 /games]# unzip tank.zip
[root@web03 /games]# mv Battle_City tank
# 授权
[root@web03 /games]# chown -R www.www /games/

# 检查配置文件
[root@web03 /games]# nginx -t
nginx: the configuration file /etc/nginx/nginx.conf syntax is ok
nginx: configuration file /etc/nginx/nginx.conf test is successful

# 重启Nginx
[root@web03 /games]# systemctl restart nginx

# 检查Nginx
[root@web03 ~]# ps -aux | grep nginx

# 浏览器
10.0.0.9:80
10.0.0.9:81