Redis集群部署安装
Linux版本:CentOS release 6.9
Redis 版本:redis-3.2.12.tar.gz
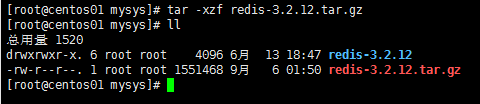
1、执行解压命令
tar -xzf redis-3.2.12.tar.gz
2、执行编译命令
make MALLOC=libc


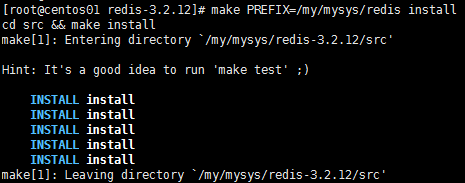
3、执行安装到指定目录命令,此次指定目录为 /my/mysys/redis
make PREFIX=/my/mysys/redis install
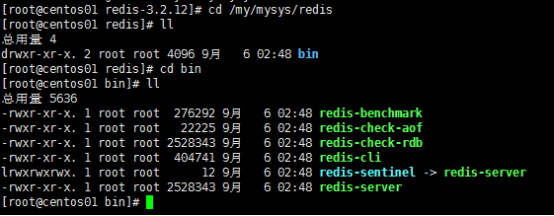
完成后目录结构
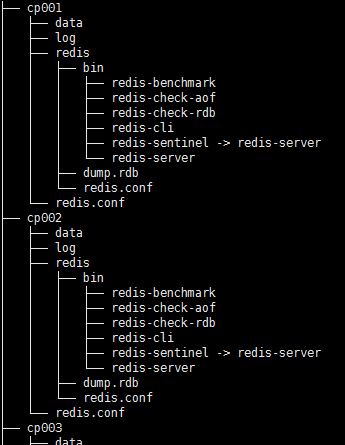
4、单服务器模拟3主3从部署
|
节点(文件夹) |
ip |
端口 |
类型 |
|
cp001 |
192.168.96.128 |
6371 |
主 |
|
cp002 |
192.168.96.128 |
6372 |
主 |
|
cp003 |
192.168.96.128 |
6373 |
主 |
|
cp004 |
192.168.96.128 |
6374 |
从 |
|
cp005 |
192.168.96.128 |
6375 |
从 |
|
cp006 |
192.168.96.128 |
6376 |
从 |
1) 创建文件夹
2) 配置文件
bind 192.168.96.128
protected-mode no
port 6376
tcp-backlog 511
timeout 0
tcp-keepalive 300
daemonize yes #后台运行
supervised no
pidfile /jq_redis/cp006/pid.pid #进程号
loglevel notice
logfile /jq_redis/cp006/log/log.log #日志文件
databases 16
save 900 1
save 300 10
save 60 10000
stop-writes-on-bgsave-error yes
rdbcompression yes
rdbchecksum yes
dbfilename dump.rdb
dir /jq_redis/cp006/data/ #数据位置
slave-serve-stale-data yes
slave-read-only yes
repl-diskless-sync no
repl-diskless-sync-delay 5
repl-disable-tcp-nodelay no
slave-priority 100
maxmemory 50gb
maxmemory-policy noeviction
appendonly no
appendfilename "appendonly.aof"
appendfsync everysec
no-appendfsync-on-rewrite no
auto-aof-rewrite-percentage 100
auto-aof-rewrite-min-size 64mb
aof-load-truncated yes
lua-time-limit 5000
cluster-enabled yes #开启集群
cluster-config-file nodes-6376.conf #集群日志
cluster-node-timeout 15000
slowlog-log-slower-than 10000
slowlog-max-len 128
latency-monitor-threshold 0
notify-keyspace-events ""
hash-max-ziplist-entries 512
hash-max-ziplist-value 64
list-max-ziplist-size -2
list-compress-depth 0
set-max-intset-entries 512
zset-max-ziplist-entries 128
zset-max-ziplist-value 64
hll-sparse-max-bytes 3000
activerehashing yes
client-output-buffer-limit normal 0 0 0
client-output-buffer-limit slave 256mb 64mb 60
client-output-buffer-limit pubsub 32mb 8mb 60
hz 10
aof-rewrite-incremental-fsync yes
3) 启动
/jq_redis/cp001/redis/bin/redis-server /jq_redis/cp001/redis.conf
/jq_redis/cp002/redis/bin/redis-server /jq_redis/cp002/redis.conf
/jq_redis/cp003/redis/bin/redis-server /jq_redis/cp003/redis.conf
/jq_redis/cp004/redis/bin/redis-server /jq_redis/cp004/redis.conf
/jq_redis/cp005/redis/bin/redis-server /jq_redis/cp005/redis.conf
/jq_redis/cp006/redis/bin/redis-server /jq_redis/cp006/redis.conf

4) 配置集群
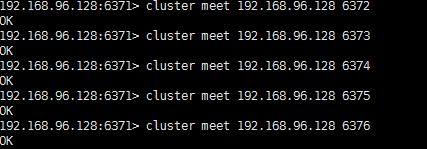
进入任意一个节点
/jq_redis/cp001/redis/bin/redis-cli -h 192.168.96.128 -p 6371

与其他节点握手
cluster meet 192.168.96.128 6372
cluster meet 192.168.96.128 6373
cluster meet 192.168.96.128 6374
cluster meet 192.168.96.128 6375
cluster meet 192.168.96.128 6376
分配 hash 槽
/jq_redis/cp001/redis/bin/redis-cli -h 192.168.96.128 -p 6371 cluster addslots {0..5461}
/jq_redis/cp002/redis/bin/redis-cli -h 192.168.96.128 -p 6372 cluster addslots {5462..10922}
/jq_redis/cp003/redis/bin/redis-cli -h 192.168.96.128 -p 6373 cluster addslots {10923..16383}

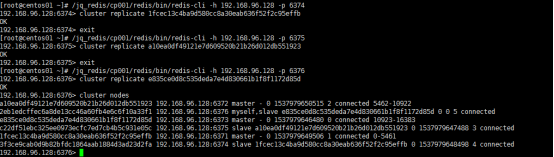
5) 复制节点
登陆节点查看节点信息
cluster nodes

依次登陆3个副本节点,设置复制的节点id
[root@centos01 ~]# /jq_redis/cp001/redis/bin/redis-cli -h 192.168.96.128 -p 6374
192.168.96.128:6374> cluster replicate 1fcec13c4ba9d580cc8a30eab636f52f2c95effb
OK
192.168.96.128:6374> exit
[root@centos01 ~]# /jq_redis/cp001/redis/bin/redis-cli -h 192.168.96.128 -p 6375
192.168.96.128:6375> cluster replicate a10ea0df49121e7d609520b21b26d012db551923
OK
192.168.96.128:6375> exit
[root@centos01 ~]# /jq_redis/cp001/redis/bin/redis-cli -h 192.168.96.128 -p 6376
192.168.96.128:6376> cluster replicate e835ce0d8c535deda7e4d830661b1f8f1172d85d
OK
192.168.96.128:6376> cluster nodes
a10ea0df49121e7d609520b21b26d012db551923 192.168.96.128:6372 master - 0 1537979650515 2 connected 5462-10922
2eb1edcffec6a8de13cc46a60fb4e6c6f10a33f1 192.168.96.128:6376 myself,slave e835ce0d8c535deda7e4d830661b1f8f1172d85d 0 0 5 connected
e835ce0d8c535deda7e4d830661b1f8f1172d85d 192.168.96.128:6373 master - 0 1537979646480 0 connected 10923-16383
c22df51ebc325ee0973ecfc7ed7cb4b5c931e05c 192.168.96.128:6375 slave a10ea0df49121e7d609520b21b26d012db551923 0 1537979647488 3 connected
1fcec13c4ba9d580cc8a30eab636f52f2c95effb 192.168.96.128:6371 master - 0 1537979649506 1 connected 0-5461
3f3ce9cab0d9b82bfdc1864aab1884d3ad23d2fa 192.168.96.128:6374 slave 1fcec13c4ba9d580cc8a30eab636f52f2c95effb 0 1537979648498 4 connected
测试数据
登陆集群 /jq_redis/cp001/redis/bin/redis-cli -c -h 192.168.96.128 -p 6376

补充:redis rename-command 从配置中重命名
在配置文件中添加
rename-command CONFIG “”
*生成环境权限等问题,需要做如下配置,(否则会报错:ERR unknown command 'CONFIG'; nested exception is redis.clients.jedis.exceptions.JedisDataException: ERR unknown command 'CONFIG')
1、打开redis的Keyspace notifications功能,在redis.conf配置文件里添加下面的配置项
notify-keyspace-events Ex
2、xml方式
在xml里加上

<util:constant static-field="org.springframework.session.data.redis.config.ConfigureRedisAction.NO_OP"/>

采用XML配置的方式,很有可能需要引入 util标签

<beans xmlns="http://www.springframework.org/schema/beans"
       xmlns:xsi="http://www.w3.org/2001/XMLSchema-instance"
       xmlns:context="http://www.springframework.org/schema/context"
       xmlns:aop="http://www.springframework.org/schema/aop"
       xmlns:mvc="http://www.springframework.org/schema/mvc"

       xmlns:util="http://www.springframework.org/schema/util"

       xsi:schemaLocation="http://www.springframework.org/schema/beans
    http://www.springframework.org/schema/beans/spring-beans-4.1.xsd
    http://www.springframework.org/schema/context
    http://www.springframework.org/schema/context/spring-context-4.1.xsd
    http://www.springframework.org/schema/aop
    http://www.springframework.org/schema/aop/spring-aop-4.1.xsd
    http://www.springframework.org/schema/mvc
    http://www.springframework.org/schema/mvc/spring-mvc-4.1.xsd

    http://www.springframework.org/schema/util
    http://www.springframework.org/schema/util/spring-util-4.1.xsd
Bean注入

@Bean
public static ConfigureRedisAction configureRedisAction() {
return ConfigureRedisAction.NO_OP;
}