CentOS7.5下安装Mycat连接MySQL8.0
Posted on 2018-11-08 11:07 许爱琪 阅读(645) 评论(2) 编辑 收藏MyCat详细介绍,请参考https://www.biaodianfu.com/mycat.html
9066管理端口,请参考https://www.cnblogs.com/parryyang/p/5606071.html
1.创建mycat用户
|
1
2
|
useradd mycatpasswd mycat |
2.下载安装包、解压并赋权
|
1
2
3
|
wget http://dl.mycat.io/1.6.6.1/Mycat-server-1.6.6.1-release-20181031195535-linux.tar.gztar -xzvf Mycat-server-1.6.6.1-release-20181031195535-linux.tar.gz -C /usr/localchown -R mycat:mycat /usr/local/mycat |
3.配置环境变量
|
1
2
3
4
5
6
7
8
9
10
11
|
vi /etc/profile增加## jdk envJAVA_HOME=/usr/java/jdk1.8.0_192CLASSPATH=$JAVA_HOME/lib/PATH=$PATH:$JAVA_HOME/binexport PATH JAVA_HOME CLASSPATH## mycat envexport MYCAT_HOME=/usr/local/mycatexport PATH=$PATH:$MYCAT_HOME/binsource /etc/profile |
4.配置server.xml
vi /usr/local/mycat/conf/server.xml
5.配置schema.xml
vi /usr/local/mycat/conf/schema.xml
6.启动Mycat
|
1
|
mycat start |
7.查看mycat启动日志
[root@mycat-server2 data]# mycat console
Running Mycat-server...
Mycat-server is already running.
8.连接MyCat
连接管理端口:
|
1
2
3
4
5
6
7
8
9
10
11
12
13
14
15
16
17
18
19
20
21
22
23
24
25
26
27
28
29
30
31
32
33
34
35
36
37
38
39
40
41
42
43
44
45
46
47
48
49
50
51
52
53
54
55
56
57
58
59
60
61
62
63
64
65
66
67
68
69
70
71
72
73
74
75
76
77
78
79
80
81
82
83
84
85
86
87
88
89
90
91
92
93
94
95
96
97
98
99
100
101
102
|
[root@mycat-server2 data]# mysql -h192.168.0.252 -P9066 -utest -ptestmysql: [Warning] Using a password on the command line interface can be insecure.Welcome to the MySQL monitor. Commands end with ; or g.Your MySQL connection id is 21Server version: 5.6.29-mycat-1.6.6.1-release-20181031195535 MyCat Server (monitor)Copyright (c) 2000, 2018, Oracle and/or its affiliates. All rights reserved.Oracle is a registered trademark of Oracle Corporation and/or itsaffiliates. Other names may be trademarks of their respectiveowners.Type 'help;' or 'h' for help. Type 'c' to clear the current input statement.# 查看所有的可用命令:mysql> show @@help;+--------------------------------------------------------------+--------------------------------------------+| STATEMENT | DESCRIPTION |+--------------------------------------------------------------+--------------------------------------------+| show @@time.current | Report current timestamp || show @@time.startup | Report startup timestamp || show @@version | Report Mycat Server version || show @@server | Report server status || show @@threadpool | Report threadPool status || show @@database | Report databases || show @@datanode | Report dataNodes || show @@datanode where schema = ? | Report dataNodes || show @@datasource | Report dataSources || show @@datasource where dataNode = ? | Report dataSources || show @@datasource.synstatus | Report datasource data synchronous || show @@datasource.syndetail where name=? | Report datasource data synchronous detail || show @@datasource.cluster | Report datasource galary cluster variables || show @@processor | Report processor status || show @@command | Report commands status || show @@connection | Report connection status || show @@cache | Report system cache usage || show @@backend | Report backend connection status | ##显示后端物理库连接信息,包括当前连接数,端口等信息| show @@session | Report front session details || show @@connection.sql | Report connection sql | ## 显示当前前端客户端连接情况| show @@sql.execute | Report execute status || show @@sql.detail where id = ? | Report execute detail status || show @@sql | Report SQL list || show @@sql.high | Report Hight Frequency SQL || show @@sql.slow | Report slow SQL || show @@sql.resultset | Report BIG RESULTSET SQL || show @@sql.sum | Report User RW Stat || show @@sql.sum.user | Report User RW Stat || show @@sql.sum.table | Report Table RW Stat || show @@parser | Report parser status || show @@router | Report router status || show @@heartbeat | Report heartbeat status || show @@heartbeat.detail where name=? | Report heartbeat current detail || show @@slow where schema = ? | Report schema slow sql || show @@slow where datanode = ? | Report datanode slow sql || show @@sysparam | Report system param || show @@syslog limit=? | Report system mycat.log || show @@white | show mycat white host || show @@white.set=?,? | set mycat white host,[ip,user] || show @@directmemory=1 or 2 | show mycat direct memory usage || show @@check_global -SCHEMA= ? -TABLE=? -retry=? -interval=? | check mycat global table consistency || switch @@datasource name:index | Switch dataSource || kill @@connection id1,id2,... | Kill the specified connections || stop @@heartbeat name:time | Pause dataNode heartbeat || reload @@config | Reload basic config from file || reload @@config_all | Reload all config from file || reload @@route | Reload route config from file || reload @@user | Reload user config from file || reload @@sqlslow= | Set Slow SQL Time(ms) || reload @@user_stat | Reset show @@sql @@sql.sum @@sql.slow || rollback @@config | Rollback all config from memory || rollback @@route | Rollback route config from memory || rollback @@user | Rollback user config from memory || reload @@sqlstat=open | Open real-time sql stat analyzer || reload @@sqlstat=close | Close real-time sql stat analyzer || offline | Change MyCat status to OFF || online | Change MyCat status to ON || clear @@slow where schema = ? | Clear slow sql by schema || clear @@slow where datanode = ? | Clear slow sql by datanode |+--------------------------------------------------------------+--------------------------------------------+59 rows in set (0.01 sec)# 查看所有的逻辑数据库:mysql> show @@database;+----------+| DATABASE |+----------+| TESTDB |+----------+1 row in set (0.00 sec)# 查看所有的数据节点:mysql> show @@datanode;Empty set (0.00 sec)mysql> show @@datasource;+----------+----------+-------+---------------+------+------+--------+------+------+---------+-----------+------------+| DATANODE | NAME | TYPE | HOST | PORT | W/R | ACTIVE | IDLE | SIZE | EXECUTE | READ_LOAD | WRITE_LOAD |+----------+----------+-------+---------------+------+------+--------+------+------+---------+-----------+------------+| dn1 | mysql_b1 | mysql | 192.168.0.242 | 3306 | W | 0 | 10 | 1000 | 6215 | 0 | 2 || dn1 | mysql_b2 | mysql | 192.168.0.240 | 3306 | R | 0 | 9 | 1000 | 6299 | 84 | 0 |+----------+----------+-------+---------------+------+------+--------+------+------+---------+-----------+------------+2 rows in set (0.00 sec)mysql> quitBye |
连接数据操作端口:
|
1
2
3
4
5
6
7
8
9
10
11
12
13
14
15
16
17
18
19
20
21
22
23
24
25
26
27
28
29
30
31
32
33
34
35
36
37
38
|
[root@mycat-server2 data]# mysql -h192.168.0.252 -P8066 -utest -ptestmysql: [Warning] Using a password on the command line interface can be insecure.Welcome to the MySQL monitor. Commands end with ; or g.Your MySQL connection id is 22Server version: 5.6.29-mycat-1.6.6.1-release-20181031195535 MyCat Server (OpenCloudDB)Copyright (c) 2000, 2018, Oracle and/or its affiliates. All rights reserved.Oracle is a registered trademark of Oracle Corporation and/or itsaffiliates. Other names may be trademarks of their respectiveowners.Type 'help;' or 'h' for help. Type 'c' to clear the current input statement.# 可以看见的都是逻辑数据库:mysql> show databases;+----------+| DATABASE |+----------+| TESTDB |+----------+1 row in set (0.00 sec)# 使用指定的逻辑数据库:mysql> use TESTDB;Reading table information for completion of table and column namesYou can turn off this feature to get a quicker startup with -ADatabase changed# 查看所有的数据表:mysql> show tables;+----------------+| Tables_in_test |+----------------+| member || t01 || t02 || t03 |+----------------+4 rows in set (0.03 sec) |
参数说明:
-h 后面是主机,即当前 mycat 安装的主机地址,本地可用 127.0.0.1 远程需要远程 ip;
-u Mycat server.xml 中配置的逻辑库用户;
-p Mycat server.xml 中配置的逻辑库密码;
-P 后面是端口 默认 9066,注意 P 是大写;
-d Mycat server.xml 中配置的逻辑库。
9.MyCat操作命令:
启动MyCat: mycat start;
停止MyCat: mycat stop;
前台运行: mycat console;
重启服务: mycat restart;
暂停: mycat pause;
查看启动状态: mycat status;
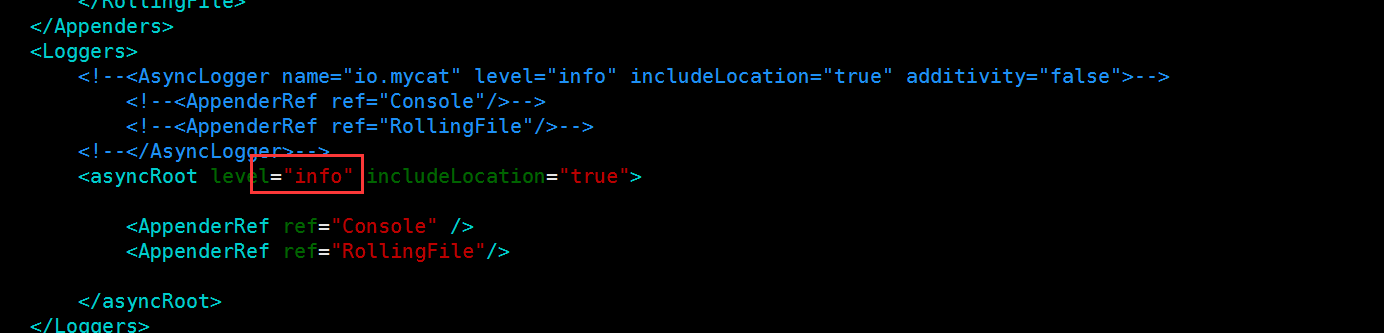
10.修改log4j的配置
为了让信息启动时更好定位,需要将conf/log4j2.xml的文件修改为debug级别。
附:其他问题
MySQL8.0的客户端连不上Mycat?
解决方案:使用mysql5的客户端可以正常访问,待详细分析


Feedback
## sudo vim /usr/lib/systemd/system/mycat.service
## 注意: ExecStart/ExecStop 取值两侧不要用引号
[Unit]
Description=MyCAT Service
After=syslog.target network.target
[Service]
Type=forking
ExecStart=/usr/local/mycat/bin/mycat start
ExecStop=/usr/local/mycat/bin/mycat stop
[Install]
WantedBy=multi-user.target
设置开机自动启动、并立即启动:
sudo systemctl enable mycat # 设置为开机自动启动
sudo systemctl start mycat # 立即启动
# sudo systemctl stop mycat # 立即停止
# sudo systemctl disable mycat # 取消开机自动启动
CentOS7.5 搭建MyCat1.6.6
1、环境及版本
操作系统: CentOS 7.5
MySQL:5.7.23
jdk:1.8.0_191
MyCat:1.6.6.1
|
1
2
3
|
cat /etc/centos-releasemysql -Vjava -version |

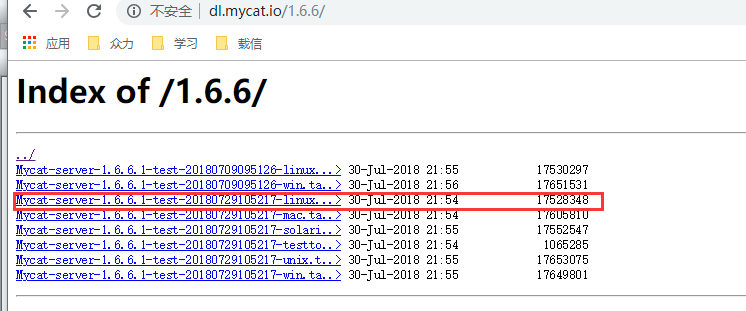
2、安装包准备
下载网站:http://dl.mycat.io/1.6.6/
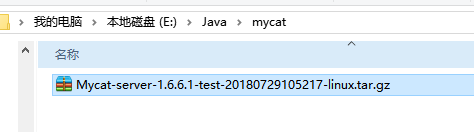
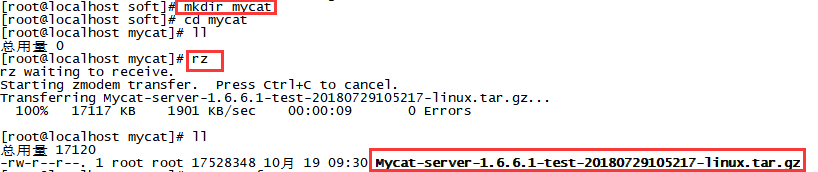
【2】上传至linux服务器:
|
1
2
3
|
mkdir /home/rhr/soft/mycatcd /home/rhr/soft/mycatrz |
3、开始安装
【1】解压
|
1
|
tar -zxvf Mycat-server-1.6-RELEASE-20161028204710-linux.tar.gz |
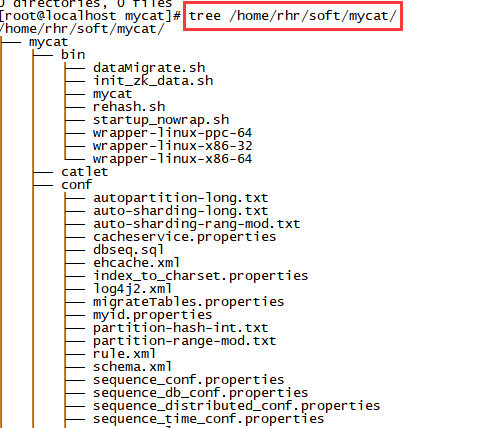
【2】安装tree(可选,使目录结构更好看)
|
1
|
yum -y install tree |
查看tree:
4、创建用户并修改配置文件
【1】为了更好的进入mycat,设置MYCAT_HOME的变量
|
1
|
vim /etc/profile |
添加绿色部分:
export JAVA_HOME=/home/rhr/soft/jdk/jdk1.8.0_191
export MYCAT_HOME=/home/rhr/soft/mycat/mycat
export PATH=$JAVA_HOME/bin:$JAVA_HOME/jre/bin:/usr/local/mysql/bin:$MYCAT_HOME/bin:$PATH

使得变量生效
|
1
|
source /etc/profile |
检查

【2】配置mycat文件
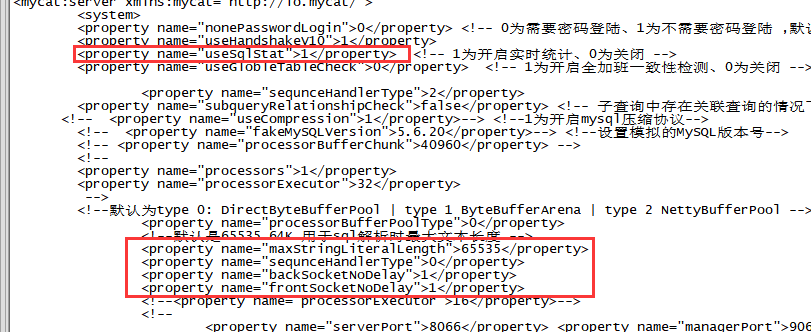
(1)修改server.xml
|
1
2
3
|
cd home/rhr/soft/mycat/mycat/confcp server.xml server_bak.xmlvim server.xml |
修改前:

修改后:
(2)修改schema.xml
1) 修改schema 标签
修改前:

    <schema name="TESTDB" checkSQLschema="false" sqlMaxLimit="100">
        <!-- auto sharding by id (long) -->
        <table name="travelrecord" dataNode="dn1,dn2,dn3" rule="auto-sharding-long" />

        <!-- global table is auto cloned to all defined data nodes ,so can join
                with any table whose sharding node is in the same data node -->
        <table name="company" primaryKey="ID" type="global" dataNode="dn1,dn2,dn3" />
        <table name="goods" primaryKey="ID" type="global" dataNode="dn1,dn2" />
        <!-- random sharding using mod sharind rule -->
        <table name="hotnews" primaryKey="ID" autoIncrement="true" dataNode="dn1,dn2,dn3" rule="mod-long" />
        <!-- <table name="dual" primaryKey="ID" dataNode="dnx,dnoracle2" type="global"
                needAddLimit="false"/> <table name="worker" primaryKey="ID" dataNode="jdbc_dn1,jdbc_dn2,jdbc_dn3" rule="mod-long" /> -->
        <table name="employee" primaryKey="ID" dataNode="dn1,dn2" rule="sharding-by-intfile" />
        <table name="customer" primaryKey="ID" dataNode="dn1,dn2" rule="sharding-by-intfile">
            <childTable name="orders" primaryKey="ID" joinKey="customer_id" parentKey="id">
                <childTable name="order_items" joinKey="order_id" parentKey="id" />
            </childTable>
            <childTable name="customer_addr" primaryKey="ID" joinKey="customer_id"  parentKey="id" />
        </table>
        <!-- <table name="oc_call" primaryKey="ID" dataNode="dn1$0-743" rule="latest-month-calldate" /> -->
    </schema>
修改后:
    <schema name="TESTDB" checkSQLschema="false" sqlMaxLimit="100">
        <!-- auto sharding by id (long) -->
    <table name="travelrecord" dataNode="dn1,dn2,dn3" rule="auto-sharding-long" />

    <!-- global table is auto cloned to all defined data nodes ,so can join
        with any table whose sharding node is in the same data node -->

    <table name="company" primaryKey="company_id" type="global" dataNode="dn1,dn2,dn3" />
    <table name="goods" primaryKey="goods_id" type="global" dataNode="dn1,dn2" />

    <!-- random sharding using mod sharind rule -->
    <table name="hotnews" primaryKey="hotnews_id" autoIncrement="true" dataNode="dn1,dn2,dn3" rule="mod-long" />

    <!-- <table name="dual" primaryKey="ID" dataNode="dnx,dnoracle2" type="global"
            needAddLimit="false"/> <table name="worker" primaryKey="ID" dataNode="jdbc_dn1,jdbc_dn2,jdbc_dn3" rule="mod-long" /> -->

    <table name="employee" primaryKey="employee_id" dataNode="dn1,dn2" rule="sharding-by-intfile" />

    <table name="customer" primaryKey="customer_id" dataNode="dn1,dn2" rule="sharding-by-murmur">
        <childTable name="orders" primaryKey="order_id" joinKey="customer_id" parentKey="customer_id">
            <childTable name="order_items" joinKey="order_id" parentKey="order_id" />
        </childTable>
        <childTable name="customer_addr" primaryKey="customer_addr_id" joinKey="customer_id"  parentKey="customer_id" />
    </table>
    <!-- <table name="oc_call" primaryKey="ID" dataNode="dn1$0-743" rule="latest-month-calldate" /> -->
    </schema>
2) 修改schema 标签
修改前
        <!-- can have multi write hosts -->
        <writeHost host="hostM1" url="localhost:3306" user="root" password="123">
            <!-- can have multi read hosts -->
            <readHost host="hostS2" url="localhost:3306" user="root" password="123" />
        </writeHost>
        <writeHost host="hostS1" url="localhost:3306" user="root" password="123" />
        <!-- <writeHost host="hostM2" url="localhost:3316" user="root" password="123456"/> -->
修改后:
    <!-- can have multi write hosts -->
    <writeHost host="hostM1" url="localhost:3306" user="root"  password="YYBrhr_2018">
        <!-- can have multi read hosts -->
        <!-- <readHost host="hostS2" url="localhost:3306" user="root" password="123" /> -->
    </writeHost>
    <!-- <writeHost host="hostS1" url="localhost:3306" user="root" password="123" /> -->
    <!-- <writeHost host="hostM2" url="localhost:3316" user="root" password="123456"/> -->
    </dataHost>
(3)修改role.xml
修改前:
<tableRule name="sharding-by-intfile">
        <rule>
            <columns>sharding_id</columns>
            <algorithm>hash-int</algorithm>
        </rule>
    </tableRule>
    <tableRule name="auto-sharding-long">
        <rule>
            <columns>id</columns>
            <algorithm>rang-long</algorithm>
        </rule>
    </tableRule>
    <tableRule name="mod-long">
        <rule>
            <columns>id</columns>
            <algorithm>mod-long</algorithm>
        </rule>
    </tableRule>
    <tableRule name="sharding-by-murmur">
        <rule>
            <columns>id</columns>
            <algorithm>murmur</algorithm>
        </rule>
    </tableRule>
修改后:
    <tableRule name="sharding-by-intfile">
        <rule>
            <columns>employee_id</columns>
            <algorithm>hash-int</algorithm>
        </rule>
    </tableRule>
    <tableRule name="auto-sharding-long">
        <rule>
            <columns>id</columns>
            <algorithm>rang-long</algorithm>
        </rule>
    </tableRule>
    <tableRule name="mod-long">
        <rule>
            <columns>hotnews_id</columns>
            <algorithm>mod-long</algorithm>
        </rule>
    </tableRule>
    <tableRule name="sharding-by-murmur">
        <rule>
            <columns>customer_id</columns>
            <algorithm>murmur</algorithm>
        </rule>
    </tableRule>
5、启动mycat并测试
【1】启动mycat
mycat start
mycat status
【2】测试
mysql -u root -p -P8066 -h 127.0.0.1
这里输入的密码,是在/home/rhr/soft/mycat/mycat/conf/server.xml里面看到的密码

这样就说明安装成功了,安装或者启动mycat之前


解决方案:这个是由参数 useGlobleTableCheck 控制的全局表一致性检测,原理通过在全局表增加_MYCAT_OP_TIME字段来进行一致性检测,类型为bigint,create语句通过mycat执行会自动加上这个字段,其他情况请自己手工添加。
所以创建表不要在 datanode 各节点去创建,而是通过 mycat 去创建。