Web Service是一种可以接收从Internet或者Intranet上的其它系统中传递过来的请求,轻量级的独立的通讯技术。通过SOAP在Web上提供的服务,使用WSDL文件进行说明,并通过UDDI进行注册。
XML:(Extensible Markup Language)扩展型可标记语言。面向短期的临时数据处理、面向万维网络,是Soap的基础。
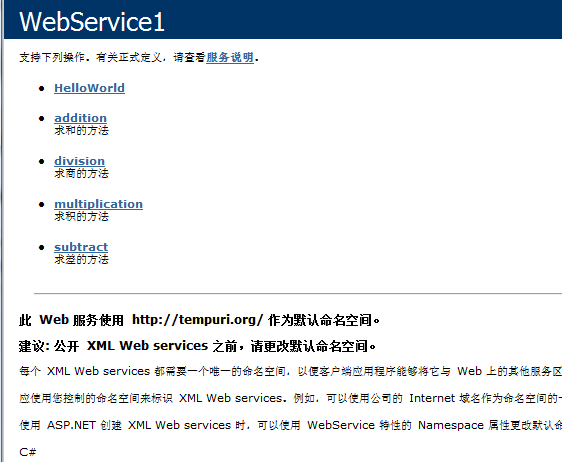
今天开始学习Web Service,开始我们还是新建一个asp.net web 应用程序,然后在项目中新建一个Webservice文件夹,然后在Webservice文件夹下新建一个Web服务,然后在这web服务下添加4个方法如下:
using System;
using System.Collections.Generic;
using System.Linq;
using System.Web;
using System.Web.Services;

namespace WebApplication3.Webservice
{
    /// <summary>
    /// WebService1 的摘要说明
    /// </summary>
    [WebService(Namespace = "http://tempuri.org/")]
    [WebServiceBinding(ConformsTo = WsiProfiles.BasicProfile1_1)]
    [System.ComponentModel.ToolboxItem(false)]
    // 若要允许使用 ASP.NET AJAX 从脚本中调用此 Web 服务,请取消对下行的注释。
    // [System.Web.Script.Services.ScriptService]
    public class WebService1 : System.Web.Services.WebService
    {

        [WebMethod]
        public string HelloWorld()
        {
            return "Hello World";
        }
        [WebMethod(Description = "求和的方法")]
        public double addition(double i, double j)
        {
            return i + j;
        }
        [WebMethod(Description = "求差的方法")]
        public double subtract(double i, double j)
        {
            return i - j;
        }
        [WebMethod(Description = "求积的方法")]
        public double multiplication(double i, double j)
        {
            return i * j;
        }
        [WebMethod(Description = "求商的方法")]
        public double division(double i, double j)
        {
            if (j != 0)
                return i / j;
            else
                return 0;
        }
    }
}
这是4个最简单的运算方法,方法写好后,我们就可以运行这个项目,在浏览器中就可以看到,如下图
现在这个webservice就写好了,然后,我们再打开VS2010再来新建一个Web应用程序,然后点击添加一个web引用,在引用上写上我们要连接的URL地址,写上我们上面运行在浏览器的地址,然后点击添加引用,这样就添加好了一个webservice了,
现在我们新加一个页面,如下
 <form id="form1" runat="server">
    <div>
     <asp:TextBox ID="Num1" runat="server"></asp:TextBox>
             <select id="selectOper" runat = "server">
                 <option>+</option>
                 <option>-</option>
                 <option>*</option>
                 <option>/</option>
             </select>
             <asp:TextBox ID="Num2" runat="server"></asp:TextBox>
        <asp:Button ID="Button1" runat="server" Text="=" onclick="Button1_Click" />
             <asp:TextBox ID="Result" runat="server"></asp:TextBox>
    </div>
    </form>
后台代码
using System.Web;
using System.Web.UI;
using System.Web.UI.WebControls;
using System.Web.Services.Description;

namespace WebApplication7
{
    public partial class WebForm1 : System.Web.UI.Page
    {
        protected void Page_Load(object sender, EventArgs e)
        {

        }

        protected void Button1_Click(object sender, EventArgs e)
        {
            webserviecs.WebService1 web = new webserviecs.WebService1(); //引用WebService

            string selectFlag = selectOper.Value;

            if (selectFlag.Equals("+")) //调用WebService里面的方法,得到结果
            {
                Result.Text = (web.addition(double.Parse(Num1.Text), double.Parse(Num2.Text))).ToString();
            }
            else if (selectFlag.Equals("-"))
            {
                Result.Text = (web.subtract(double.Parse(Num1.Text), double.Parse(Num2.Text))).ToString();
            }
            else if (selectFlag.Equals("*"))
            {
                Result.Text = (web.multiplication(double.Parse(Num1.Text), double.Parse(Num2.Text))).ToString();
            }
            else if (selectFlag.Equals("/"))
            {
                Result.Text = (web.division(double.Parse(Num1.Text), double.Parse(Num2.Text))).ToString();
            }
        }
    }
}
运行这个页面,在浏览器中就可以看到
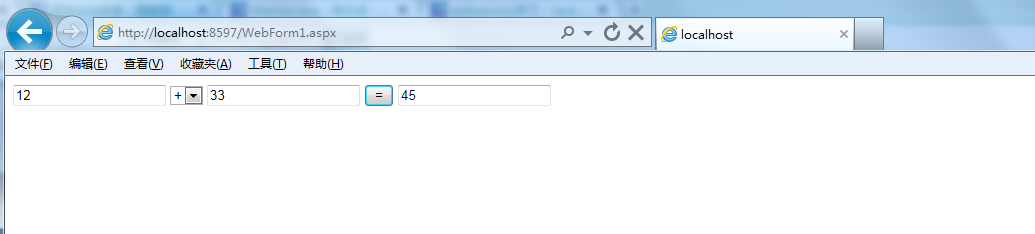
这样我们就通过调用webservice来做了一个简单的计算器,到此一个一个简单的WebService的开发和调用就已经完成了,
在实际应用中可以根据自己的需要,写一些功能强大的,复杂的WebService,不管多么复杂,整个流程都是这样的。先学到这吧!