创建web项目 实现的效果! 用户点击页面不同的链接,后台调用不同的代码!
创建两个类实现共同的接口!
public interface Action {

    String  execute();
}
public class LoginAction  implements Action{

    public  String  execute(){
        System.out.println("LoginAction......");
        return  "success";
    }
}
public class ListAction implements Action {

    public  String  execute(){
        System.out.println("ListAction......");
        return  "success";
    }
}
想让用户能访问到我们的后台代码,要么使用servlet 要么使用filter!
使用filter
创建一个filter用来拦截用户的请求
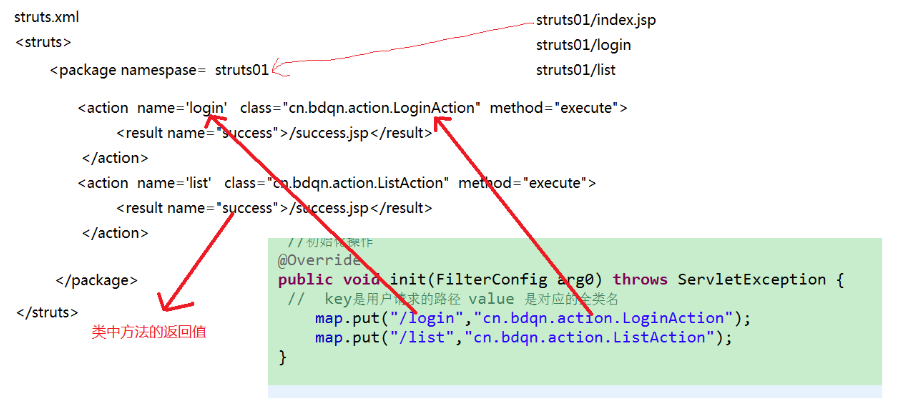
public class DoFilter implements Filter {
    //全局的变量
     Map<String,String> map=new  HashMap<String, String>();

     //初始化操作
    @Override
    public void init(FilterConfig arg0) throws ServletException {
        System.out.println("DoFilter 初始化了.............................");
     //  key是用户请求的路径  value 是对应的全类名
        map.put("/login","cn.bdqn.action.LoginAction");
        map.put("/list","cn.bdqn.action.ListAction");
    }


    //真正的处理
    @Override
    public void doFilter(ServletRequest request, ServletResponse response,
            FilterChain chain) throws IOException, ServletException {
         //向下转型
        HttpServletRequest httpServletRequest=(HttpServletRequest) request;
        HttpServletResponse httpServletResponse=(HttpServletResponse) response;
        //看一下 各个路径的区别
        System.out.println("getContextPath()==>"+httpServletRequest.getContextPath());//项目名
        System.out.println("getServletPath()==>"+httpServletRequest.getServletPath());//访问的路径
        System.out.println("getRequestURI()==>"+httpServletRequest.getRequestURI());//项目下面的路径
        System.out.println("getRequestURL()==>"+httpServletRequest.getRequestURL());//带协议的完整路径
       //应该使用getServletPath
        String  path=httpServletRequest.getServletPath();
        try {
            if (path.equals("/index.jsp")) {
                chain.doFilter(request, response);  //放行
            }else{
                Action action=(Action) Class.forName(map.get(path)).newInstance();
                action.execute();
                //跳转到成功界面
                httpServletRequest.getRequestDispatcher("/success.jsp").forward(request, response);
            }
        } catch (InstantiationException e) {
            e.printStackTrace();
        } catch (IllegalAccessException e) {
            e.printStackTrace();
        } catch (ClassNotFoundException e) {
            e.printStackTrace();
        }


    }
    @Override
    public void destroy() {

    }


}
前台页面
<%@ page language="java" import="java.util.*" pageEncoding="UTF-8"%>
<%
String path = request.getContextPath();
String basePath = request.getScheme()+"://"+request.getServerName()+":"+request.getServerPort()+path+"/";
%>

<!DOCTYPE HTML PUBLIC "-//W3C//DTD HTML 4.01 Transitional//EN">
<html>
  <head>
    <base href="<%=basePath%>">

    <title>My JSP 'index.jsp' starting page</title>
    <meta http-equiv="pragma" content="no-cache">
    <meta http-equiv="cache-control" content="no-cache">
    <meta http-equiv="expires" content="0">
    <meta http-equiv="keywords" content="keyword1,keyword2,keyword3">
    <meta http-equiv="description" content="This is my page">
    <!--
    <link rel="stylesheet" type="text/css" href="styles.css">
    -->
  </head>

  <body>
    <a  href="login">登录 </a>
    <a  href="list">详情 </a>
  </body>
</html>
sucess.jsp页面就是一个成功界面!!!省略掉!
我们使用xml文件来代替 map中 所保存的 键值对 信息!
key:用户的请求
value:对应的后台实现类 全类名!